Master the art of accurate attribution across multiple domains and unlock your true Google Ads ROI
Picture this: A potential customer clicks your Google Ad, browses your main website, then completes their purchase on your secure checkout domain. Your Google Ads dashboard shows zero conversions from that campaign. Sound familiar?
Cross-domain tracking issues are silently draining ROI from countless Google Ads accounts, and most advertisers don’t even realise it’s happening.
Table of Contents
What is Cross-Domain Tracking (And Why It’s Make-or-Break for Your ROI)
Cross-domain tracking is the technical bridge that connects user journeys across multiple websites. Without it, Google’s tracking systems treat each domain as a separate session, losing the crucial connection between your ad clicks and conversions.
Here’s what happens without proper cross-domain tracking:
- User clicks your Google Ad → Lands on yourdomain.com (Tracked correctly)
- User navigates to checkout → Moves to secure-checkout.com (New session starts)
- User completes purchase → Conversion attributed to “(direct)” or referral (Your ad gets zero credit)
The result? Your best-performing ads appear to be duds, while your actual duds might look like winners. It’s a measurement nightmare that makes data-driven optimisation nearly impossible.
Identify Your Setup
Before configuring cross-domain tracking for Google Ads, you need to identify your current Google Ads tracking setup. This determines which configuration method you’ll use.
There are to main setups:
- Google Tag with Google Ads as a destination.
- Google Ads Conversion Linker
If your are certain about what your setup is, you can go directly to the relevant implementation sections.
- For Google Tag with Google Ads as a destination and it fires on all pages → Cross Domain Tracking With Google Tag (Modern Setup).
- For Google Ads Conversion Linker → Cross Domain Tracking With Conversion Linker in GTM (Legacy Setup).
If your are not certain about your setup, read on.
The simplest and most reliable way to identify your setup is to use Google Tag Assistant. This free tool will show you everything you need to know in a single scan.
Step 1: Scan Your Site with Tag Assistant
Important: Disable any ad blockers before starting. Ad blockers can prevent Tag Assistant from detecting your tags correctly.
- Go to tagassistant.google.com
- In the
Domainssection, clickAdd domain
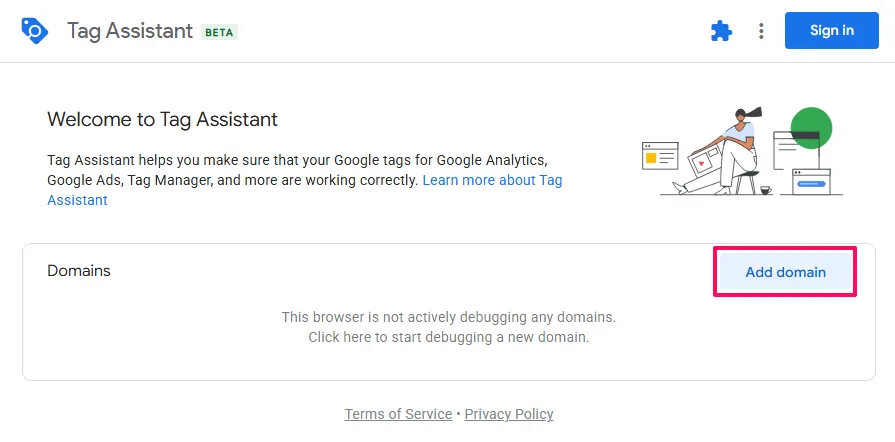
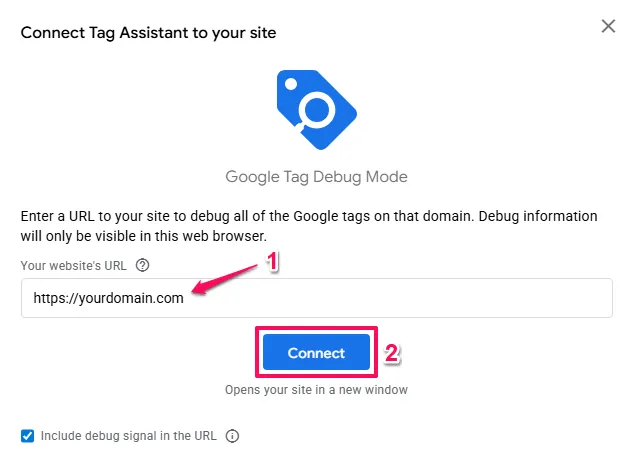
- In the pop-up window, enter your website URL in the
Your website's URLfield- Include the full URL with
https://(e.g.,https://yourdomain.com)
- Include the full URL with
- Click
Connect
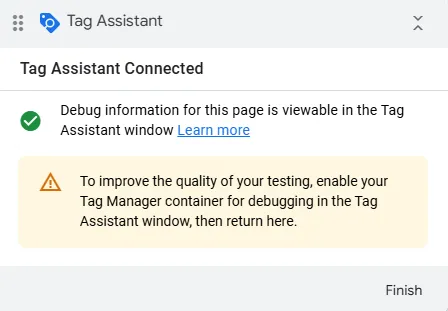
A new browser tab will open showing your website. In the bottom right corner, you should see a small Tag Assistant box appear briefly.
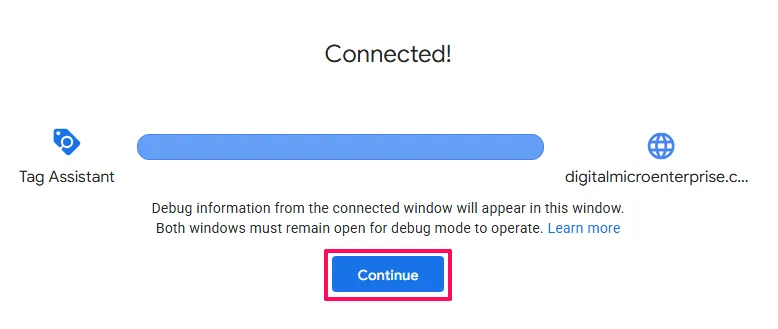
- Go back to the Tag Assistant tab
- If the connection was successful, you’ll see a message saying
Connected! - Click
Continue
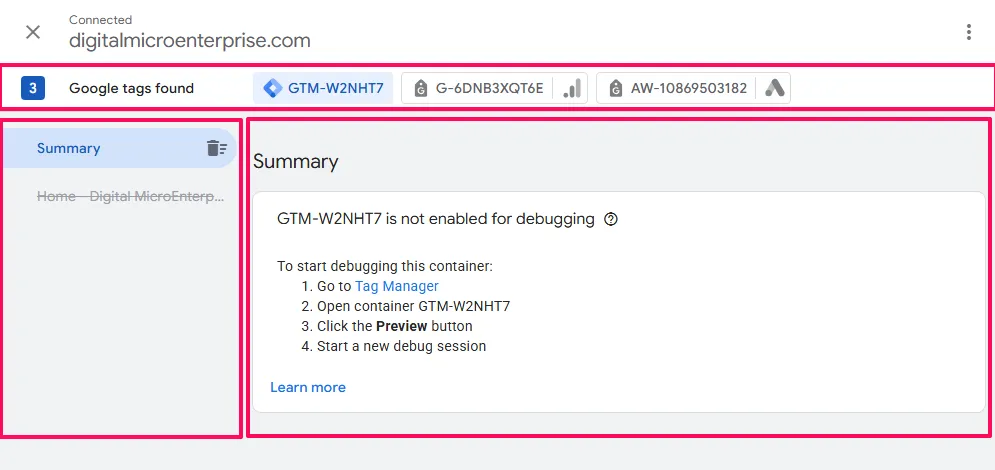
You should now see the Tag Assistant interface showing all Google tags detected on your website.
Step 2: Understand What Tag Assistant Shows You
The Tag Assistant interface displays:
Google tags foundalong the top.- This has the number of tags found and then tabs you can click on for each tag.
Eventstimeline along the left side, showing events that occurred.- Details of what is select on the Events timeline is show in the area to the right of it.
Look at the Google tags found section. This shows all Google tags detected on your current page.
Step 3: Look for the Google Ads Icon
Now you need to determine if you have Google Ads tracking configured.
What to look for in Google tags found:
Look at the tags listed in the Google tags found section. Each tag will show:
- The tag ID (e.g.,
AW-123456789,GT-ABC123, orG-XXXXXXXXXX) - One or more product icons indicating which Google platforms the tag serves
Look for the Google Ads Icon
- If you see a tag with only the Google Ads icon, this tag serves Google Ads exclusively
- If you see a tag with the Google Ads icon plus other icons (like Google Analytics 4), this tag serves multiple destinations including Google Ads
Either of these is correct. As long as the Google Ads icon is present, you have Google Ads tracking configured.
Scenario 1: You See a Tag with the Google Ads Icon
Congratulations! You have Google Ads tracking. Now you need to determine your specific setup.
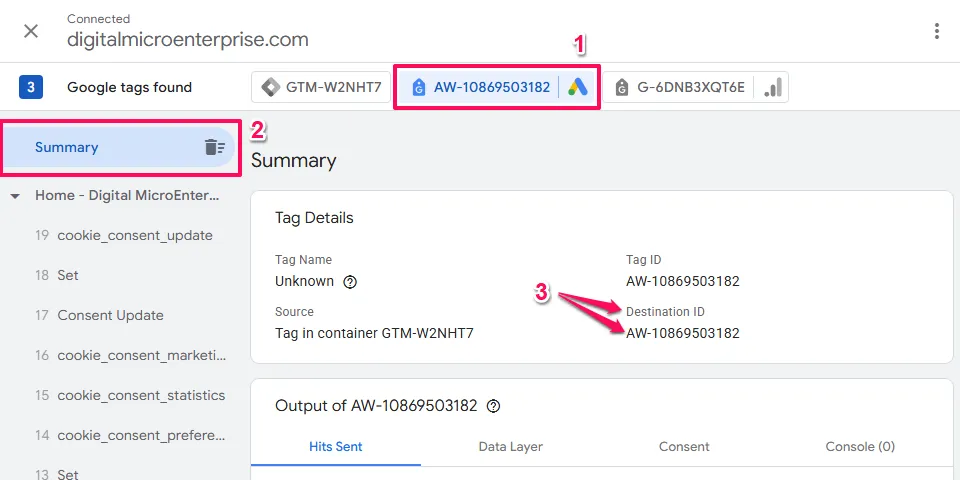
Take note of your Conversion Tracking ID:
- Click on the tag that has the Google Ads icon.
Summarywill be selected by default in the Event timeline, when this is selected theTag Detailssection in the main area will display detailed information about the tag.- Look in under
Destination IDsfor yourConversion Tracking IDwhich begins withAWand take note of it.
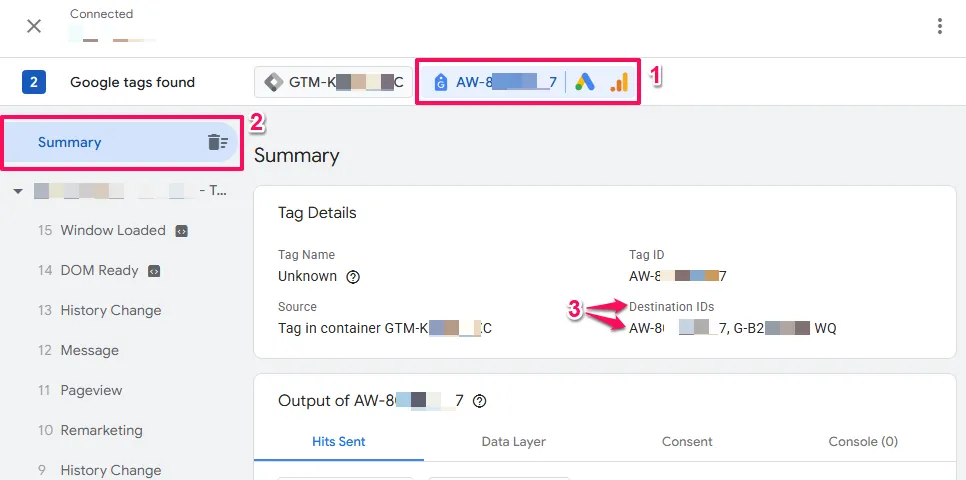
You may have notices that the Conversion Tracking ID appears in other places other than the Destination ID section if you tag only has Google Ads as a destination.
However, when a Google Tag has multiple destinations, the Conversion Tracking ID might only appear under Destination IDs
Step A: Determine if Your Tag is in GTM or On-Page
To see how your tag is implemented, look under Source in the Tag Details panel.
- If you see
Tag in container GTM-XXXXXX→ Your tag is implemented via GTM (continue to Step B below)
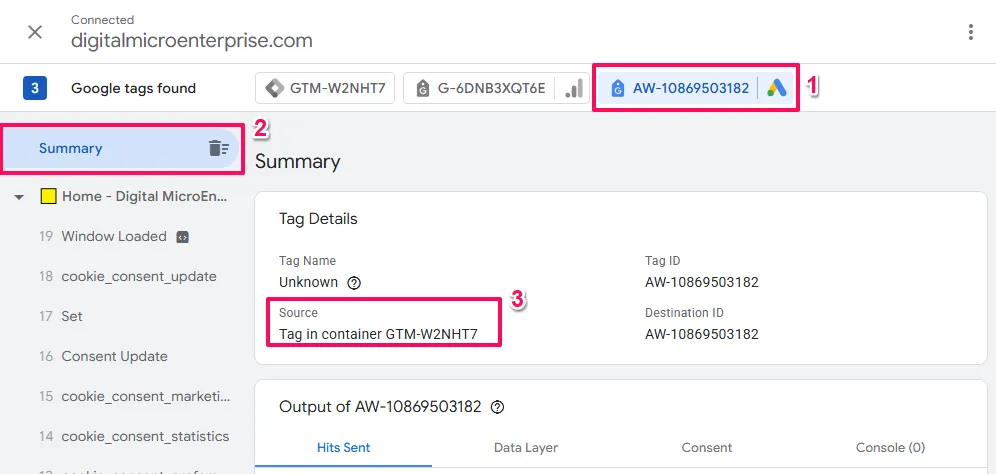
- If your see
On-page gtag('config')→ Your tag is implemented on-page (skip to Step C below)

Step B: For GTM Users – Determine Your Setup Type
You need to check inside Google Tag Manager to see if you’re using a Google Tag or Conversion Linker.
- Open a new tab and go to tagmanager.google.com
- Sign in and open your GTM container
- Click
Tagsin the left menu - Look through your tag list
Setup Type 1: Google Tag in GTM
You have this if you see:
- A tag with tag type
Google Tag.
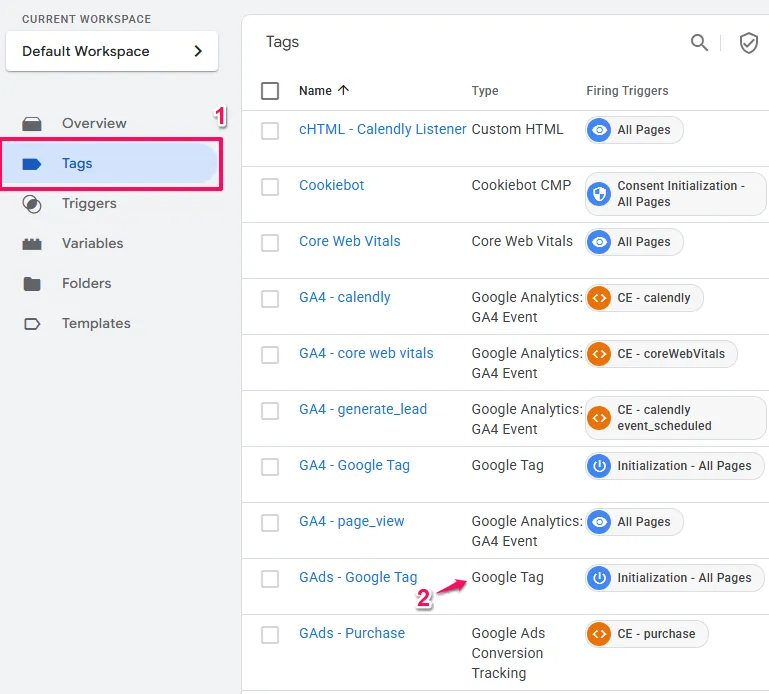
- When you open the Google Tag, the
Tag IDstarts withAWand matches theConversion Tracking IDyou took note of earlier. - (You may also see separate
Google Ads Conversion Trackingtags for specific conversion events)

What to do next: → Go to the Cross Domain Tracking With Google Tag (Modern Setup) section
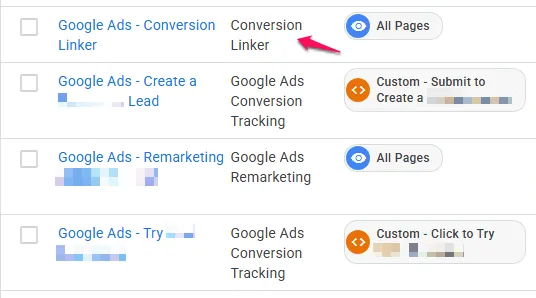
Setup Type 2: Conversion Linker in GTM (Legacy)
You have this if you see:
- A tag with tag type
Conversion Linker - AND one or more tags with tag type
Google Ads Conversion Tracking - BUT NO
Google Tagthat has a Google AdsTag ID
This is an older implementation method that still works, but Google recommends the Google Tag approach.
What to do next: → Go to the Cross Domain Tracking With Conversion Linker in GTM (Legacy Setup) section
Step C: For On-Page Users
Your Google Ads tracking is implemented directly in your website code using the modern Google Tag (gtag.js). The Google Tag has conversion linking functionality built in.
What to do next: → Go to the Cross Domain Tracking With Google Tag (Modern Setup) section
Scenario 2: You Don’t See Any Tag with the Google Ads Icon
What you see in “Google tags found”:
- One or more tags are listed
- But NONE of them show the Google Ads icon
- You might see other Google product icons (like Google Analytics 4)
What this means: Google Ads tracking might not be firing on your homepage. It’s common for Google Ads tags to only fire on specific pages like checkout or thank you pages.
What to do:
Test on a conversion page:
- In Tag Assistant, click
Add domain(or the + icon) - Enter a URL where conversions happen on your site:
- Checkout page
- Thank you page
- Form submission confirmation page
- Any page where you expect Google Ads to track conversions
- Click
Connect - Navigate through your conversion process if needed (add item to cart, proceed to checkout, etc.)
- Go back to Tag Assistant and check the “Google tags found” section again
If you now see a tag with the Google Ads icon:
- You DO have Google Ads tracking
- Follow
Scenario 1above to determine your setup type
If you still don’t see any tag with the Google Ads icon:
- You don’t have Google Ads conversion tracking implemented
- You need to implement Google Ads tracking before you can configure cross-domain tracking
What to do next if you don’t have Google Ads tracking:
You need to implement Google Ads conversion tracking first. We recommend:
- Using Google Tag Manager (GTM)
- Implementing a Google Tag with Google Ads as a destination
However, implementing Google Ads tracking from scratch is beyond the scope of this cross-domain tracking guide.
For implementation guidance, see Google Ads Conversion Tracking Using Google Tag Manager.
Once you have Google Ads conversion tracking in place and can see the Google Ads icon in Tag Assistant, return to this guide to configure cross-domain tracking.
Cross Domain Tracking With Google Tag (Modern Setup)
This is the current recommended approach from Google. If you have a Google Tag implemented, you’ll configure cross-domain tracking through the Google Tag configuration interface.
Important: The Google Tag has its own configuration UI that exists independently of how the tag is implemented. Whether you implemented the tag through GTM or manually in your code, you can access this UI to configure cross-domain tracking.
Understanding Consolidated vs Separate Tags
Before configuring, understand your tag structure:
Consolidated tag: One Google Tag with multiple destinations (e.g., GA4 and Google Ads both configured in a single tag). When you configure cross-domain on this tag, it automatically applies to all destinations including Google Ads.
Separate tags: Individual Google Tags for each platform (e.g., one tag for GA4, another for Google Ads). You’ll configure cross-domain on your Google Ads tag specifically. The process is identical for other tags if you want cross-domain for those destinations too.
This guide focuses on configuring cross-domain for Google Ads. If you have separate tags and also want cross-domain for other destinations (like GA4), simply repeat the same process for those tags.
How to Access the Google Tag UI
To access the Google Tag UI from Google Ads:
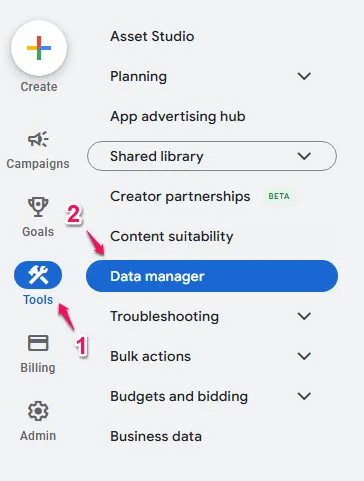
- Log into your Google Ads account
- Click the
Toolsicon in the left navigation - Click
Data Manager
- Under the
Google tagsection, clickManage
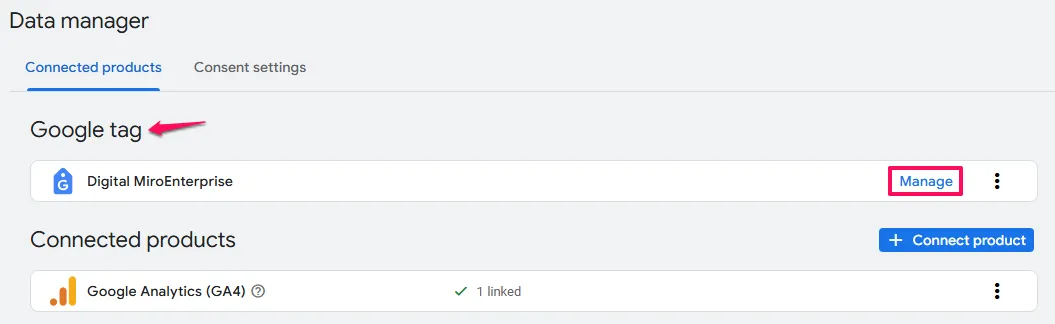
- This opens the Google Tag configuration interface where you can access your tag settings
Configuring Cross-Domain in the Google Tag UI
Once you’re in the Google Tag configuration interface follow these steps:
- On the lower portion of the screen that appears, click
Configure your domains.
If this is the first time adding domains, you may be presented with some suggestions where you can either Accept suggestion or click the - symbol to decline.
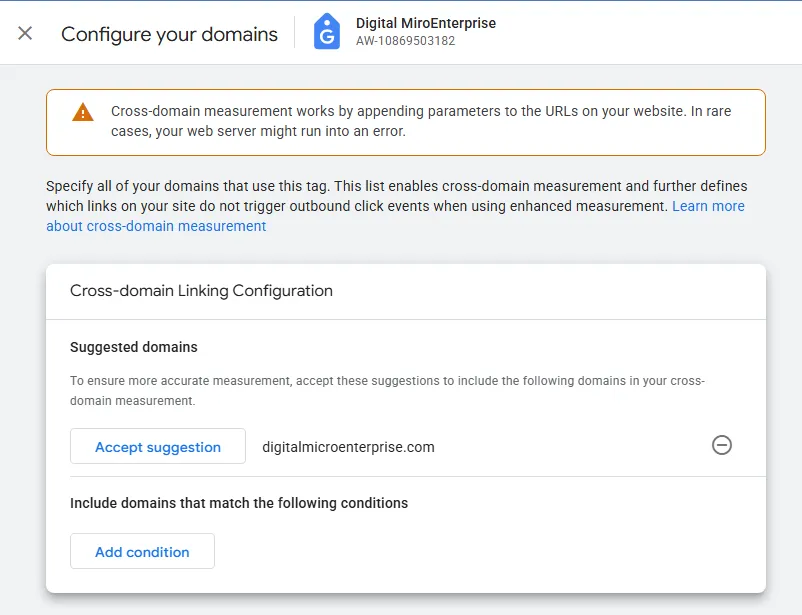
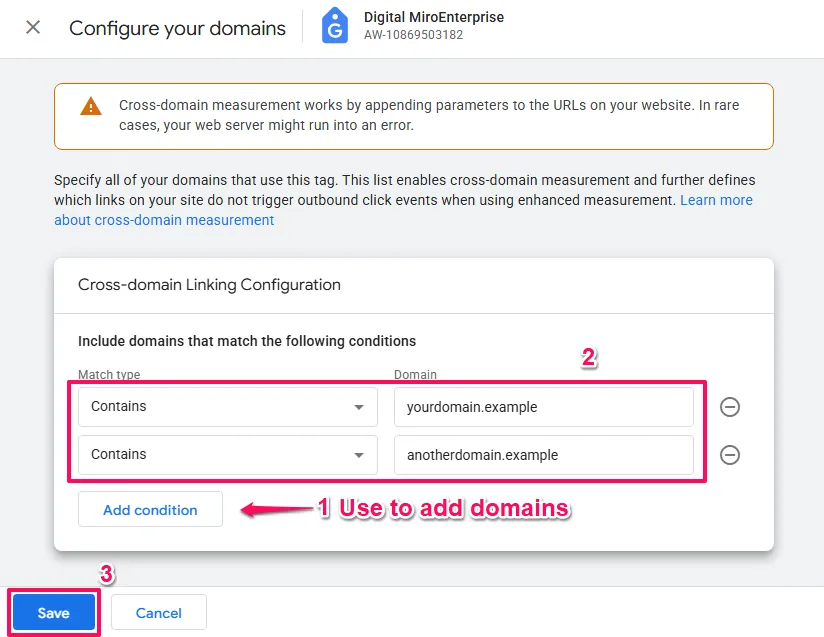
- To add a domain click the
Add conditionbutton. - Enter your first domain (e.g.,
yourdomain.com)- Do NOT include https:// or www. (just the domain name)
- Use
Add conditionfor each additional domain you want to add. - Click
Save.
If You Have Separate Google Tags
If you have separate Google Tags (one for Google Ads, one for GA4, etc.), you need to decide:
- Just configure Google Ads: Follow the steps above for your Google Ads tag only
- Configure all tags: Repeat the exact same process for each tag, using identical domain lists
The domains must match if you configure multiple tags. If the domain lists differ, cross-domain tracking will fail.
Cross Domain Tracking With Conversion Linker in GTM (Legacy Setup)
Note: If you have a Google Tag firing on all pages, you do not need a Conversion Linker tag. The Google Tag handles cross-domain tracking through its own configuration UI (see “Google Tag” section above). Having both is redundant.
Conversion Linker is a legacy GTM tag type that predates the Google Tag. If your setup includes only a Conversion Linker tag (no Google Tag), you can still configure cross-domain tracking, but you should consider modernising to the Google Tag approach for better functionality and future-proofing.
Configuring Cross-Domain on Conversion Linker
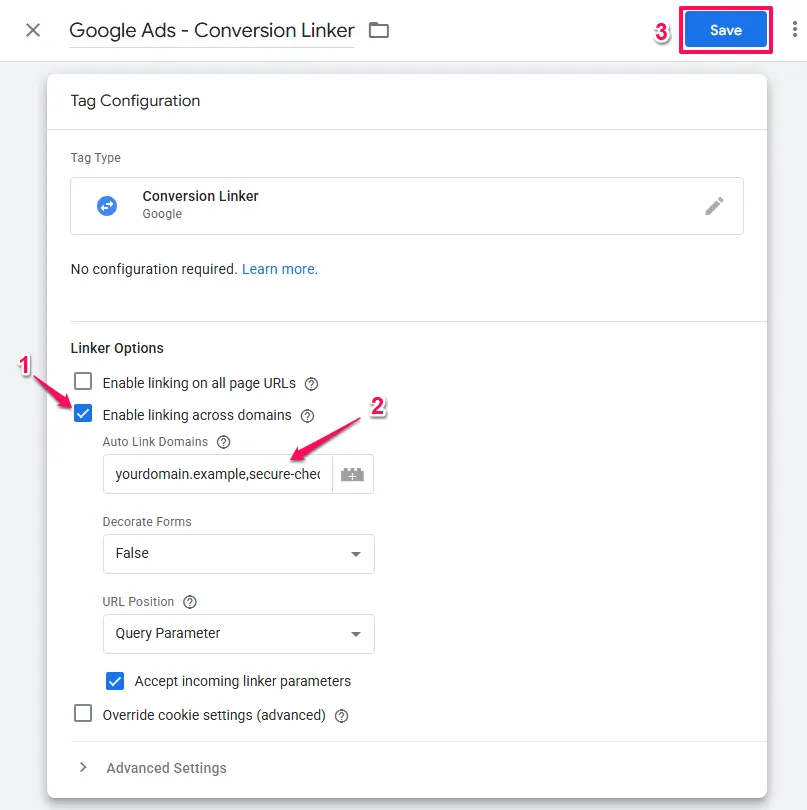
- In GTM, open your Conversion Linker tag
- In the tag Linking Options section, check the checkbox to
Enable linking across domains. - A field will appear:
Auto Link Domains. - Enter your domains as a comma-separated list
- Example:
yourdomain.example,secure-checkout.example,another-domain.example - Do NOT include https:// or www. (just domain names)
- Example:
- Ensure the trigger is set to
All Pages(not just specific pages) - Click
Save.
Important Notes
This setup is functional but outdated. Google recommends the Google Tag approach for new implementations because it provides:
- Unified configuration across platforms
- Access to the Google Tag UI for easier management
- Better future-proofing as Google evolves its tracking
If you want to modernise your setup to use Google Tags instead of Conversion Linker, that involves tag architecture and implementation decisions beyond the scope of this cross-domain tracking guide.
Verification Process: Making Sure It Actually Works
Implementation is only half the battle. Here’s how to thoroughly verify your cross-domain tracking is working correctly.
Test 1: GTM Preview Mode Testing (For GTM Users)
If you configured through GTM, you should have already done this during the configuration process. If you haven’t, follow the “GTM Preview and Testing” steps in the configuration section above.
Test 2: The URL Parameter Check
This is the simplest and most critical test for all implementations.
How to Test:
- Navigate from your primary domain to your secondary domain by clicking a link (not typing the URL)
- Look at the URL in your browser’s address bar on the secondary domain
- You MUST see a
_glparameter in the URL
What you should see:
https://secure-checkout.com/?_gl=1*abcde5*rs6h2f*MTcwOTkx...The _gl parameter contains encrypted tracking information that links the sessions together.
If this parameter is missing, your cross-domain tracking is broken.
Common causes when missing:
- Incorrect domain configuration
- Website redirects stripping URL parameters
- JavaScript redirects removing parameters
- Tags not firing before navigation occurs (for GTM: ensure “Initialization – All Pages” trigger)
Test 3: The Cookie Test (The Definitive Proof)
This test verifies that Google Ads attribution data (the GCLID) is transferring correctly across domains.
Detailed Cookie Testing Process:
- Create a Test GCLID
- Visit your landing page with a test GCLID parameter
- Example:
https://yourdomain.com/?gclid=testGCLID12345 - Press Enter to load the page
- Check Cookie on Primary Domain
- Open Developer Tools (Right-click > Inspect, or press F12)
- Navigate to the “Application” tab (Chrome/Edge) or “Storage” tab (Firefox)
- In the left menu, expand “Cookies”
- Click on your primary domain
- Find the
_gcl_awcookie in the list - Note its value (it should contain your test GCLID somewhere in it)
- Example value:
GCL.1709912345.testGCLID12345
- Navigate to Secondary Domain
- Click a link on your website that takes you to the secondary domain
- Do NOT type the URL manually (you must click a link for cross-domain tracking to work)
- Check Cookie on Secondary Domain
- Once on the secondary domain, open Developer Tools again (F12)
- Navigate to Application > Cookies
- Select your secondary domain from the cookies list
- Look for the
_gcl_awcookie - Compare its value to the value from the primary domain
Success Criteria: The _gcl_aw cookie must exist on the secondary domain with the EXACT same value as the primary domain.
If successful: Your cross-domain tracking is working perfectly. Google Ads will correctly attribute conversions on the secondary domain back to the original ad click.
If the cookie is missing or has a different value: Your setup needs troubleshooting. See the Troubleshooting section below.
Test 4: Real-World Simulation
This end-to-end test confirms everything works under real conditions.
How to Test:
- Clear Your Data
- Clear your browser cache and cookies completely
- Or use an incognito/private browsing window
- Simulate a Real User Journey
- Visit your primary domain with a test GCLID
- Example:
https://yourdomain.com/?gclid=testGCLID12345 - Browse the site normally
- Navigate to your secondary domain (checkout, thank you page, etc.)
- Complete your conversion action if possible (test purchase, form submission, etc.)
- Check Google Ads Attribution
- Wait 24-48 hours
- Log into Google Ads
- Navigate to Goals > Conversions
- Look for your test conversion
- Check the “Source” (it should show “Google Ads” or your campaign name)
- Should NOT show as “(direct)” or as a referral
- Check GA4 User Journey (if you also configured GA4 for cross-domain)
- Log into Google Analytics 4
- Navigate to Reports > User > User Explorer
- Find a recent user (yourself)
- Expand the user journey
- Verify you see pageviews from both domains in a single session
- Should NOT show as two separate sessions
This confirms cross-domain tracking works in real-world conditions.
Test 5: Multiple Domain Journey
If your user journey involves more than two domains, test the full path:
- Start on Domain A with a test GCLID
- Navigate to Domain B (check for
_glparameter) - Navigate to Domain C (check for
_glparameter) - Verify cookies exist on all domains with matching values
Cross-domain tracking should work across any number of domains in your configuration.
Troubleshooting Common Issues
Even with careful implementation, cross-domain tracking can encounter issues. Here’s how to diagnose and fix the most common problems.
Debugging Tools
GTM Preview Mode: Primary debugging tool for GTM users. Shows which tags fire, when, and with what data. Essential for diagnosis.
Browser Developer Tools:
- Console: JavaScript errors
- Network: Tag loading and requests
- Application: Cookie inspection
- Source: Verify code presence
GA4 DebugView: Real-time event debugging for GA4 (if you also configured GA4 for cross-domain). Navigate to Configure > DebugView in GA4. Requires debug mode enabled.
Issue 1: _gl Parameter Not Appearing in URLs
Symptom: When navigating from primary to secondary domain, the URL doesn’t contain the _gl parameter.
This means: The linker is not decorating links, so sessions won’t connect across domains.
Diagnostic Steps:
- Verify Configuration is Saved
- Go back to the Google Tag UI (or GTM tag configuration)
- Verify your domains are listed in the cross-domain configuration
- Check for typos in domain names
- Fix: Correct any errors and save again
- For GTM Users: Verify Tags Fire Before Navigation
- Open GTM Preview Mode
- Navigate to primary domain
- Look at “Container Loaded” event
- Verify your Google Tag fires during this initial event
- If tag fires later (like on “Click” events), it’s too late
- Fix: Change trigger to “Initialization – All Pages”
- For GTM Users: Verify Container is Published
- Check GTM Versions tab
- Ensure your latest changes are in the “Published” version
- Fix: Publish the container if not published
- Verify Domain Match Configuration
- In cross-domain configuration, check the match type (if applicable)
- Should be “Contains” for most cases
- Fix: Change match type if incorrect
- Check for JavaScript Errors
- Open browser Developer Tools (F12)
- Go to Console tab
- Look for red errors related to gtag or Google
- Fix: Address any JavaScript errors preventing tags from loading
- Test Link Type
- Cross-domain tracking works on link clicks, not all navigation types
- Try different links on the page
- Forms submitting across domains may need additional configuration
- Fix: Ensure you’re testing with standard HTML links
- Check for Redirects
- Some redirects strip URL parameters
- Use Network tab in Developer Tools to watch the navigation
- Look for 301/302 redirects that might remove parameters
- Fix: Modify redirect logic to preserve URL parameters, or use server-side redirect configuration
Issue 2: Cookies Not Transferring
Symptom: The _gcl_aw cookie exists on primary domain but not on secondary domain (or has different value).
This means: Google Ads attribution data isn’t carrying over, so conversions won’t be attributed correctly.
Diagnostic Steps:
- First, Check if _gl Parameter Exists
- If the
_glparameter isn’t in the URL, fix that first (see Issue 1) - Cookie transfer depends on the
_glparameter being present
- If the
- Verify Cookie Isn’t Being Blocked
- Check if you’re using privacy/ad-blocking browser extensions
- Try in an incognito window with no extensions
- Try in a different browser
- Fix: Test in clean browser environment
- Check Cookie Domain Scope
- Open Developer Tools > Application > Cookies
- Click on your primary domain cookie (
_gcl_aw) - Check the “Domain” column
- If it shows
.yourdomain.com(with leading dot), it’s scoped to that domain tree - Fix: This is usually automatic, but if cookies are scoped incorrectly, it may be a browser or server configuration issue
- Verify Both Domains Accept Cookies
- Some domains have restrictive cookie policies
- Check browser console for cookie-related errors
- Check if secondary domain has cookie consent barriers
- Fix: Ensure both domains allow first-party cookies
- Check for Cookie Deletion
- Some websites deliberately clear cookies on page load
- Check if secondary domain has scripts that delete all cookies
- Fix: Modify cookie clearing scripts to whitelist Google tracking cookies
- Timing Issues
- Cookies need time to set
- If navigation happens too quickly, cookies might not be ready
- Fix: For GTM users, ensure using “Initialization” trigger
For Google Ads Specifically:
- Verify your Google Ads tag has the correct AW- or GT- ID
- Verify the tag fires on all pages of all domains (for GTM users, check in Preview Mode)
- Check Google Ads interface to ensure the conversion tracking tag is active
Issue 3: Working in Test, Failing in Production
Symptom: Everything works in testing (GTM Preview Mode or manual tests), but fails in production.
Diagnostic Steps:
- For GTM Users: Verify Container Published
- Check GTM Versions tab
- Ensure your latest changes are in the “Published” version
- Not just “Latest Version”
- Fix: Publish the container if not published
- Check for Caching Issues
- Website might be serving cached version
- Clear website cache (if using caching plugin/CDN)
- Clear browser cache
- Test in incognito mode
- Fix: Wait for cache to clear, or force cache invalidation
- For GTM Users: Check GTM Container Code
- View source on live site
- Verify GTM container is present and correct
- Check that container ID matches your published container
- Fix: If wrong container or missing, update website code
- Check for Publishing Conflicts
- If multiple people use GTM, someone might have published over your changes
- Check version history
- Fix: Re-publish your version
Issue 4: Intermittent Failures
Symptom: Sometimes works, sometimes doesn’t. Inconsistent behaviour.
Common causes:
- Race Conditions (GTM)
- Tags fire after user already navigated
- Fix: Use “Initialization” trigger (not “Page View” or later)
- Slow Page Load
- On slow connections, tags might not load before user clicks
- Fix: For GTM users, ensure GTM container in
<head>section, not footer
- Mobile vs Desktop
- Works on desktop but not mobile (or vice versa)
- Check if website serves different code for mobile
- Fix: Ensure tracking configuration is consistent across all versions
- Browser-Specific
- Works in Chrome but not Safari
- Safari has stricter privacy controls
- Fix: Test in multiple browsers; ensure not relying on blocked features
- Network Issues
- Google’s servers unreachable in some regions
- Usually temporary
- Fix: Monitor, usually resolves itself
Issue 5: Configuration Changed But Not Working
Symptom: You updated the domain configuration but changes don’t seem to take effect.
Diagnostic Steps:
- For Google Tag UI Changes (non-GTM):
- Changes take effect immediately
- Clear browser cache and test again
- Verify you saved the changes
- Fix: Re-save configuration, clear cache, test in incognito
- For GTM Changes:
- Configuration changes in GTM tags require publishing
- Check if you published after making changes
- Fix: Publish your GTM container
- Verify Correct Tag Modified
- If you have multiple Google Tags (separate setup), ensure you modified the right one
- For Google Ads cross-domain, ensure you modified your Google Ads tag
- Fix: Check all relevant tags have matching domain lists
When to Get Help
If you’ve tried these troubleshooting steps and still have issues:
- Document what you’ve tested
- Screenshots showing configuration
- URLs showing missing parameters
- Cookie values from Developer Tools
- Any error messages
- Check Google’s Official Documentation
- Search Google Tag Manager help centre
- Check Google Ads help centre
- Look for recent known issues
- Post in Communities
- r/GoogleTagManager on Reddit
- Google Tag Manager Community Forum
- Include specific details, not just “it doesn’t work”
- Consider Professional Help
- If this is business-critical, consider hiring a GTM or tracking expert
- Cross-domain tracking issues can have subtle causes
- Professional diagnosis often pays for itself in saved time
The Bottom Line
Cross-domain tracking might seem technical, but it’s fundamentally about one thing: getting credit for the sales and leads your ads actually generate.
In an era where every marketing dollar must be justified, accurate attribution isn’t optional – it’s survival. The businesses that master cross-domain tracking will have a significant competitive advantage in optimising their Google Ads spend.
The Competitive Advantage
Most advertisers never properly implement cross-domain tracking. They lose attribution, make decisions on bad data, and wonder why their campaigns underperform.
By implementing this correctly, you’re gaining an advantage:
- More accurate conversion attribution
- Better optimisation decisions
- Clearer understanding of user journeys
- Proper ROI calculation
This isn’t just technical configuration – it’s a competitive moat.
Next Steps: Expanding Your Attribution Infrastructure
Monitor Cross-Domain Attribution Performance
After implementing cross-domain tracking, establish ongoing monitoring to catch issues before they corrupt your data:
Weekly Attribution Checks:
- Review Google Ads conversion source data (Goals > Conversions) for unexpected spikes in “(direct)” conversions, which often indicates broken cross-domain tracking
- Monitor the ratio of conversions on your secondary domain versus primary domain for sudden shifts
- Check for new redirects or website updates that might strip URL parameters
Monthly Infrastructure Audits:
- Test cross-domain flow after any website updates or redesigns
- Verify GTM container versions remain published (for GTM users)
- Test in Safari specifically (stricter privacy controls often surface issues first)
Understanding Cross-Domain Tracking Within Your Marketing Foundation

Cross-domain tracking preserves Google Ads attribution across multiple domains, but it’s one component of a complete measurement infrastructure. Understanding how it connects with Google Analytics 4 (which needs matching cross-domain configuration for unified session tracking), UTM parameters (which classify traffic sources beyond just ad clicks), and conversion tracking across all platforms creates a system that maintains attribution accuracy throughout complex user journeys spanning multiple domains and touchpoints.
How to Build Your Marketing Measurement Foundation shows you how cross-domain tracking integrates with your complete measurement infrastructure, ensuring attribution accuracy across your entire analytics ecosystem, not just Google Ads in isolation.
Continue Building Your Attribution Accuracy
Related Configuration: GA4 Cross-Domain Tracking
If you use Google Analytics 4 alongside Google Ads, you must configure cross-domain tracking for GA4 separately using identical domain lists. Without this, you’ll see accurate Google Ads attribution but fragmented session data in GA4 (user journeys split across multiple sessions). The configuration process mirrors what you’ve learned here but occurs in GA4’s property settings.
Additional Consideration: If your user journey involves third-party payment processors (Stripe, PayPal) or affiliate networks, cross-domain tracking becomes more complex and may require server-side solutions or alternative attribution methods.
If You Need Help
Cross-domain tracking configuration is straightforward when you have standard domains under your control, but implementing cross-domain tracking for complex scenarios involving third-party payment processors, multiple subdomains with different CMS platforms, or hybrid client-side and server-side architectures requires understanding DNS configuration, cookie scope limitations, and advanced GTM debugging techniques.
Our Marketing Measurement Foundation service provides complete implementation with cross-domain tracking properly configured across all platforms if you prefer expert setup.
Conclusion
Don’t let broken tracking silently sabotage your ROI. Take action today, implement proper cross-domain tracking, and discover the true performance of your Google Ads campaigns.
And remember: when in doubt, test everything twice. The 30 minutes you spend verifying now saves you hours of troubleshooting later.