Updated: 2025-03-03
This guide will help Thinkific Course Creators measure which traffic sources are leading to sales, by tracking purchases with Google Analytics 4 (GA4), so they can optimise their marketing.
While Thinkific has an integration with Google Analytics 4 via an app from their App Store, it only tracks page views and does not track conversions such as purchases or sign-ups. To track Thinkific conversions and other important events with Google Analytics 4, Google Tag Manager (GTM) needs to be used.
Table of Contents
Add Google Tag Manager to Thinkific
If your are not yet using Google Tag Manager on your Thinkific site, this section will guide you through its implementation.
Google Tag Manager is a tag management system that allows you to quickly and easily setup measurement codes (tags) on you website such as GA4, Meta Pixel, Google Ads Conversions, etc.
There are two methods to add Google Tag Manager to Thinkific:
- In your site’s Theme Code.
- In your site’s Footer Code.
There are some drawbacks to adding GTM to the Footer, so this guide will not cover that route. If you would like to find out more about adding GTM to the footer, it is covered in Thinkific’s documentation.
Create a Google Tag Manager Account if You Don’t Have one
If you do not have a Google Tag Manager account, you will need a Google Account, such as a GMail or Google Workspace, to create one.
Go to https://tagmanager.google.com/
If you are not already logged in the browser with a Google Account, you will be prompted to sign in with one. Once signed in, click the Create Account button to the top right.

On the next screen:
- Enter and Account Name (it can be anything you like).
- select your Country.
- Enter a Container name (it can be anything but typically it is the website the container is related to).
- Choose Web for Target platform.
- Click the Create button.

Click Yes to accept the Terms of service.

You will then be presented with the code to be added to Thinkific.
Add Google Tag Manager to Thinkific Theme Code
Copy the GTM <head> code

Login to the Admin area of your Thinkific account.
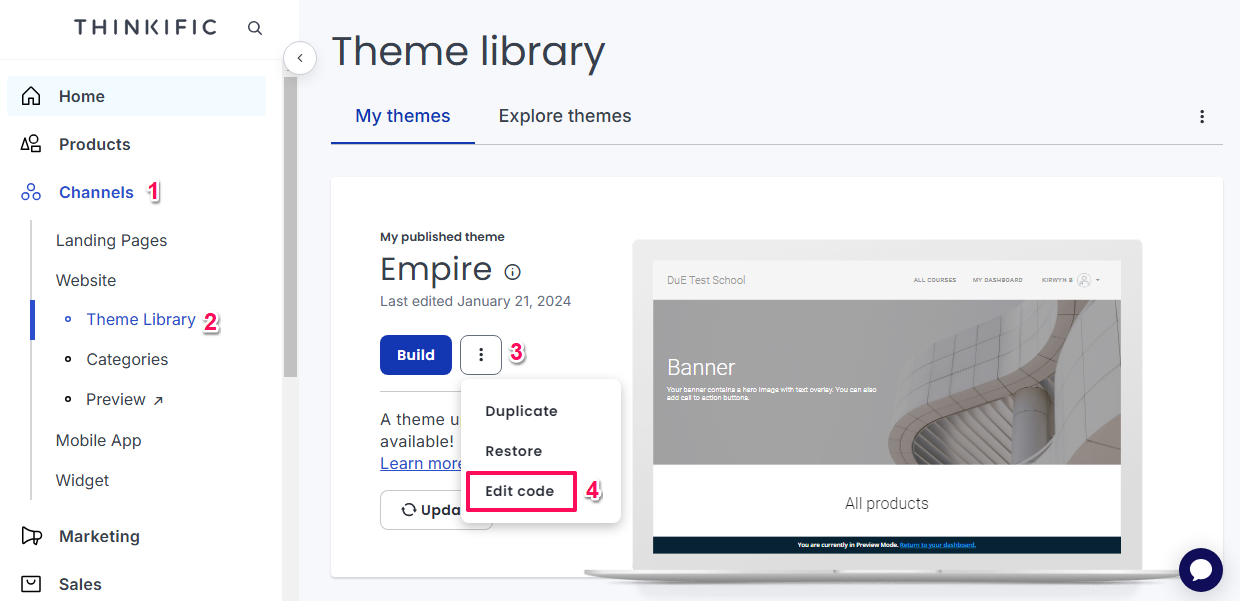
- Go to Channels > Theme Library.
- To the right of the BUILD button on your theme, click the three dots, then click EDIT CODE.
Click Layouts > default.
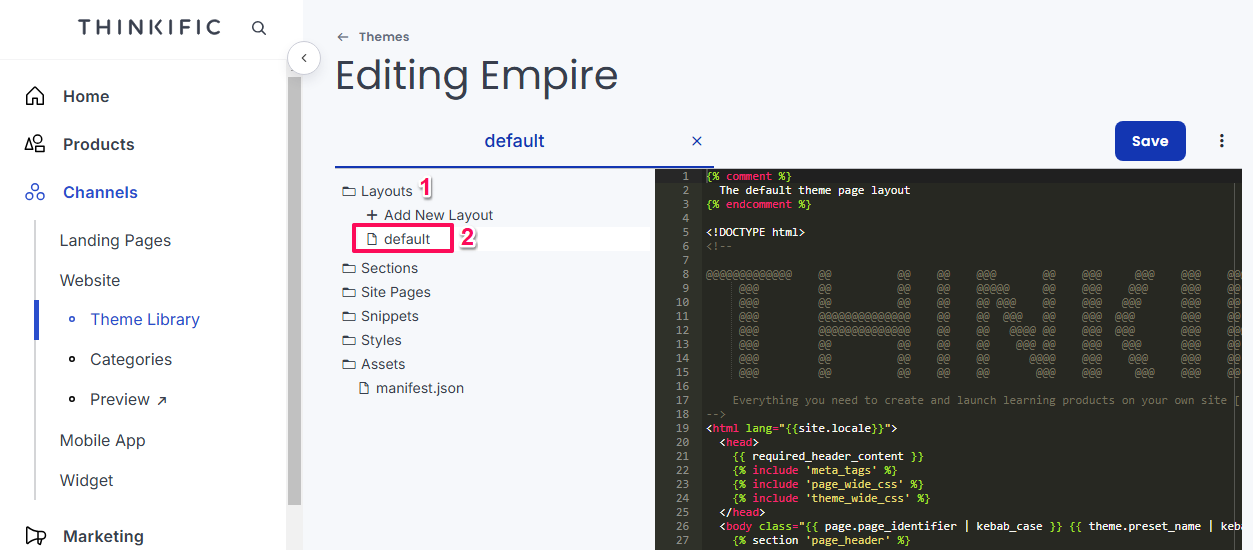
Paste the GTM code to the top of the head tag:
- Look for the opening <head> tag.
- Put you cursor after the > of the tag.
- Press enter to create a new line.
- Paste the GTM code that was previously copied.

Go back to GTM and copy the body code.

Past the GTM code to the top of the <body> tag:
- Look for the opening <body> tag.
- Put you cursor after the > of the tag.
- Press enter to create a new line.
- Paste the GTM code that was previously copied.
- Click the SAVE button to the top right.

Publish Empty GTM Container
Publish the empty GTM container in order to avoid issues that may occur when trying to test an unpublished container.

- Enter a Version Name (eg Empty Container).
- Click the Publish button to the top right.

Add GA4 Recommended Events Data Layer to Thinkific
What is the Data Layer?
The Data Layer is a place where you can put information about your website while the user interacts with your site. If the user visits a particular page, information about that page can be put in the Data Layer. In this guide, we are going to put information about Purchases and Sing-Up in the Data Layer.
Google Tag Manager detects when information is put into the Data Layer and can use it for Triggers that then fires Tags.
Add Purchase Event Data Layer to Thinkific
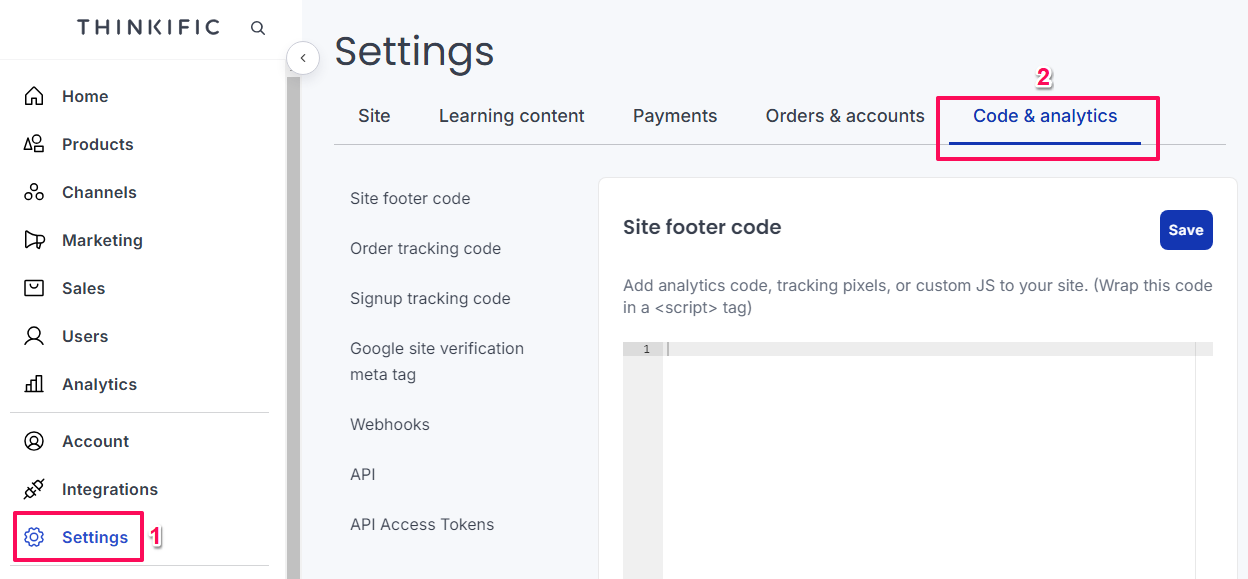
Go to Settings > Code & analytics
Copy the code below
<!-- GA4 Data Layer purchase event -->
<script>
  window.dataLayer = window.dataLayer || [];
  window.dataLayer.push({ ecommerce: null });  // Clear the previous ecommerce object.
  window.dataLayer.push({
    event: "purchase",
    ecommerce: {
      transaction_id: "{{order_number}}",
      value: {{total_price}},
      currency: "USD",
      items: [
        {
          item_id: "{{product_id}}",
          item_name: "{{product_name}}",
          price: {{total_price}},
          quantity: 1,
          affiliation: "{{referral_code}}"
        }
      ]
    }
  });
</script>
<!-- End GA4 Data Layer purchase event -->In the Order tracking code section, paste the code and then click the SAVE button.
Add Sign-Up Event Data Layer to Thinkific
Copy the code below.
<!-- GA4 Data Layer sign-up event -->
<script>
  window.dataLayer = window.dataLayer || [];
  dataLayer.push({
    event: 'sign_up',
    user_id: '{{id}}'
  });
</script>
<!-- End GA4 Data Layer sign-up event -->In the Signup tracking code section, paste the code and then click the SAVE button.
Add Google Analytics 4 to Thinkific Using Google Tag Manager
Get GA4 Measurement ID
In GA4, go to Admin > Data Streams then click on appropriate data stream (hopefully there is only one)

Copy the Measurement ID

Create a Constant Variable for the Measurement ID
In GTM create a constant variable for the Measurement ID. Go to Variables and click the New button.

Click Variable Configuration and select Constant in the Utilities section.


Paste the Measurement ID in the Value field. Give the variable an name and then click the Save button.

Create Google Tag
- Select Tags from the left menu.
- Click New > Tag Configuration > Google Analytics > Google Tag.
- To insert a variable, click the grey icon (that look like a lego block) to the right of the Tag ID input field.
- Select the Measurement ID constant variable created previously.

- Click Configuration settings to reveal its options.
- Click the Add parameter button.
- Enter send_page_view in the Configuration Parameter field and false for the Value field.

- Scroll to the bottom and click Triggering
- Select All Pages

Enter a name and then click the Save button

Create Data Layer Variables
Needed to get non ecommerce parameters from the data layer.
Create Data Layer Variables for Sign-Up Parameters
- Go to Variables > New > Variable Configuration
- In the Page Variables section click Data Layer Variable

- Enter user_id in the Data Layer Variable Name field.
- Enter a name for the the variable (eg. DLV data_layer_variable_name).
- Click the Save button.

Create GTM Triggers
Purchase Trigger
Starting from the left menu:
- Click Triggers > New > Tag Configuration.
- Scroll to the Other section and click Custom Event.

- Enter purchase in the Event Name field.
- Enter a name for the tirgger (that makes it clear what it is).
- Then click the Save button to top right.

Sign-Up Trigger
- Click Triggers > New > Tag Configuration.
- Scroll to the Other section and click Custom Event.
- Enter sign_up in the Event Name field.
- Enter a name for the tirgger (that makes it clear what it is).
- Then click the Save button to top right.

Create GTM Event Tags
Create Page View Event Tag
Starting from the left menu:
- Click Tags > New > Tag Configuration > Google Analytics > Google Analytics: GA4 Event.
- To insert a variable, click the grey icon (that looks like a lego block) to the right of the Measurement ID field.
- Click the Measurement ID constant variable previously created.
- Enter page_view in the Event Name field.
- Go to the bottom of the screen and click Triggering > All Pages.

- Enter a name for the Event (for GA4 events (eg. ‘GA4 Event name_of_the_event’).
- Then click the Save button to top right.

Create Purchase Event Tag
Ensure still on the Tags screen then:
- New > Tag Configuration > Google Analytics > Google Analytics: GA4 Event.
- To insert a variable, click the grey icon (that looks like a lego block) to the right of the Measurement ID field.
- Click the Measurement ID constant variable previously created.

- Enter purchase in the Event Name field.
- Click on More Settings to reveal its options.
- Check the Send Ecommerce data checkbox.
- Ensure Data Layer is selected from the Data source dropdown.

- Go to the bottom of the screen and click Triggering.
- Select the purchase trigger created previously.

- Enter a name for the Event.
- Then click the Save button to top right.

Create Sign-Up Event Tag
Ensure still on the Tags screen then:
- New > Tag Configuration > Google Analytics > Google Analytics: GA4 Event.
- To insert a variable, click the grey icon (that looks like a lego block) to the right of the Measurement ID field.
- Click the Measurement ID constant variable previously created.
- Enter sign_up in the Event Name field.

- Click Event Parameters to see its options
- Click Add Parameter
- Enter user_id in the Event Parameter field
- To insert a variable, click the grey icon (that looks like a lego block) to the right of the Value field.
- Select the user_id data layer variable created previously.

- Go to the bottom of the screen and click Triggering.
- Select the sign_up trigger created previously.
- Enter a name for the Event.
- Then click the Save button to top right.
Use Preview Mode in GTM to Verify Things are Working
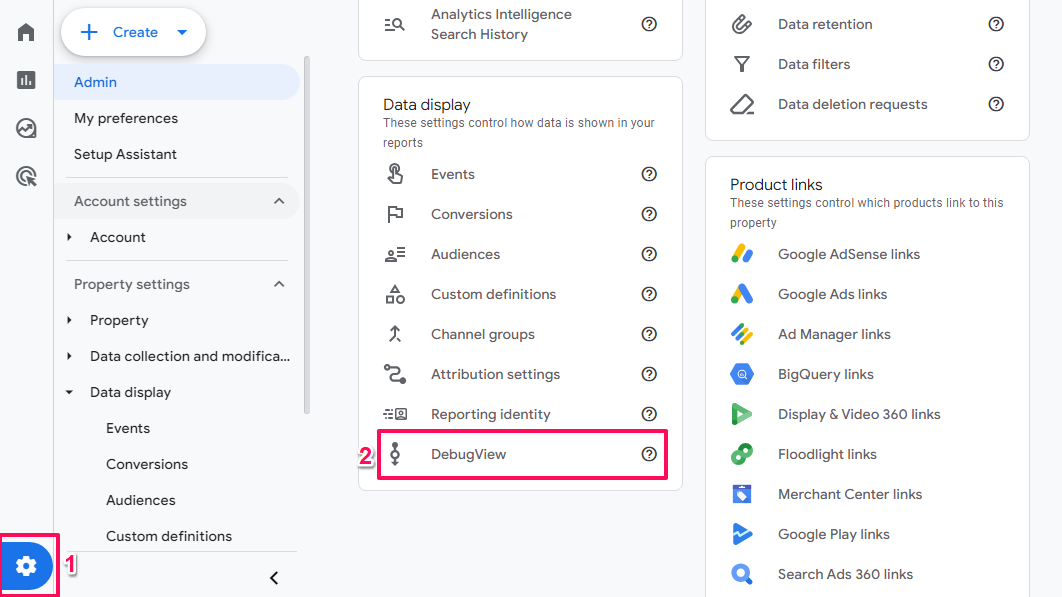
Have GA4 open on a tab and go to the DebugView:
- Admin > DebugView
Go to GTM and click the Preview button to start preview mode.

Tag Assistant will open:
- Enter the URL of your Thinkific site in the Websites URL field.
- Click Connect

Your website should open in a new tab:
- Begin a purchase transaction on your Thinkific site (you can use a coupon to zero the cost)
- When the button to complete the order is clicked and the account setup screen loads, check Tag Assistant for the sign_up event.

Check debug screen in GA4 for the sign_up event

After credentials have bee submitted and the Thank You page loads.
- Check Tag Assistant for the purchase event.
- Check GA4 debug view for the purchase event.

Switch From Thinkific GA4 App to GA4 Via GTM
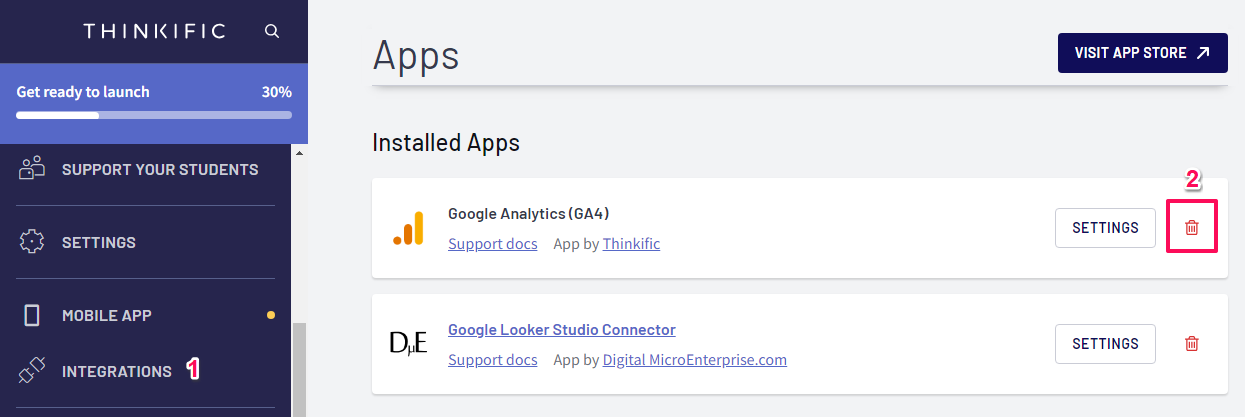
Uninstall GA4 up in Thinkific
- Click INTEGRATIONS
- click the red trash can icon to Uninstall GA4
Publish the GTM container:
- Click Submit to the top right.
- Enter a Version Name
- Enter a Version Description
- Click the Publish button.

Which Traffic Sources Are Leading to Sales?
Now that measurement is in place, the next step would be to wait till you are certain you have some sales. The data won’t be in the reports right away though, so at minimum wait till the following day to check (it could take as much as 48 hours). Then go to:
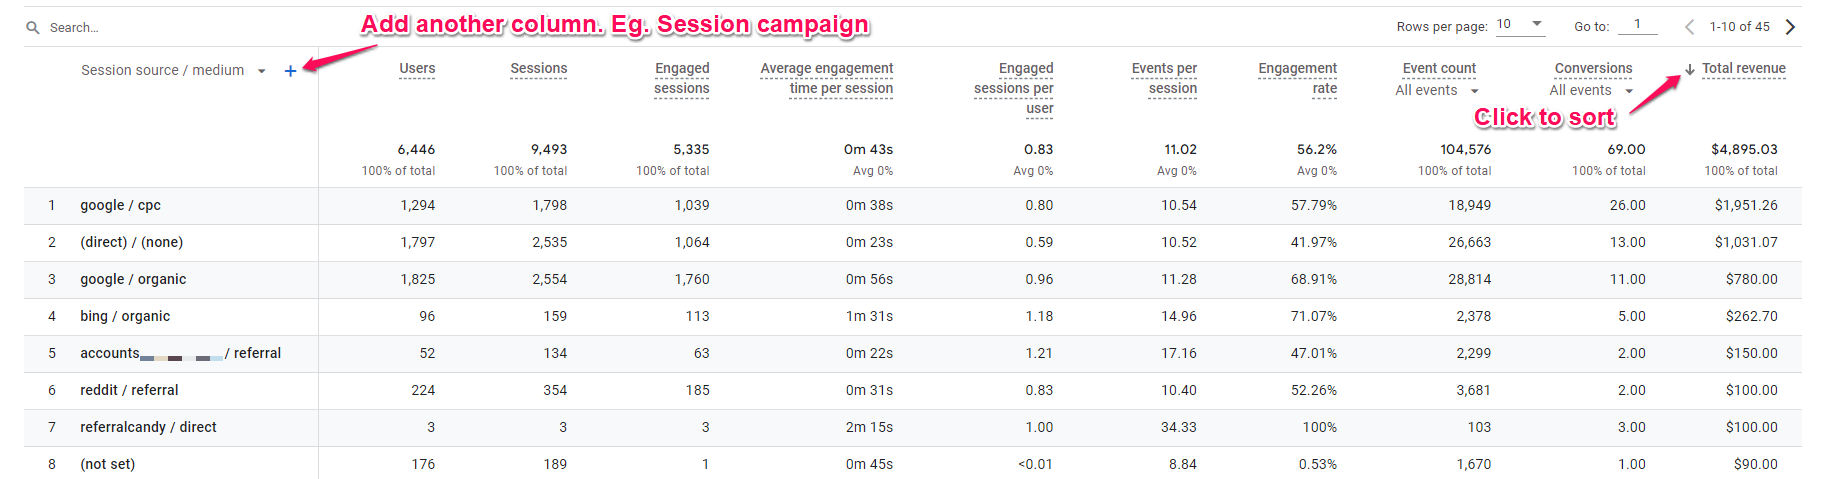
- Reports > Acquisition > Traffic acquisition.

This report shows Traffic source by Sessions, and by default the left most column in Session default channel group. If you desire to see things broken down UTMs Session source / medium instead, go to:
- Click the Session default channel group heading.
- Select Session source / medium.

You can also click the arrow in the heading of the Total revenue column to sort the column in descending order so you can see your traffic sources from highest to lowest sales.
The plus symbol to the right of heading of the first columns alloys you to add a second dimension. Eg. you can add Session campaign to evaluate if you have proper UTMs setup for your traffic sources (et. paid ad campaigns, etc.).
Gotchas
GTM Does Not Fire On The Checkout Page – A Thank You Page is Needed
Google Tag Manager does not load on the Checkout Page. Instead, for the purchase flow, the sign_up event happens on the screen after the checkout page where credentials are entered, while the purchase event happens on the Thank You page.
For things to work there must be a native Thinkific Thank You page in the flow. If this is missing, or there is a totally custom thank you page, it will not work.
Previews of Courses Do Not Have a Thank You Page
The checkout flow for the Preview of a course does not have a Thank You Page. Instead, the sign-up event is fired after user password is entered and then goes directly to the Course Player. Google Tag Manager does not work in the Course Player. Since the purchase event is not fired, the details of Preview Courses are not captured and sent to GA4.
This is one of the reasons it is important to capture sign-ups.
GA4 Has a 24 to 48 Hour Processing Time
GA4 has a processing time of 24 to 48 hours. Therefore you may not see any data in the reports until that time period has elapsed. Usually data will show up the following day, but when troubleshooting the reports be sure to exclude the most recent 48 hours.
Next Steps: Expanding Your Thinkific Measurement System
Analyse Your Traffic Sources and Conversion Patterns
With purchase tracking operational, use GA4 reports to understand which marketing efforts drive sales:
Primary Analysis Workflow:
- Navigate to Reports > Acquisition > Traffic acquisition to see sessions and revenue by traffic source
- Click “Session default channel group” heading and select “Session source / medium” for more granular breakdown
- Sort by “Total revenue” column (click arrow in heading) to identify your highest-value traffic sources
- Use the plus symbol next to the first column heading to add “Session campaign” as a secondary dimension if you’re using UTM parameters
Key Questions to Answer:
- Which traffic sources generate the most revenue versus just the most sessions?
- What’s the conversion rate difference between organic social, paid ads, and email traffic?
- Are certain traffic sources bringing browsers whilst others bring buyers?
Understanding Thinkific Tracking Within Your Marketing Foundation
Thinkific purchase tracking captures conversions from your course sales, but it’s one component of a complete measurement infrastructure. Understanding how it connects with UTM parameters (which classify your external traffic sources like social media posts and email campaigns), Microsoft Clarity (which shows why visitors abandon checkout or struggle with your sales pages), and cross-platform conversion tracking (which measures ad performance from Google Ads, Meta, or LinkedIn) creates a system that answers both “Which traffic sources drive sales?” and “How can I improve the entire customer journey from discovery to purchase?”
How to Build Your Marketing Measurement Foundation shows you how Thinkific purchase tracking integrates with your complete measurement infrastructure, connecting course sales data to unified reporting across all your marketing channels.
Continue Building Your Measurement Capabilities
Next Recommended Component: UTM Parameter Implementation
GA4 shows traffic sources, but without proper UTM parameters on your external links (social media posts, email campaigns, paid ads, affiliate links), much of your traffic appears as generic categories like “social” or “referral” without identifying specific campaigns or content. UTM parameters transform vague traffic data into actionable intelligence about which specific marketing efforts drive course sales.
Guide to UTM Parameters shows you how to properly tag your external links so every traffic source is identifiable in your reports.
Additional Expansion: Implement conversion tracking for your advertising platforms (Google Ads, Meta Ads) using the same data layer events you’ve created. How to Setup Google Ads Conversion Tracking for Thinkific Purchases leverages your existing setup to enable campaign optimisation.
Pair GA4 With User Experience Analytics
GA4 shows what users do (which pages they visit, conversion rates by traffic source), but cannot show how users interact with your pages or why they behave the way they do. Microsoft Clarity provides session recordings and heatmaps that reveal friction points in your checkout flow.
Combined Analysis Workflow:
- Use GA4 to identify problem areas (pages with low engagement, checkout steps with high abandonment)
- Use Clarity recordings and heatmaps to diagnose why (watch actual user sessions, see where they click)
- Make targeted improvements based on observed behaviour
- Use GA4 to measure the impact of your changes
Microsoft Clarity vs Google Analytics explains how these tools complement each other. Note: Clarity works on your sales pages but not within the Thinkific course player.
Centralise Your Data With Looker Studio
GA4 reports answer specific questions, but strategic decisions require seeing your complete marketing picture in one place. Looker Studio synthesises data from GA4, your advertising platforms, and other business tools into unified dashboards.
Explore the Actionable Google Marketing Template which includes pre-built reports for traffic analysis, conversion tracking, and revenue attribution.
If You Need Help
Thinkific purchase tracking with GTM is straightforward when following this guide, but implementing comprehensive measurement across multiple platforms—UTM parameter strategies, cross-platform conversion tracking for all your ad accounts, Microsoft Clarity integration, and unified Looker Studio reporting—requires understanding how these systems share data and where their coverage overlaps or creates gaps.
Our Marketing Measurement Foundation service provides complete implementation with Thinkific tracking properly configured alongside your broader marketing infrastructure if you prefer expert setup.
Were You Able to Track Your Thinkific Purchases with Google Analytics 4?
I know setting up measurement from scratch to get your Thinkific Purchases into Google Analytics 4 can seem overwhelming. I hope with this guide you were able to go through the process step by step and achieve successful results.
To recap, the steps were to:
- Add Google Tag Manager to Thinkific.
- Add Event Data Layer Pushes to Thinkifc.
- Add Google Analytics 4 to Thinkific Using GTM
- Create a Google Tag
- Create Data Layer Variable for the Sign-up Event
- Create Triggers for Purchase and Sign-up Events
- Create Event Tags for Page Views, Purchases and Sign-ups
- Test Preview Mode in GTM to Verify Things are Working
- Use a GA4 Report to Answer; Which Traffic Sources are Leading to Sales?
Frequently Asked Questions
Will this Track Performance Checkout Purchases?
Yes, it will track Performance Checkout purchases. The tracking does not happen on the checkout page however, but the Thank You page. Ensure you have a Thinkific Thank You page for it to work.
Will Google Tag Manager Fire in the Course Player?
No, Google Tag Manager will not fire in the Course Player, it will fire on the site pages only.
Will this Track the Price of Courses with Different Prices?
Yes, the total value of the product purchased in captured.
Will I Be Able to See the Name of What was Purchased in Google Analytics?
Yes, the Product Name is captured and will be available in Item Scoped reports in Google Analytics such as the table to the bottom of the ‘Ecommerce purchases’ report.
I installed the Google Analytics 4 App in Thinkific. However, I do not see sales and where they are coming from?
The Google Analytics 4 (GA4) app in Thinkific only tracks page views and does not track e-commerce sales or purchases by itself. To see sales and know where they are coming from, you need to set up conversion tracking properly by using Google Tag Manager (GTM) and adding specific tracking code to Thinkific’s order tracking code section. This includes sending purchase events with transaction ID, value, and currency data to GA4.
thank you very much, everything works perfectly.
You’re welcome Enrico!