Updated: 2026-04-08
Google Workspace Studio launched in December 2025 and I stumbled across it in early January 2026. I’ve been automating Google Workspace since the days it was called Google Apps for Business, though it hasn’t been my main focus lately. But the more I dig into Workspace Studio, the more I think it’s worth paying close attention to, particularly some of the features Google initially released and then pulled back. The possibilities are quite interesting.
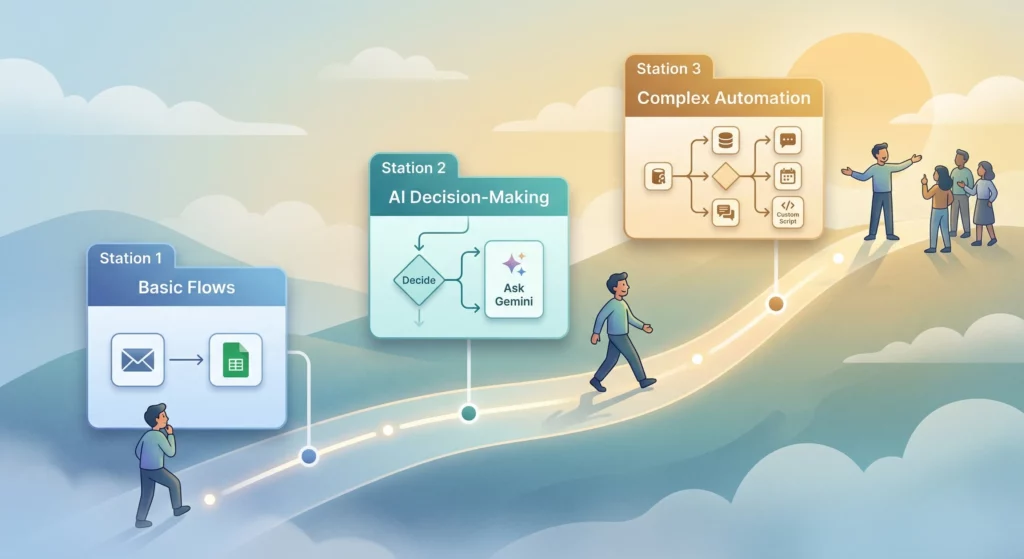
For now, this post is focused on the basics. I’ll be updating it regularly as I learn more, especially the detailed tutorials further down. The goal is a natural progression: a gentle introduction if you’re just getting your bearings, and more detailed real-world examples as you go deeper. One place to bookmark, that is kept current.
Access: Google Workspace Studio is available on Business Starter, Standard, and Plus; Enterprise Standard and Plus; and Education editions. Visit
studio.workspace.google.comto check whether your account has access. For admin configuration, see Access and Setup.
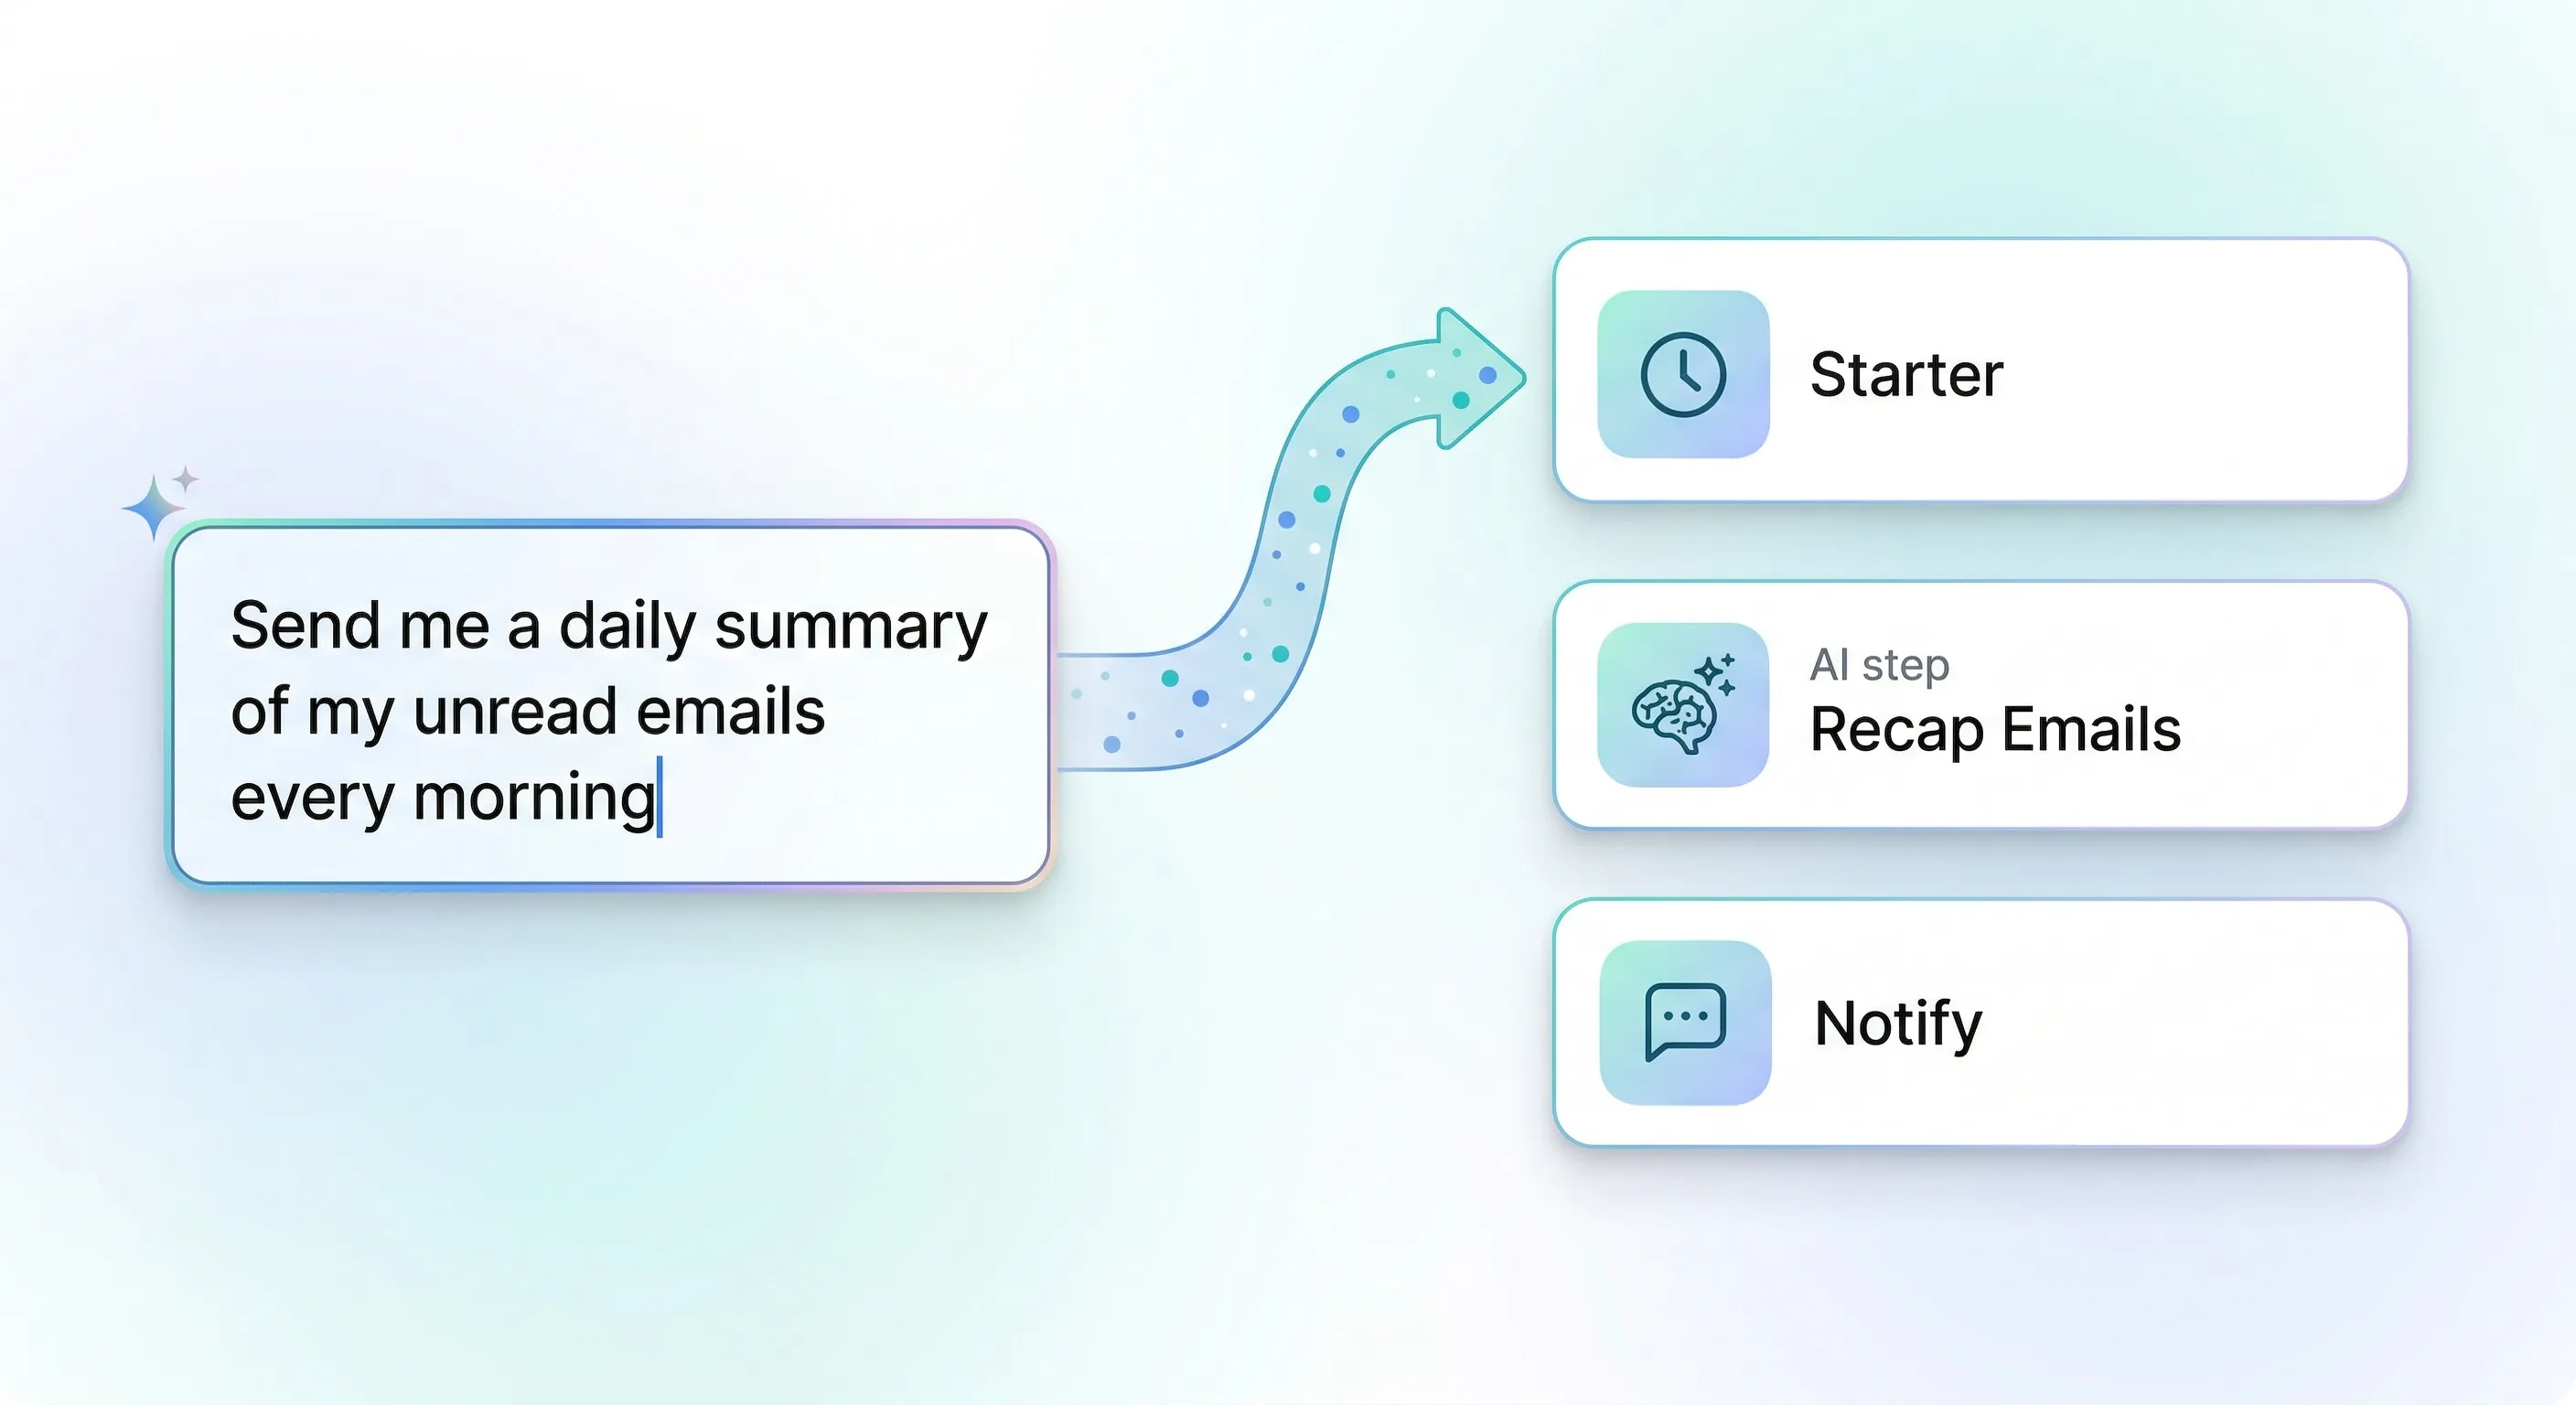
Just getting started? The quickest way in is to describe what you want to automate in natural language and let Gemini build the flow for you. Once you’ve tried that, the rest of the post will make a lot more sense.
Table of Contents
What is Google Workspace Studio?
Google Workspace Studio is a no-code platform at studio.workspace.google.com that lets you create “flows”; intelligent agents that connect your Google Workspace apps and make decisions on your behalf.
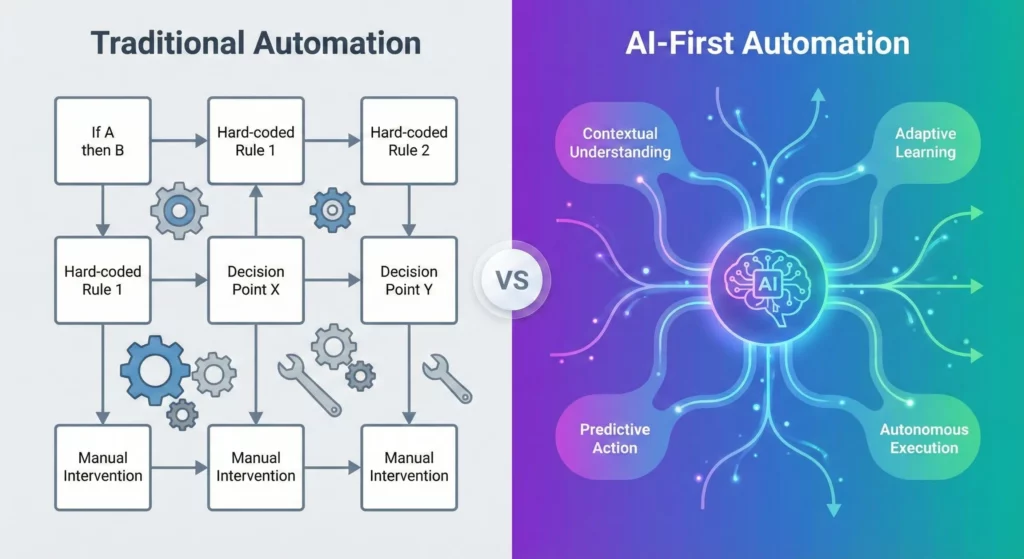
The critical difference from traditional automation tools is that Workspace Studio is AI-first. You define the intent (like “manage my inbox for urgent client issues”), and Gemini handles the execution logic. The system can distinguish between spam and a critical client complaint without you programming every possible scenario.
Think of Workspace Studio as connective tissue between previously siloed applications. A Google Form response no longer sits idle in a spreadsheet waiting for you to notice it. Instead, it becomes a living event that triggers emails, schedules meetings, and updates CRMs automatically.
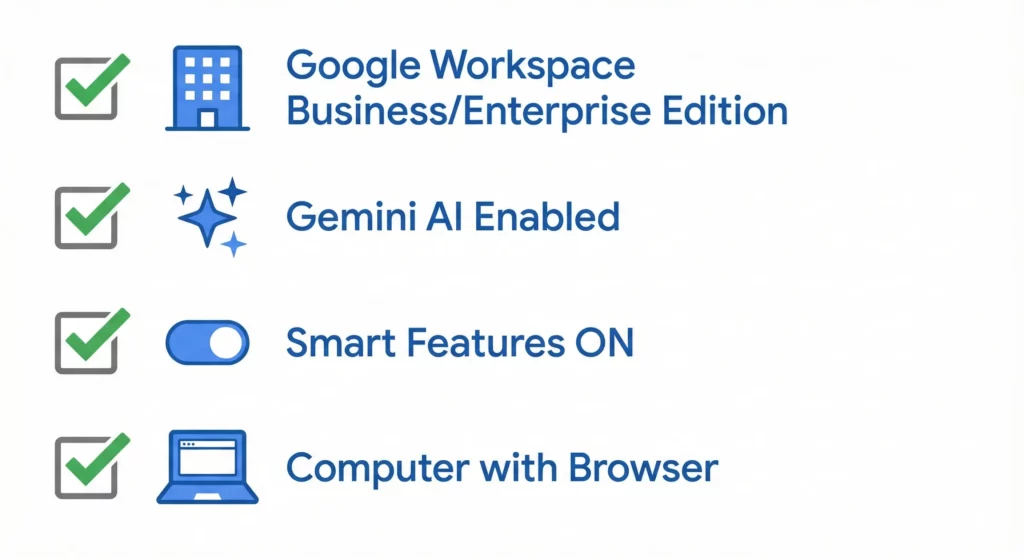
What You Need Before You Start
- A
Google Workspaceaccount on a supported edition (Business Starter, Standard, or Plus; Enterprise Standard or Plus; Education) Geminienabled on your account – your administrator controls this in theAdmin ConsoleSmart featuresandGoogle Workspace smart featurestoggledONinGmail Settings > General– required for email-triggered flows to run- A computer with a supported web browser – flow creation is not available on mobile
If your account doesn’t have access yet, see Access and Setup at the end of this guide.
Getting to Know the Workspace Studio Interface
Access Workspace Studio at https://studio.workspace.google.com. The interface is divided into four primary workspaces:
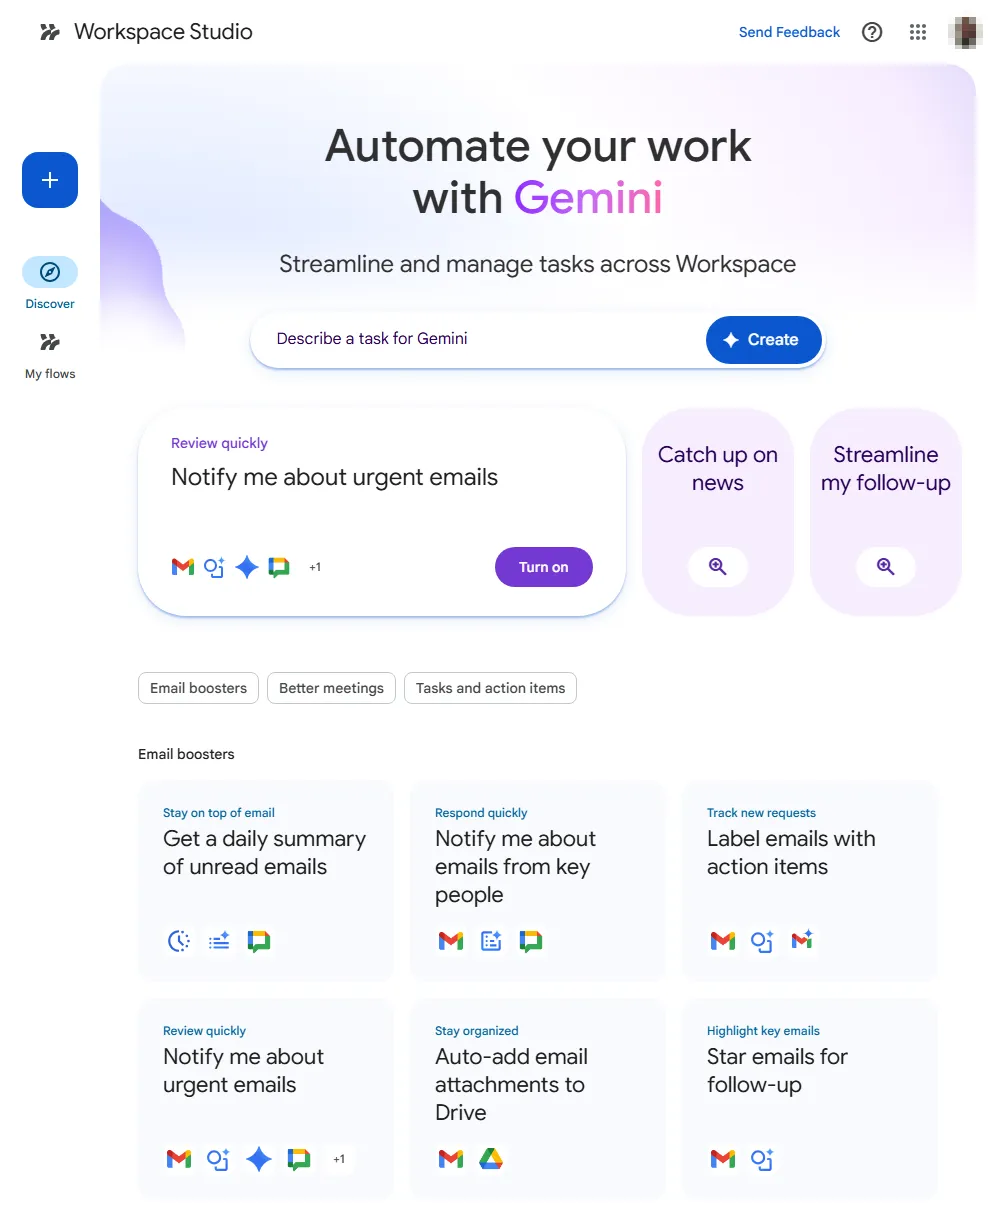
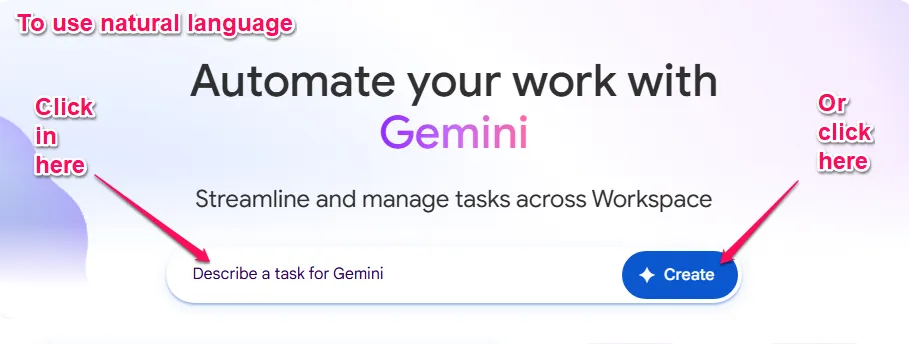
The Discover Page is your entry point. It features a Describe a task for Gemini input where you can type natural language requests like “Create an agent that saves invoices to Drive.” It also houses pre-built templates categorised by role (Sales, HR, Admin).
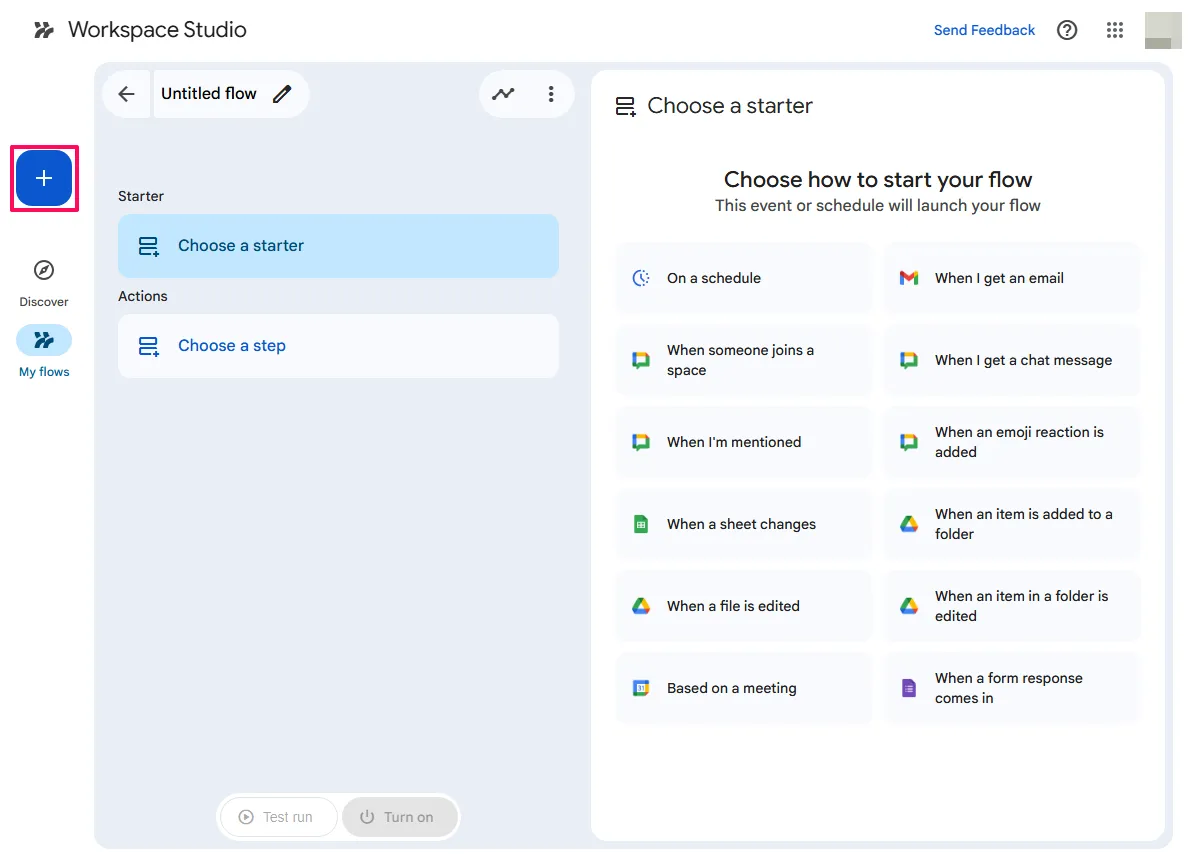
The Flow Builder is where you construct agents. It’s a vertical, linear timeline where you click the + button to insert steps. The right-hand sidebar provides configuration options for each step, including variable mapping and prompt engineering fields.
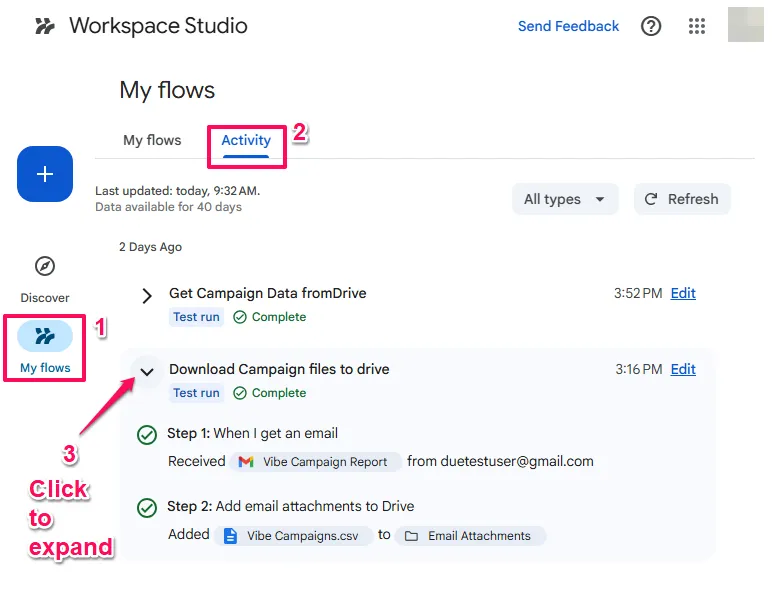
My Flows is your dashboard for managing existing agents. It provides a list view with toggle switches to instantly enable or pause flows, plus a “Last Run” status for health monitoring.

Activity & Logs is critical for debugging. You can drill down into specific runs to see exactly what data entered and exited each step. This is essential for diagnosing why a Decide step returned False when you expected True.
Create Your First Flow by Describing It
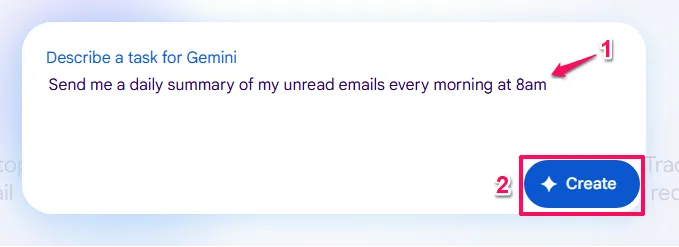
The fastest way to start is the Describe a task for Gemini bar on the Discover page. Type what you want to automate in natural language, and Gemini generates a complete flow – starter, steps, and variables already configured. You review, adjust if needed, and activate.
- Go to Workspace Studio
- Navigate to
studio.workspace.google.com
- Navigate to
- Find the description field
- On the Discover page, locate the
Describe a task for Geminifield at the top of the page
- On the Discover page, locate the
- Describe your automation in plain English
- Be specific about the trigger and the outcome: describe what starts the flow and what you want to happen as a result
- You don’t need to know step names or how the flow is structured – describe the behaviour you want
Examples that work well:
- “Send me a daily summary of my unread emails every morning at 8am”
- “Send me a
Google Chatmessage 15 minutes before each calendar meeting” - “When a new row is added to my
Google Sheet, send me a notification inChat“ - You’ll then have to manually choose the spreadsheet, sheet, etc. So this is an example of one that gets you started, but you need to make edits to complete.
Specificity improves results. A vague description gives Gemini less to work with. Here’s a complete prompt that produces the Morning Briefing Agent in the next section — you can use it verbatim:
“Every weekday at 8am, scan my unread emails from the previous day. List emails that need a reply today under ‘Action Required’. Group everything else under ‘FYI’. Ignore newsletters and automated notifications. Send the formatted summary to me in Google Chat.”
The more specific the description, the more accurately the generated flow matches your intent and the fewer manual adjustments you need to make.
- Review the generated flow
- Gemini produces a draft flow with starters, steps, and variables already configured
- Check that the trigger matches your intent – confirm sender filters, schedule settings, and conditions
- Verify variable mappings in each step
- Test and activate
- Click
Test runto verify the flow works before turning it on - Click
Turn onwhen you’re satisfied
- Click
Starting from a Template
The Discover page includes a library of pre-built flows organised by use case. Browse the categories, pick one that matches your scenario, and Workspace Studio gives you a working flow – steps, variables, and triggers already configured. You adjust the specifics (which folder, which sheet, which people) and activate.
Email boosters
- Get a daily summary of unread emails
- Notify me about emails from key people
- Label emails with action items
- Notify me about urgent emails
- Auto-add email attachments to Drive
- Star emails for follow-up
- Notify me about messages with a keyword
Better meetings
- Get pre-meeting briefs in Chat
- Send guests summaries and action items after meetings
- Send me summaries and action items after meetings
- Get meeting reminders in Chat
- Auto-create tasks for me from meeting transcripts
- Draft meeting follow-up emails with Gemini
Tasks and action items
- Auto-create tasks when I’m sent action items
- Create tasks when customers send requests
- Auto-create tasks when files are added to a folder
- Notify me when I’m mentioned in spaces
- Notify me about emails with action items
- Notify me when a file is added to a folder
Customer connections
- Draft email replies to questions using a doc and Gemini
Everyday essentials
- Get news headlines summarised daily
- Get AI news briefs daily
When to Use Templates, Plain English, or Scratch
Use a template when:
- A pre-built option closely matches your use case
- You want to be up and running in under two minutes
- You’d rather see how a working flow is structured before building your own
Use plain English when:
- You have a specific scenario in mind that no template covers
- You want a custom starting point to edit from
- You’re exploring what’s possible without yet knowing step names
Build from scratch when:
- You need precise control over triggers, filters, and variable mapping from the start
- The generated flow doesn’t match your intent after one or two refinements
Templates and plain English both produce complete flows you can customise and activate. Scratch gives you exact control from the outset. Most users start with a template or description, then switch to manual editing when they need precision.
Your First Flow from Scratch: A Personal Briefing Agent
The best way to understand the system is to build something simple but useful. We’ll use the morning briefing scenario from the previous section. If you already generated it using the plain English prompt, follow along to see what Gemini built and how each piece fits together. If you’re starting fresh, these steps build the same flow from scratch.
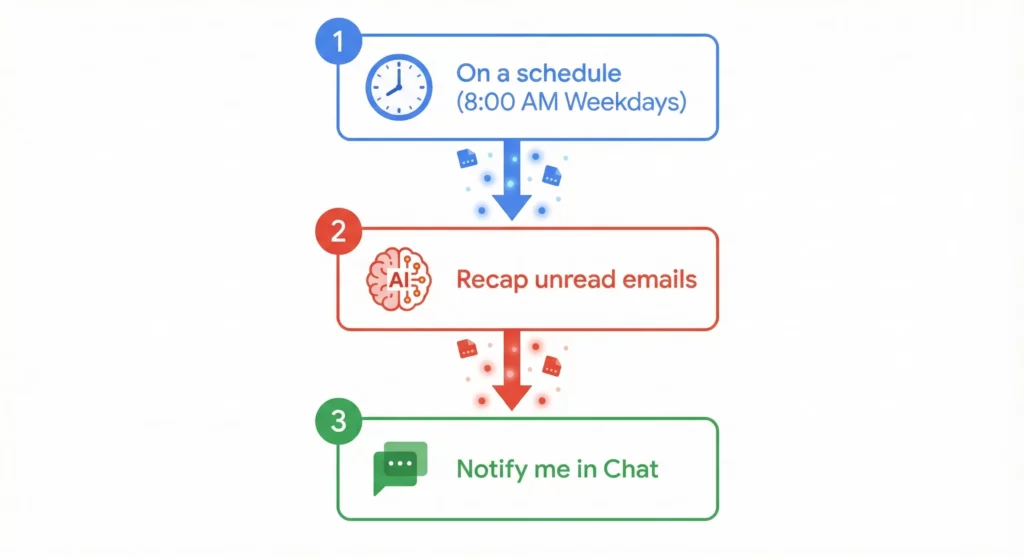
Scenario: You start your day with an overloaded inbox. Instead of manually checking your inbox first thing, this agent automatically triages your inbox while you sleep. At 8:00 AM, it identifies unread emails from a specific timeframe, categorises them by urgency and theme, and sends a beautifully formatted summary to your Google Chat.

Creating the Flow:
- Access the Workspace Studio
- Go to
studio.workspace.google.com
- Go to
- Start from Scratch
- On the Discover page, click
+New Flow(or use theDescribe a task for Geminibar and type “Send me a daily summary of VIP emails in Chat”)
- On the Discover page, click
- Name Your Agent
- Click the pencil icon at the top left to rename your flow from “Untitled” to “Morning Briefing Bot”
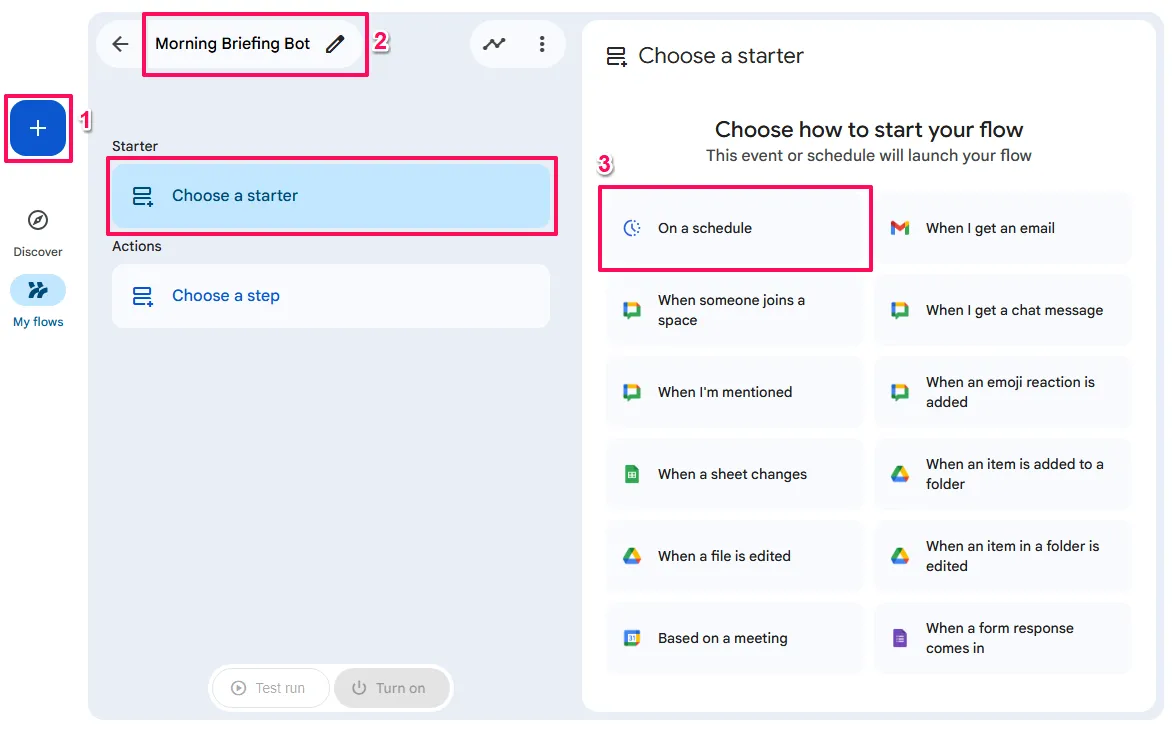
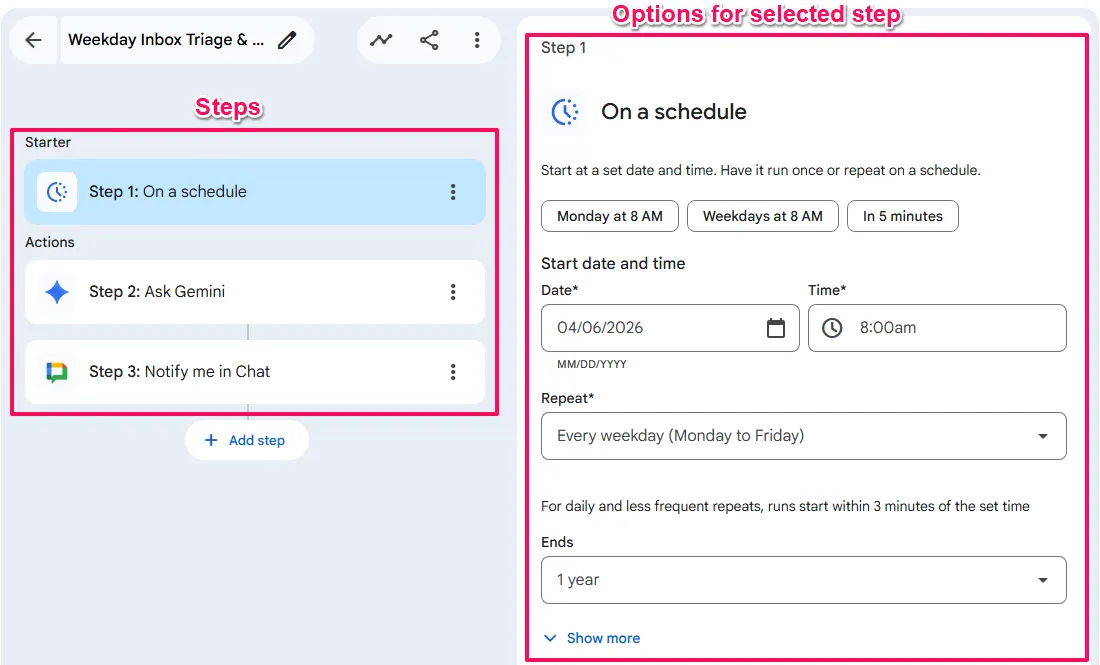
Step 1: The Starter (The Trigger)
- Click
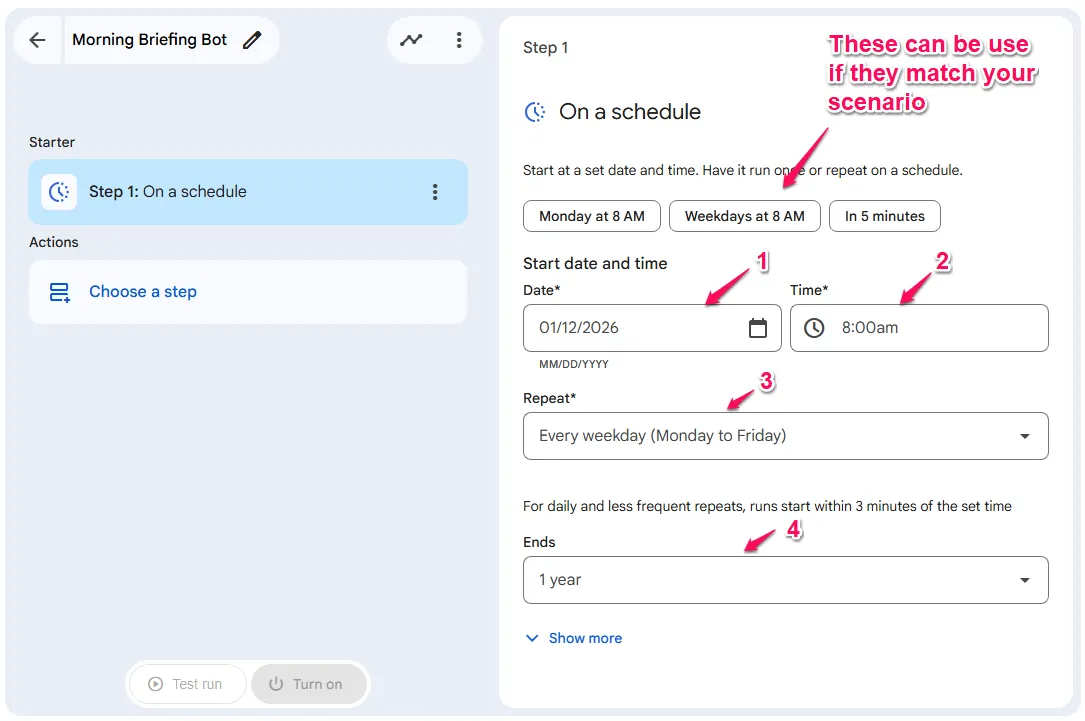
Choose a starterand selectOn a schedule. - Configuration:
- In the
Start date and time sectionselect aDateand set theTimetime to8:00am. - For
Repeat, selectEvery weekday (Monday to Friday)from the dropdown. - You can also select when it
Ends.
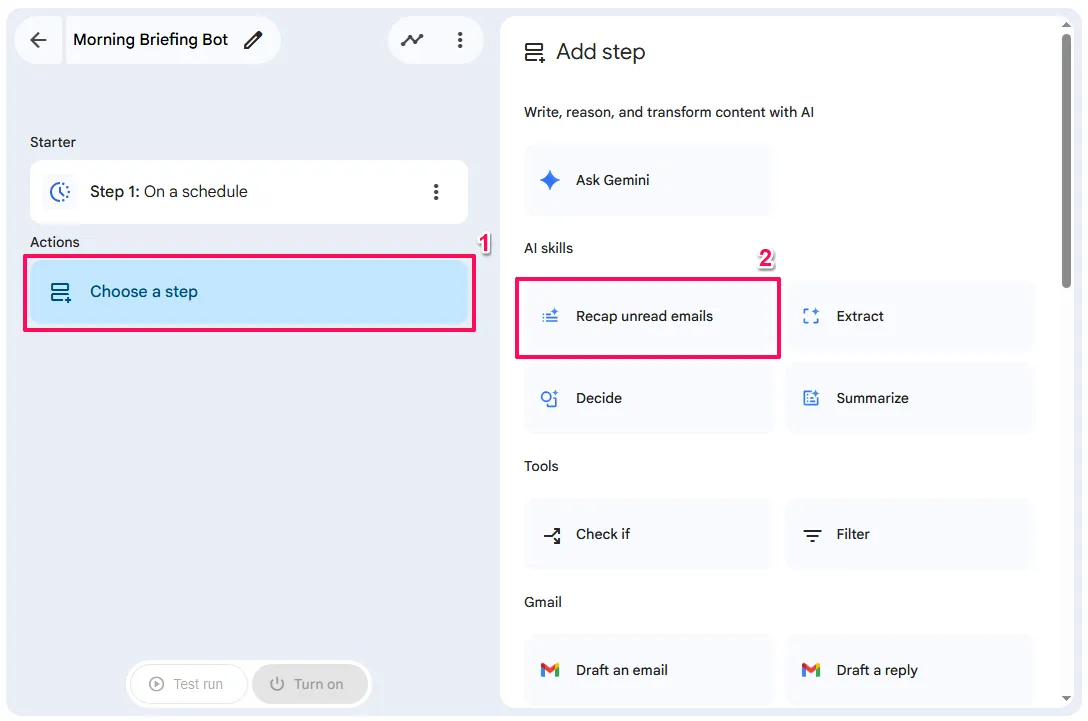
Step 2: The Intelligence (Recap unread emails)
- Click the
Choose a stepbelow your starter and selectRecap unread emailsstep from theAI skillssection.
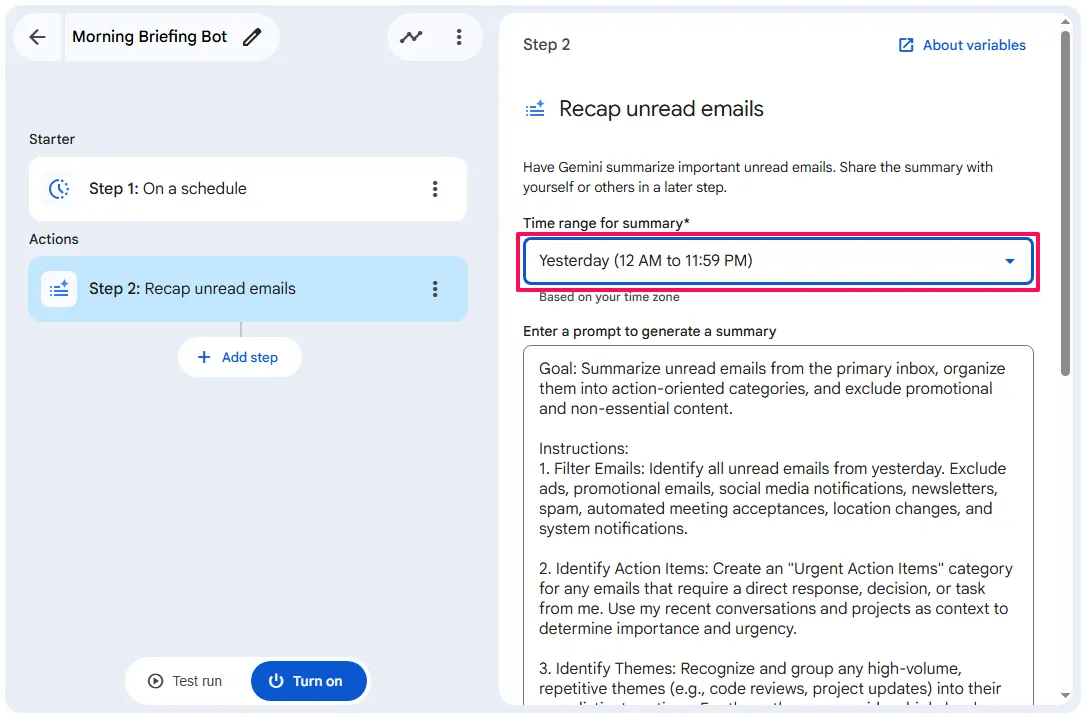
- Configuration:
Time range for summary- Select
Yesterday (12 AM to 11:59 PM)from the dropdown
- Select
Enter a prompt to generate a summary- This field comes with a sophisticated default prompt. This prompt is designed to:
- Filter content: It automatically excludes ads, social media notifications, newsletters, and spam
- Identify Action Items: It creates an “Urgent Action Items” category for emails requiring a direct response
- Theme Grouping: It groups repetitive themes, such as project updates, into high-level summaries rather than listing every individual email
- Customisation Tip:
- You can edit this prompt to be more specific, such as adding “Focus specifically on emails from [Client Name]” to further refine the results
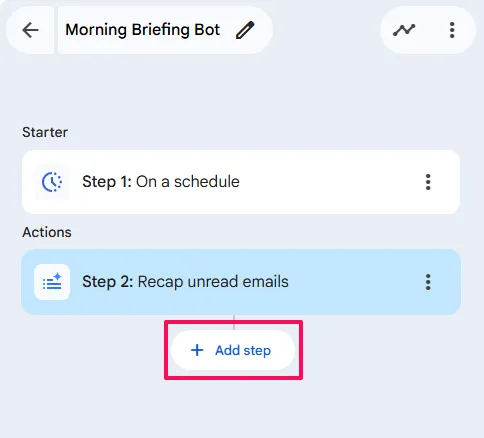
Step 3: The Delivery (Google Chat)
- Click
+ Add step.
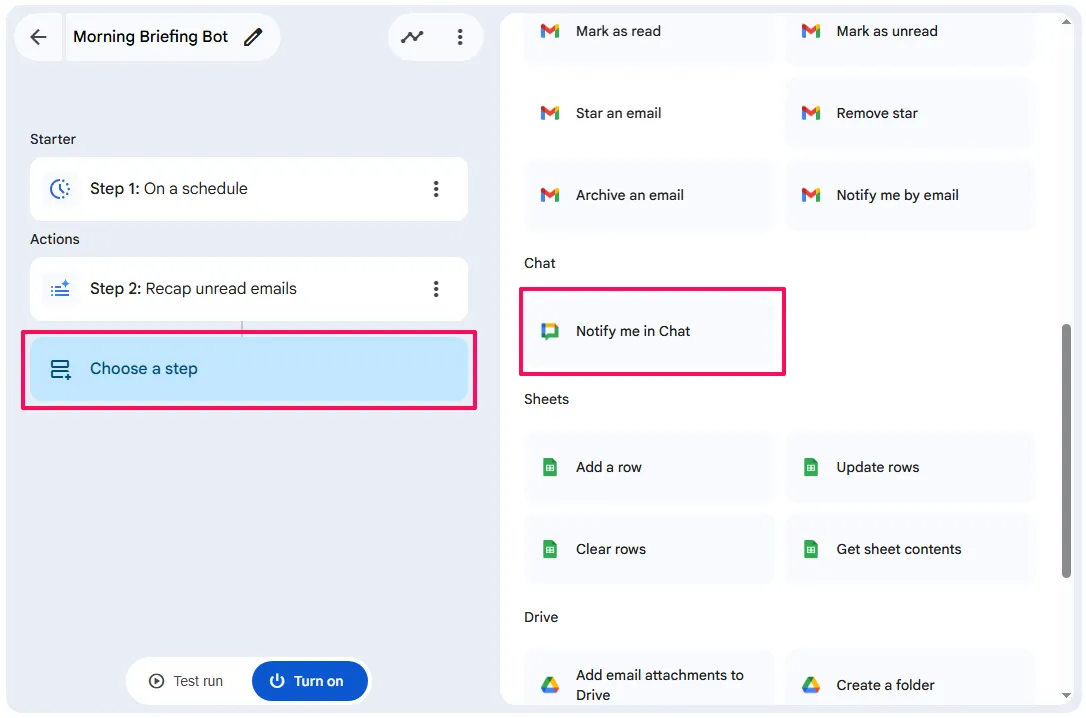
- Select
Notify me in Chat.
- Message Body:
- Click into the
Messagefield and type the @ symbol (or click+ Variables) - Select the Variable:
- From the list, choose
Step 2: Summary of unread email. It will appear as a coloured chip in your text

or

This passes the AI’s categorised summary into your chat message.
Activation and Testing
- Test Run:
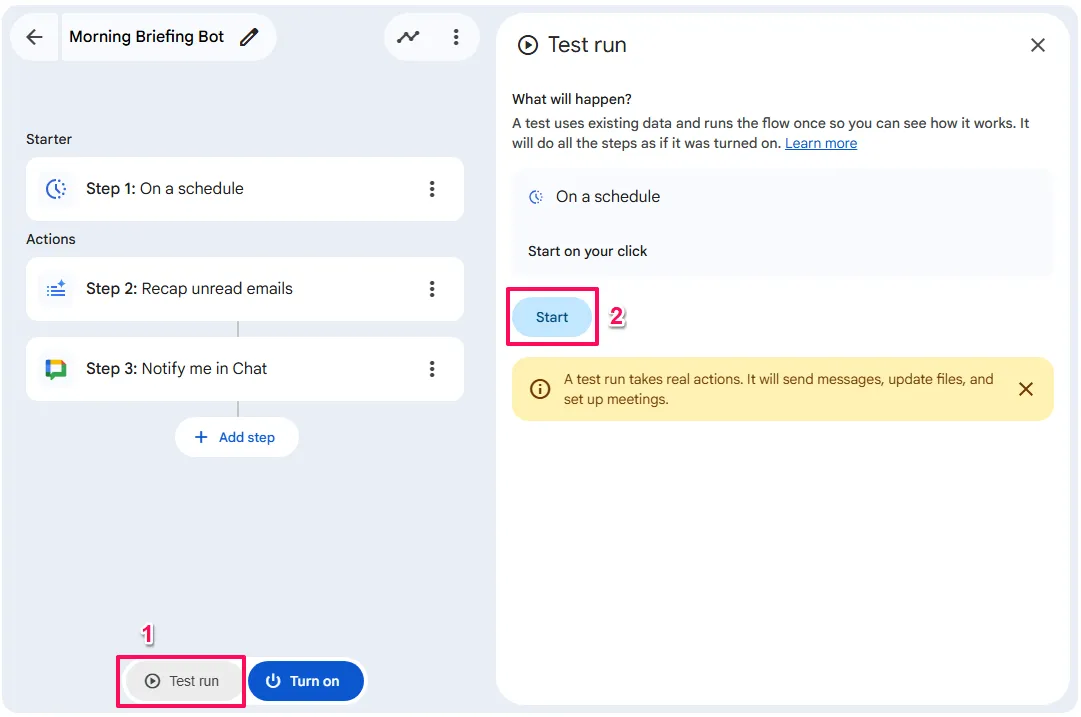
- If you don’t want to wait until 8:00 AM, click
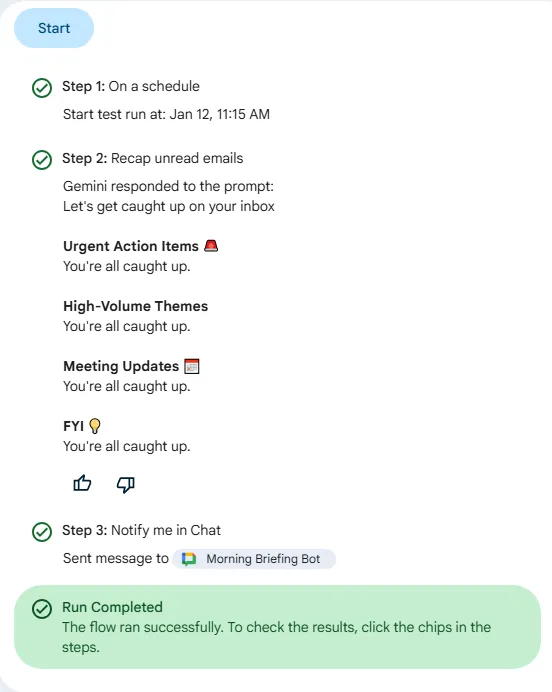
Test runto execute the flow immediately and see the results in the Activity tab - Note: Test runs execute the flow for real. This one sends an actual
Google Chatmessage to you – that’s intentional, and it’s how you confirm the output looks correct before turning the flow on. For flows that modify files or send emails to others, test against dedicated test data first.
- Find Your Results:
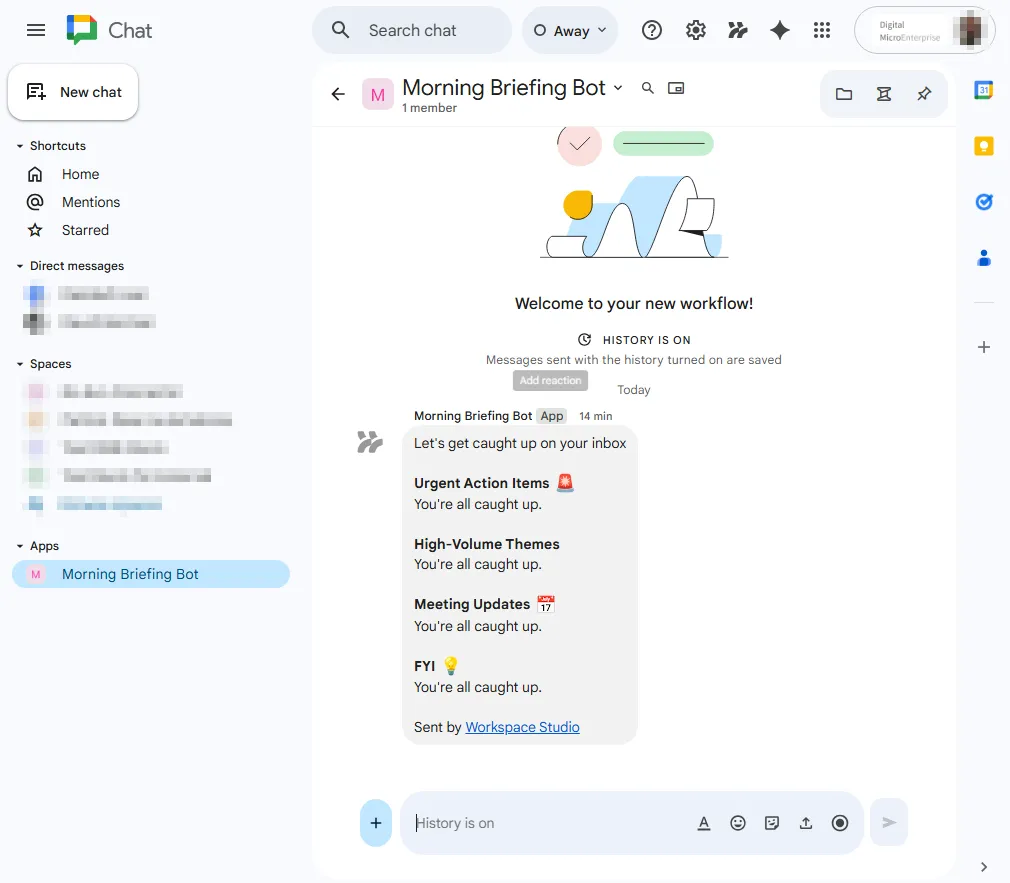
- Your briefing will not appear as a standard DM from a person. Instead, look in the “Apps” section at the bottom of your
Google Chatsidebar. You will see a new app named “Morning Briefing Bot” (the name of your flow) - Turn On: Click the
Turn ontoggle
This simple three-step flow demonstrates the core loop: Trigger (Time) → Intelligence (Summarisation) → Action (Communication).
Understanding the Core Concepts
To use Workspace Studio effectively, you need to understand its specific architecture. The platform operates on four fundamental concepts: Starters, Steps, Variables, and the Intelligence Layer.

Starters: What Triggers Your Flows
Every flow begins with a single event called a Starter. This acts as an event listener waiting for a specific state change in your Google ecosystem. Currently, each flow can have only one starter; you can’t trigger the same flow from both an email and a chat message (you’d need two separate flows).
Starters fall into three categories:
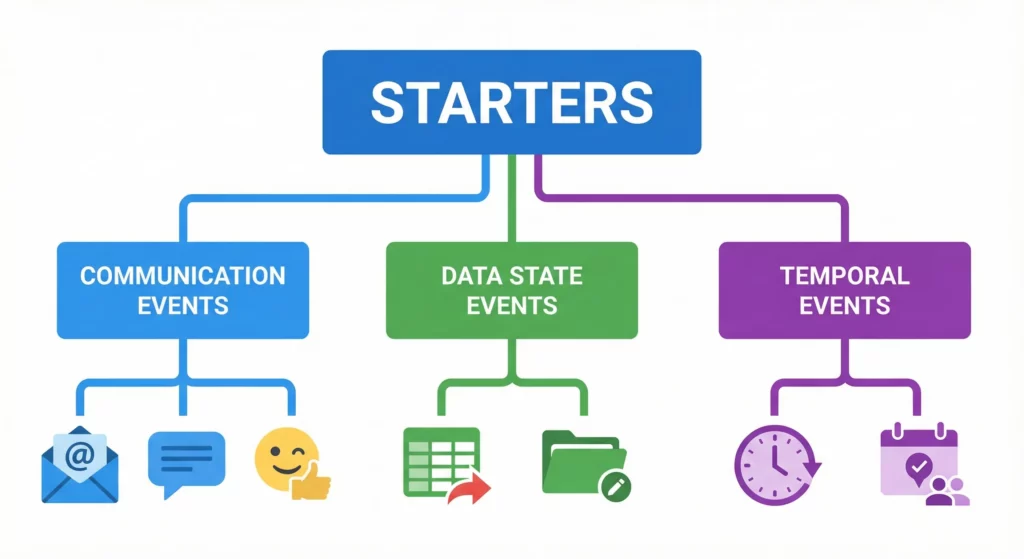
Communication Events
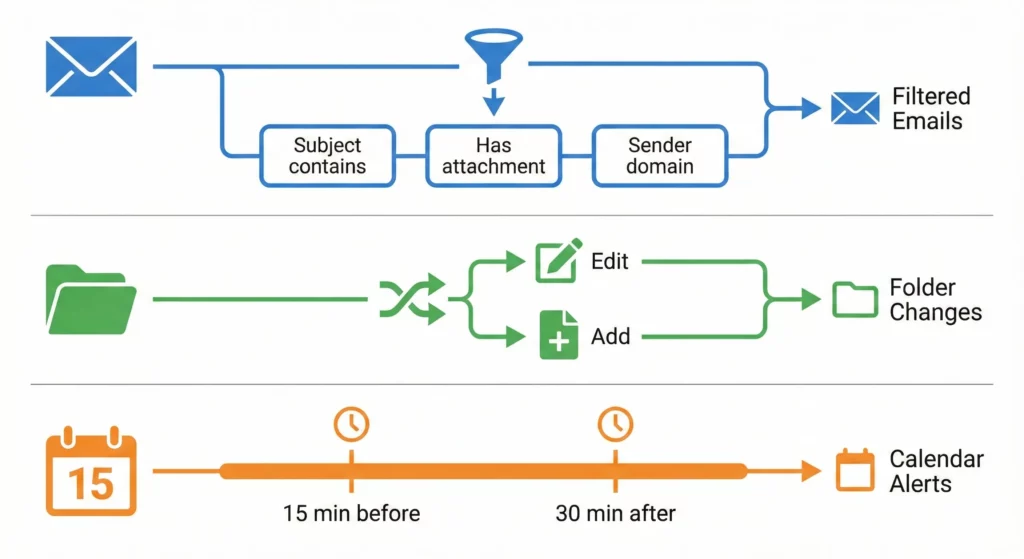
Communication Events trigger from human interaction. When I get an email is the most common, hooking into Gmail with pre-processing filters for sender, subject, and attachments. This filtering is crucial, without it, your flow fires on every marketing newsletter, quickly exhausting your daily limits.
When I get a chat message and When I'm mentioned enable “ChatOps,” transforming Google Chat into a command-line interface for your business. When an emoji reaction is added might seem trivial, but it unlocks powerful approval workflows. A manager can approve a document simply by reacting with a ✅, which the system interprets as permission to proceed.
Data State Events
Data State Events monitor changes to static data. When a sheet changes turns Google Sheets into a database with triggers, monitoring specific columns or rows for updates. This is particularly powerful for status tracking, when a “Status” column changes to “Done,” your flow can automatically notify stakeholders.
When a file is edited in Drive detects content changes (but not metadata changes like renaming or moving, which prevents infinite loops).
Temporal Events
Temporal Events trigger based on time. On a schedule works like a cron job for batch processing. Based on a meeting is unique – it carries event metadata (attendees, description, attachments) into your flow, enabling contextual preparation or follow-up actions.
Steps: The Execution Chain
Once a Starter fires, your flow executes a sequence of Steps. You’re currently limited to 20 steps, which enforces modular design over monolithic complexity.
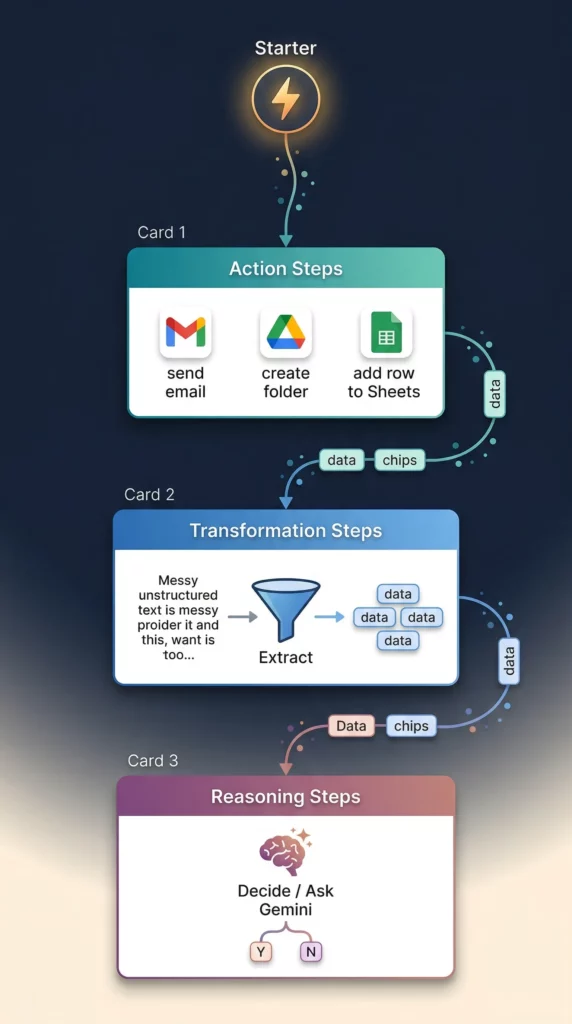
Action Steps are deterministic operations that interact with APIs: Send email, Create Drive Folder, Add row to Sheet, or Post Message to Chat.
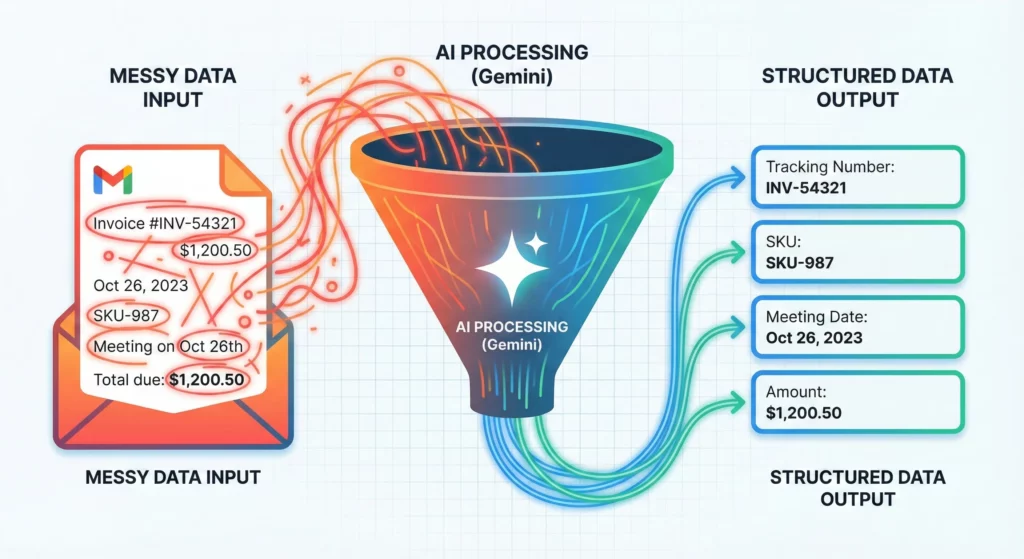
Transformation Steps manipulate data in transit. The Extract step uses AI to parse unstructured text (like an invoice) into structured data (Invoice ID, Amount, Date).
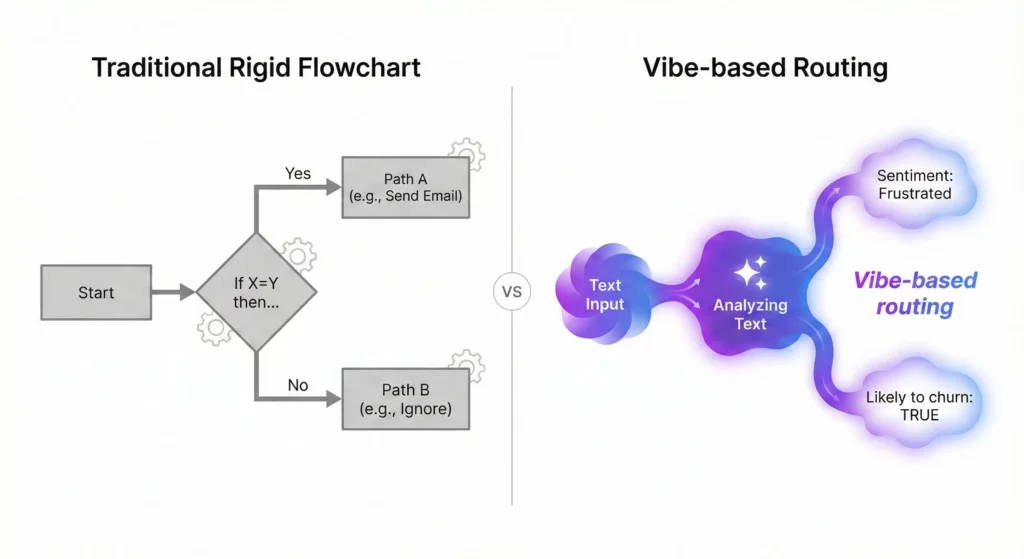
Reasoning Steps differentiate Workspace Studio from traditional automation. The Decide step doesn’t just compare values, it evaluates semantic meaning. You can ask it to determine whether an email comes from a frustrated customer likely to churn. The Ask Gemini step allows for sophisticated prompt engineering within your flow, letting you guide exactly how the AI responds.
Variables: Your Data Pipeline
Data flows through your agent via Variables. When a Starter executes, it generates an object containing relevant metadata. A “New Email” starter generates Sender, Subject, Body, Date, and Attachments.
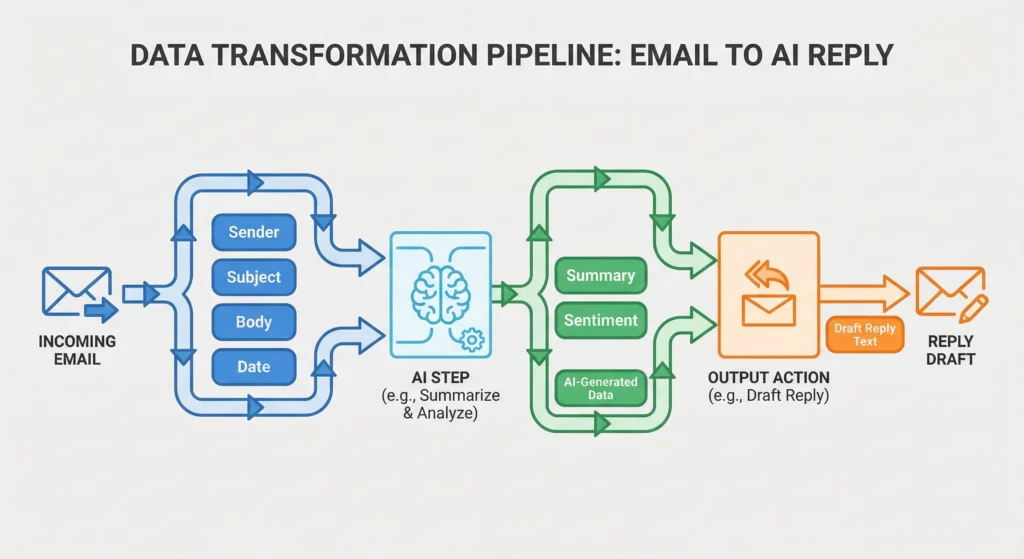
Subsequent steps can reference these variables. Your reply draft might use the Sender variable to address the recipient and a Summary variable from an AI summarisation step to generate content.
In the Workspace Studio interface, variables appear as chips you can insert into text fields. Understanding data types is critical here, a File variable (an object reference) can’t be placed into a Text field without causing errors or producing useless object ID strings.
The Intelligence Layer: Gemini
Google’s Gemini model underpins the entire system. Unlike traditional code that produces identical output for identical input, Gemini’s output can vary slightly in phrasing or tone. This probabilistic nature is a feature, allowing for creativity and adaptability in communication workflows.
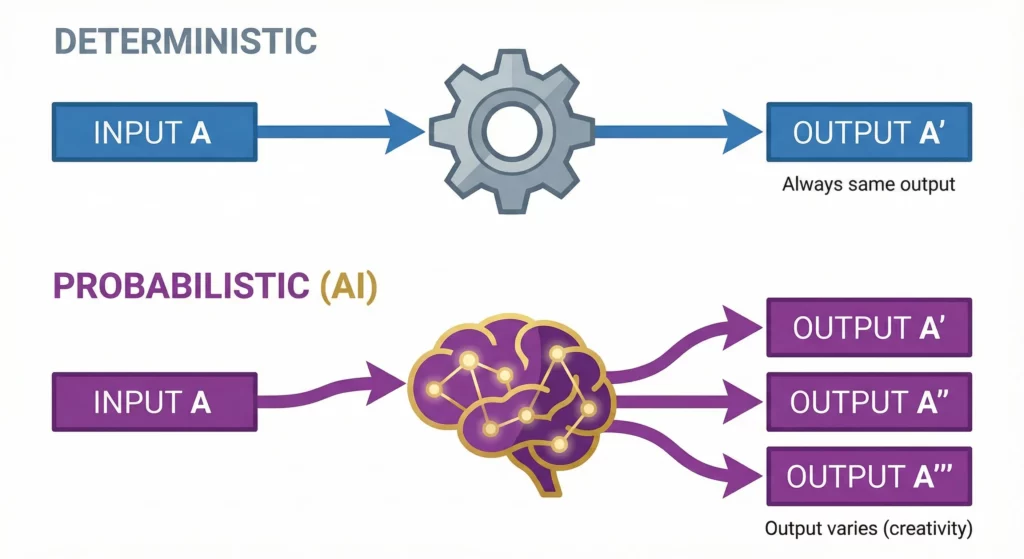
This requires a mindset shift. You need to design flows that are resilient to slight variations in AI output, often by using the Decide step to validate responses before taking action.
Key Capabilities That Set Workspace Studio Apart
Advanced Event Monitoring
The Starter mechanism is more sophisticated than simple triggers. It includes pre-flight filtering that’s essential for quota management.
Granular Email Filtering doesn’t just fire on “New Email.” You can configure Boolean logic at the trigger level: Subject CONTAINS "Invoice" AND HasAttachment == TRUE AND SenderDomain != "internal.com". Setting this up correctly is the single most important step in preventing runaway automation that exhausts your daily limits.
File Event Nuance distinguishes between files being added versus edited. The File Edited starter detects content changes but currently doesn’t trigger on metadata changes like moving (though this feature in Google Drive is currently in developer preview). However, simply renaming a file still generally does not trigger a Content Edited flow.
Calendar Context with the Based on a meeting starter allows for relative time triggers (15 minutes before, 30 minutes after). It carries event metadata into your flow, enabling highly contextual preparation or follow-up actions.
The AI Reasoning Engine

Gemini integration enables steps that were previously impossible in automation.
The Decide Step is a probabilistic logic gate. Unlike standard conditional checks that compare strings, Decide evaluates sentiment and intent. You can ask it: “Is this email from a frustrated customer who is likely to churn?” The system feeds the email body and your prompt to Gemini, which returns a Boolean to guide your flow. This enables what you might call “vibe-based” routing.
The Extract Step uses Gemini’s Named Entity Recognition capabilities. It can ingest a PDF, image, or messy email thread and extract specific entities you define (Tracking Number, SKU, Meeting Date). It creates structured variables from these entities, essentially cleaning messy human data for machine processing.
Prompt Engineering in Ask Gemini gives you a blank canvas. You can use sophisticated prompting techniques (Few-Shot Prompting, Chain-of-Thought) to guide the AI’s output. For example, you might provide three examples of your desired writing style to ensure drafted emails match your voice. One configuration detail that significantly affects output quality: in the Sources field, select All sources rather than leaving it on the default. This allows Gemini to search your actual Gmail and Drive content, not just respond from its training data. Without this, Ask Gemini steps produce generic answers instead of context pulled from your real emails and documents.
Native Application Integration
Workspace Studio has superuser access to Google Apps, often bypassing the limitations of public APIs.
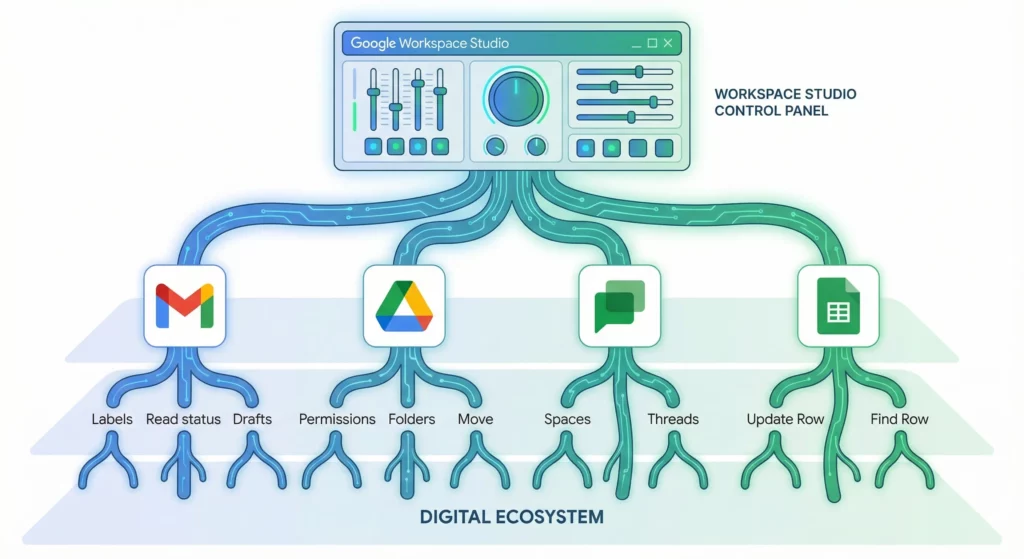
Gmail flows can manage labels, mark messages as read or unread, and draft replies in your Drafts folder (a best practice for human review before sending).
Drive flows can manage folder hierarchies, move files, and control permissions. The file iterator capability (processing all files in a folder) is particularly useful for batch organisation.
Chat flows can interact with specific Spaces and distinguish between threaded replies and new conversations, enabling organised automated discourse.
Sheets flows can use Update Row and Find Row steps to function as a lightweight relational database. You can look up a customer ID in Column A and update Status in Column F, effectively turning Sheets into a CRM backend.
Connectivity and Extensibility (Currently in Limited Preview)
Limited Preview. There is currently no way to request access to the limited preview
Workspace Studio connects to the external world through two primary mechanisms.
Webhooks: Your Digital Messenger
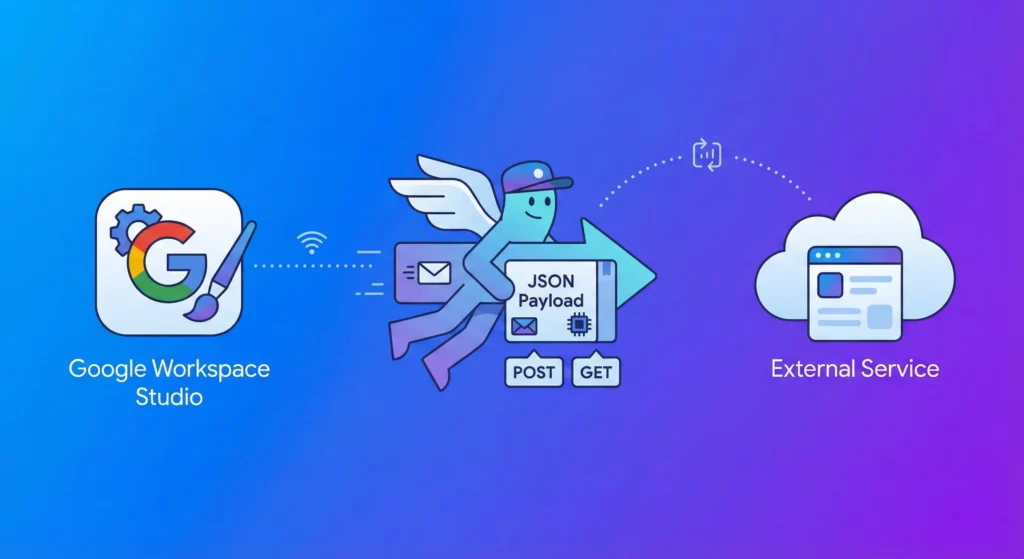
Think of a webhook as a way for your flow to send a specific message to another app. A webhook step sends an HTTP request to a URL you provide, allowing you to trigger actions in external services.
- How it works: You provide a static URL for the external service and choose a “method” (like
POSTto create something new orGETto retrieve data). - The Payload: This is the actual information you are sending, such as a customer’s name or an email summary. We recommend using JSON format for this, as it is the standard language web services use to talk to each other.
- Example: You could set up a flow that, upon receiving an “Urgent” email, automatically sends a webhook to Slack to post a message in an emergency channel
Third-Party Integrations: Ready-to-Use Connections
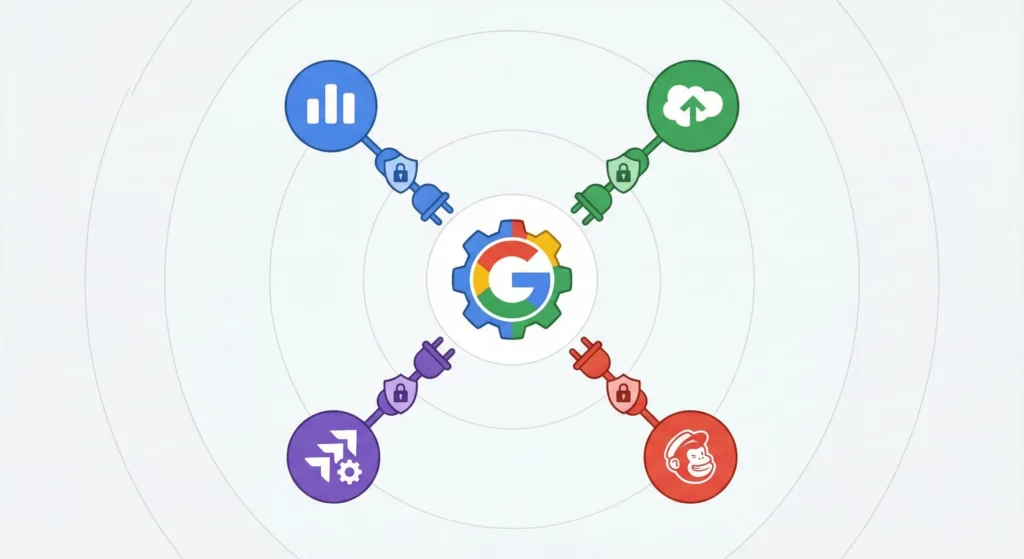
For those who don’t want to deal with URLs and payloads, Workspace Studio offers pre-built integrations. These allow you to drag and drop actions from popular business apps directly into your execution chain.
- Common Connectors: You can currently find integrations for Asana, Jira, Mailchimp, and Salesforce.
- Simple Setup: These integrations handle the technical “handshaking” (OAuth authentication) for you. You simply connect your account through the Google Workspace Marketplace and follow the on-screen instructions.
- Beginner Tip: Always make sure you trust the third-party service before connecting it, as your flows may share sensitive Google Account data, like Gmail message contents or Calendar event details, with that service
Add-on Extensions: Custom Power with Apps Script
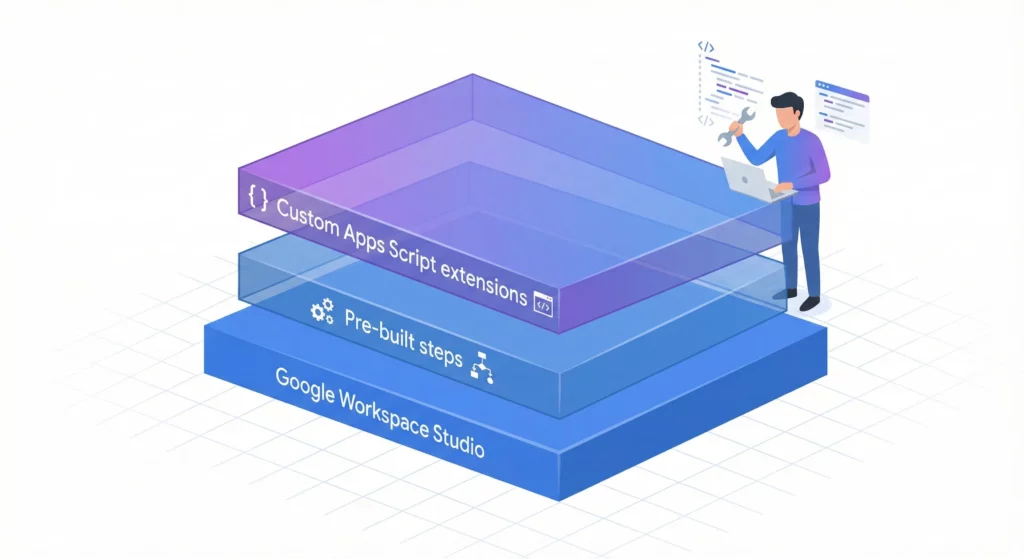
If a pre-built step doesn’t exist for your specific needs, you (or a developer in your organisation) can build one using Google Apps Script.
- Custom Steps: These are tasks tailored to your specific business logic that can be shared across your organisation.
- Complex Data Handling: For more advanced users, extensions allow for Dynamic Variables (information that changes based on what you select during setup, like specific questions in a Google Form) and Custom Resources (which group multiple related variables together, like a customer’s name, email, and address)
Advanced AI: Ask a Gem
Extensibility also includes specialised AI agents called Gems. In the Ask a Gem step, you can use an AI agent that has been pre-trained for a very specific expertise, such as a “Brainstormer” or a “Sales Pitch Ideator,” rather than just asking general questions to Gemini
Building AI Agents: Detailed Tutorials
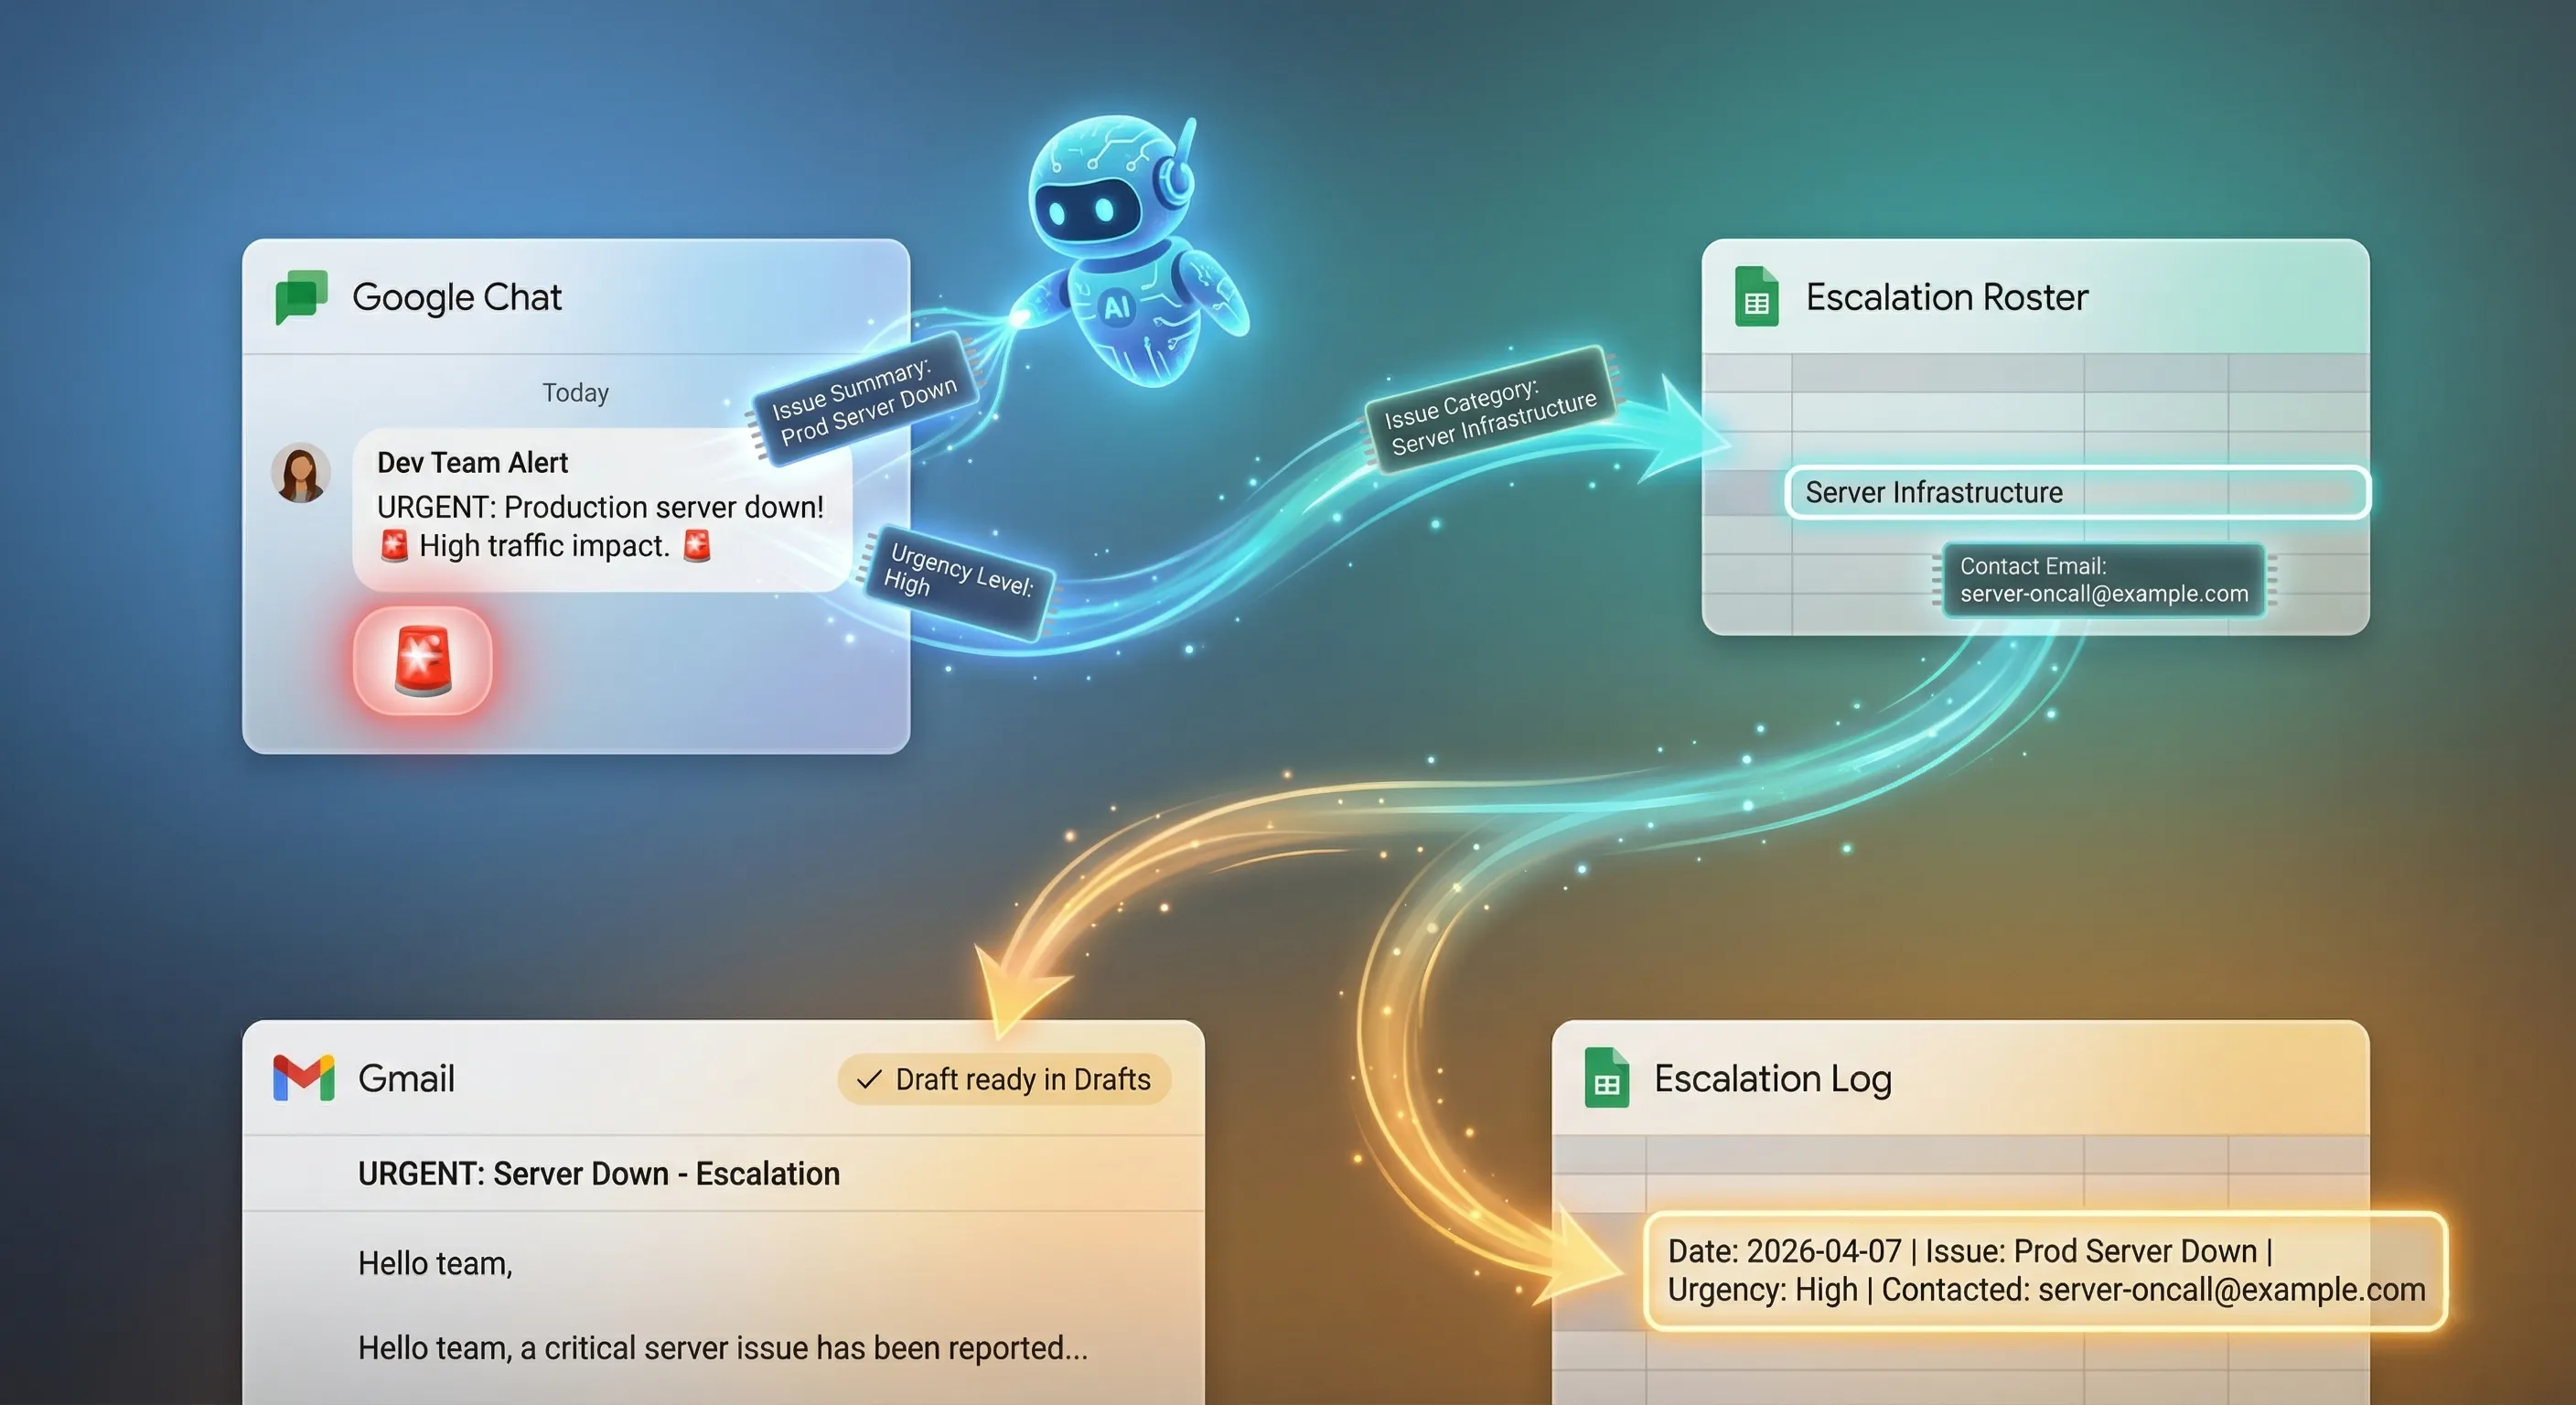
Tutorial 1: The Dynamic Escalation Router
Scenario: Your team flags urgent issues in Google Chat, but the message gets buried. You then have to manually figure out who needs to know, write the escalation email, and log it somewhere. Three manual tasks from a single emoji.
Objective: React to any Chat message with 🚨 and the flow handles the rest – it extracts the issue, category, and urgency from the message, looks up the right contact from a routing spreadsheet, pre-fills a formatted escalation email draft addressed to that contact, and logs the incident to your private tracker.
Before you build: Create a private Google Sheet (it can’t be shared with others – see Limitations) and call it Escalation Hub say, with two tabs:
- Escalation Roster – two columns:
Category(e.g. Billing, Support, Sales) andContact Email - Escalation Log – columns:
Date,Sender,Issue,Urgency,Category
Construction:
Starter
Step 1: When an emoji reaction is added
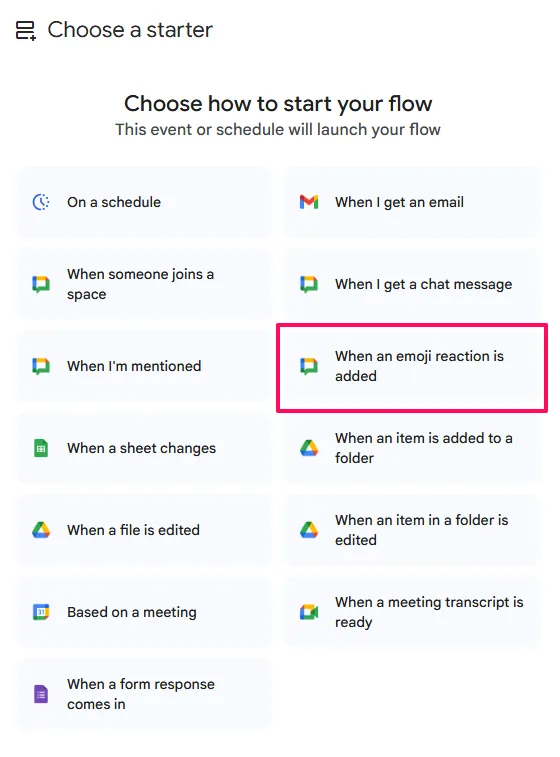
- Choose the
police-car-lightemoji: 🚨 - Ensure
All messagesis selected forConversation type.
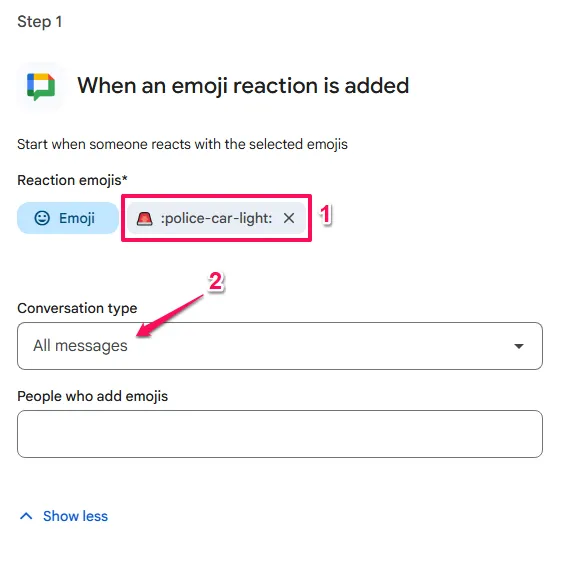
- Note: This starter provides
Message Text,Message Sender, andSpace Nameas variables.
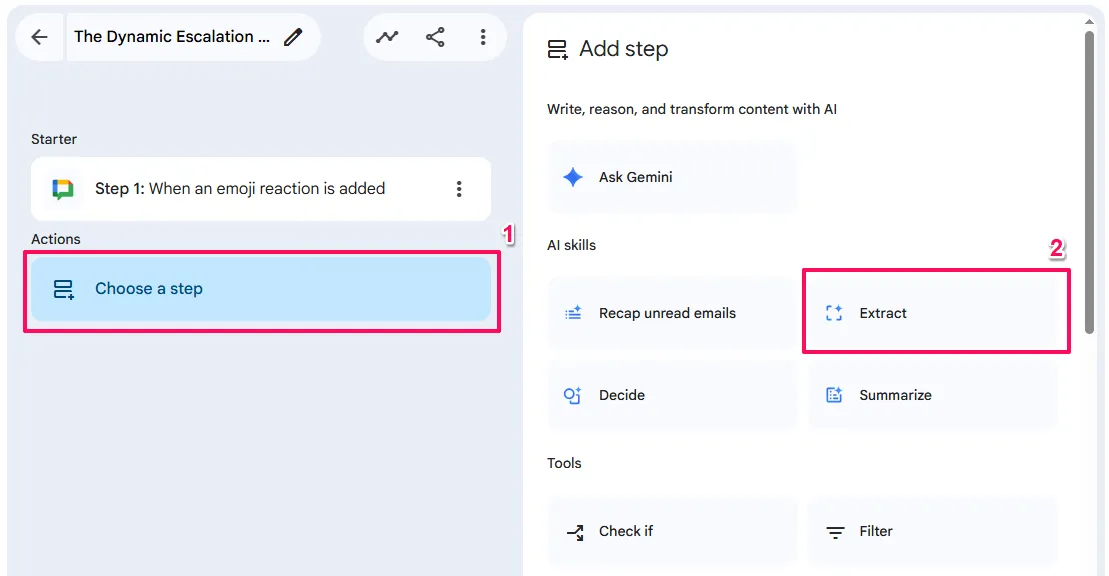
Actions
Step 2: Extract
Add the Extract step to your flow. This step uses Gemini to read unstructured text and pull out specific data points.
- Action:
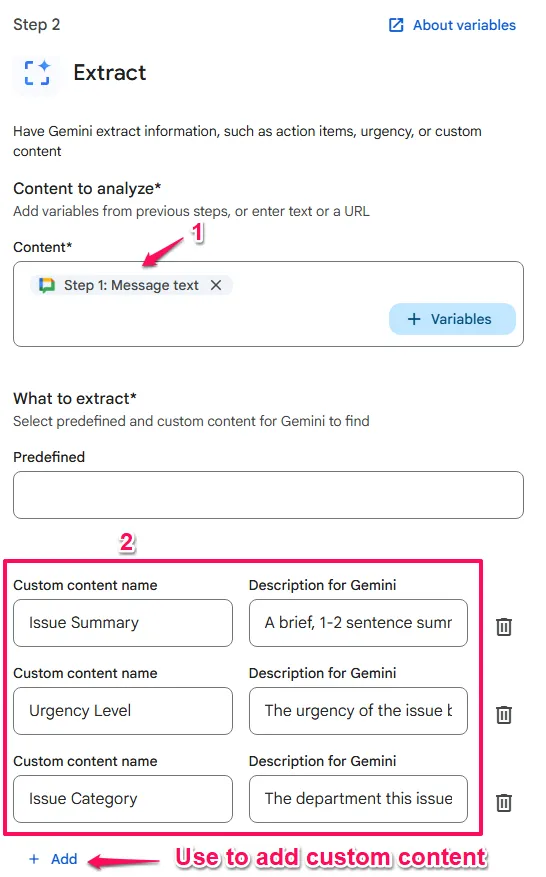
Extract - Input:
{Message Text} - Fields to extract: Issue Summary (Text), Urgency Level (Text), Issue Category (Text – matching the categories in your Escalation Roster, e.g. “Billing”, “Support”, “Sales”)
- Gemini reads the raw message and returns three structured variables you can use in the steps below.
Content to analyze- Click
+ Variables(or type@) and select the{Message text}variable from your When an emoji reaction is added starter.
- Click
What to extract- Item 1
Custom content name:Issue SummaryDescription for Gemini:A brief, 1-2 sentence summary of the core problem or request.
- Item 2
Custom content name:Urgency LevelDescription for Gemini:The urgency of the issue based on the context. Return only "High", "Medium", or "Low".
- Item 3
Custom content name:Issue CategoryDescription for Gemini:The department this issue belongs to. You must return EXACTLY one of these three words: "Support", "Billing", or "Sales".
- Item 1
Why this matters: By giving Gemini strict instructions in the description for “Issue Category”, you ensure it outputs a word that perfectly matches the columns in your Escalation Roster spreadsheet. If Gemini outputs “Technical Support” instead of exactly “Support”, the spreadsheet lookup in the next step will fail!
Step 3: Get sheet contents
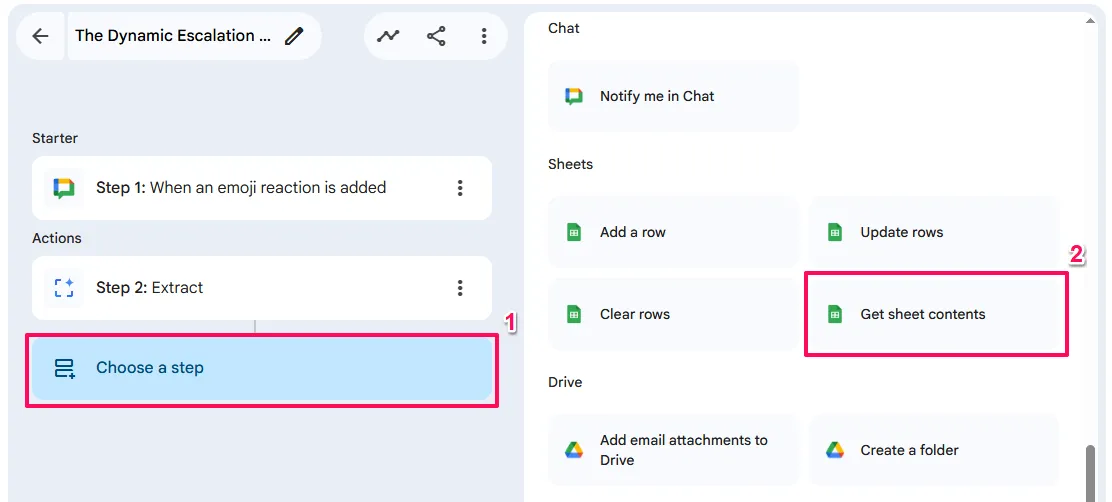
- Action:
Get sheet contents - Sheet: your private Escalation Roster
- Filter:
Categorycolumn matches{Issue Category} - Output:
[Matching values "Contact Email"]– the email address for whoever owns that category

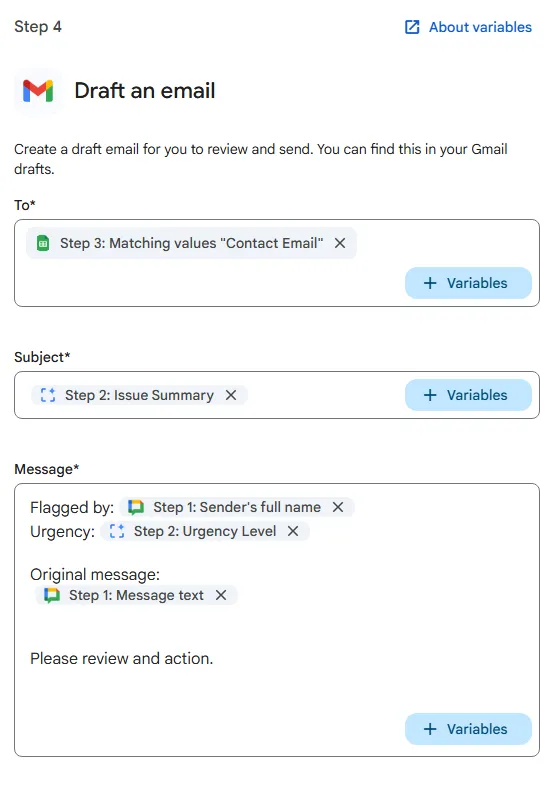
Step 4: Draft an email
- Action:
Draft an email - To:
Step 3>{Matching values "Contact Email"}.
- Subject:
Step 2>{Issue Summary}.
- Body:
Flagged by: {Sender's full name}
Urgency: {Urgency Level}

Original message:
{Message text}

Please review and action.
The draft lands in your Gmail Drafts folder, addressed to the right person, formatted and ready to send.
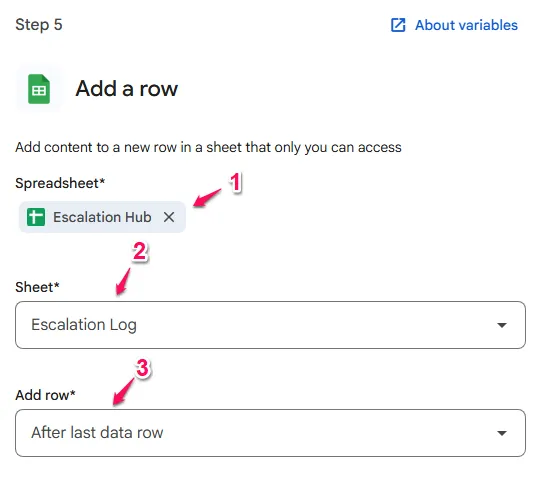
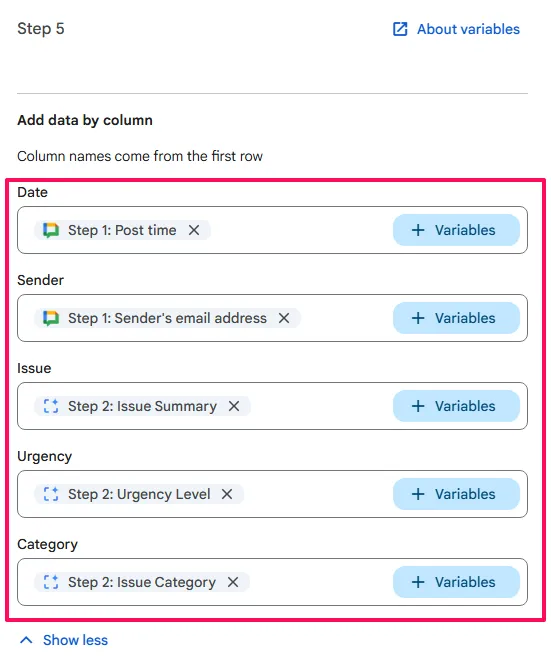
Step 5: Add a row
- Action:
Add a row - Sheet: your private Escalation Log
- Mapping:
DateStep 1>{Post time}
SenderStep 1>{Sender's email address}
IssueStep 2>{Issue Summary}
UrgencyStep 2>{Urgency Level}
CategoryStep 2>{Issue Category}
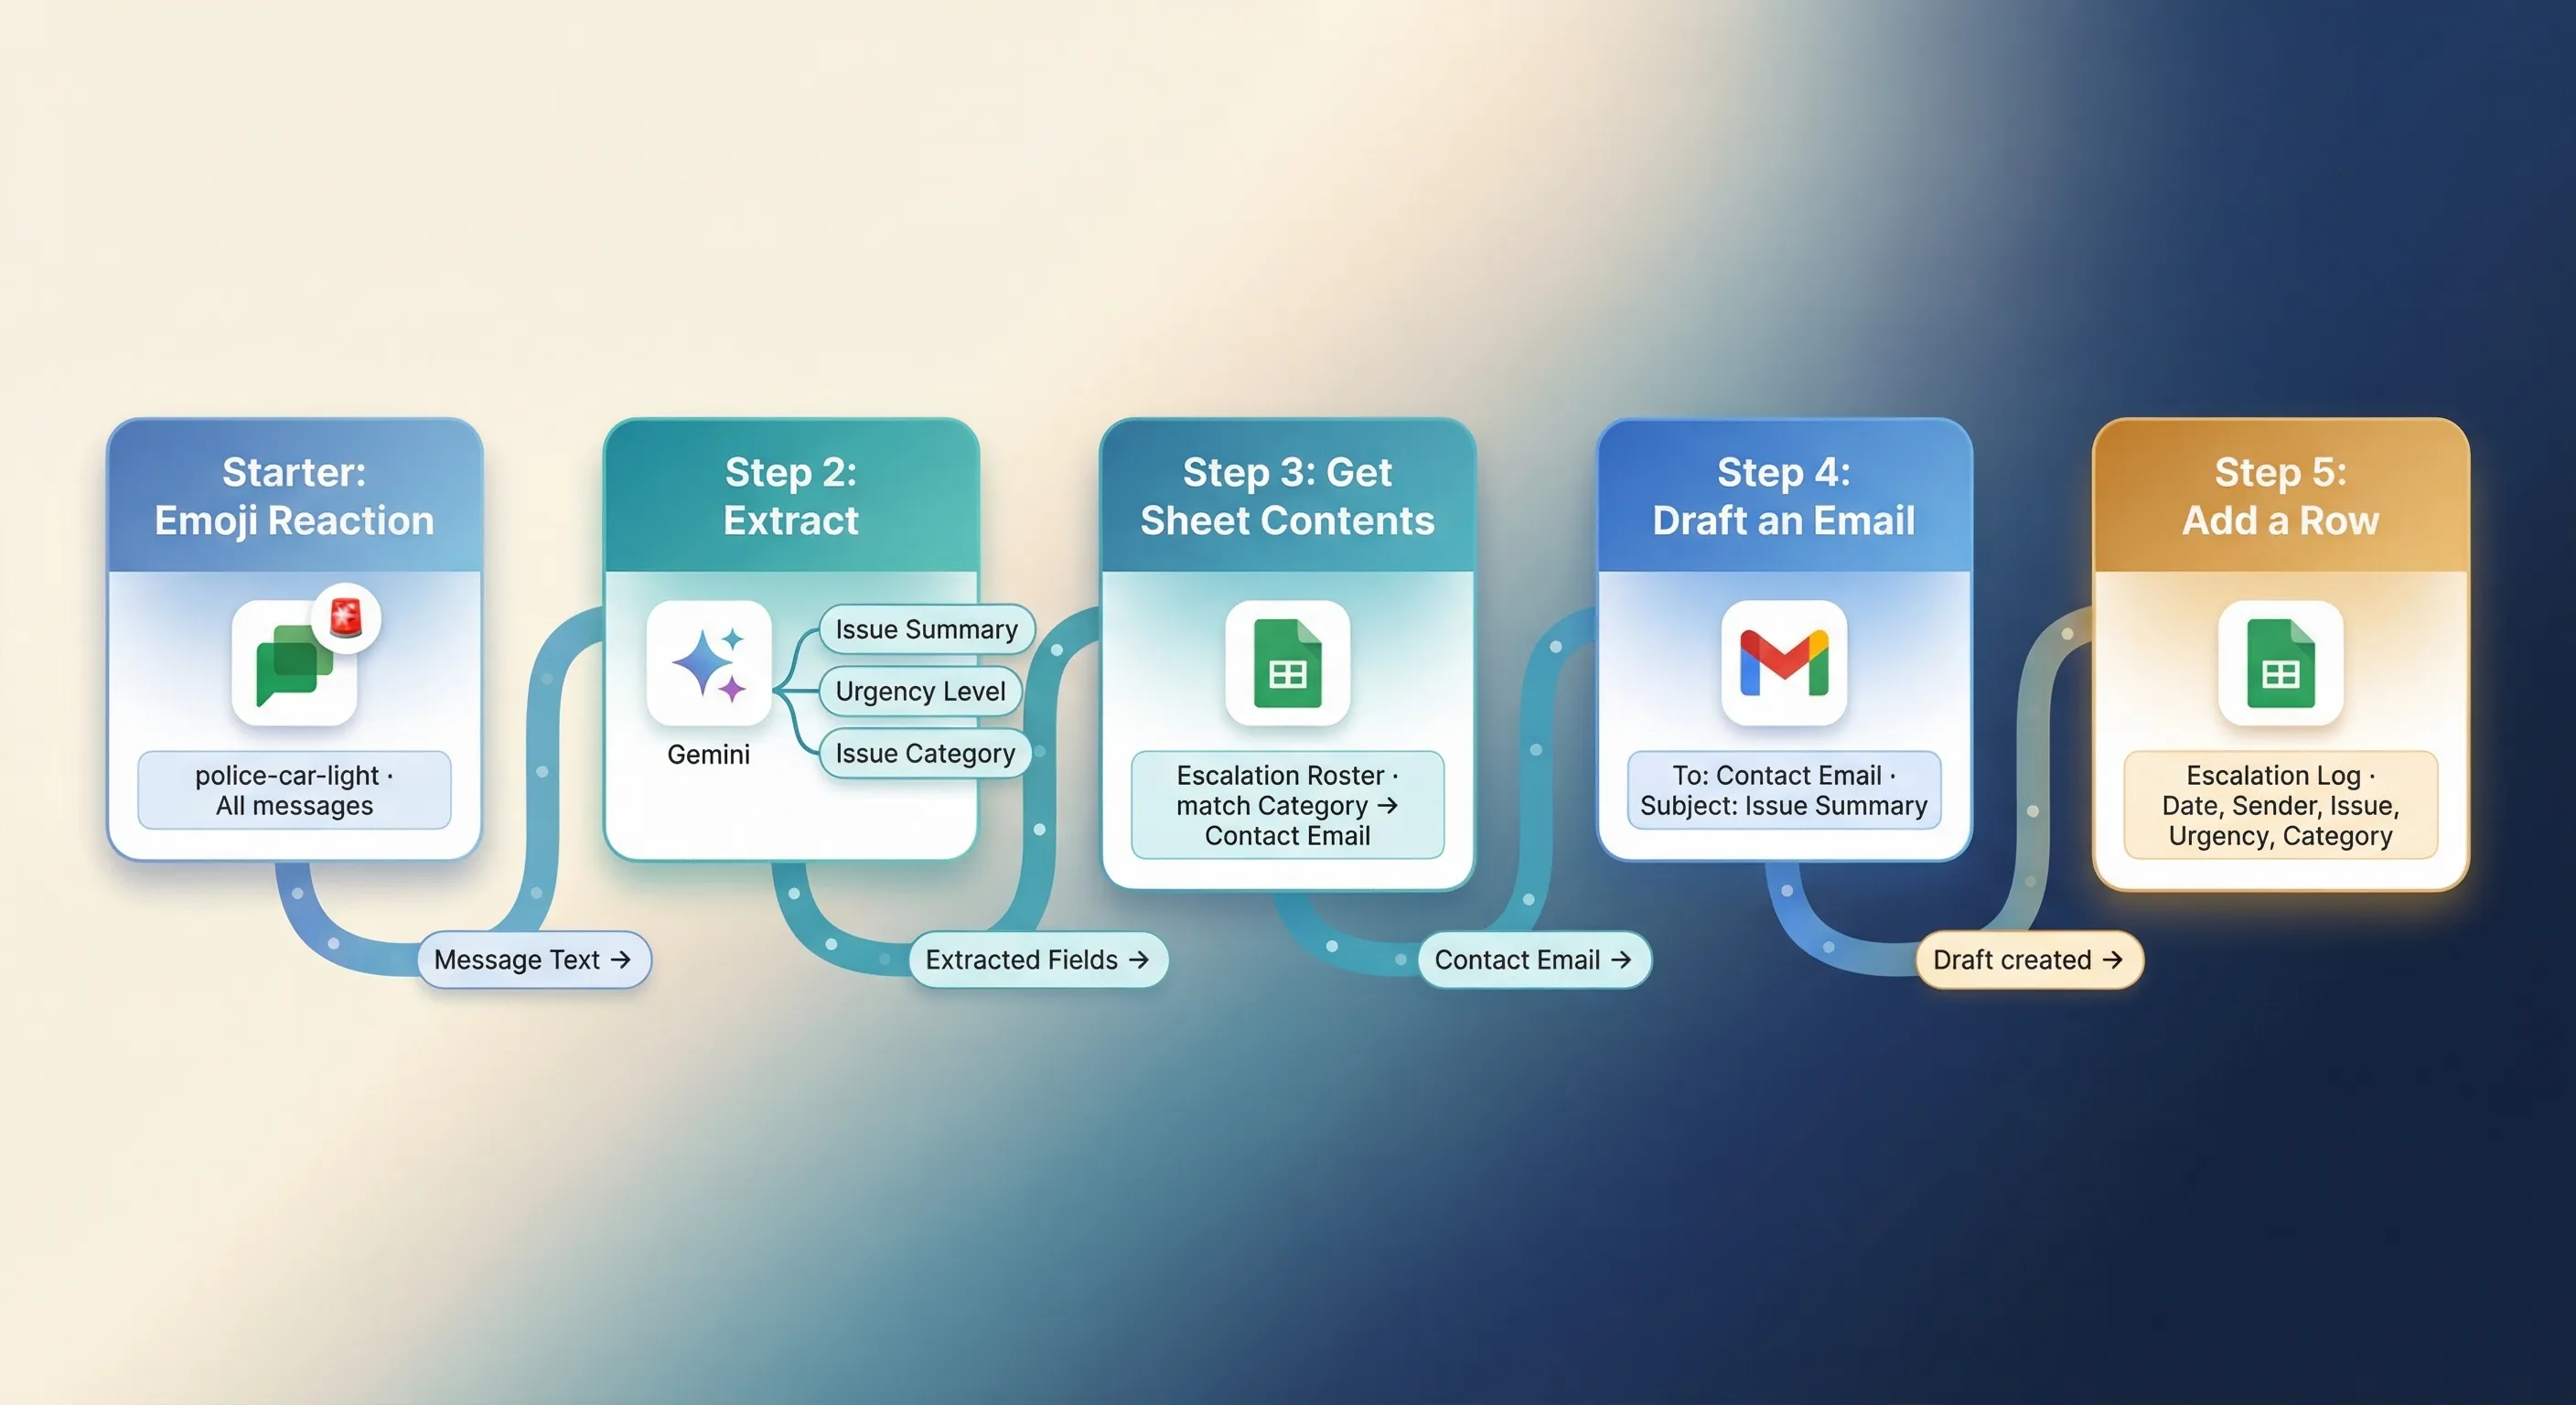
Outcome: One emoji reaction extracts the issue, routes it to the right person, and logs it – without opening another tab. The mental model this flow demonstrates – extract unstructured data with AI, query a spreadsheet for conditional routing, act on the result – applies to dozens of other workflows once you’ve built it once.
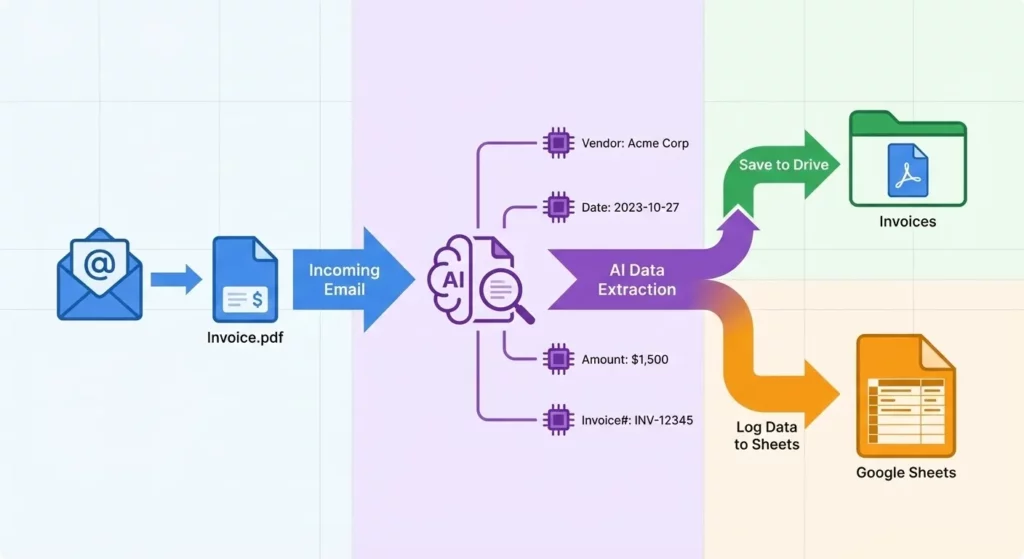
Tutorial 2: The Invoice Bot
Scenario: Vendors send PDF invoices to your email. You manually save them to Drive and log amounts in a Sheet.
Objective: Automate the extraction and logging of invoice data.
Construction:
Starter
Step 1: When I get an email
- Click
Choose a starter>When I get an email. - Click the
Specific emails button. - In the
Has the wordsfield, enterinvoice OR bill OR receipt OR statement. - Click
Show moreto see more options. Has your email address in Cs or Bccshould be selected by default.- Enable the
Has attachmentcheckbox.
Actions
Step 2: Filter a list of email attachments
- Click
Choose a step>Filter. - In
Apply filter toclick+ Variables>Step 1: Email attachments. - For the
Ifcondition selectFile typeand thenisshould populate by default in the other dropdown (ensure that it is the selection if not). - Select
PDFsfrom the dropdown below the other two.
Step 3: Add email attachments to Drive
- Click
+ Add step>Add email attachments to Drive. - In the
Location for email attachmentssection, click theDrivebutton and select a folder to deposit the pdfs. - In the
Gmail attachmentssection click+ Variables>Step 2: Filtered items>{Filtered items}.
The
Add email attachments to Drivestep is the first step to get access to the data in the attachment. We must therefore have it before theExtractstep.
Step 4: Extract
- Click
+ Add step>Extract. - For
Contentclick+ Variables>Step 3: Add email attachments to ...{Links to the files}. What to extract- Item 1
Custom content name: enterVendor Name.Description for Gemini: enterThe legal name of the company or person issuing the invoice
- Item 2
Custom content name: enterInvoice NumberDescription for Gemini: enterThe unique identification number assigned by the sender to this specific bill
- Item 3
Custom content name: enterTotal AmountDescription for Gemini: enter `The final total balance due including all taxes and fees
- Item 4
Custom content name: enterDue DateDescription for Gemini: enterThe deadline by which the payment must be received
- Item 1
Step 5 Get sheet contents
- click
Choose a step>Get sheet contents. - To
Select the sheets to searchunderSpreadsheetclick+ Spreadsheet>{Accounts Payble Ledger}or whatever is the Google Sheet you are using. - Choose the
Sheethas your invoices from the dropdown, in this example in isInvoices. - In the Find rows to get values from section:
- For
ColumnchooseVendor Namethen forValueclick+>Step 4: Extract>{Vendor Name}. - Click
And. - For Column choose
Invoice Numberthen forValueclick+>Step 4: Extract>{Invoice Number}.
- For
Step 6: Check if Step 5: Number of matching rows > 0
Step 7: Notify me in Chat- Click
Add substep>Notify me in Chat. Message: input🛑 Duplicate invoice# {Step 4: Invoice Number} detected from {Step 4: Vendor Name}.
- Click
Step 8: Add labels- Click
Add substep> `Add labels`. - If you don’t already have a label, under
Your labelsclick+ New LabelenterDuplicate Invoices - Reviewfor theNew label name>Create.
- Click
Step 9: Archive an email- Add substep > Archive an email > under
Email to archive+ Variables>Step 8: Add labels>Email ID(ie{Step 8: Email ID}).
- Add substep > Archive an email > under
Step 10: Check if Step 5: Number of matching rows is 0
- Click
+ Add step>Check if. If>{Step 5: Number of matching rows}>is>0.- Step 11: Add a row
- Click
Add substep>Add a row. - To
Select the sheets to searchunderSpreadsheetclick+ Spreadsheet>{Accounts Payble Ledger}or whatever is the Google Sheet you are using. - Choose the
Sheethas your invoices from the dropdown, in this example in isInvoices. Add data by columnVendor Name- Use
@or+ Variables>Step 4: Extract>{Vendor Name}
- Use
Invoice Number- Use
@or+ Variables>Step 4: Extract>{Invoice Number}
- Use
Total AmountTotal Amountto+ Variables>Step 4: Extract>{Total Amount}
Due Date- Use
@or+ Variables>Step 4: Extract>{Due Date}
- Use
Invoice Link- Use
@or+ Variables>Step 3: Add email attachments to ...{Links to the files}.
- Use
- “Status
- Enter text
Review Needed
- Enter text
- Click
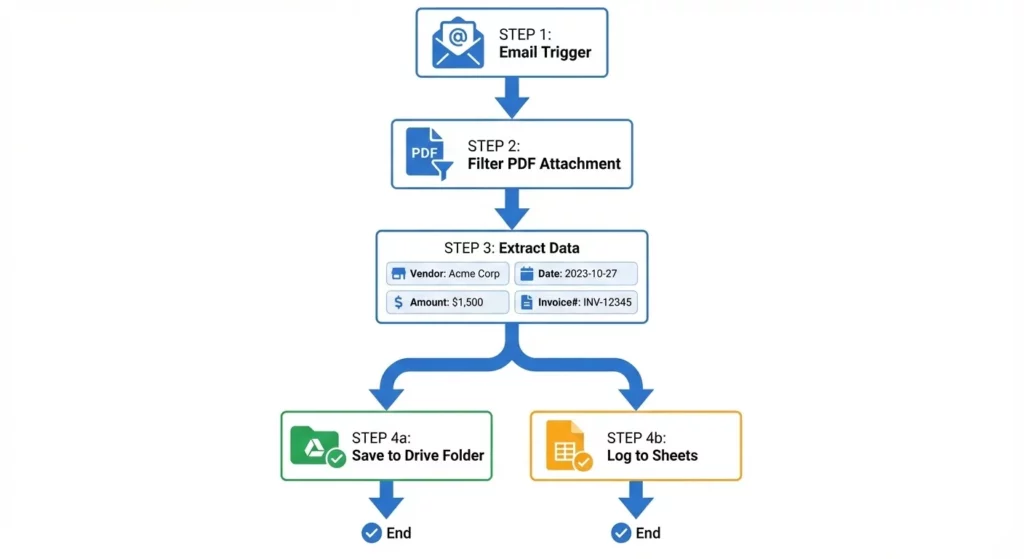
Outcome: A fully automated Accounts Payable ingestion engine.
Tutorial 3: The Sales Lead Route
🚨 Important Note: This tutorial uses Webhooks and Third-Party Integrations. These features are currently in Limited Preview. If you do not see these options in your Workspace Studio environment, your account does not yet have access to this experimental track.
Scenario: A “Contact Us” form on your website collects leads. You want to route high-value leads to Salesforce and low-value leads to an email nurture sequence.

Construction:
Starter
Step 1: When a form response comes in
- Click
Choose a starter>When a form response comes in. - Select the form you want to monitor: Choose your “Contact Us” form from the dropdown.
ActionsStep 2: Decide
AI Qualification
- Click
Choose a step>Decide. - In the
Enter a prompttext box, write the question you want Gemini to answer with a true or false decision:Analyse this lead inquiry: {+ Variables > Step 1: Form Response}. Is this a high-value enterprise lead (asking for bulk pricing, 100+ seats, or from a Fortune 500 domain)? Return TRUE for Enterprise, FALSE for SMB. - Note: A Decide step is always paired with a Check if step that is prefilled to check if the Decide result is true.
Step 3: Check if Step 2: Decision is true
Route High-Value Leads (If True)
- Inside the automatically generated
Check ifstep, add your integration step. - Select your Salesforce integration connector.
- Map the data using your variables from Step 1.
Step 4: Create the "Else" Branch
Create the “Else” Branch
- To have the flow do steps for the opposite condition, add another
Check ifstep with the matching set to the opposite of the first. - Set the condition to check if the Decide result is false.
Step 5: Route SMB Leads (If False)
- Inside this second
Check ifstep, click+ Add stepand selectSend a webhook. - Webhook or API URL:
https://api.mailchimp.com/3.0/lists/.... - Method: Choose the HTTP method for your request, such as
POSTto send data. - Payload: Enter the content for the request body using your JSON payload. You can use a variable to add content to the payload:
{
"email": "{+ Variables > Step 1: Email}",
"tags": ["nurture_sequence"]
}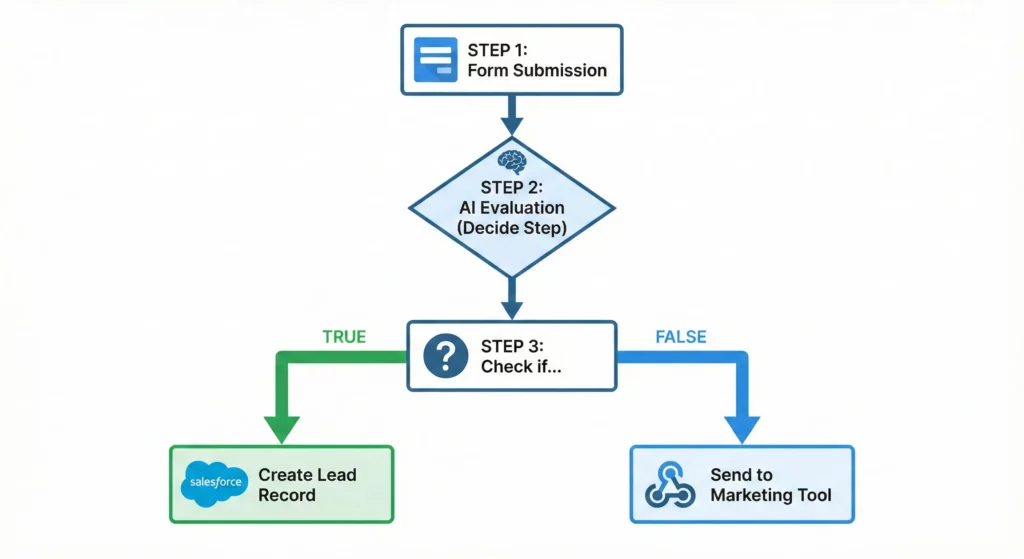
Outcome: Automated lead qualification that prioritises high-value prospects instantly.
Why Google Released This Now
By late 2025, employees were drowning in disparate AI tools. The constant switching between chatbot windows, email clients, and document editors created what’s known as “toggle tax” – the mental cost of context switching.

Google’s strategy with Workspace Studio is consolidation. By embedding intelligent automation inside your existing workspace, they address the two biggest barriers to enterprise AI adoption: context switching and data security.
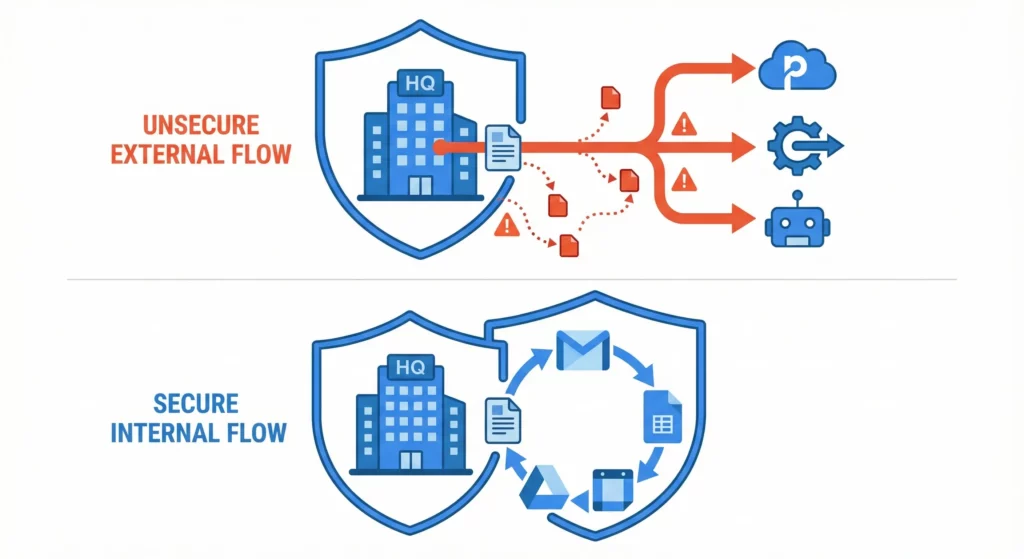
There’s another factor at play. Employees were increasingly using unapproved tools like Zapier or personal ChatGPT accounts to automate their work. This “Shadow IT” posed serious risks to data governance. Workspace Studio brings automation activity back under organisational control, allowing administrators to monitor, audit, and manage how AI interacts with corporate data.
How Workspace Studio Compares to Other Automation Tools
To understand where Workspace Studio fits, you need to see it in the context of the broader automation market dominated by Zapier, Make, n8n, and Zenphi.
The Cost and Security Advantage
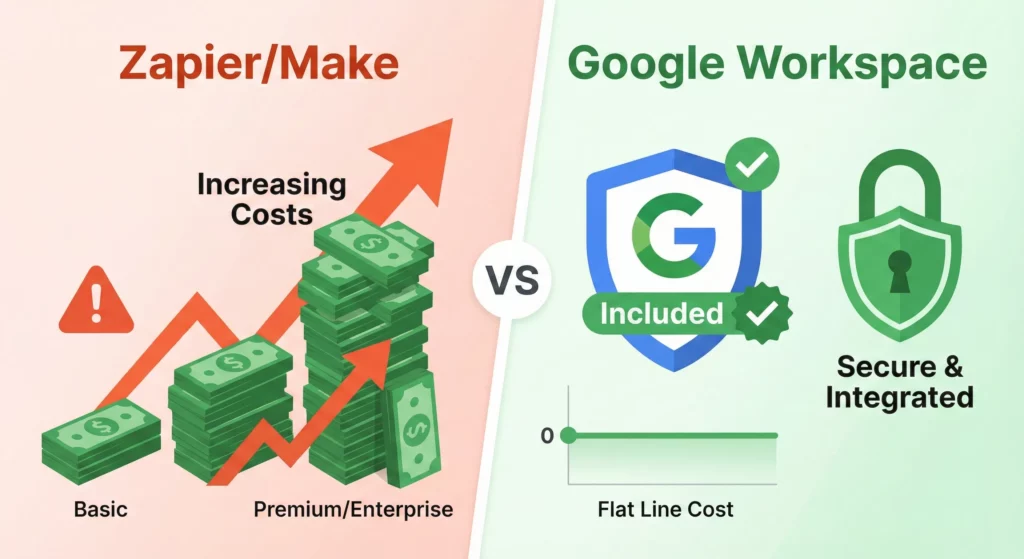
For existing Google Workspace Business and Enterprise customers, Workspace Studio is largely included in your subscription. Compare this to Zapier or Make, which charge by the task or operation. A company running 10,000 automations monthly could pay hundreds to Zapier – with Workspace Studio, this cost is absorbed into your seat licence (subject to daily limits).
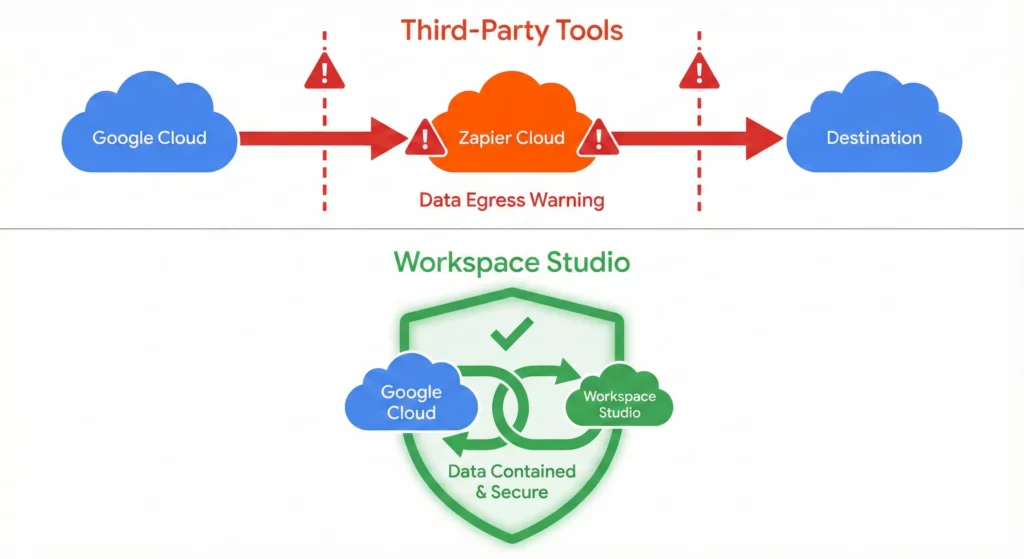
Third-party tools like Zapier require your data to leave the Google tenant. An email arrives in Gmail, gets sent to Zapier’s servers for processing, then action is taken. This data egress creates security vulnerabilities and compliance headaches (GDPR, HIPAA). Workspace Studio processes data within the Google compliance boundary; a massive advantage for regulated industries.
Competitor Comparison
Here’s how Workspace Studio compares to the main alternatives:
| Feature | Google Workspace Studio | n8n | Zenphi | Zapier |
|---|---|---|---|---|
| Primary User | Business Analyst / Generalist | Developer / Technical Ops | Enterprise Process Architect | SMB / Generalist |
| Architecture | SaaS (Google Cloud) | Self-Hosted or Cloud | SaaS (Google Cloud) | SaaS |
| Logic Model | Agentic (AI/Probabilistic) | Deterministic (Node-based) | Process-Oriented (BPMN) | Deterministic (Trigger-Action) |
| Data Sovereignty | High (Stays in Google) | Highest (Self-Hosted) | High (Google Native) | Low (Third-Party Processing) |
| Complexity Limit | Low (20 Steps, No Loops) | High (Infinite Complexity) | High (State Machines) | Medium (Multi-step Zaps) |
| Pricing | Included in Workspace* | Licensing / Free Community | Subscription | Usage-Based (Task count) |
n8n remains superior for complex, technical orchestration. If you need to transform massive JSON arrays, run Python scripts, or connect to on-premise SQL databases via VPN, n8n is the tool. Workspace Studio can’t match n8n’s flexibility or self-hosting capability.
Zenphi positions itself as a “Business Process Automation” tool rather than a “Task Automation” tool. It handles long-running state (like a document approval process taking three weeks and involving five people). Workspace Studio flows are transient, they run and finish. Zenphi also offers deeper admin governance features that Workspace Studio currently lacks.
Zapier remains the king of connectivity. With 6,000+ apps, if you need to connect to a niche marketing tool or specific project management software not supported by Google’s limited Marketplace, Zapier is still necessary.
Understanding the Limitations
Google is providing promotional access to higher usage limits of Workspace Studio to allow users to experiment with these features. However, usage may be subject to change to ensure consistent performance for all users.
The following are the limits as of early 2026:
Capacity and Quotas
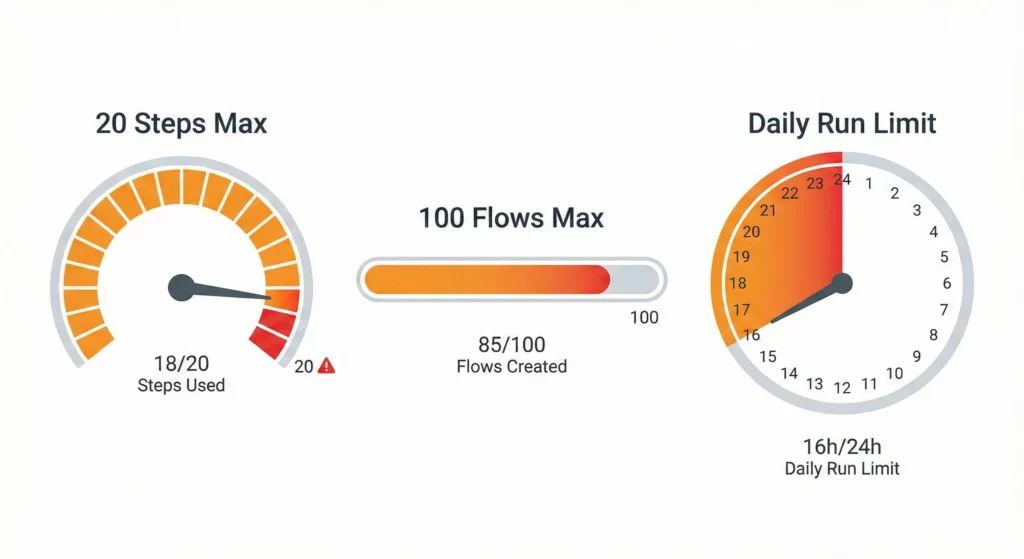
- The 20-Step Ceiling means a single flow cannot exceed 20 steps. This forces you to break complex processes into smaller, daisy-chained flows, which can make debugging difficult.
- Flow Creation Cap: You can create a maximum of 100 total flows per account, which includes both active and inactive (turned off) agents.
- Gmail Starter Restrictions: To manage high-frequency events, a maximum of 25 active flows can be triggered by Gmail starters at any one time.
- Daily Run Limit: There is a combined maximum number of times all of your flows can run within a 24-hour period. If this limit is reached, all active flows will stop running until the limit resets.
- Gemini Prompt Limits: When using AI steps like “Ask Gemini” or “Decide”, your total prompt must remain under approximately 144,000 characters (roughly 18,000 words). This limit is cumulative, meaning it includes your manual instructions, all content added via variables (such as a “Message Body”), and any linked content. If a flow attempts to process a very long email thread or a massive document that pushes the prompt over this ceiling, the run will fail with an error. To avoid this, consider using fewer variables or ensuring the source data is concise.
Performance
- Latency is real for AI steps. A
Decidestep involves an LLM inference call, which can take 2-5 seconds. Workspace Studio isn’t suitable for real-time, sub-second latency requirements.
Logic and Conditional Constraints
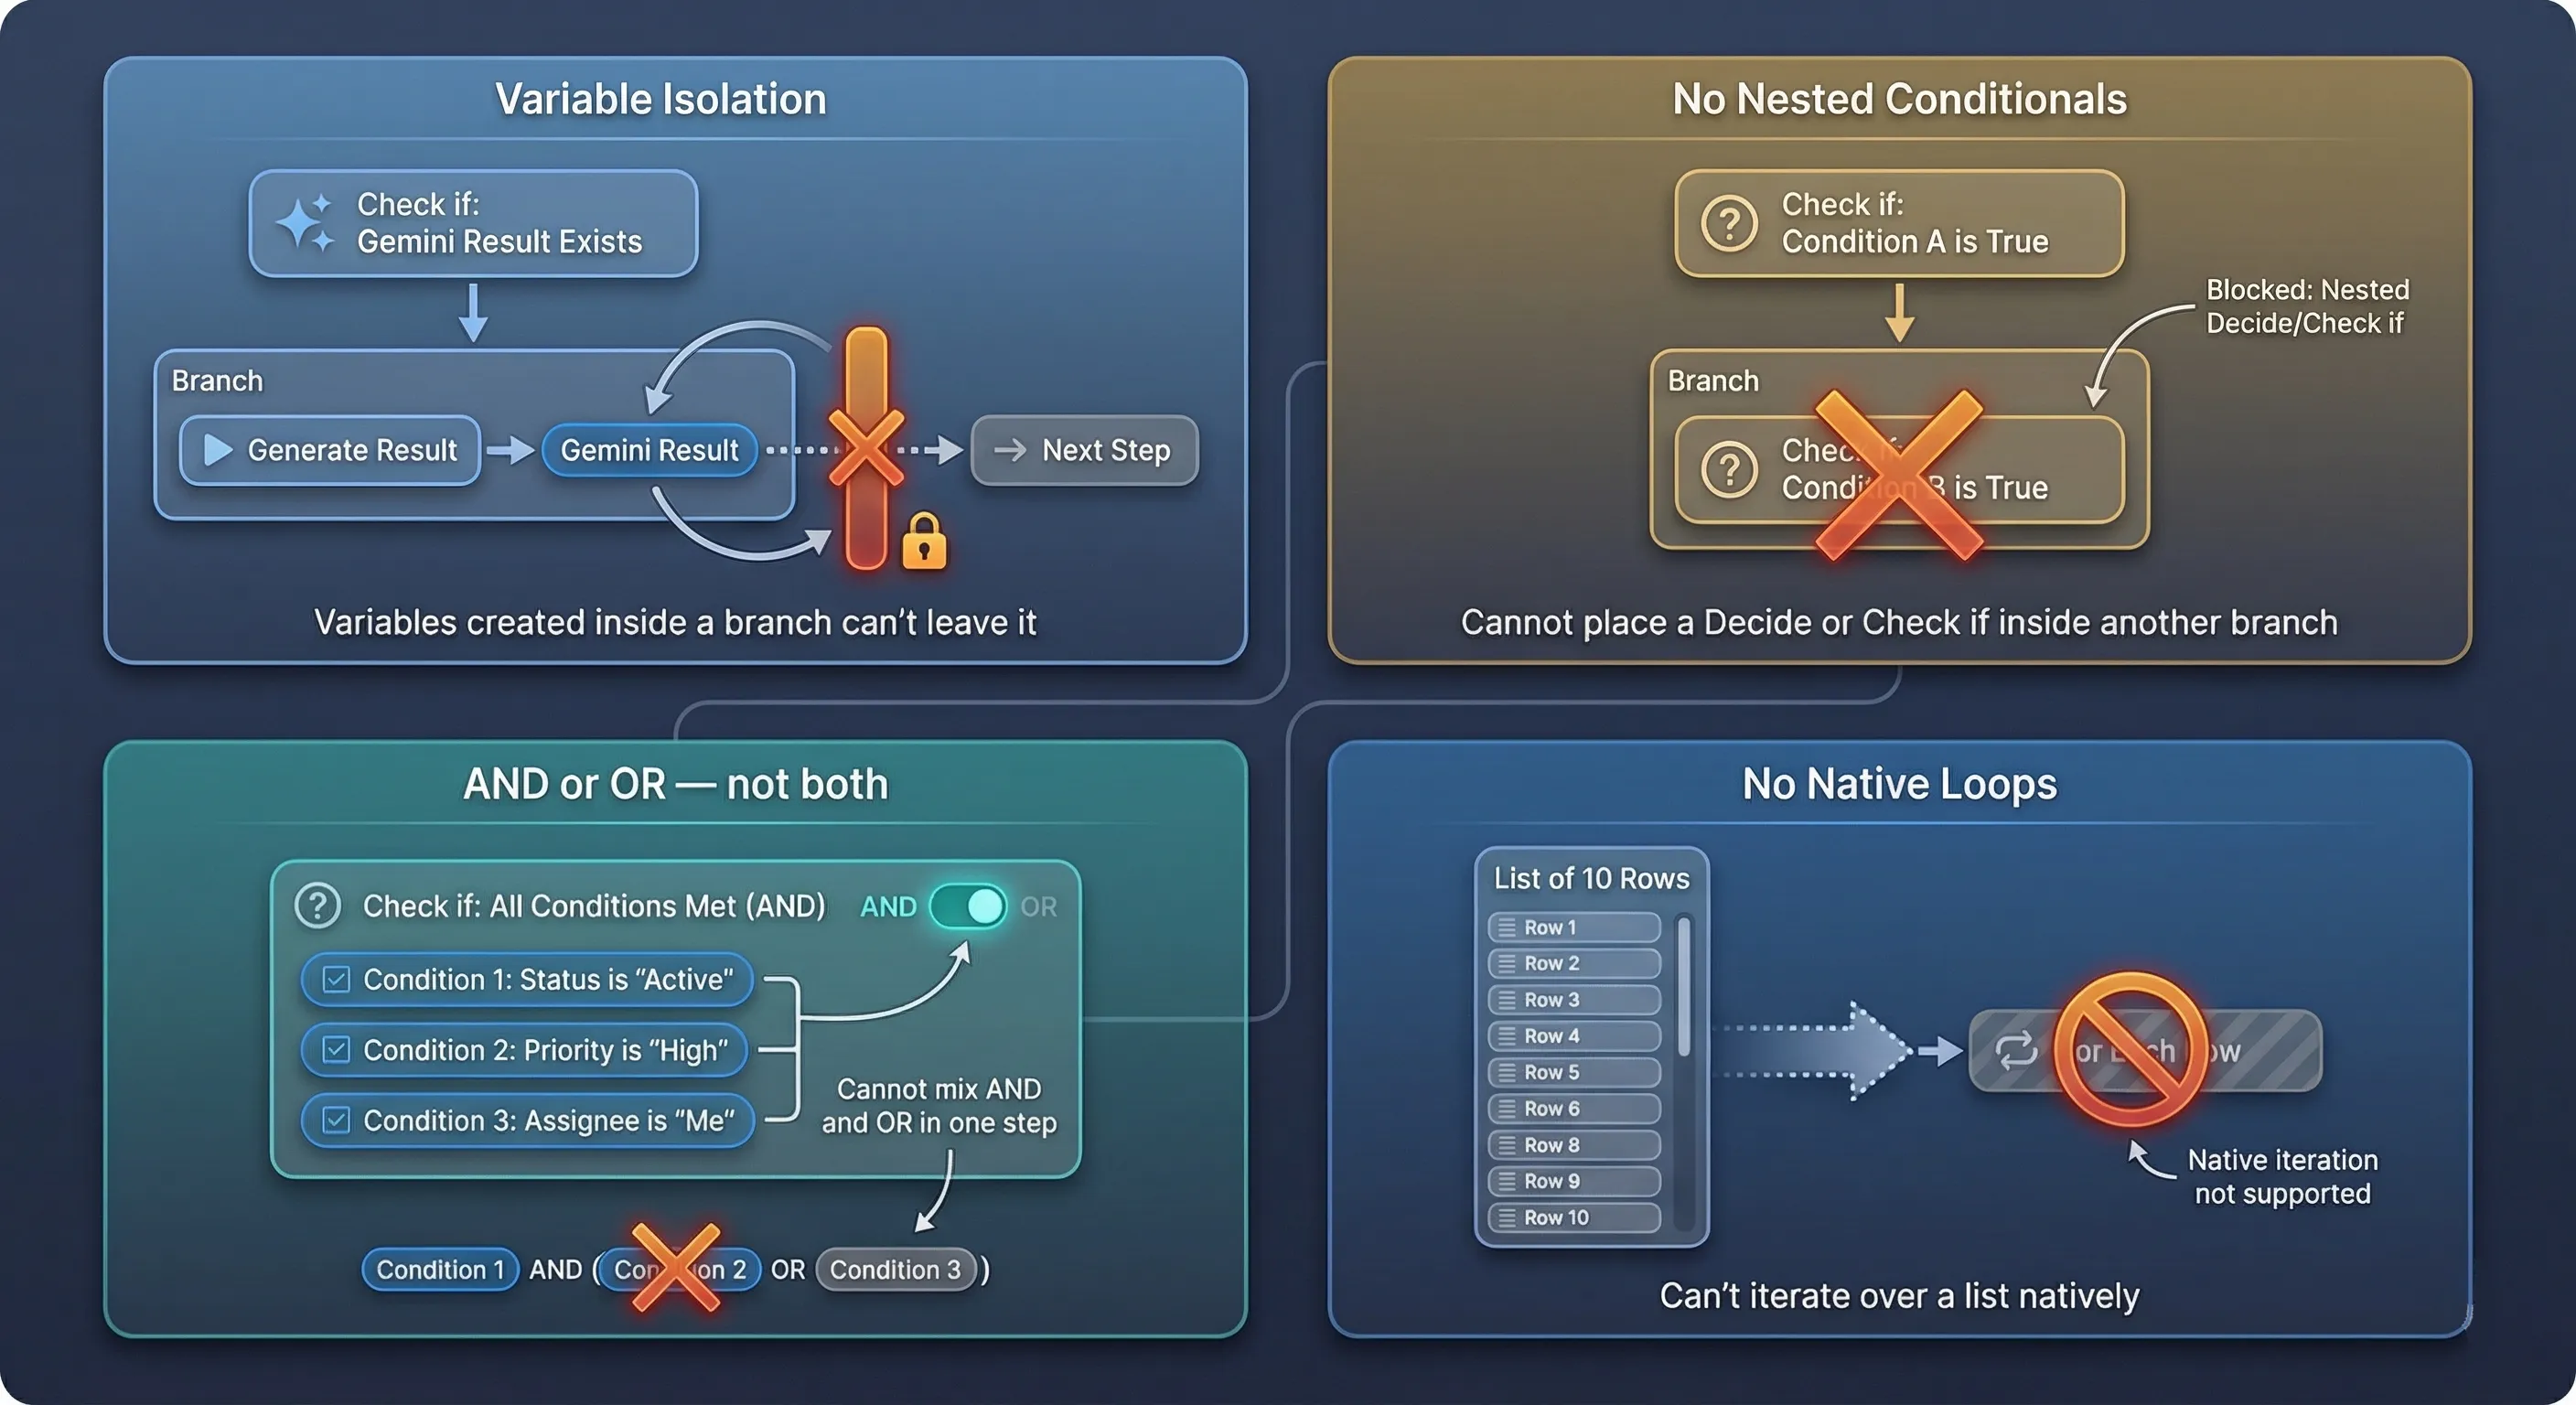
Workspace Studio’s linear design results in specific limitations for branching logic:
- Variable Isolation: You cannot use variables generated within a conditional substep (like an “Ask Gemini” result inside a “Check if” branch) in later steps of the main flow.
- No Nesting: Flows cannot have nested conditional steps. You cannot place a “Check if” or “Decide” step inside the substeps of another conditional block.
- Operator Uniformity: When setting multiple conditions in a “Check if” step, you must choose either AND or OR; you cannot mix these operators within a single step.
- No Native Loops means you can’t iterate over a list of items within a flow. If a sheet change provides 10 modified rows, the flow processes them as a batch or processes only the first one, depending on configuration. You can’t say “For Each Row, Send Email”; a significant limitation compared to Apps Script or n8n.
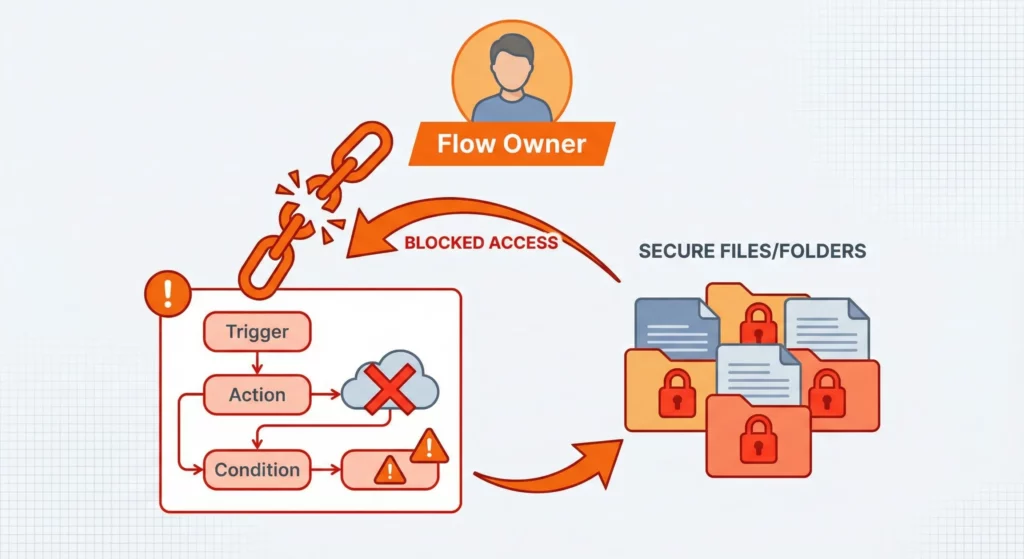
Identity and Context Limitations
- The User Context Problem means flows execute with the permissions of the flow owner. If the owner loses access to a shared folder, the flow fails. There’s currently no concept of a “System Flow” that runs with elevated, independent privileges. This links automation fragility to employee turnover.
- Approval Workflow Gaps are significant. The platform lacks a built-in “Wait for Approval” state. You can’t pause a flow for two days while a manager reviews a document. You must construct workarounds using two separate flows (Request Flow and Approval Response Flow), which is cumbersome compared to Zenphi’s native approval steps.
Security and Access Limitations
- Age Restrictions: Users under 18 on school accounts are strictly prohibited from using any AI features; AI steps will be automatically removed if a flow is shared with them.
- Device Requirements: You must use a computer with a supported web browser to create or edit flows. Workspace Studio is not available for flow creation on mobile devices.
- File Permissions: Flows may fail to update files if the file is shared with other people or groups; it is recommended to use files that only you can access for automated updates.
Users under 18 (in K-12 Education domains) are blocked from using AI features in Workspace Studio, significantly limiting education sector use cases.
Best Practices for Production Deployment
Governance and Security
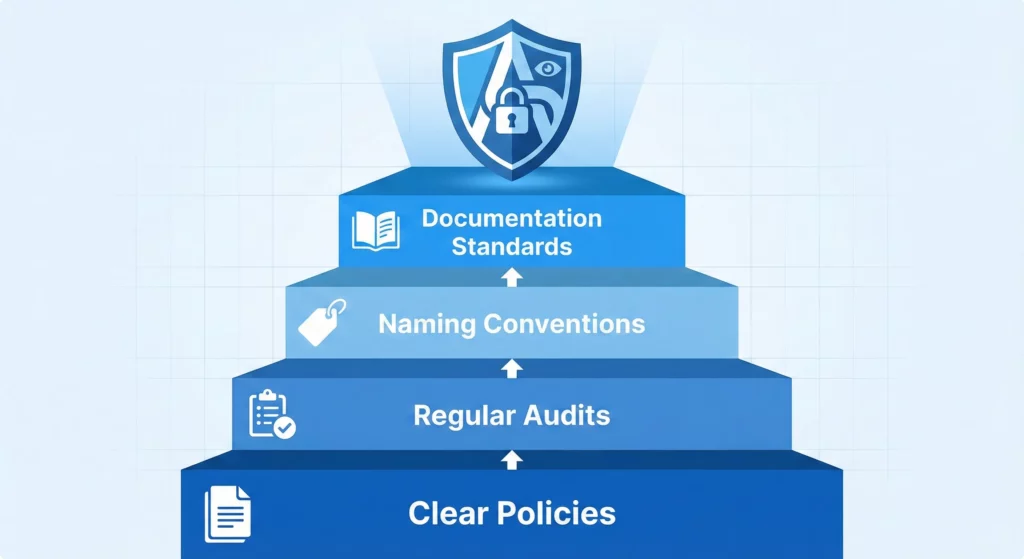
Administrators must actively manage the environment. This means:
- Setting clear policies on what types of automation are permitted
- Regularly auditing active flows to prevent data sprawl
- Establishing naming conventions for flows to make them discoverable
- Creating documentation standards so flows can be maintained when employees leave
Education and Training
Users need training not just on how to build flows, but when to use AI versus standard logic. Some decisions benefit from AI’s flexibility, while others require the predictability of deterministic rules.
Create internal champions who can help colleagues design flows effectively. The democratisation of automation doesn’t mean everyone should automate everything; it means the right people should automate the right things.
Strategic Positioning
Define where Workspace Studio fits in your broader automation stack. For simple, Google-native workflows with AI requirements, Studio is ideal. For complex, multi-system orchestration or long-running approval processes, you may need Zenphi or n8n alongside Studio.
Don’t force Workspace Studio into use cases where its limitations create more problems than it solves. The 20-step limit and lack of loops make certain workflows genuinely difficult.
Access and Setup
Supported Editions
Google Workspace Studio is available on the following editions:
- Google Workspace: Business Starter, Standard, and Plus; Enterprise Standard and Plus; Education Fundamentals, Standard, Plus, and the Teaching and Learning add-on
- Google AI: Google AI Pro for Education; Google AI Ultra for Business
Release Tracks (fully rolled out March 2026)
Google distributes new features through two tracks. Your organisation’s administrator chooses which track to use.
Rapid Release – Workspace Studio became available on this track from December 2025. Users on Rapid Release see new features as soon as they roll out from Google.
Scheduled Release – Workspace Studio became available on this track from February 2026. New features arrive at least one week after Rapid Release, giving organisations more time to prepare.
Workspace Studio is now fully rolled out on both tracks as of the second half of March 2026.
Administrative Setup
Before you can create your first flow, your Google Workspace Administrator must ensure several requirements are met in the Admin Console:
Workspace Studio is a core service and will be on or off by default based on your organization’s release track setting.
- To Turn On Workspace Studio:
- Navigate to
Main Menu > Apps > Google Workspace > Workspace Studio. - Click
Service status. - To turn a service on for everyone in your organisation, click
On for everyoneand then clickSave. - Alternatively, enable it for specific organisational units or groups.
- Enable Gemini Access:
- To use any AI-powered steps, such as “Ask Gemini” or “Recap,” your admin must explicitly enable Gemini on your account.
- Marketplace & Integration Setup:
- If you intend to use third-party connectors (like
SalesforceorJira), your admin may need to allow these integrations in theGoogle Workspace Marketplaceor install a required helper application for specific services. - Mandatory Gmail Settings:
- Even if the admin has enabled everything, your flows will fail to start if you have disabled smart features. You must go to your
Gmail Settings > Generaland ensure bothSmart featuresandGoogle Workspace smart featuresare toggledON. - Platform Restriction:
- You must use a computer with a supported web browser to create or edit flows; Workspace Studio is currently not available on mobile devices for the creation process.
Gemini Alpha Features
If your administrator wants access to experimental Gemini features beyond what’s available by default, they can enable the Gemini Alpha programme.
Important: The Alpha programme gives access to ALL experimental Gemini features, not just Workspace Studio. This means users will see other pre-release features that are still in development.
How your administrator can enable Alpha access:
As of April 2025, all Google Workspace customers can access Gemini alpha features without needing a specific add-on.
- Sign in to the
Google Admin consolewith an administrator account. - Navigate to
Menu > Generative AI > Gemini for Workspace(Note: This requiresGemini Settingsadmin privileges). - Click on the
Alpha Gemini featurespanel. - On the left, choose to enable access for specific
Users,Groups, orOrganisational units. - Click
Onand follow the prompts to confirm.
What to know about Alpha access:
- All-or-Nothing:
You cannot pick and choose which alpha features to enable, it’s all of them or none. - Data Security:
Alpha features follow the same data protection standards as core Google Workspace services. Your data is not used to train Google’s general AI models. - Feature Availability:
Some advanced steps (third-party connectors, webhooks, etc) may be in “Limited Preview” or temporarily unavailable as Google scales infrastructure.
Next Steps
If you’re ready to implement Google Workspace Studio, start with these immediate actions:
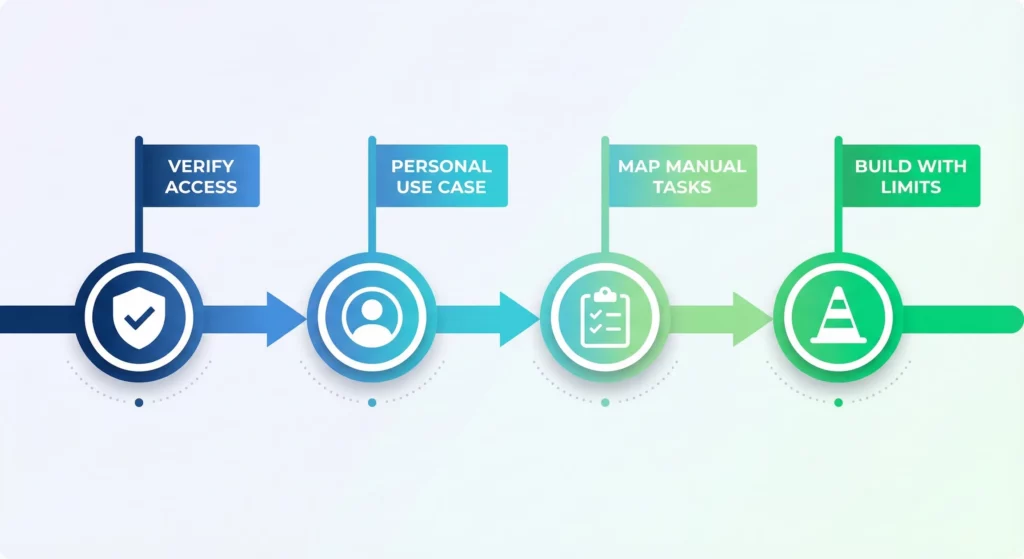
Verify your organisation has Workspace Studio enabled. Check with your Google Workspace Administrator whether the service is turned on for your Organisational Unit. If not, request activation.
Start with a personal use case. Don’t begin by automating critical business processes. Build a simple flow that solves your own problem; like the morning briefing agent or automated file organisation. This builds your understanding without risking business operations.
Map your most time-consuming manual tasks. Spend a day noting every time you manually move data between systems or perform repetitive categorisation. These are your highest-value automation targets.
Build with the limitations in mind. Design flows that stay within the 20-step limit. If you need more complexity, plan how you’ll chain multiple flows together. Accept that some workflows genuinely aren’t suitable for Workspace Studio yet.
Google Workspace Studio represents a significant capability, but it’s a tool that requires thoughtful implementation. Success comes from understanding both its strengths and its constraints, then applying it strategically where it genuinely improves productivity.
Conclusion
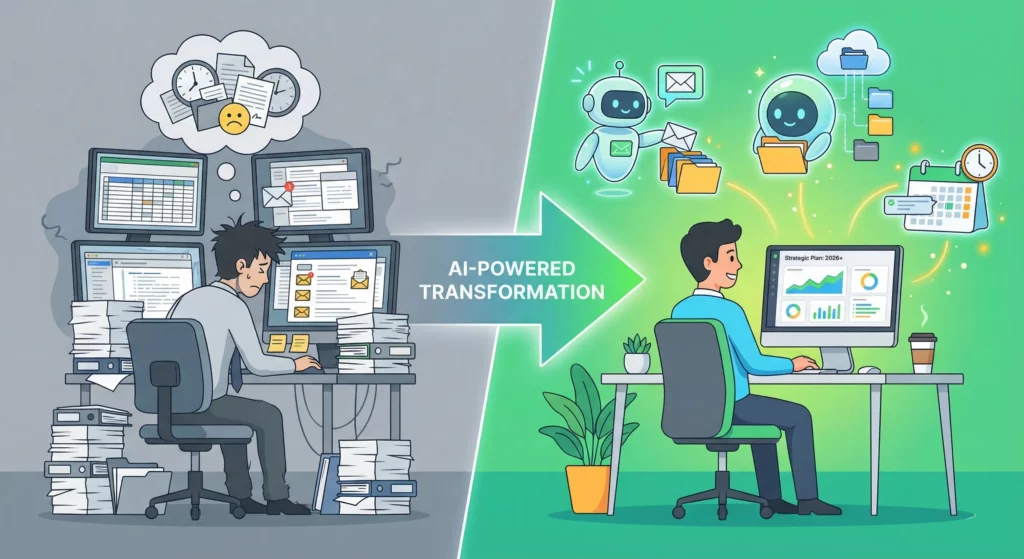
The release of Google Workspace Studio marks the moment when AI agents transitioned from theoretical concept to practical utility in everyday work. For organisations, it presents a genuine opportunity to reclaim lost productivity, the hours spent moving data from email to sheets, from Drive to Chat, can now be handled by Gemini.
But Workspace Studio isn’t a magic solution. It’s a tool that requires governance, education, and strategy. Administrators must manage the environment to prevent security risks. Users must understand when to use AI versus standard logic. Organisations must define where Studio fits alongside other automation tools in their stack.
As we move deeper into 2026, Google will likely address current limitations like loops and service accounts. But the capabilities available today are already sufficient to transform personal and team productivity. The question isn’t whether to use Workspace Studio; it’s how to use it strategically, with clear understanding of both its power and its constraints.
Frequently Asked Questions
Is Google Workspace Studio available on a free or personal Gmail account?
No. Studio requires a paid Google Workspace subscription. It is available on Business Starter, Standard, and Plus; Enterprise Standard and Plus; and Education editions. Free Gmail accounts (@gmail.com) and Google Workspace Individual plans are not supported. If you are unsure which plan your organisation is on, your Google Workspace Administrator can confirm this in the Admin Console.
I have a Workspace account but I cannot access Studio. What is wrong?
There are two common causes. First, your administrator may not have turned the service on. They need to navigate to Main Menu > Apps > Google Workspace > Workspace Studio and set it to active. Second, if you are signed into multiple Google accounts in the same browser, Studio may load under the wrong account. Creating a separate Chrome profile that is signed in only to your Workspace account is the most reliable workaround.
What does my administrator need to configure before flows will actually run?
Three things must be in place. Your administrator must enable Workspace Studio in the Admin Console, enable Gemini access for your account, and allow any third-party integrations your flows will use via the Google Workspace Marketplace. Beyond the admin setup, you also need to check your own Gmail settings: go to Settings > General and ensure both Smart features and Google Workspace smart features are toggled on. If these are off, email-triggered flows will fail silently, which is a common source of confusion.
Can flows automatically send emails, or do they only create drafts?
Currently, flows can only create email drafts, not send them automatically. This is the most frequently requested missing feature in the community. Google has confirmed that auto-sending is on the roadmap, but no release date has been given. In the meantime, you can build a flow that creates a draft and notifies you via Google Chat so you can review and send it manually.
Can Studio create Google Calendar events from emails?
Not yet. This is a notable gap, particularly because you can already create a Calendar event from a Gmail message manually using Gemini. Google has not confirmed a timeline for when this will be available in Studio flows.
Can flows read from or write to shared Google Drive files or Shared Drives?
No, and this is the most significant limitation for teams. Currently, Studio can only read from and write to files that are stored privately in your own Drive and are not shared with any other user. If a file has been shared, or if it uses the IMPORTRANGE function, the flow will return an error. The only workaround is to unshare the file, use it privately within the flow, and then reshare it separately. Google has confirmed this restriction will be lifted in a future update.
Can Gemini extract information from images or screenshots?
No. Studio cannot process images or screenshots as inputs. If you need to extract data from visual files, such as scanned invoices or photographed receipts, this is not currently possible within Studio. The platform works with text-based content from Gmail, Docs, Sheets, and Forms.
How many flows can I create, and how often can they run?
The key limits to be aware of are: a maximum of 100 flows per user (including inactive ones), no more than 25 active flows triggered by Gmail events, a maximum of 20 steps per flow, and monthly run caps that vary by plan. Business Standard plans receive approximately 400 flow runs per month, AI Expanded Access raises this to 2,000, and AI Ultra Access allows 10,000. There is also a daily run cap, though Google does not publish the exact number. If you hit your limit, flows stop executing until the next period. To stay within limits, make your starters more specific so flows only trigger when genuinely needed, and turn off flows you are not actively using.
Is Studio suitable for team-wide automation, or is it mainly for personal use?
Honestly, at this stage it is better suited to individual productivity than to shared team workflows. The monthly run limits are per user, not pooled across a team. Flows cannot write to shared Drive files. There are no service accounts, so a flow runs as you, not as a neutral system account. And the 25 Gmail-trigger limit can be reached quickly if one person is managing many automations. For straightforward personal tasks like inbox triage, morning briefings, or logging your own emails to a private sheet, Studio works well today. For organisation-wide processes, a dedicated tool like Zapier or Make is currently more reliable, though this balance may shift as Studio matures.
Why have “Ask a Gem” and “Post to a Space” disappeared from Studio?
These steps were available briefly after launch and were then disabled by Google. The most likely reason is infrastructure scaling during the initial rollout period. Google has confirmed in their official developer channels that both features will return, along with other temporarily disabled steps, over the coming weeks and months. If you had flows relying on these steps, they will not run until the features are reinstated.
When will third-party integrations like Salesforce, HubSpot, or Shopify be available?
Third-party connectors are not yet available to anyone, regardless of plan or admin configuration. Studio itself is fully rolled out, so if you have installed apps via the Google Workspace Marketplace and cannot see them in Studio, this is expected behaviour rather than a configuration error. Google has confirmed integrations are coming but has not given a specific timeline. The current expectation within the community is sometime in Q2 2026, though this is not an official commitment.
Can I build custom steps in Studio using Apps Script?
Not yet. Google has published a developer quickstart guide for building custom add-on steps, which has led some developers to attempt this already. However, the feature is not live, and following the guide will currently result in errors. Google has confirmed it will be enabled in a future release.
How does Studio compare to Zapier, Make, or n8n?
The most meaningful difference is cost and context. Studio is included in your existing Workspace subscription, requires no additional tools, and operates entirely within Google’s security and data protection framework. It also uses Gemini to interpret intent rather than requiring you to programme every condition explicitly, which makes it faster to set up for straightforward tasks.
The trade-off is breadth and flexibility. Zapier connects to over 7,000 apps, Make offers a powerful visual workflow builder with deep branching logic, and n8n can be self-hosted with no per-execution costs. Studio currently only connects to Google’s own apps, has a 20-step limit per flow, and has monthly run caps that can become restrictive at scale.
A practical way to think about it: if your workflow lives entirely within Google Workspace and involves 10 steps or fewer, Studio is likely the right tool. If you need to connect to non-Google services, handle complex conditional logic, or run hundreds of automations per day, a dedicated platform like Zapier or Make will serve you better for now.