Google Analytics 4 Ecommerce tracking isn’t about collecting data for the sake of having numbers in reports. It’s about understanding the specific behaviours that create revenue so you can identify exactly where you’re losing money and what’s working well.
Most businesses can see their total traffic and final revenue, but they’re completely blind to what happens in between. They don’t know which products people view but never buy, whether customers abandon at shipping or payment, or which traffic sources bring browsers versus buyers. This guide shows you how to implement comprehensive ecommerce tracking in Google Analytics 4 (GA4) that illuminates these critical decision points.
Table of Contents
Why Ecommerce Tracking Matters for Your Business
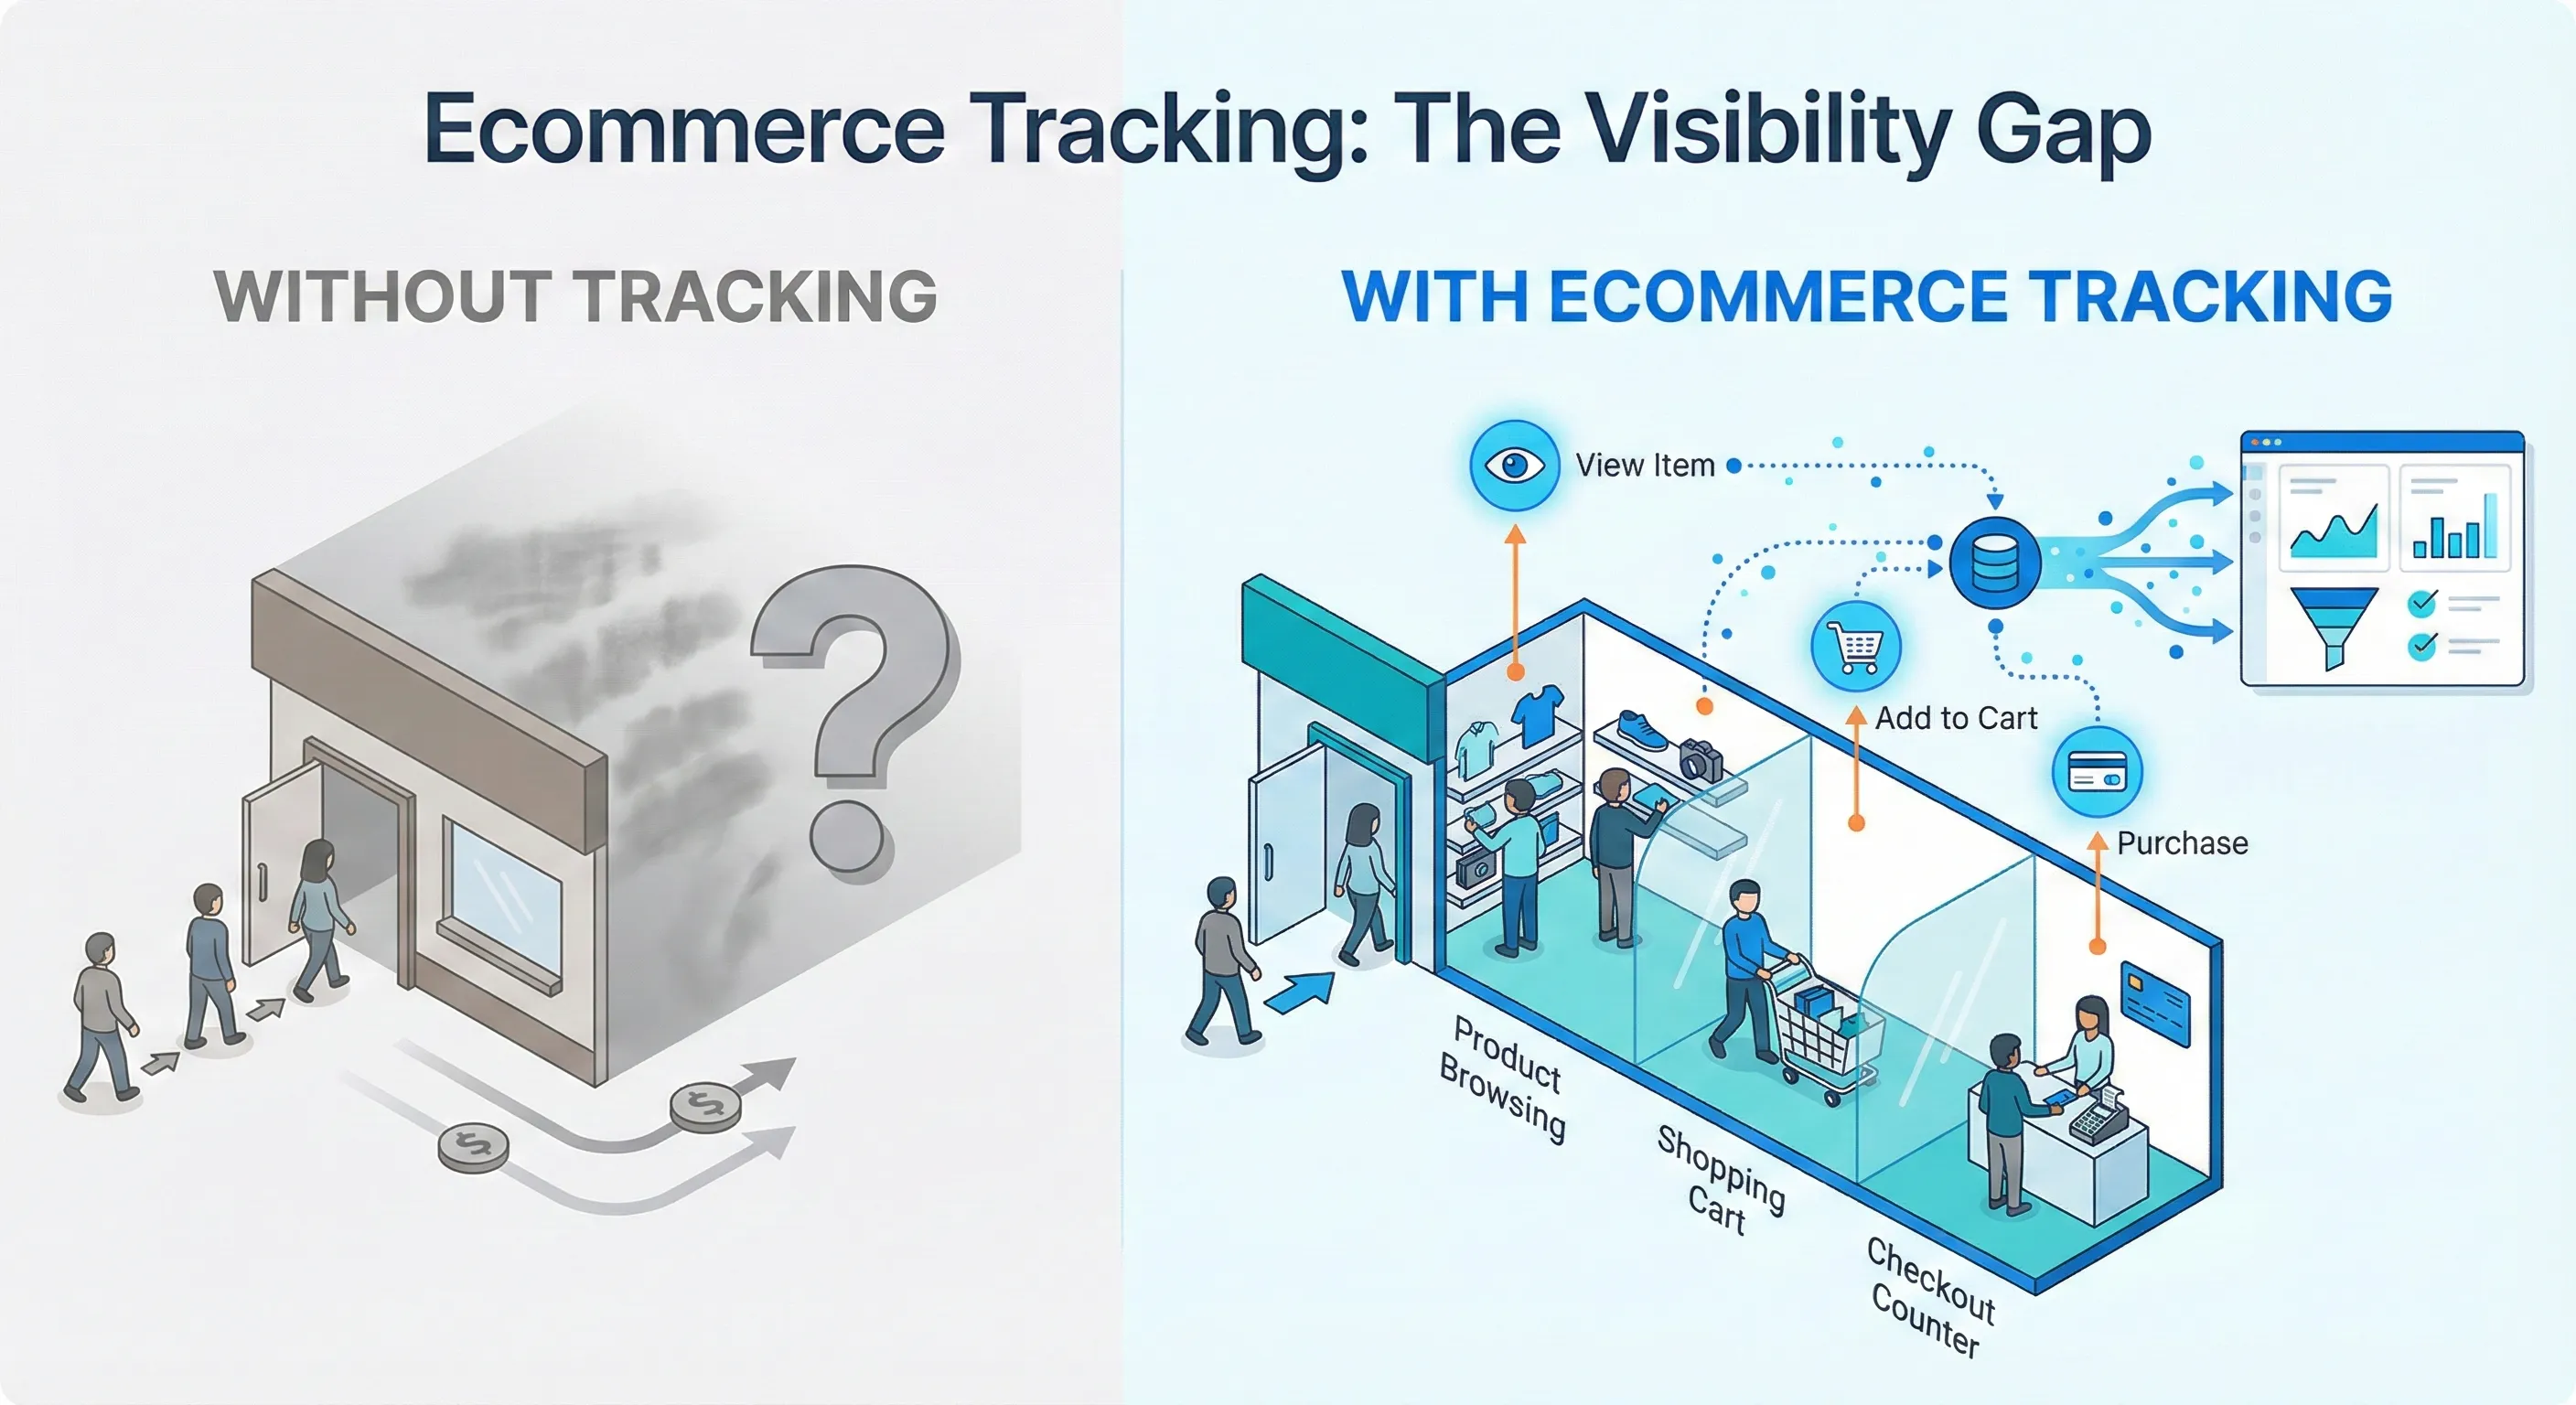
The gap between having analytics installed and actually understanding your customer journey is massive. You might see that 10,000 people visited your site and you made $15,000 in sales, but that tells you almost nothing about how to improve performance.
Ecommerce tracking captures the specific behaviours that lead to purchases. When someone views a product, adds it to their cart, begins checkout, or completes a purchase, each action reveals something about their decision-making process and your site’s effectiveness.
The Questions Proper Tracking Answers
With complete ecommerce tracking, you can answer questions that directly impact revenue:
- Which products get viewed frequently but rarely added to cart?
- This could indicate problems with pricing, descriptions, or images that you can fix immediately.
- Where do people abandon the checkout process?
- If users start checkout but don’t complete payment, you know there could be friction in your checkout flow, not a traffic quality problem.
- Which traffic sources bring people who actually buy?
- You might discover that Instagram drives high traffic but low purchases, while email subscribers convert at 8% versus social ads at 1%.
- How do different customer segments behave?
- Mobile users might browse extensively but purchase on desktop, suggesting you need to improve mobile checkout rather than mobile product pages.
These aren’t theoretical questions. They’re the specific insights that let you stop guessing and start knowing where to focus your optimisation efforts.
The Reports This Implementation Populates
The tracking you’ll implement powers four critical GA4 reports:
Monetization Overview shows your revenue trends, top-selling items, and overall ecommerce performance. This is your high-level revenue dashboard.
Ecommerce Purchases provides granular product analysis. You can see items viewed, items added to cart, and items purchased side by side for each product, instantly identifying conversion gaps.
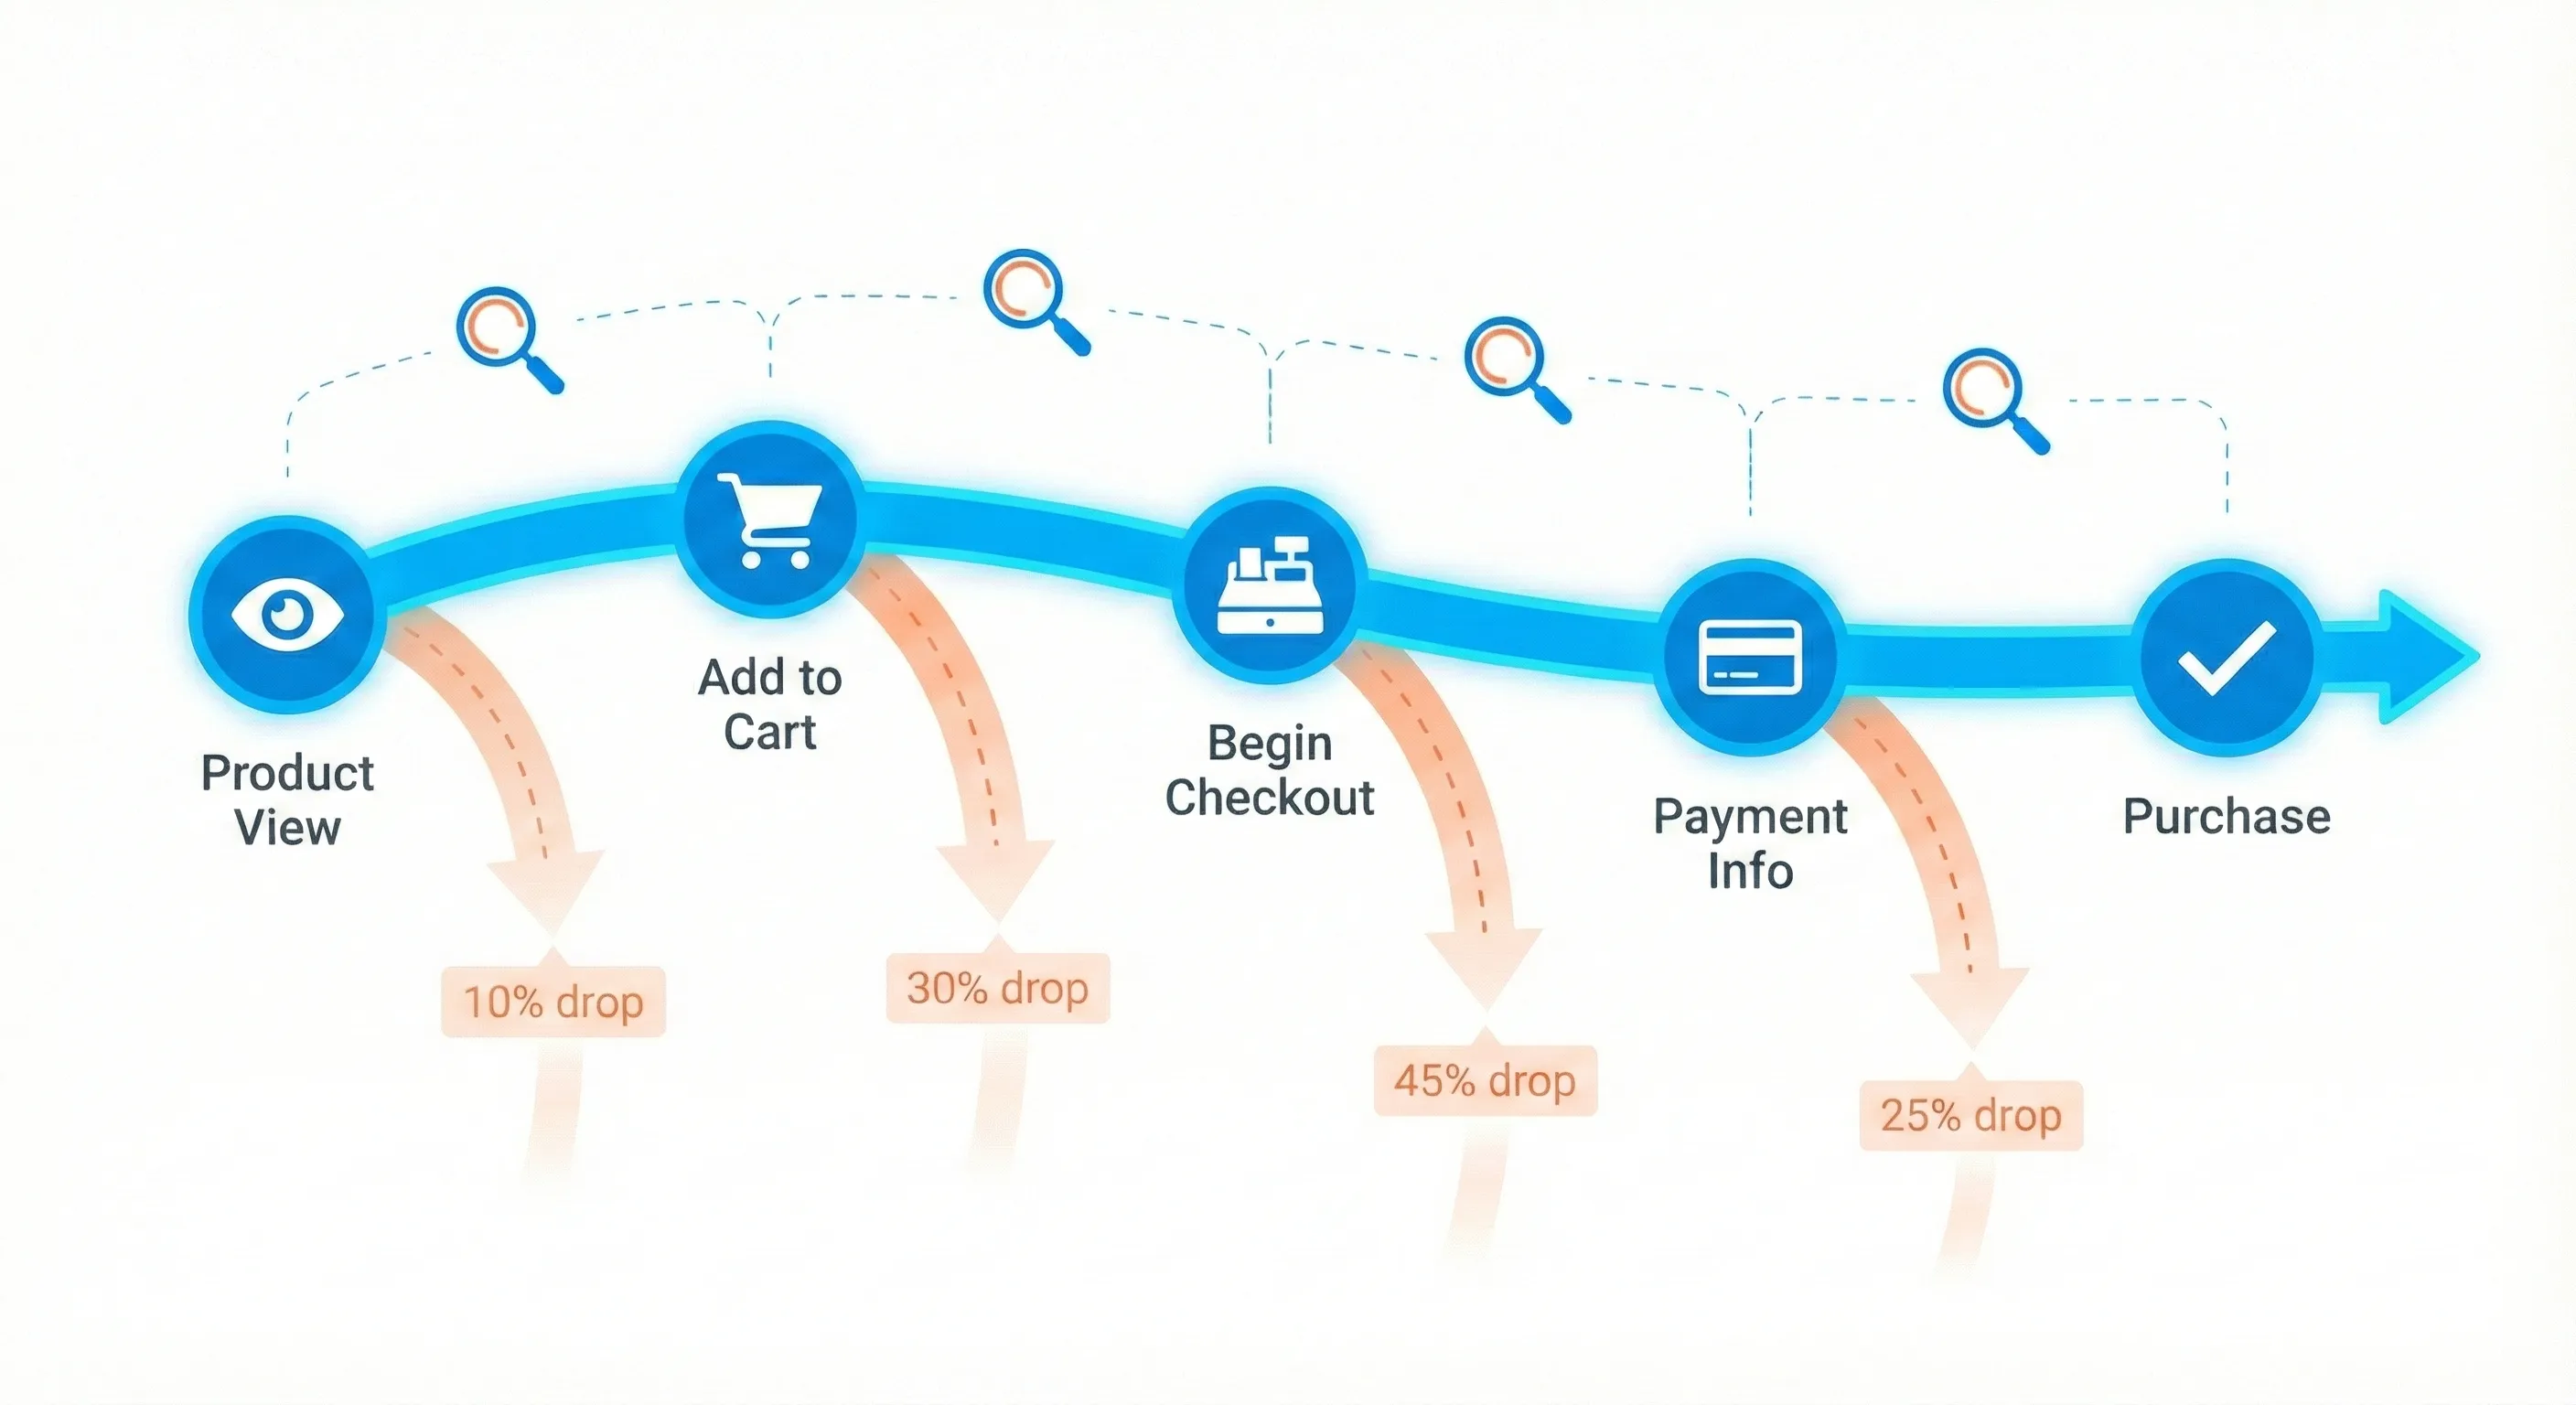
Purchase Journey visualises the complete funnel from session start through product view, add to cart, begin checkout, and purchase. Steep drop-offs between stages tell you exactly where to investigate.
Checkout Journey zooms into the final conversion steps, tracking begin checkout through add shipping, add payment, and purchase. This reveals which specific checkout obstacles prevent completed sales.
Before You Begin: Required Foundation
This guide assumes three critical elements are already in place. Without them, the implementation won’t work.
The Data Layer Must Already Exist
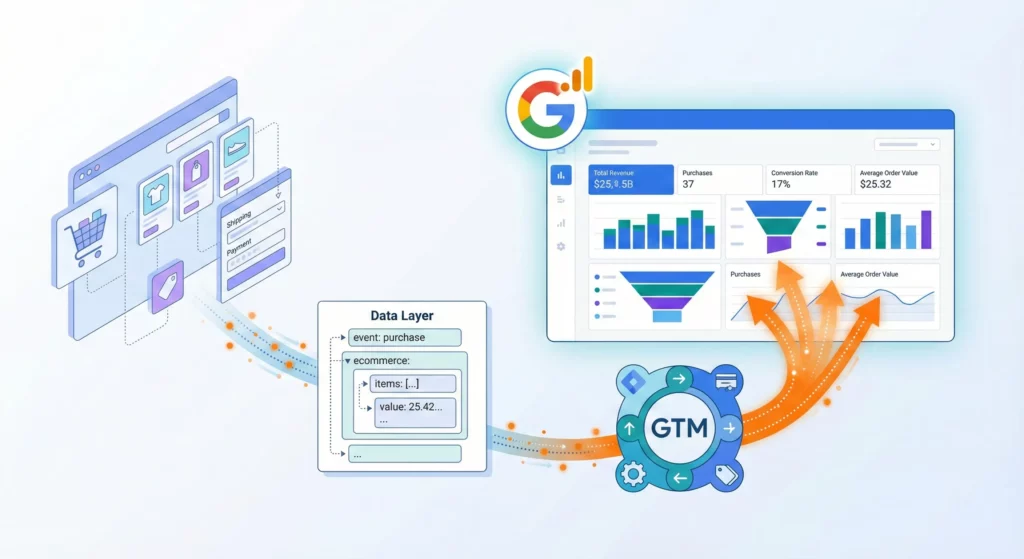
Your website needs a properly implemented GA4-schema ecommerce Data Layer. This is the structured communication protocol that tells your tracking tools exactly what’s happening on your site.
Think of your website as a busy restaurant kitchen. Complex processes happen continuously, but it’s chaotic. Your analytics platforms are like accountants in the back office who need precise transaction records.
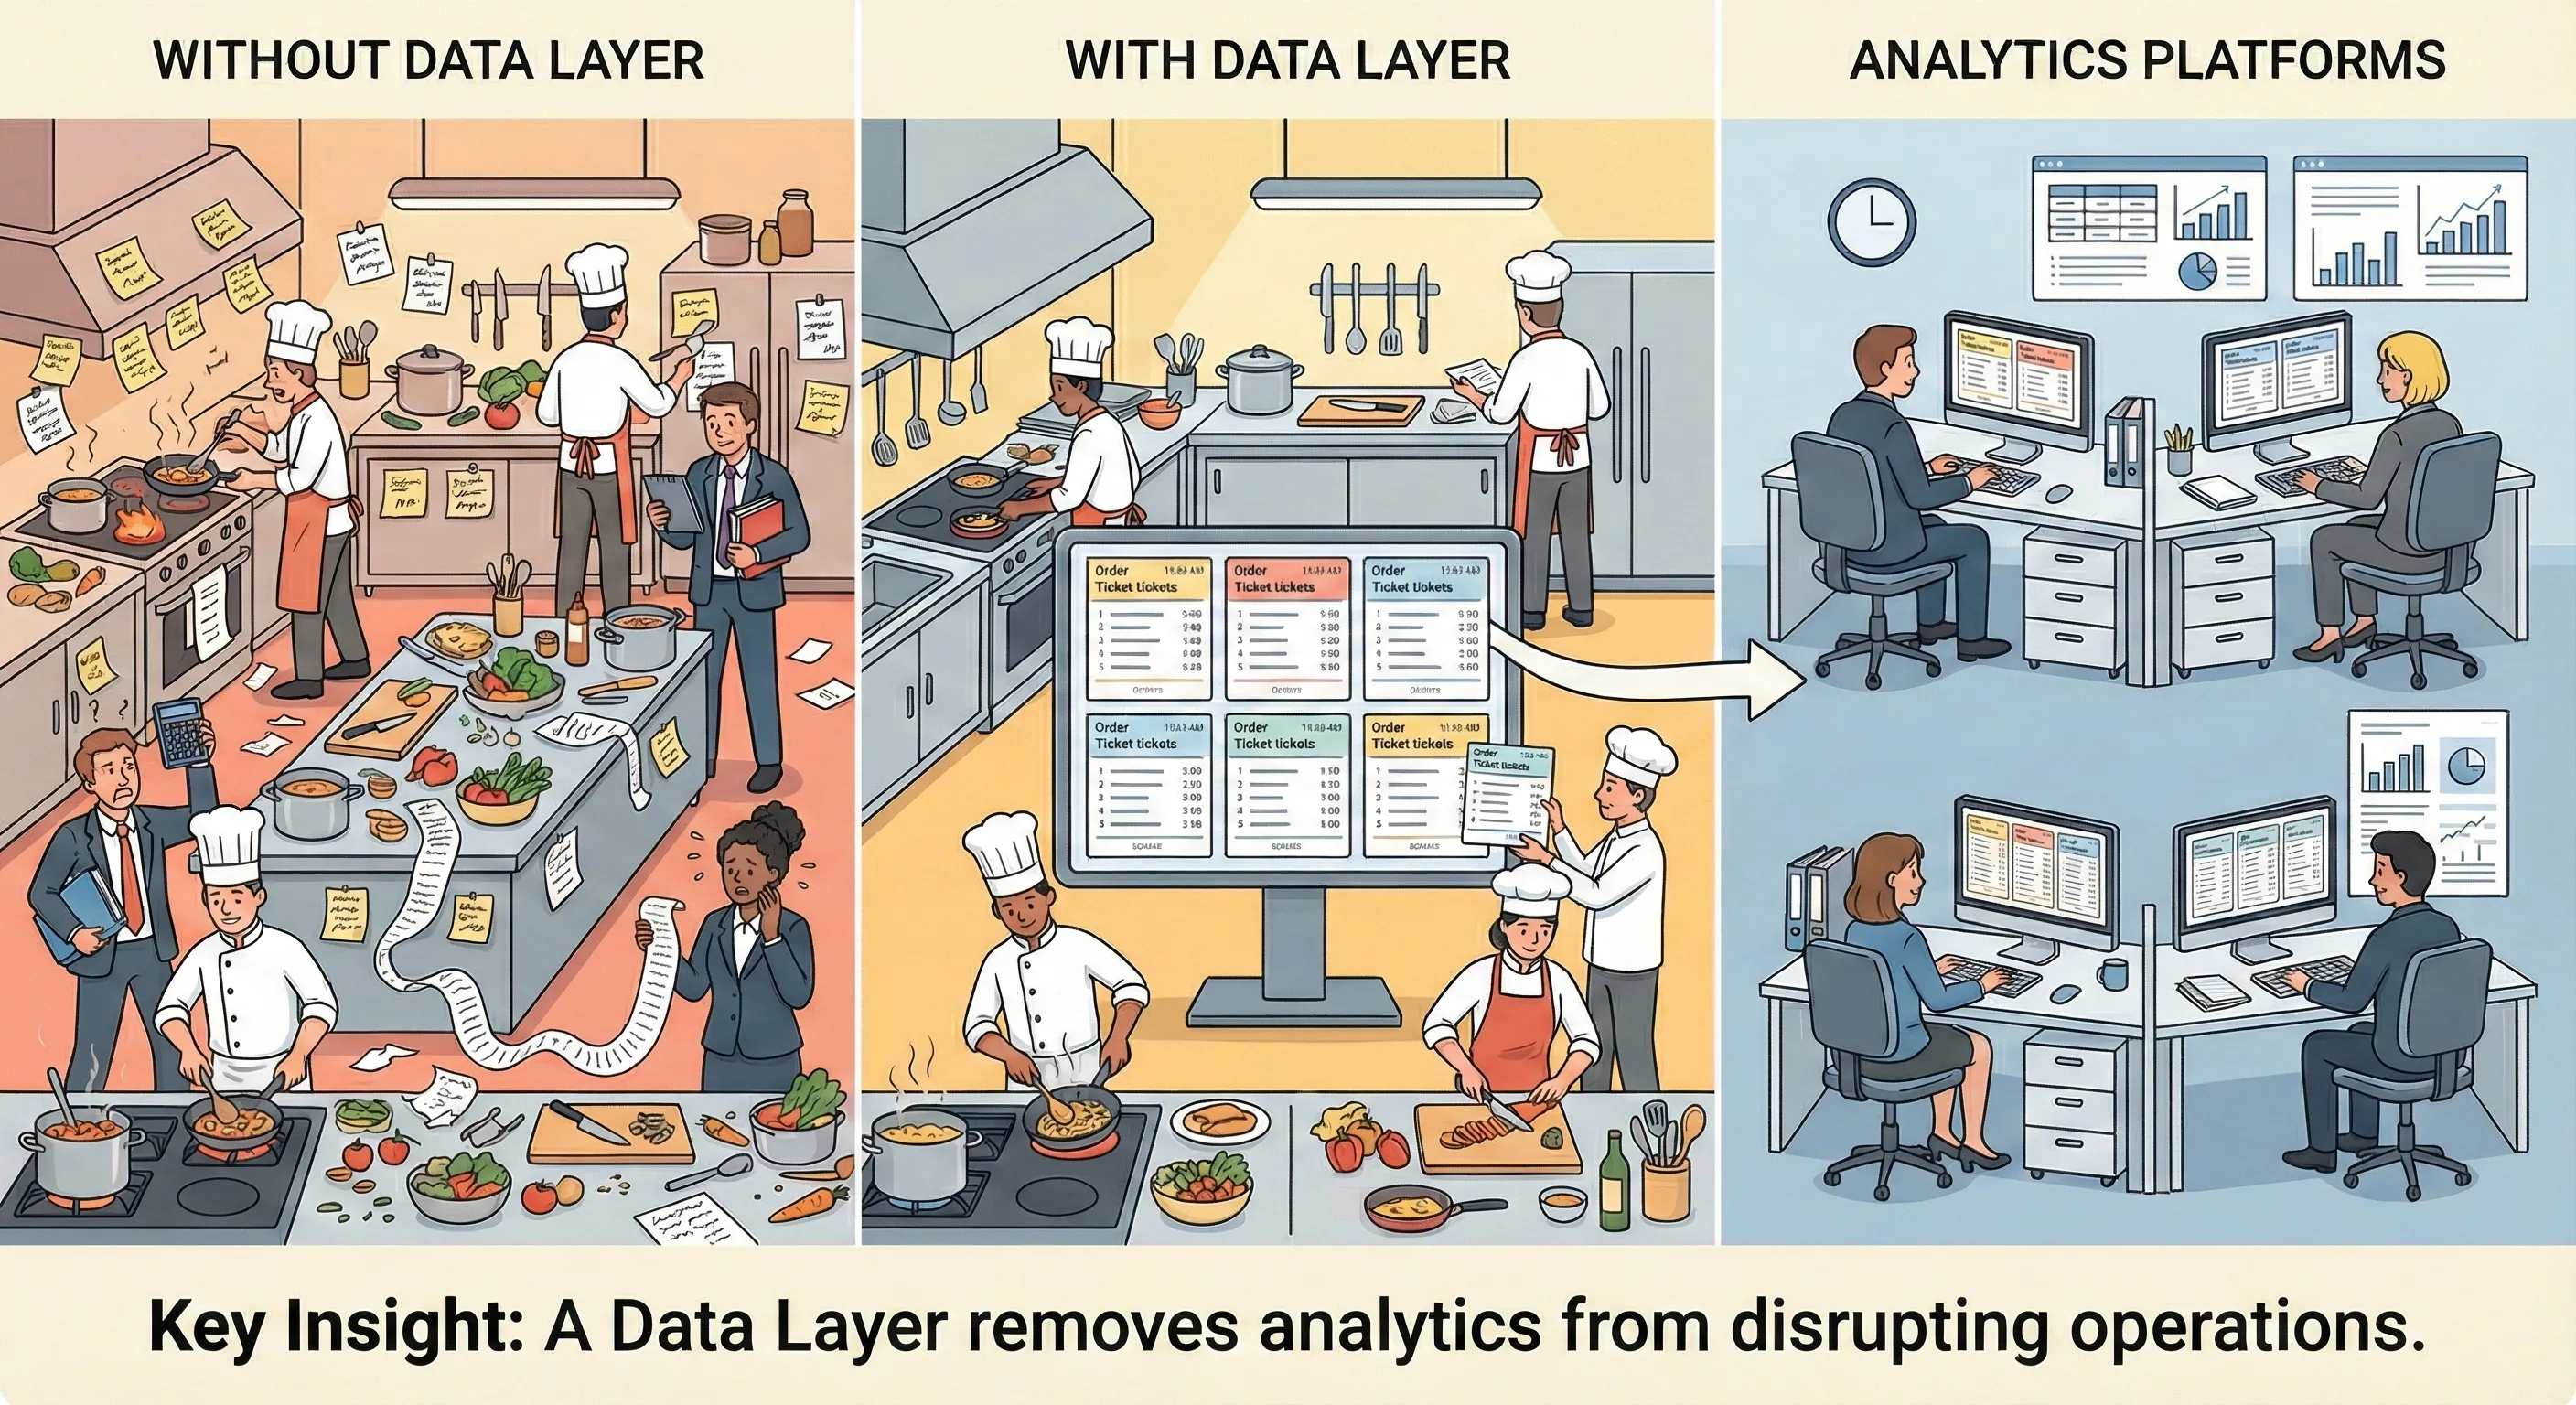
The Data Layer establishes a standardised process. For every important event (viewing a product, adding to cart, completing purchase), your website code places a clear, structured ticket on a central communication hub with all the relevant details.

The method we’re using in this guide (the “Send Ecommerce data” feature in GTM) relies entirely on reading this standardised structure. If the Data Layer is missing, malformed, or uses non-standard variable names, the tracking will fail.
This Data Layer implementation is a development task, not something you configure in GTM. If you don’t have this yet, you’ll need a developer or a platform-specific plugin to create it before proceeding with this guide.
Google Tag Manager Must Be Installed
GTM is the deployment system that monitors your Data Layer and routes information to GA4. It’s the infrastructure layer between your website and your analytics.
You need GTM installed on every page of your site. If you don’t have this yet, see our guide on How to Install Google Tag Manager.
The Base GA4 Configuration Must Be Active
You need your base GA4 Google Tag (the Configuration Tag) already installed and firing on all pages. This tag establishes the connection to your GA4 property and handles basic metrics like page views.
The ecommerce tracking we’re building rides on top of this configuration. If you haven’t installed your base GA4 tag yet, see our guide on Installing GA4 Through Google Tag Manager.
Understanding the Implementation Method
Traditional ecommerce tracking required creating dozens of individual tags in GTM: one for view product, one for add to cart, one for purchase, and so on. Each tag needed meticulous configuration of variables for product ID, name, price, brand, category, and variant.
This approach was brittle and hard to maintain. A website code change could break one tag while leaving others functional, leading to data discrepancies that were difficult to diagnose.
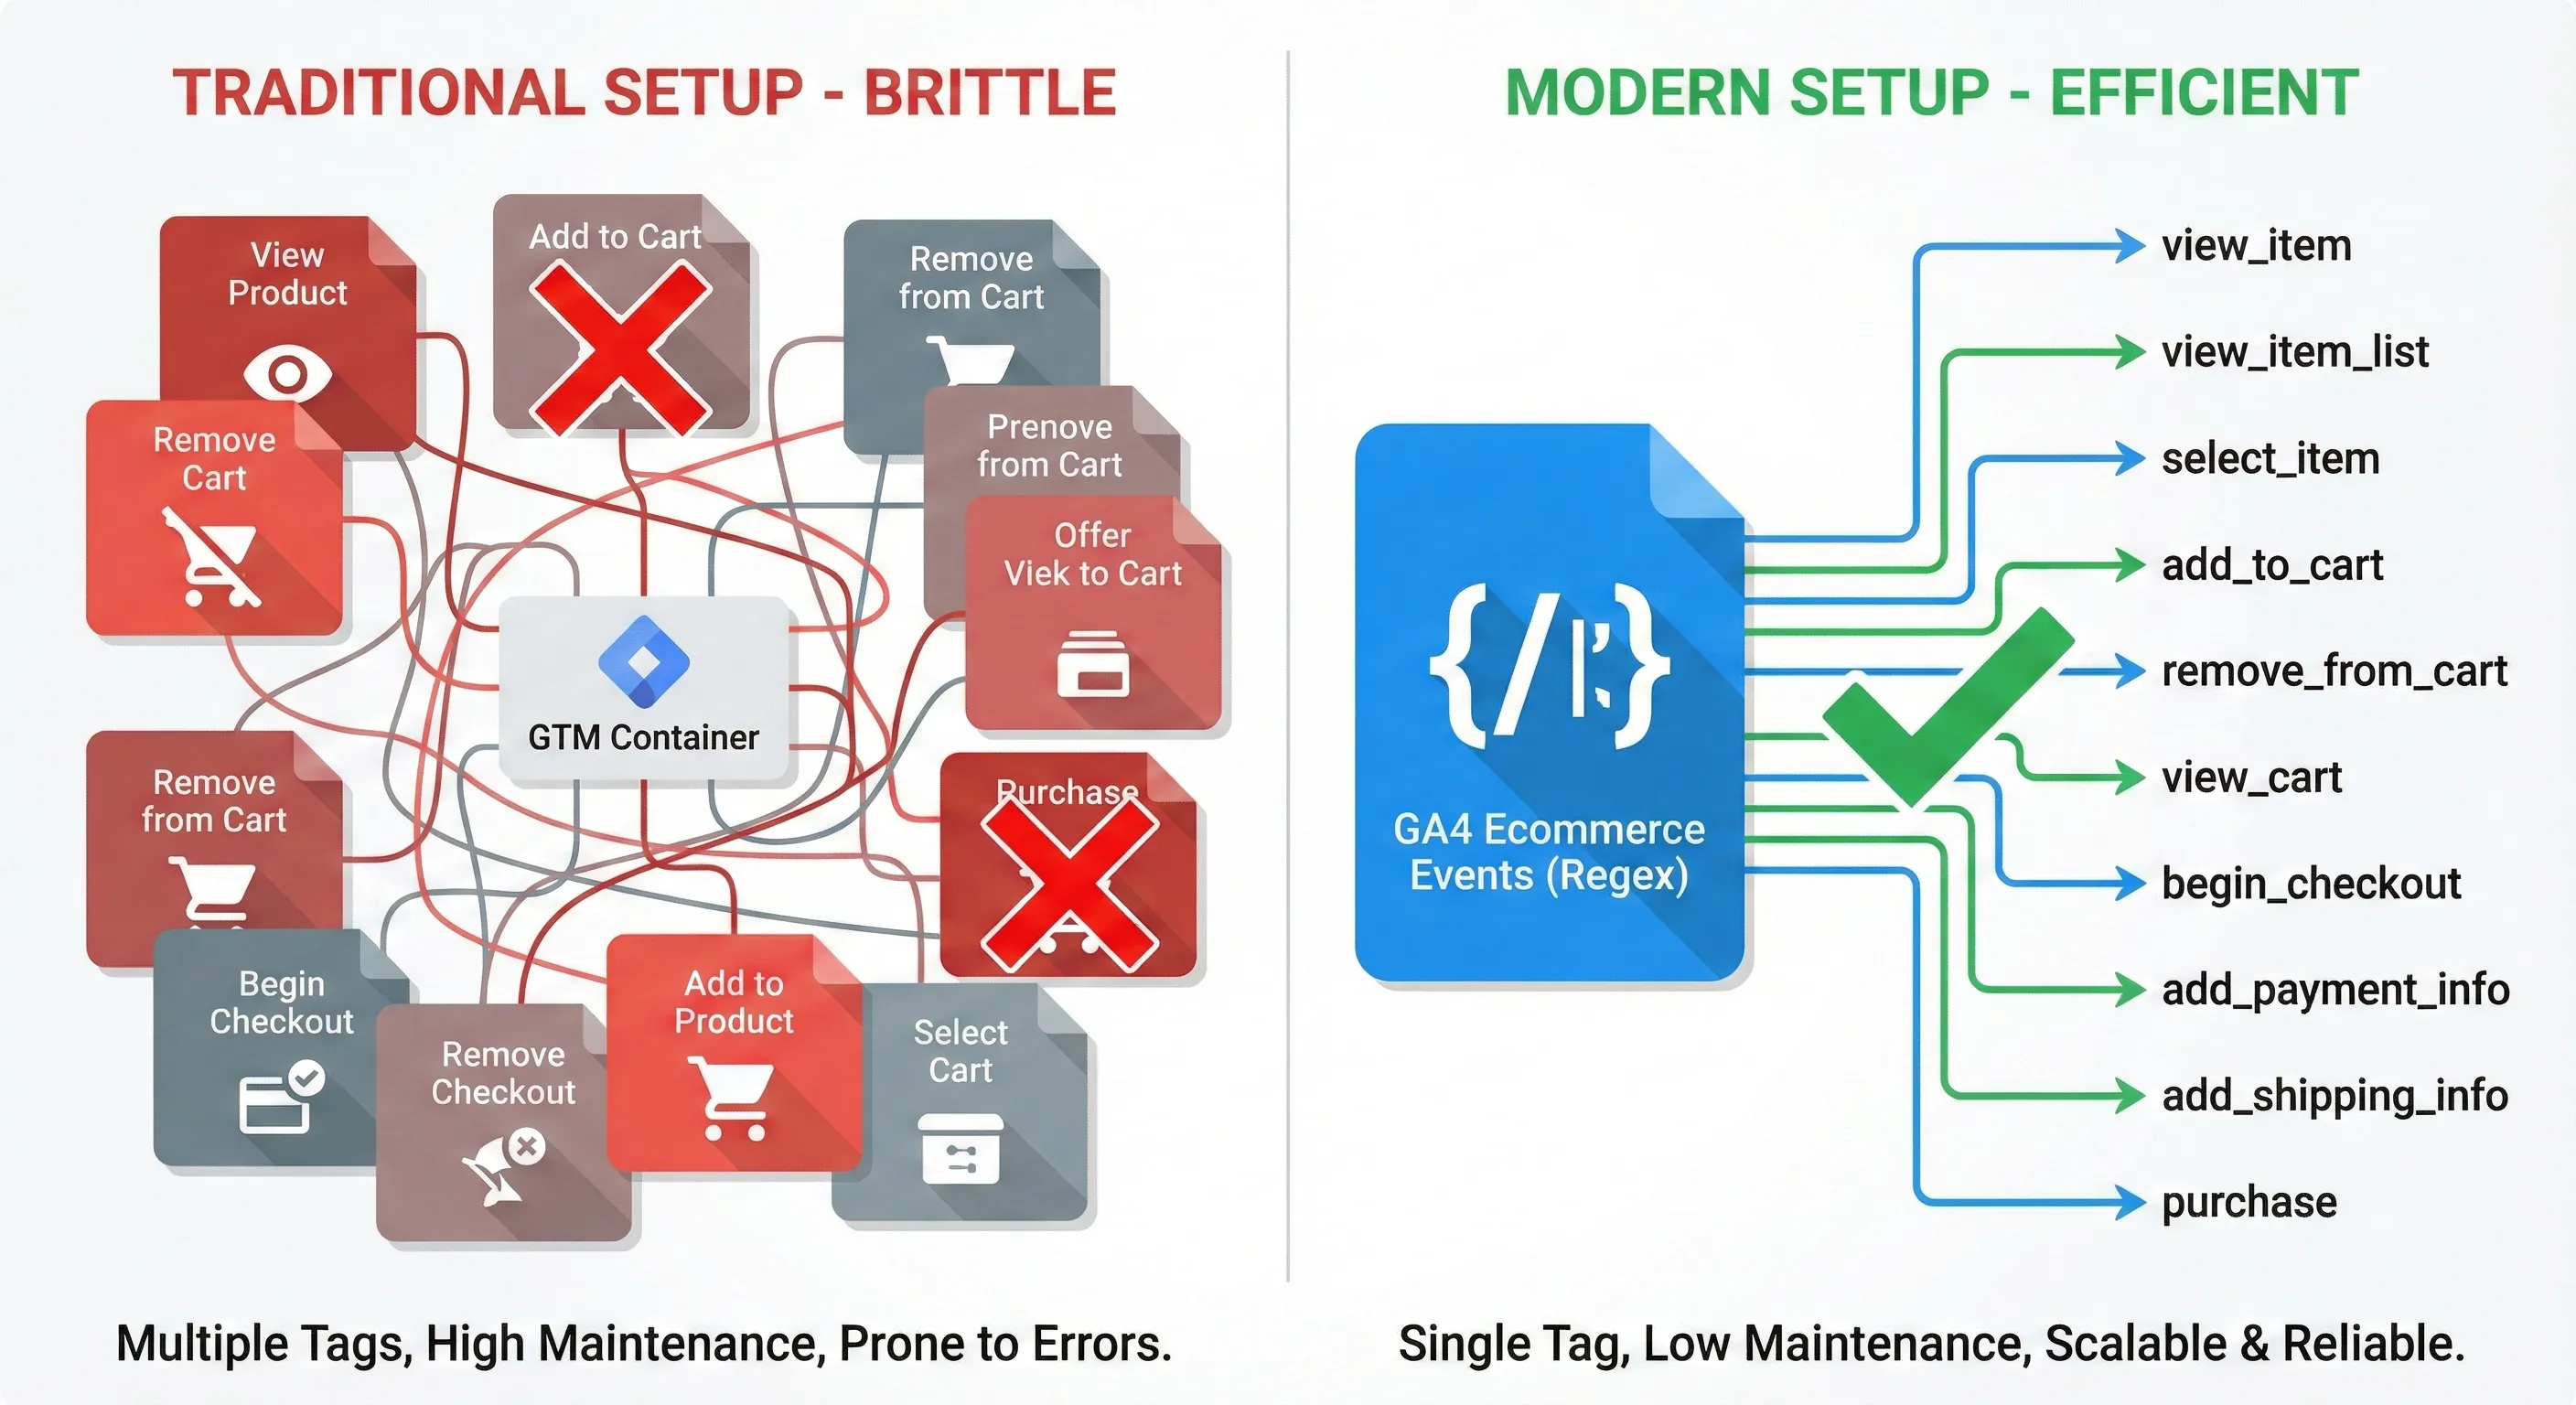
The modern method uses a single tag with a regex trigger combined with the “Send Ecommerce data” feature. This approach monitors your Data Layer for any ecommerce event, then automatically extracts and sends all relevant product data to GA4.
The advantage is dramatic: instead of maintaining dozens of tags with hundreds of individual variable configurations, you maintain one tag that handles every ecommerce event automatically. When your Data Layer structure is correct, the data sent to GA4 will be accurate.
Step 1: Create the Master Trigger Using Regex
We’ll create a single trigger that listens for all ecommerce events using Regular Expressions (regex). This is far more efficient than creating ten separate triggers for ten different events.
Creating the Trigger
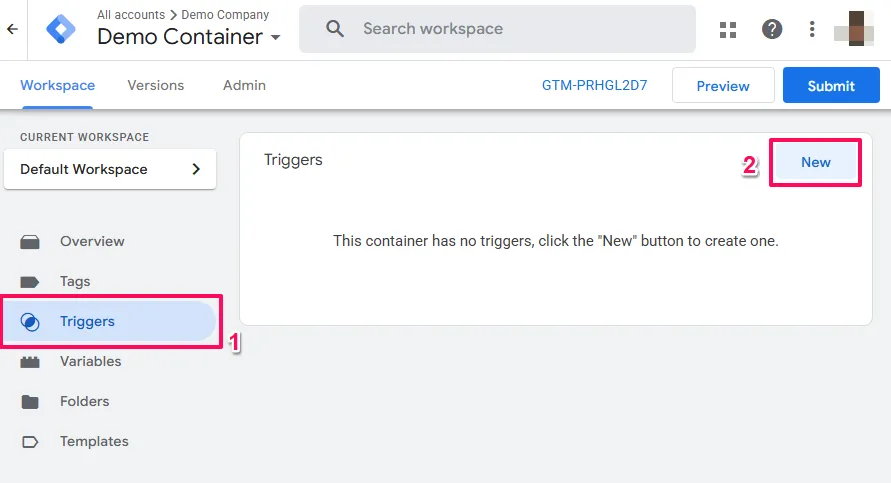
Log into your GTM container and navigate to Triggers in the left sidebar. Click New to create a new trigger.
Name it distinctively to indicate its function. Use: CE - GA4 Ecommerce Events
The “CE” prefix stands for Custom Event, which helps keep your workspace organised when you have many triggers.
Click into the Trigger Configuration area and select Custom Event as the trigger type.

Configuring Regex Matching
This is the critical step that differentiates an efficient setup from a cluttered one.
Locate the checkbox labelled Use Regex Matching next to the Event Name field and check it. This tells GTM to treat the text you enter as a pattern rather than a literal string.
In the Event Name field, paste this pattern:
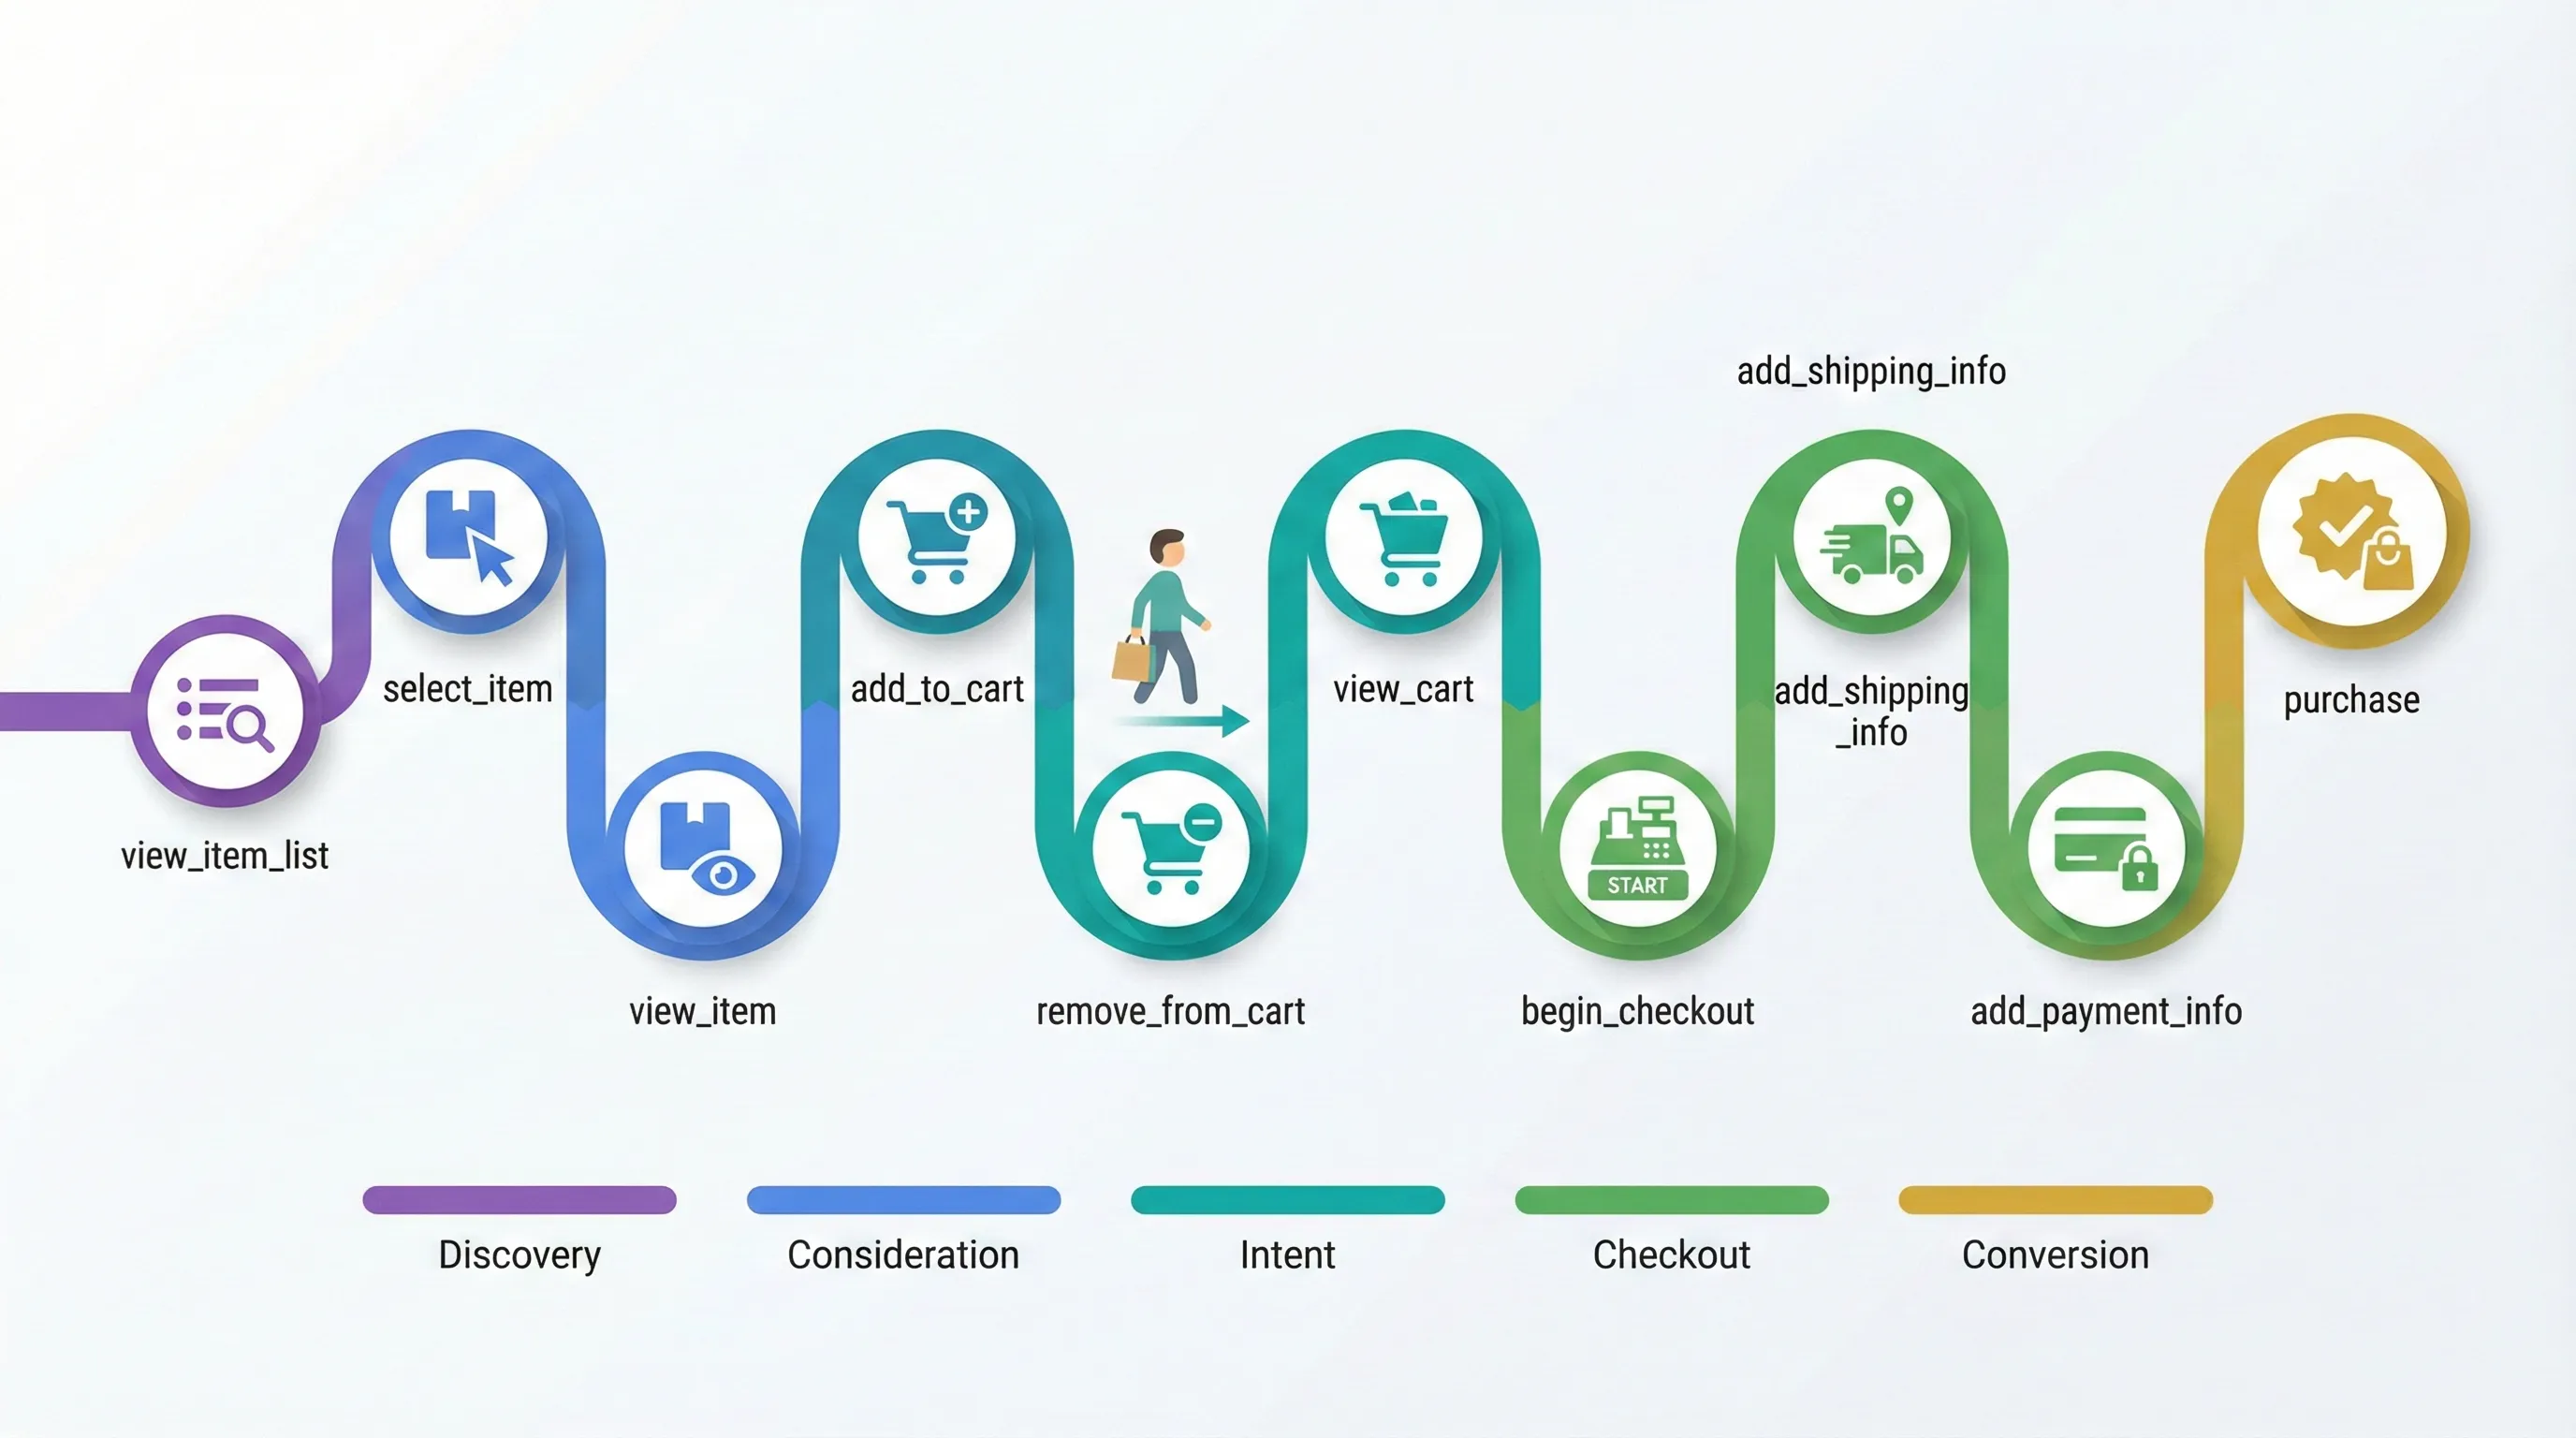
view_item|view_item_list|select_item|add_to_cart|remove_from_cart|view_cart|begin_checkout|add_payment_info|add_shipping_info|purchase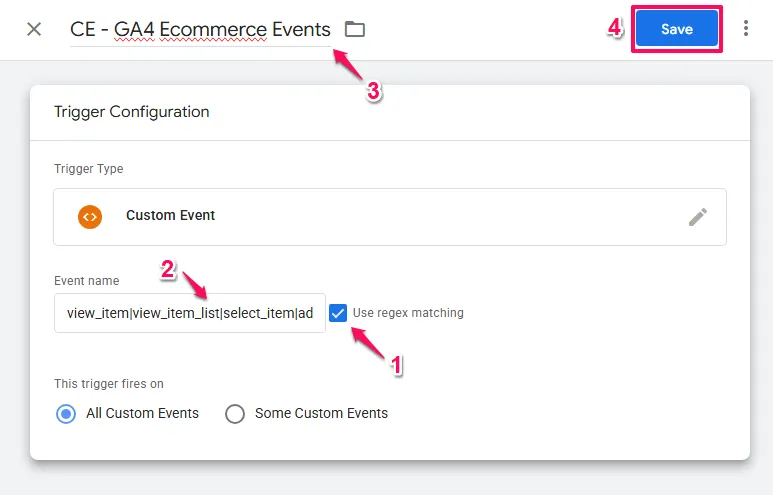
Why This Pattern Works
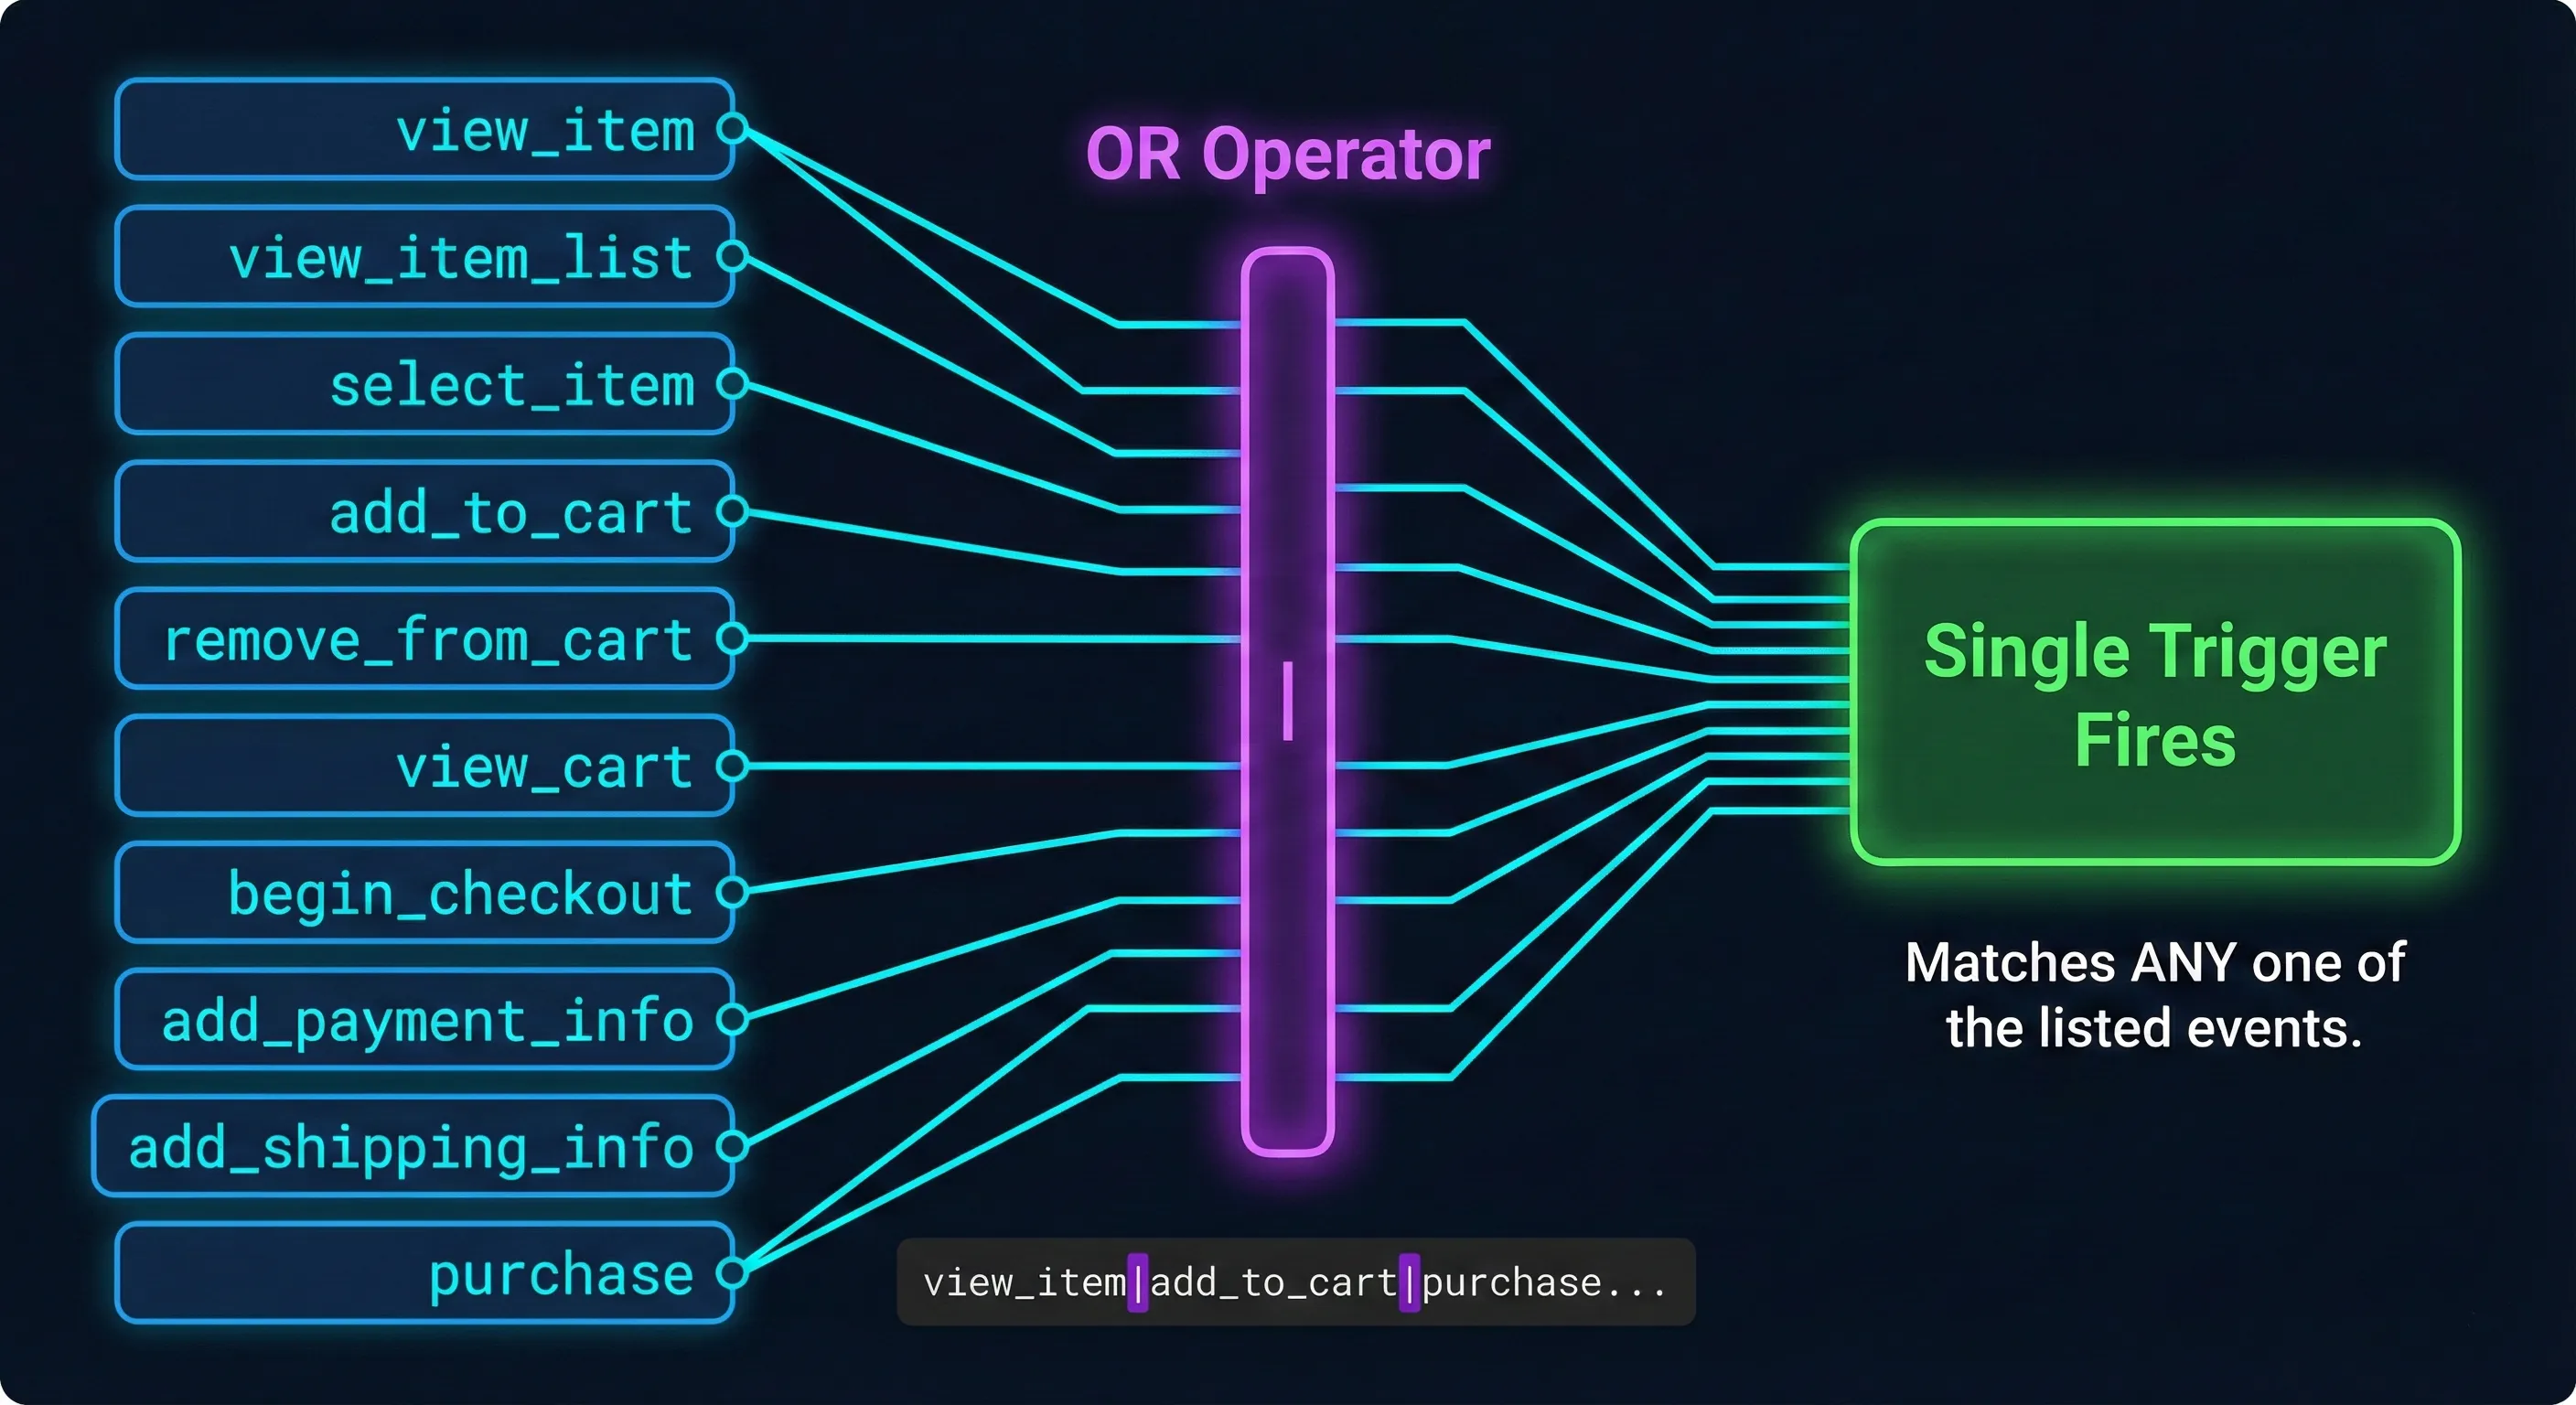
The pipe character (|) in regex acts as an “OR” operator. This pattern tells GTM: “Fire this trigger if the Data Layer event name is view_item OR view_item_list OR add_to_cart” and so on.
This isn’t an arbitrary list. These are the standard GA4 recommended events for online sales. By grouping them, your single tag will capture the entire customer journey from discovery through purchase.
Here’s what each event represents:
view_item_listfires when users view a category or search results page. They’re browsing your product catalogue.view_itemfires when users view a specific product detail page. They’re evaluating a particular product.select_itemfires when users click a product from a list. They’re showing interest in learning more.view_cartfires when users review their cart contents. They’re considering their selections.add_to_cartfires when users express intent to buy. This is a critical micro-conversion.remove_from_cartfires when users optimise their cart. They’re refining their purchase decision.begin_checkoutfires when users start the purchase flow. They’re committing to buy.add_shipping_infofires when users provide delivery details. They’re progressing through checkout.add_payment_infofires when users provide payment details. They’re at the final friction point.purchasefires when users complete the transaction. This is your macro-conversion.
Ensure the trigger is set to fire on All Custom Events, then save the trigger.
Step 2: Create the GA4 Event Tag
Now you need a tag to send the data to GA4 when your trigger fires. This is where the “magic checkbox” feature comes in.
Creating the Tag
Navigate to Tags in the left sidebar and click New.
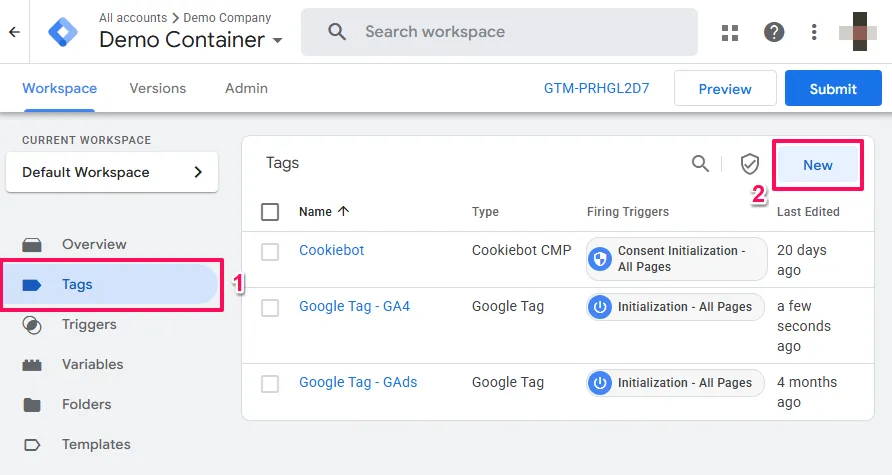
Click Tag Configuration and select Google Analytics: GA4 Event.
Configuring the Tag
Configuration Tag: Select your existing GA4 Configuration Tag from the dropdown menu. This links this event tag to your base configuration and Measurement ID.

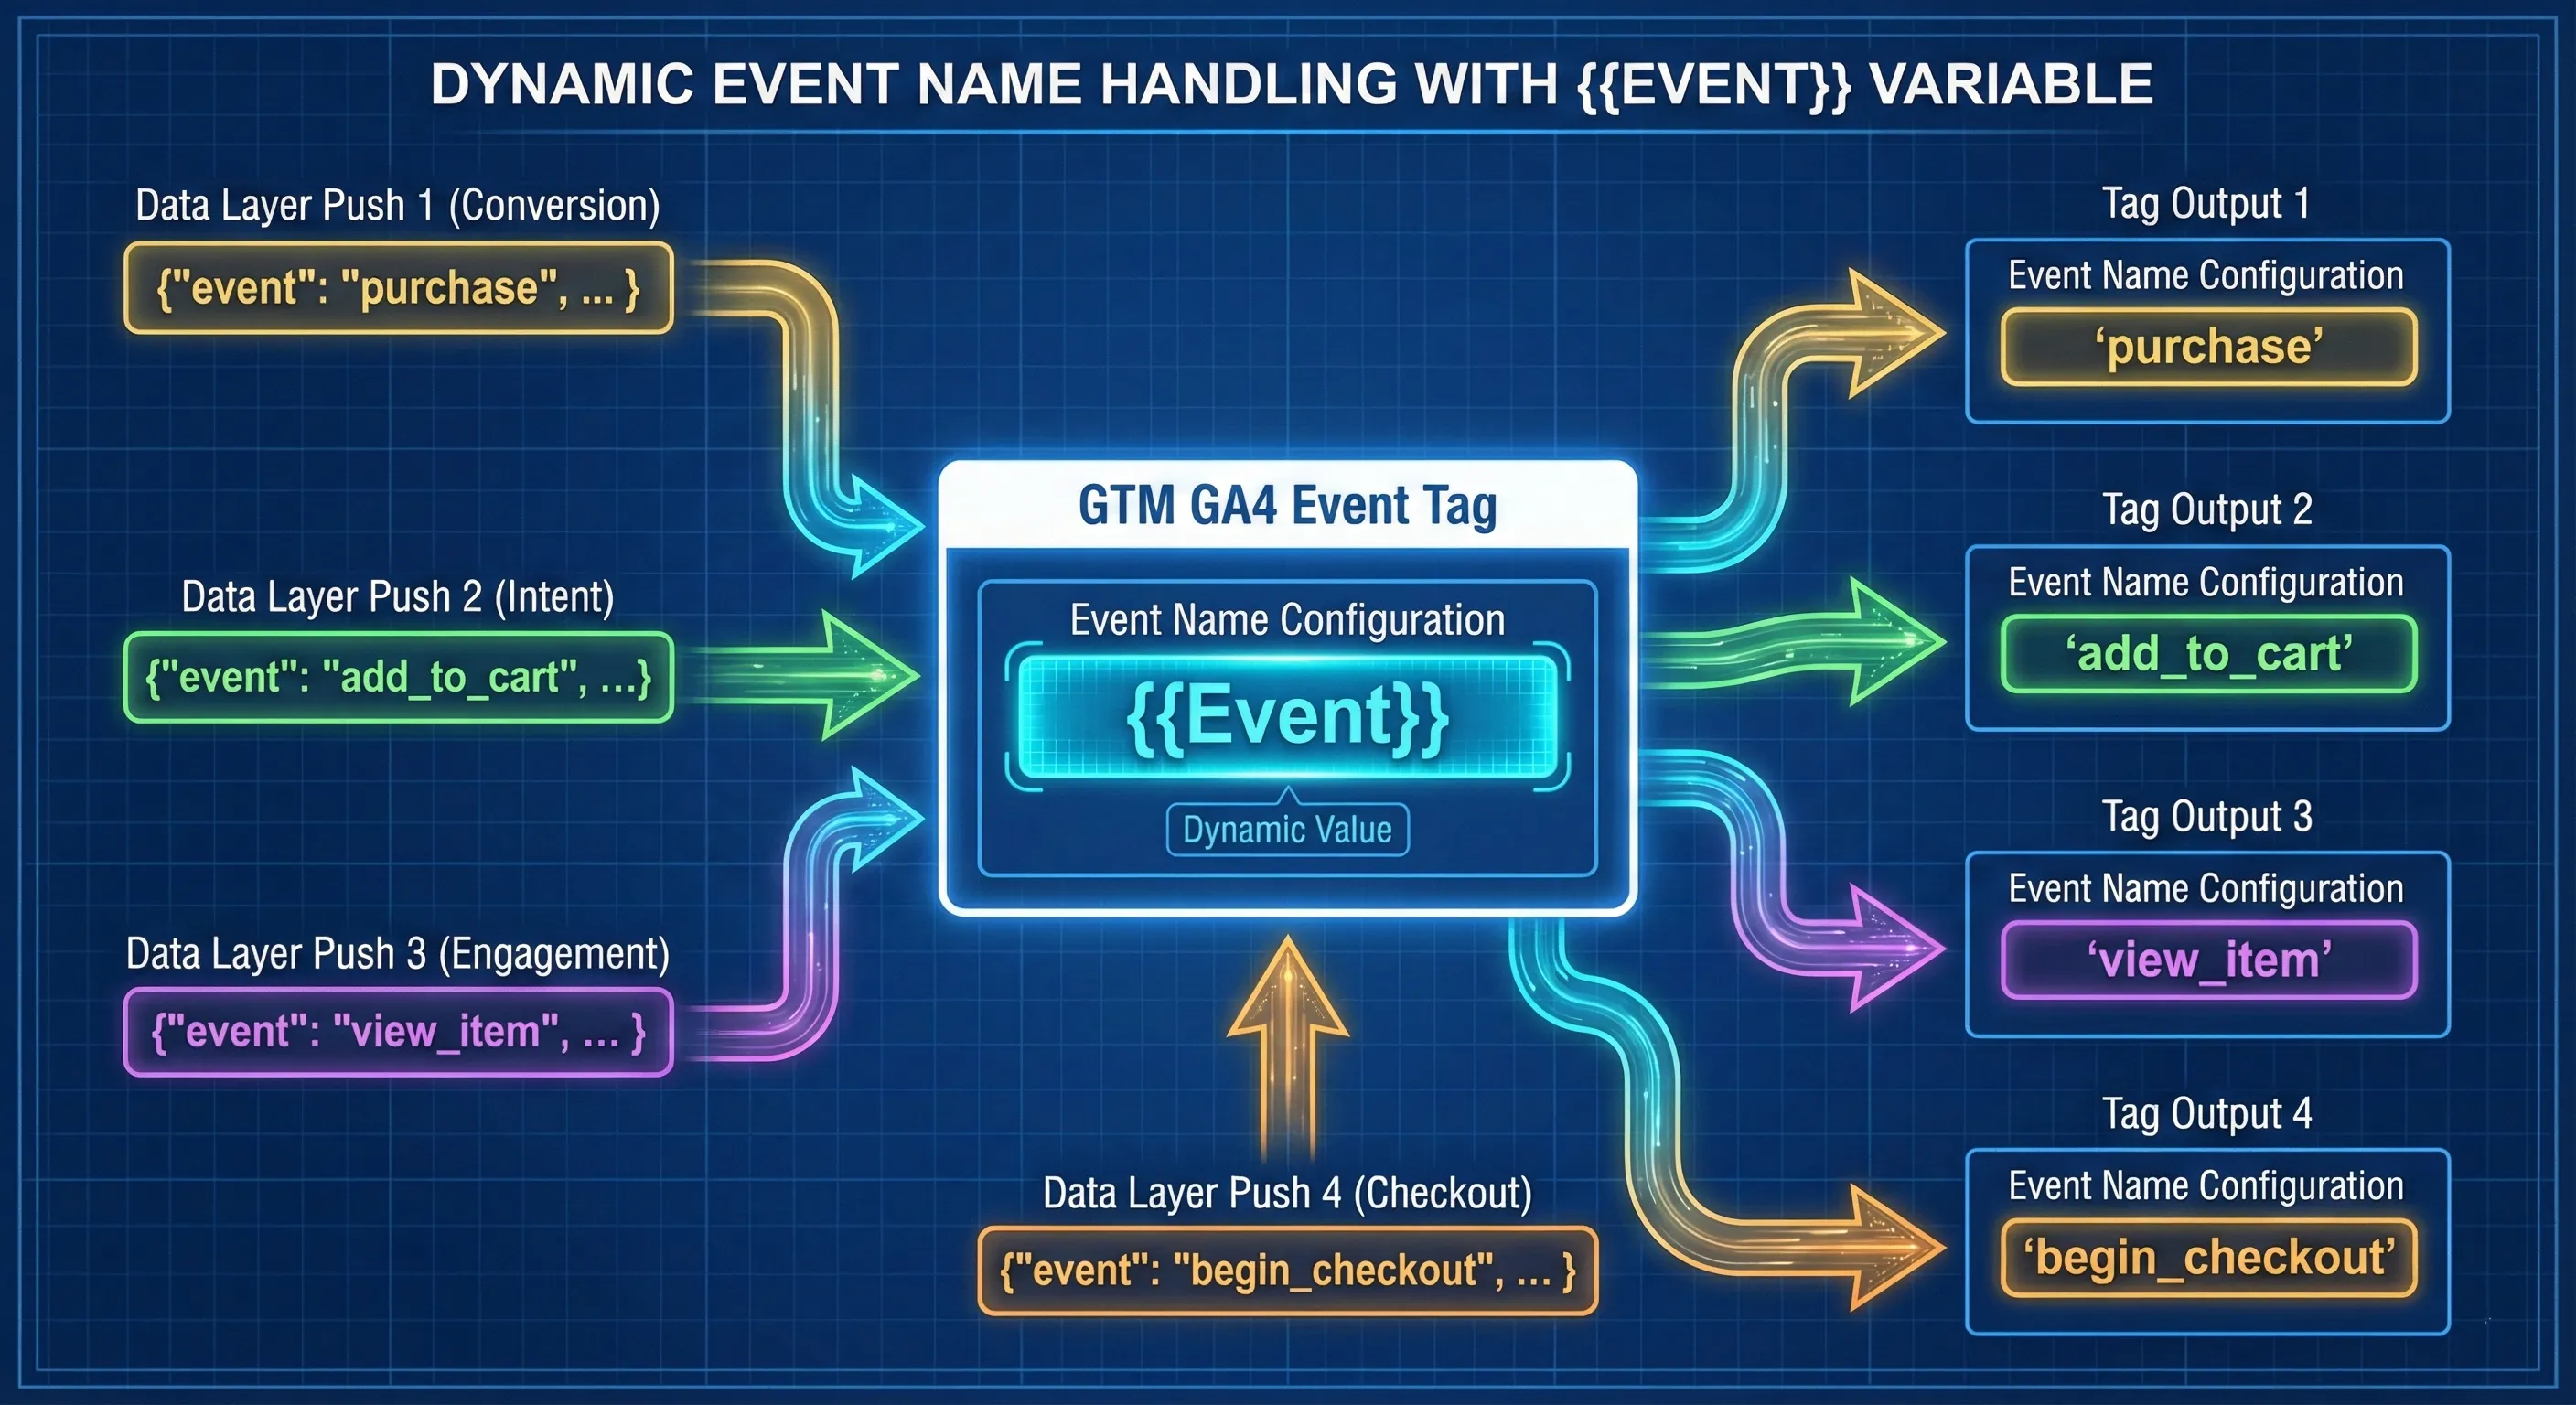
Event Name: This setting is crucial. Don’t type a static name like “purchase” or “add_to_cart”.
Click the brick icon (variable selector) next to the field and select the built-in variable {{Event}}.

This dynamic approach is what allows one single tag to handle unlimited event types. When the Data Layer pushes “purchase”, the tag sends “purchase” to GA4. When it pushes “view_item”, the tag sends “view_item”. The tag automatically uses whatever event name triggered it.
The Critical Checkbox: Send Ecommerce Data
Do not manually add rows in the Event Parameters section for items, currency, or value.
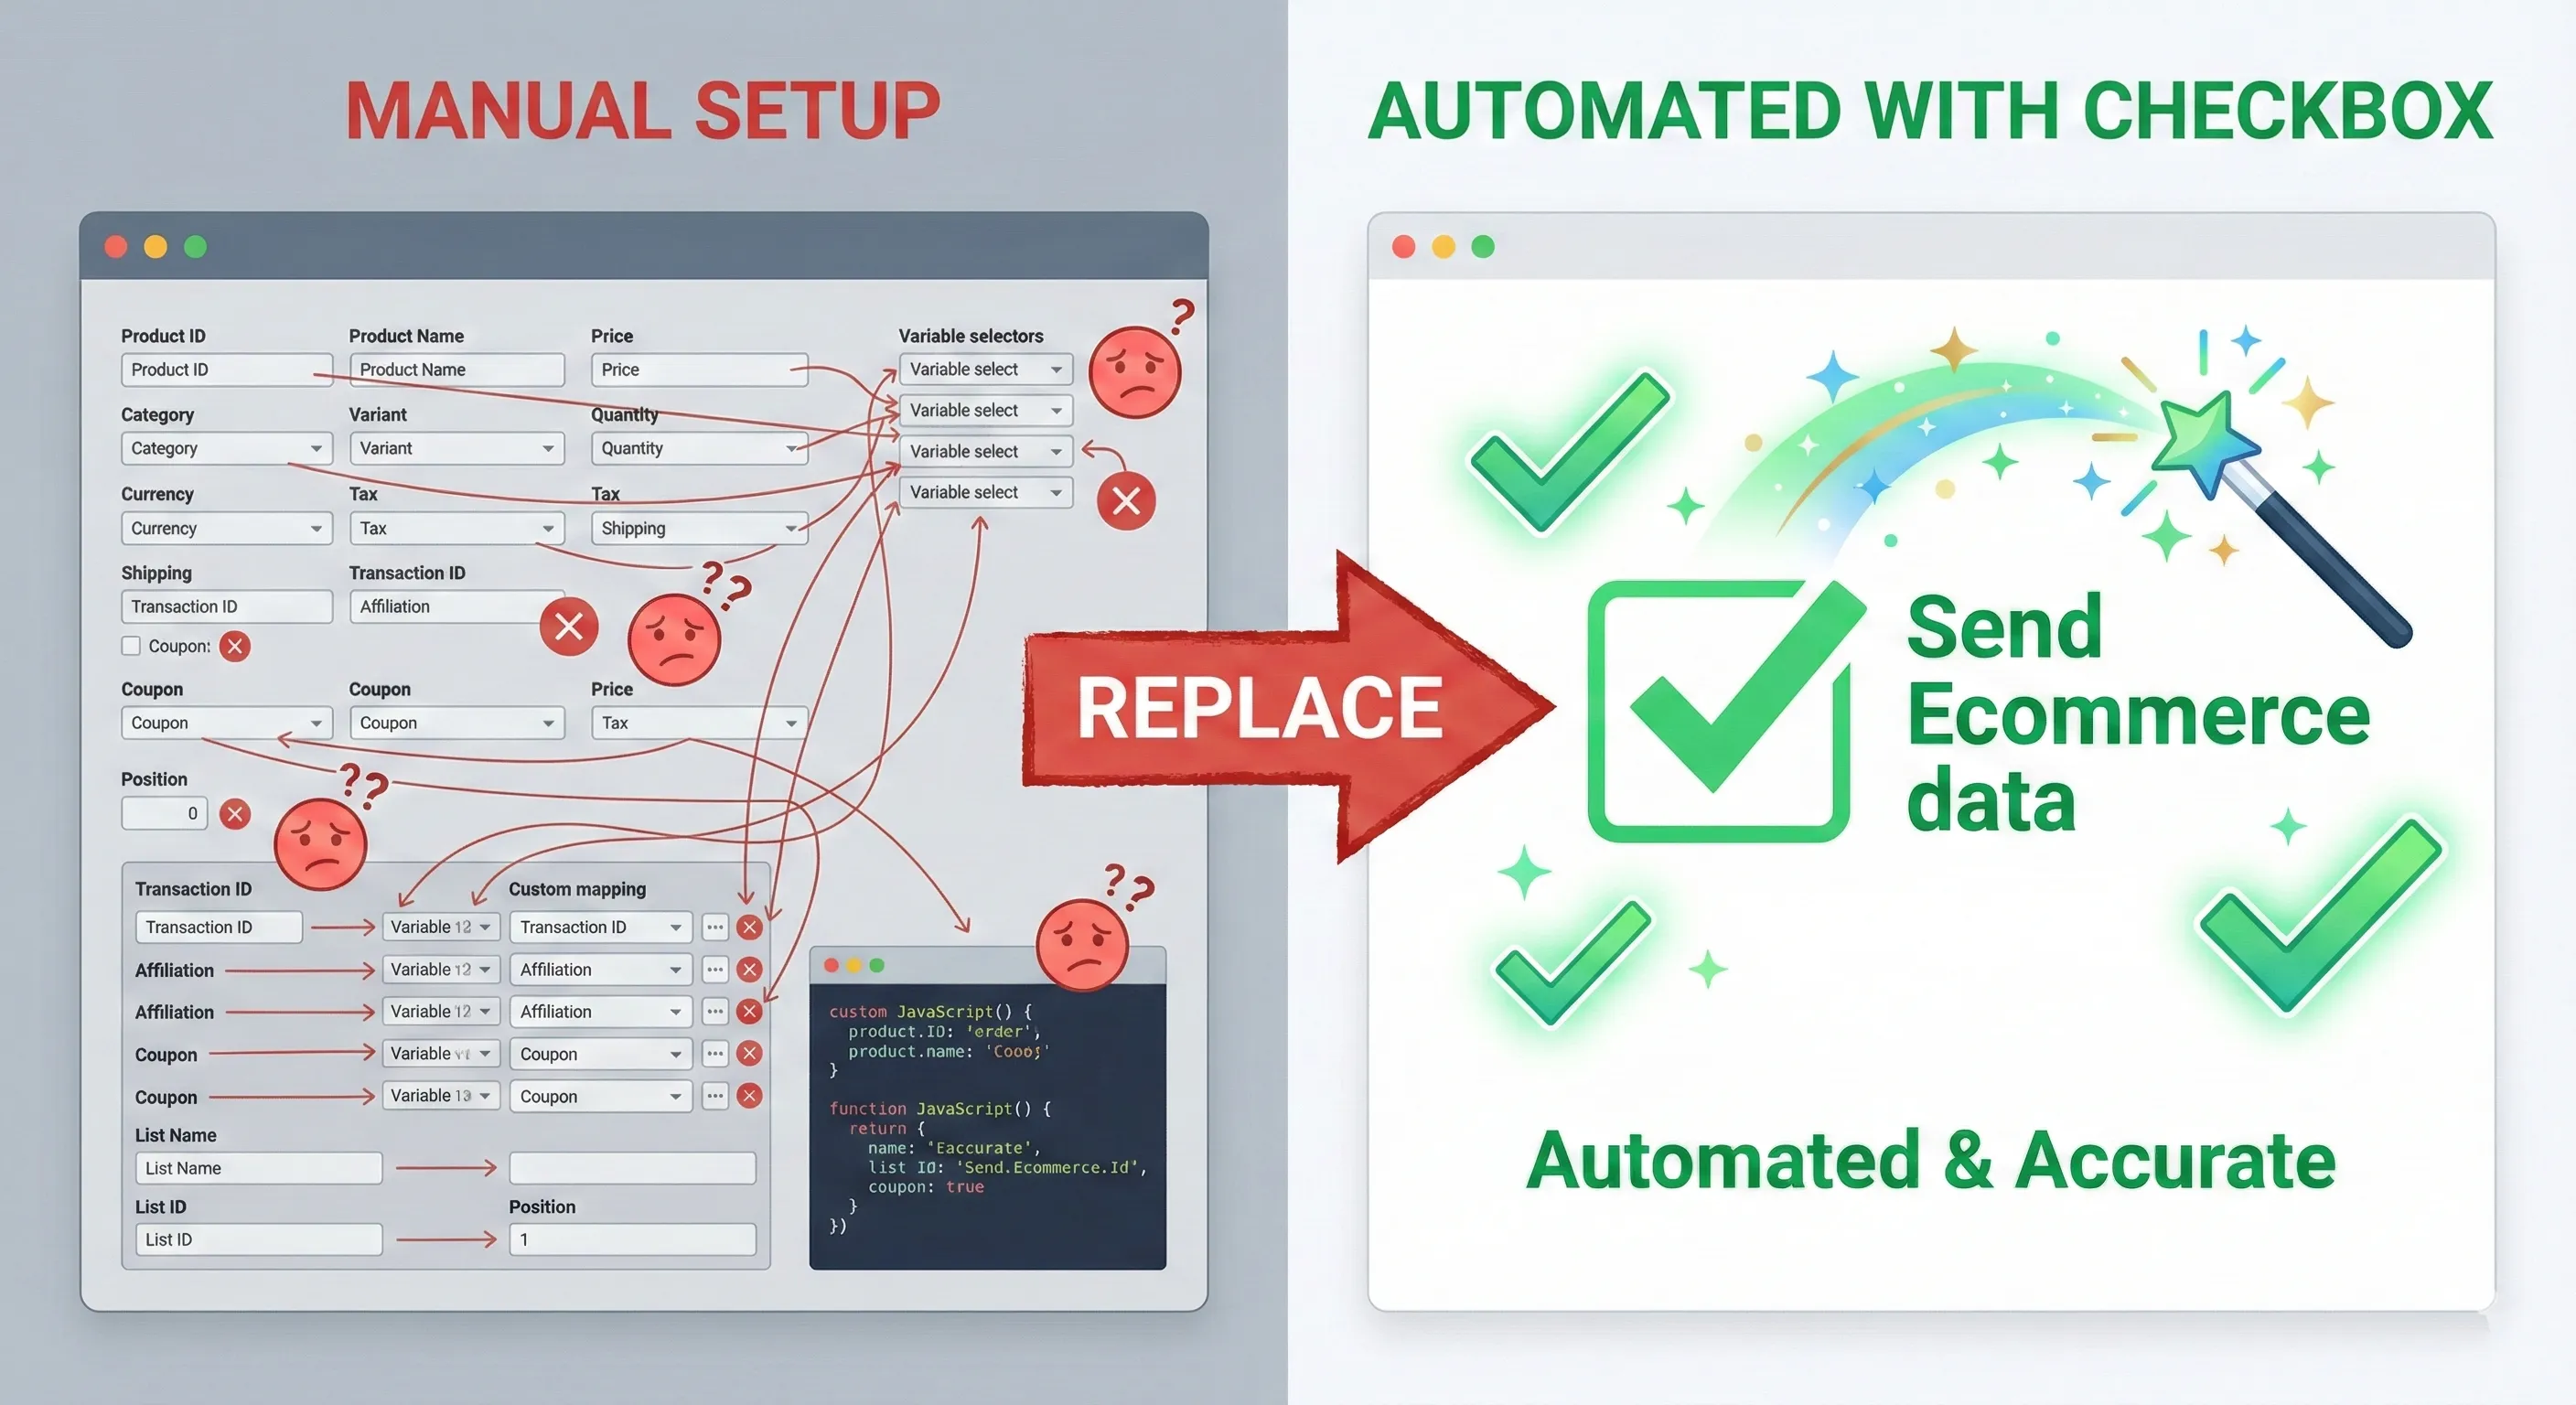
In traditional setups, analysts would meticulously map currency to one variable, value to another variable, and items to a third variable. This process was tedious, repetitive, and highly error-prone. One typo would break the tracking.
Instead, scroll down to More Settings and click to expand the Ecommerce section.
Check the box labelled Send Ecommerce data.
Under Data Source, ensure Data Layer is selected.

Why This Works
When you check “Send Ecommerce data”, GTM acts as an intelligent parser. It automatically looks for a JavaScript object named ecommerce in the Data Layer push that triggered the tag.
It then automatically extracts and maps all standard parameters including transaction_id, value, tax, shipping, currency, and the critical items array directly to the GA4 payload.
This single checkbox replaces the need for dozens of manual variable configurations. As long as your Data Layer structure is correct, the data sent to GA4 will be accurate.
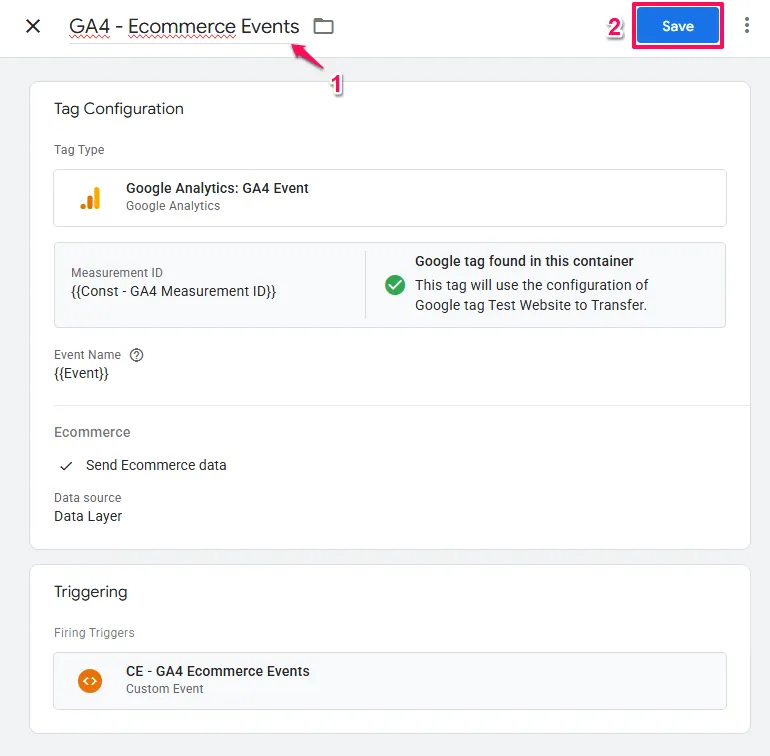
Attaching the Trigger
Click into the Triggering section and select the CE - GA4 Ecommerce Events trigger you created in Step 1.

Name the tag: GA4 - Ecommerce Events
Save the tag.
Verification: Confirming Everything Works
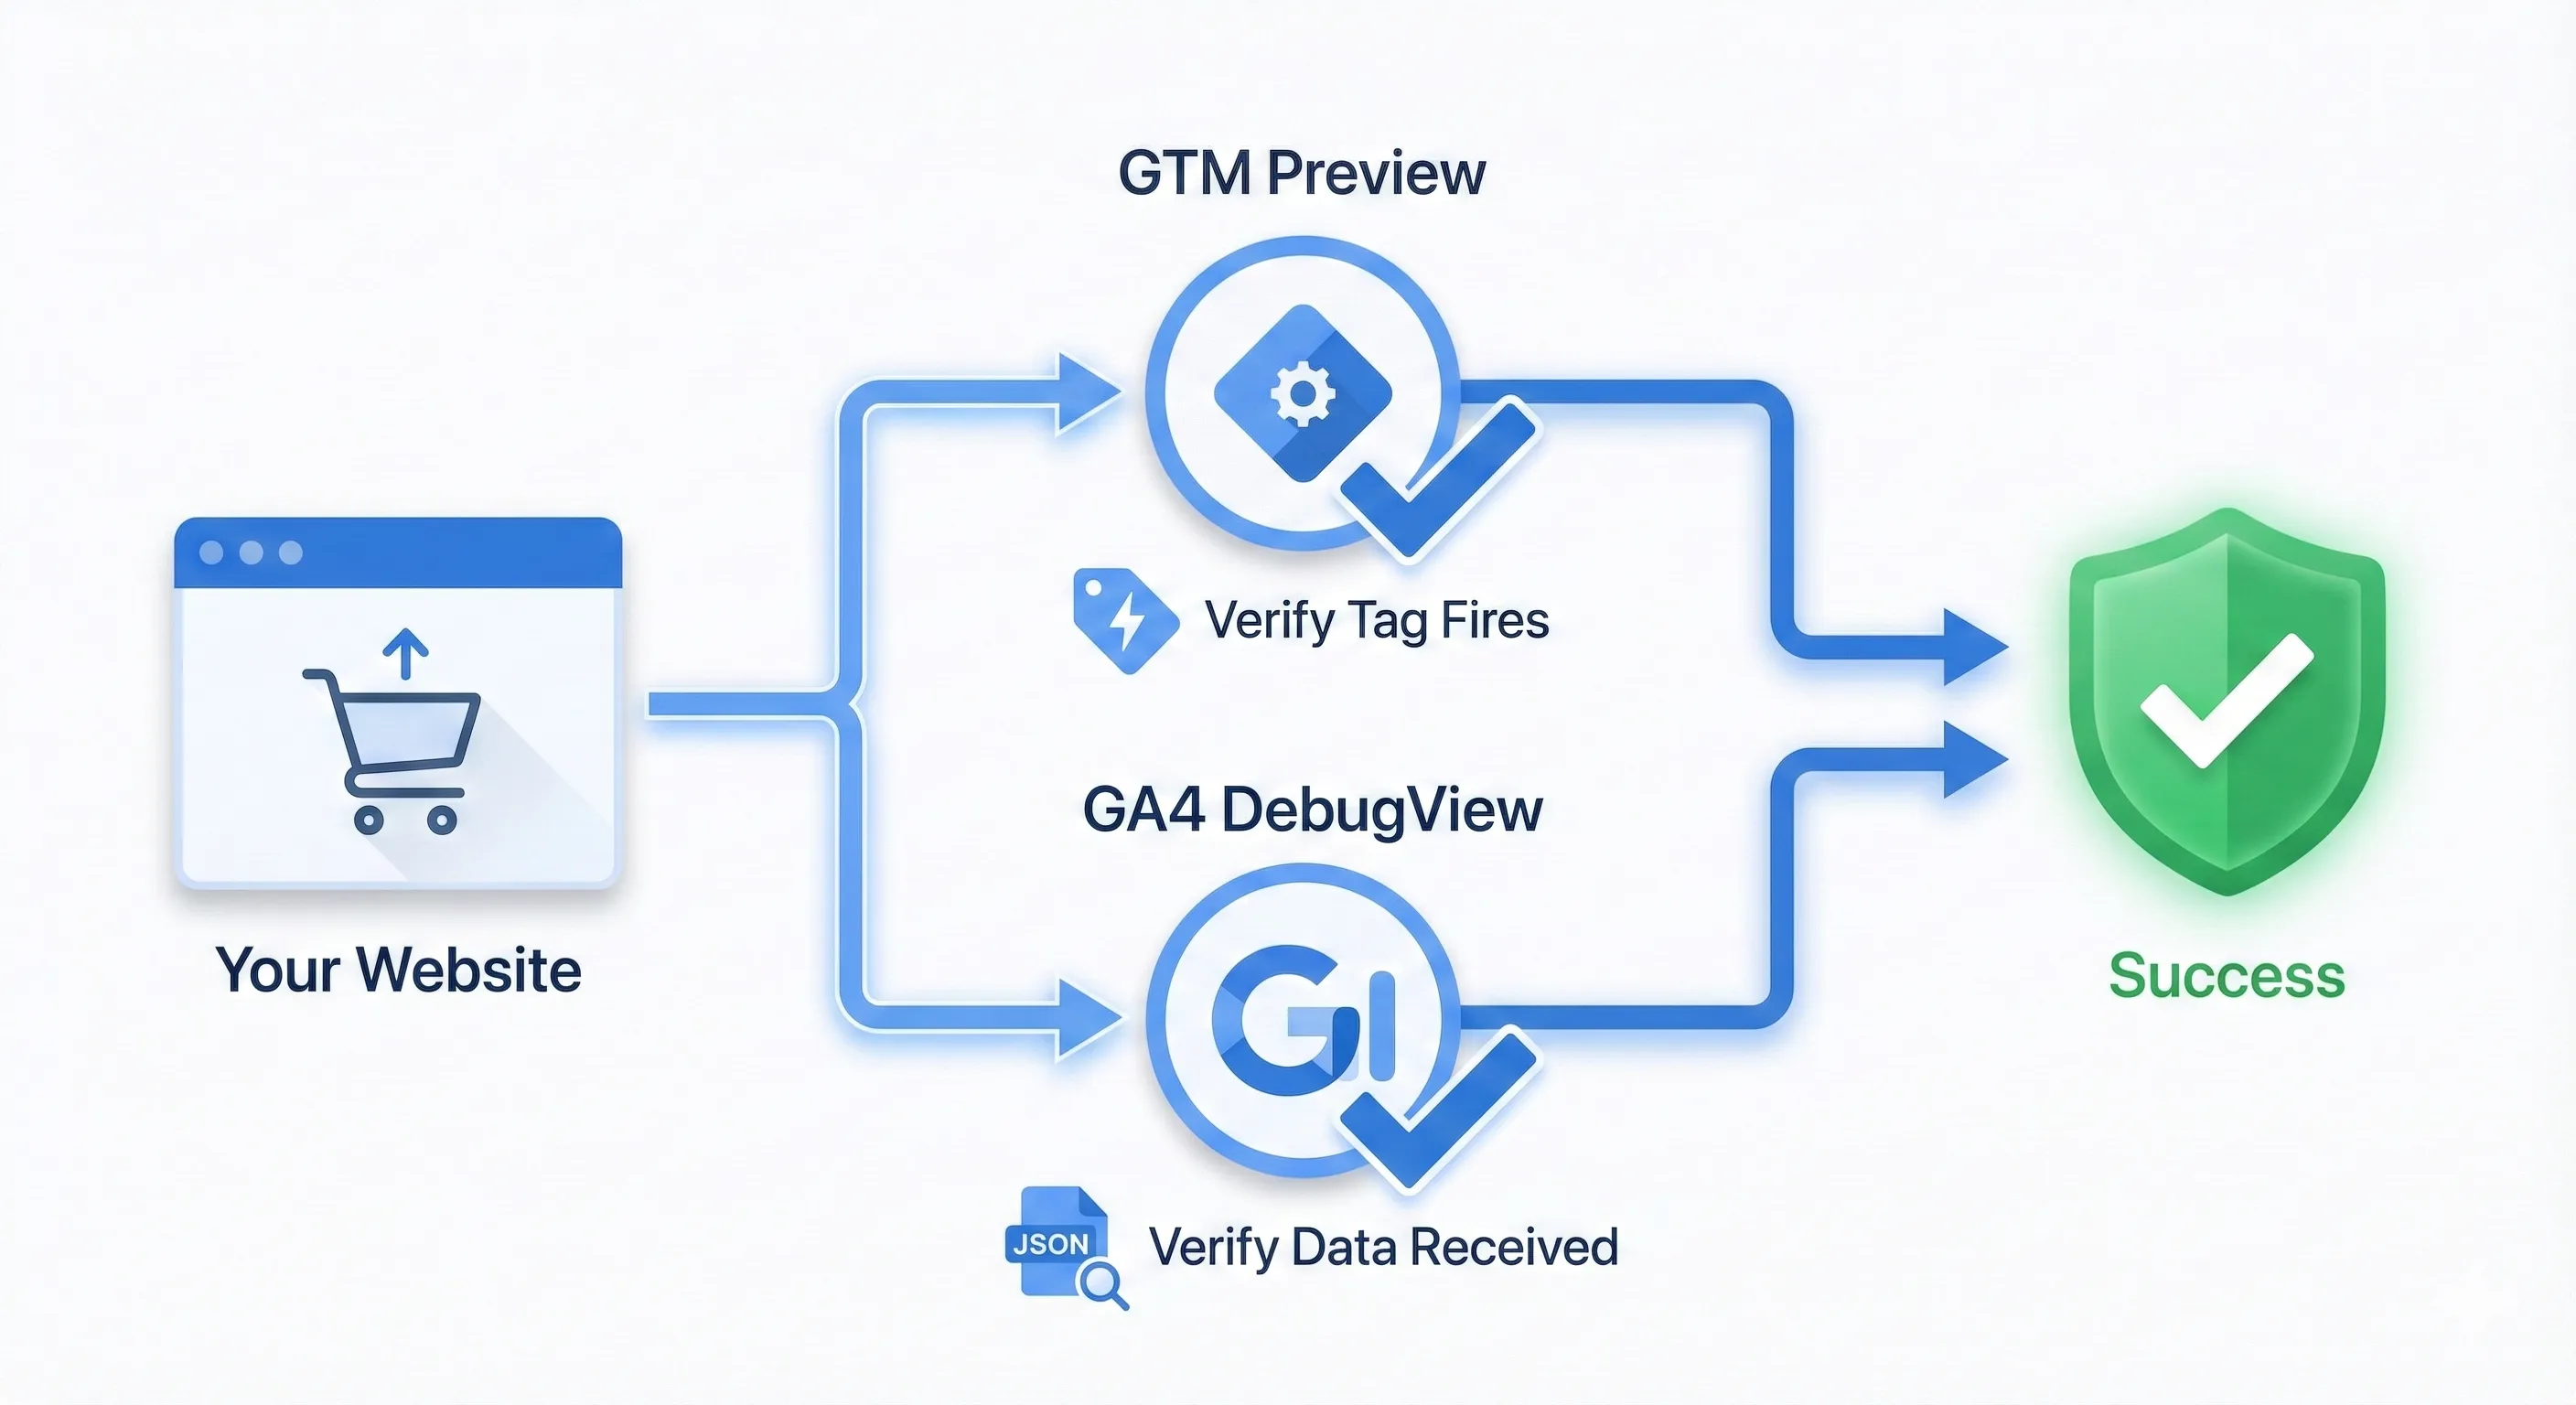
Implementation without verification is merely hope. You must test before publishing to ensure data flows correctly.
Using GTM Preview Mode
Click the Preview button in the top right of the GTM workspace. Enter your website URL and connect.
Navigate your site as a customer would:
Go to a category page (should trigger view_item_list) Click a product (should trigger select_item and view_item) Add it to cart (should trigger add_to_cart) Proceed to checkout (should trigger begin_checkout)
In the Tag Assistant debugger, you should see these events appearing chronologically in the summary column on the left.
Click on one of these events (like view_item). In the centre panel, check the Tags Fired section. You should see your GA4 - Ecommerce Events tag listed.
Click on the tag itself to see details. Verify that “Send Ecommerce data: true” is visible in the properties.
Switch to the “Values” view (top right of the tag detail pane). Confirm that the items array is populated with product data including name, ID, and price, and that currency and value are present where appropriate.
Using GA4 DebugView
GTM Preview tells you if the tag fired. GA4 DebugView tells you if GA4 received and processed the data correctly.
In GA4, navigate to Admin > Data display > DebugView.
Trigger an event on your site (like add_to_cart).
Watch the timeline in DebugView. You should see the add_to_cart event appear.
Click the event and expand it to see the parameters. Check for the items parameter and expand it. You should see the product name, price, and other details.
If items is missing or empty, the “Send Ecommerce data” checkbox failed to find the ecommerce object in your Data Layer, indicating a Data Layer implementation problem.
Common Issues and Solutions
Regex case sensitivity: The regex pattern provided is lowercase (view_item). If your Data Layer pushes View_Item with capitalisation, the trigger won’t fire unless you check Ignore Case in the GTM trigger settings.
Timing problems: The Data Layer push must happen after the GTM container loads. For single-page applications or dynamic actions, the Custom Event trigger works perfectly. If you have ecommerce data hardcoded on page load (like a thank you page), ensure the Data Layer push occurs above the GTM snippet in the source code.
Duplicate reporting: Make sure you don’t have both this GTM setup and a plugin (like GTM4WP or Shopify’s native integration) sending data simultaneously. This will result in double-counting revenue.
Understanding the Data Layer Structure
While this guide assumes you have a functional Data Layer, understanding its structure helps with troubleshooting when reports don’t populate as expected.
The “Send Ecommerce data” feature is a strict parser of a specific JSON schema. It specifically listens for the ecommerce key in the Data Layer push. If your developer names this key ecom, commerce, or ga4_data, the tag will fail to capture product data even if the trigger fires correctly.
The Standard Structure
A standard GA4 Data Layer push for a purchase event looks like this:
{
  "event": "purchase",
  "ecommerce": {
    "transaction_id": "T_12345",
    "value": 25.42,
    "tax": 4.90,
    "shipping": 5.99,
    "currency": "USD",
    "coupon": "SUMMER_SALE",
    "items": [
      {
        "item_id": "SKU_123",
        "item_name": "Organic Cotton T-Shirt",
        "affiliation": "Online Store",
        "coupon": "SUMMER_SALE",
        "currency": "USD",
        "discount": 2.50,
        "index": 0,
        "item_brand": "EcoWear",
        "item_category": "Apparel",
        "item_category2": "Shirts",
        "item_category3": "T-Shirts",
        "item_list_id": "related_products",
        "item_list_name": "Related Products",
        "item_variant": "Green",
        "location_id": "London",
        "price": 9.99,
        "quantity": 1
      }
    ]
  }
}The Critical Items Array
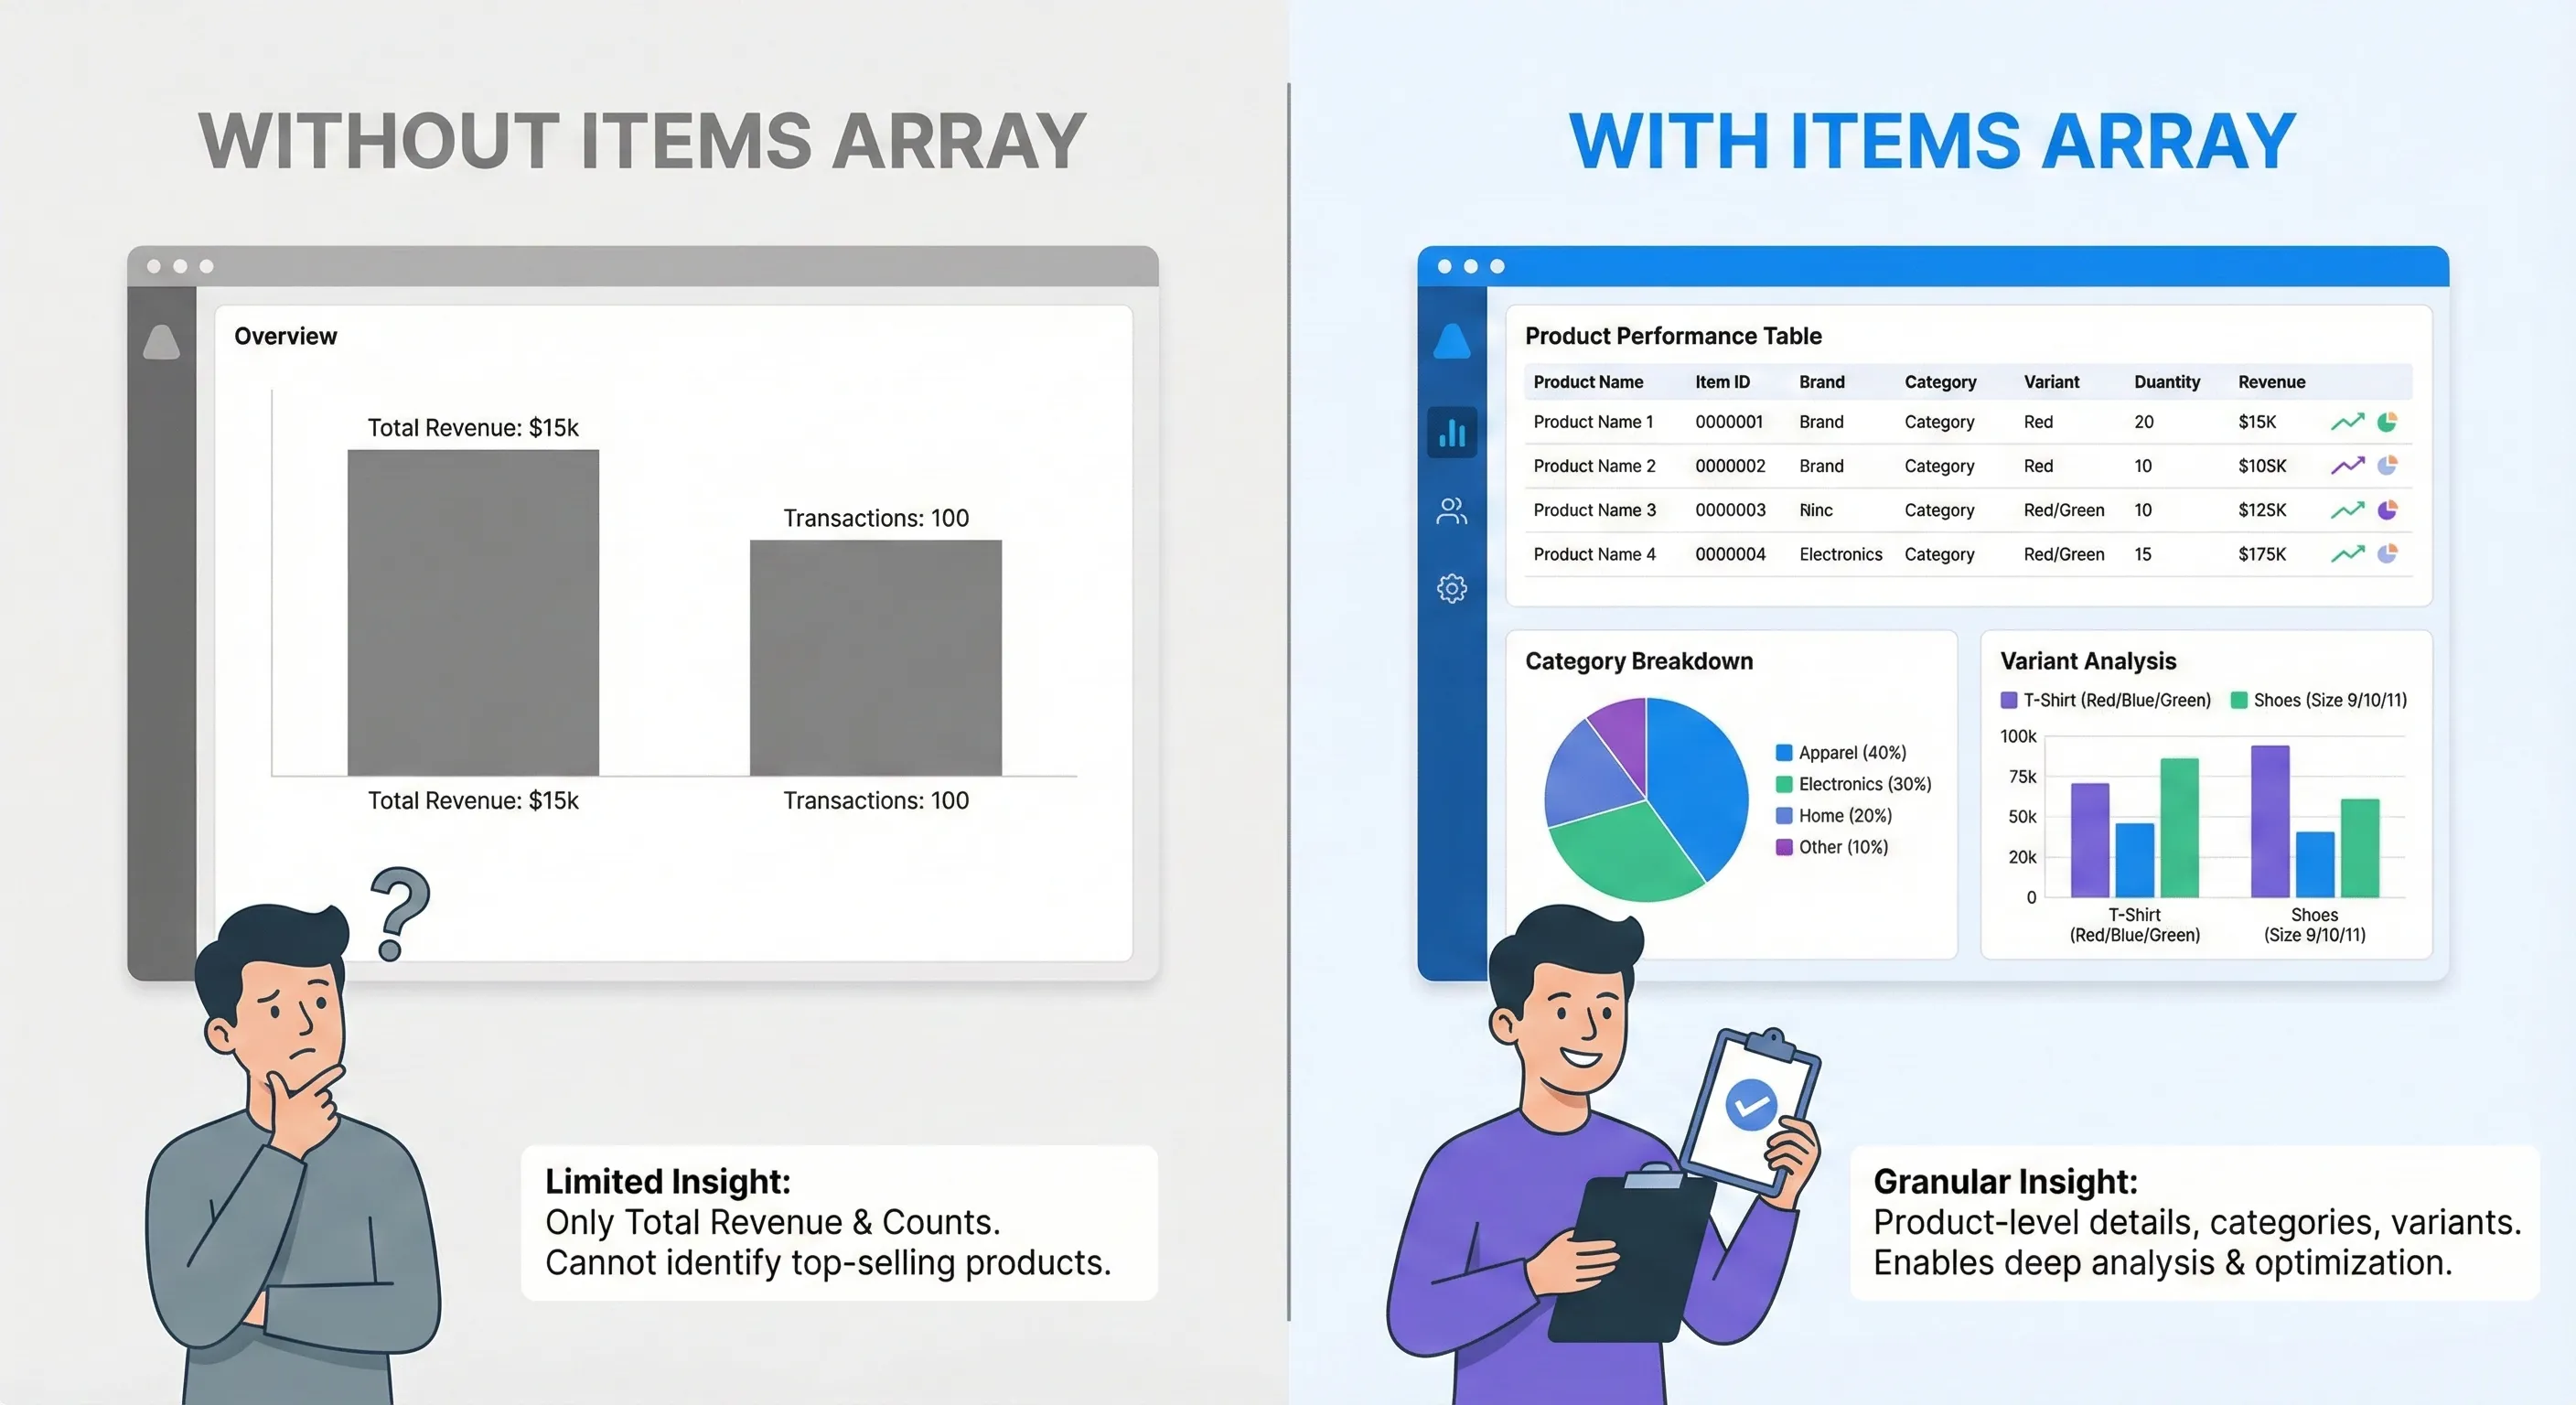
The items array is the heartbeat of GA4 ecommerce tracking. Without it, you get transaction count and total revenue but lose all granular insight. You cannot answer “Which products are selling?”
With it, you unlock the Ecommerce Purchases report that shows product-level performance.
The “Send Ecommerce data” checkbox iterates through this array and maps every parameter (item_id, item_name, item_category) to the corresponding GA4 event parameter automatically.
Notice the depth of data available: item_category2 through item_category5. Using these fields enables deep analysis of product taxonomy performance. If you only track the top-level category, you might miss insights about specific sub-niches.
Currency and Value: The Revenue Engine
For the Monetization Overview report to accurately reflect revenue, the value and currency parameters are mandatory at the event level (inside the ecommerce object but outside the items array) for the purchase event.
A common pitfall is sending value as a string (“25.42”) instead of a number (25.42). While GA4 attempts to auto-correct this, best practice is sending integers or floats.
Ensure the currency code follows ISO 4217 standards (USD, GBP, EUR). A mismatch here can cause revenue data to be rejected or improperly converted.
Using the Reports to Drive Business Decisions
Implementing the tracking is only the foundation. The goal is answering questions that improve performance.
Scenario: The Window Shopper Problem
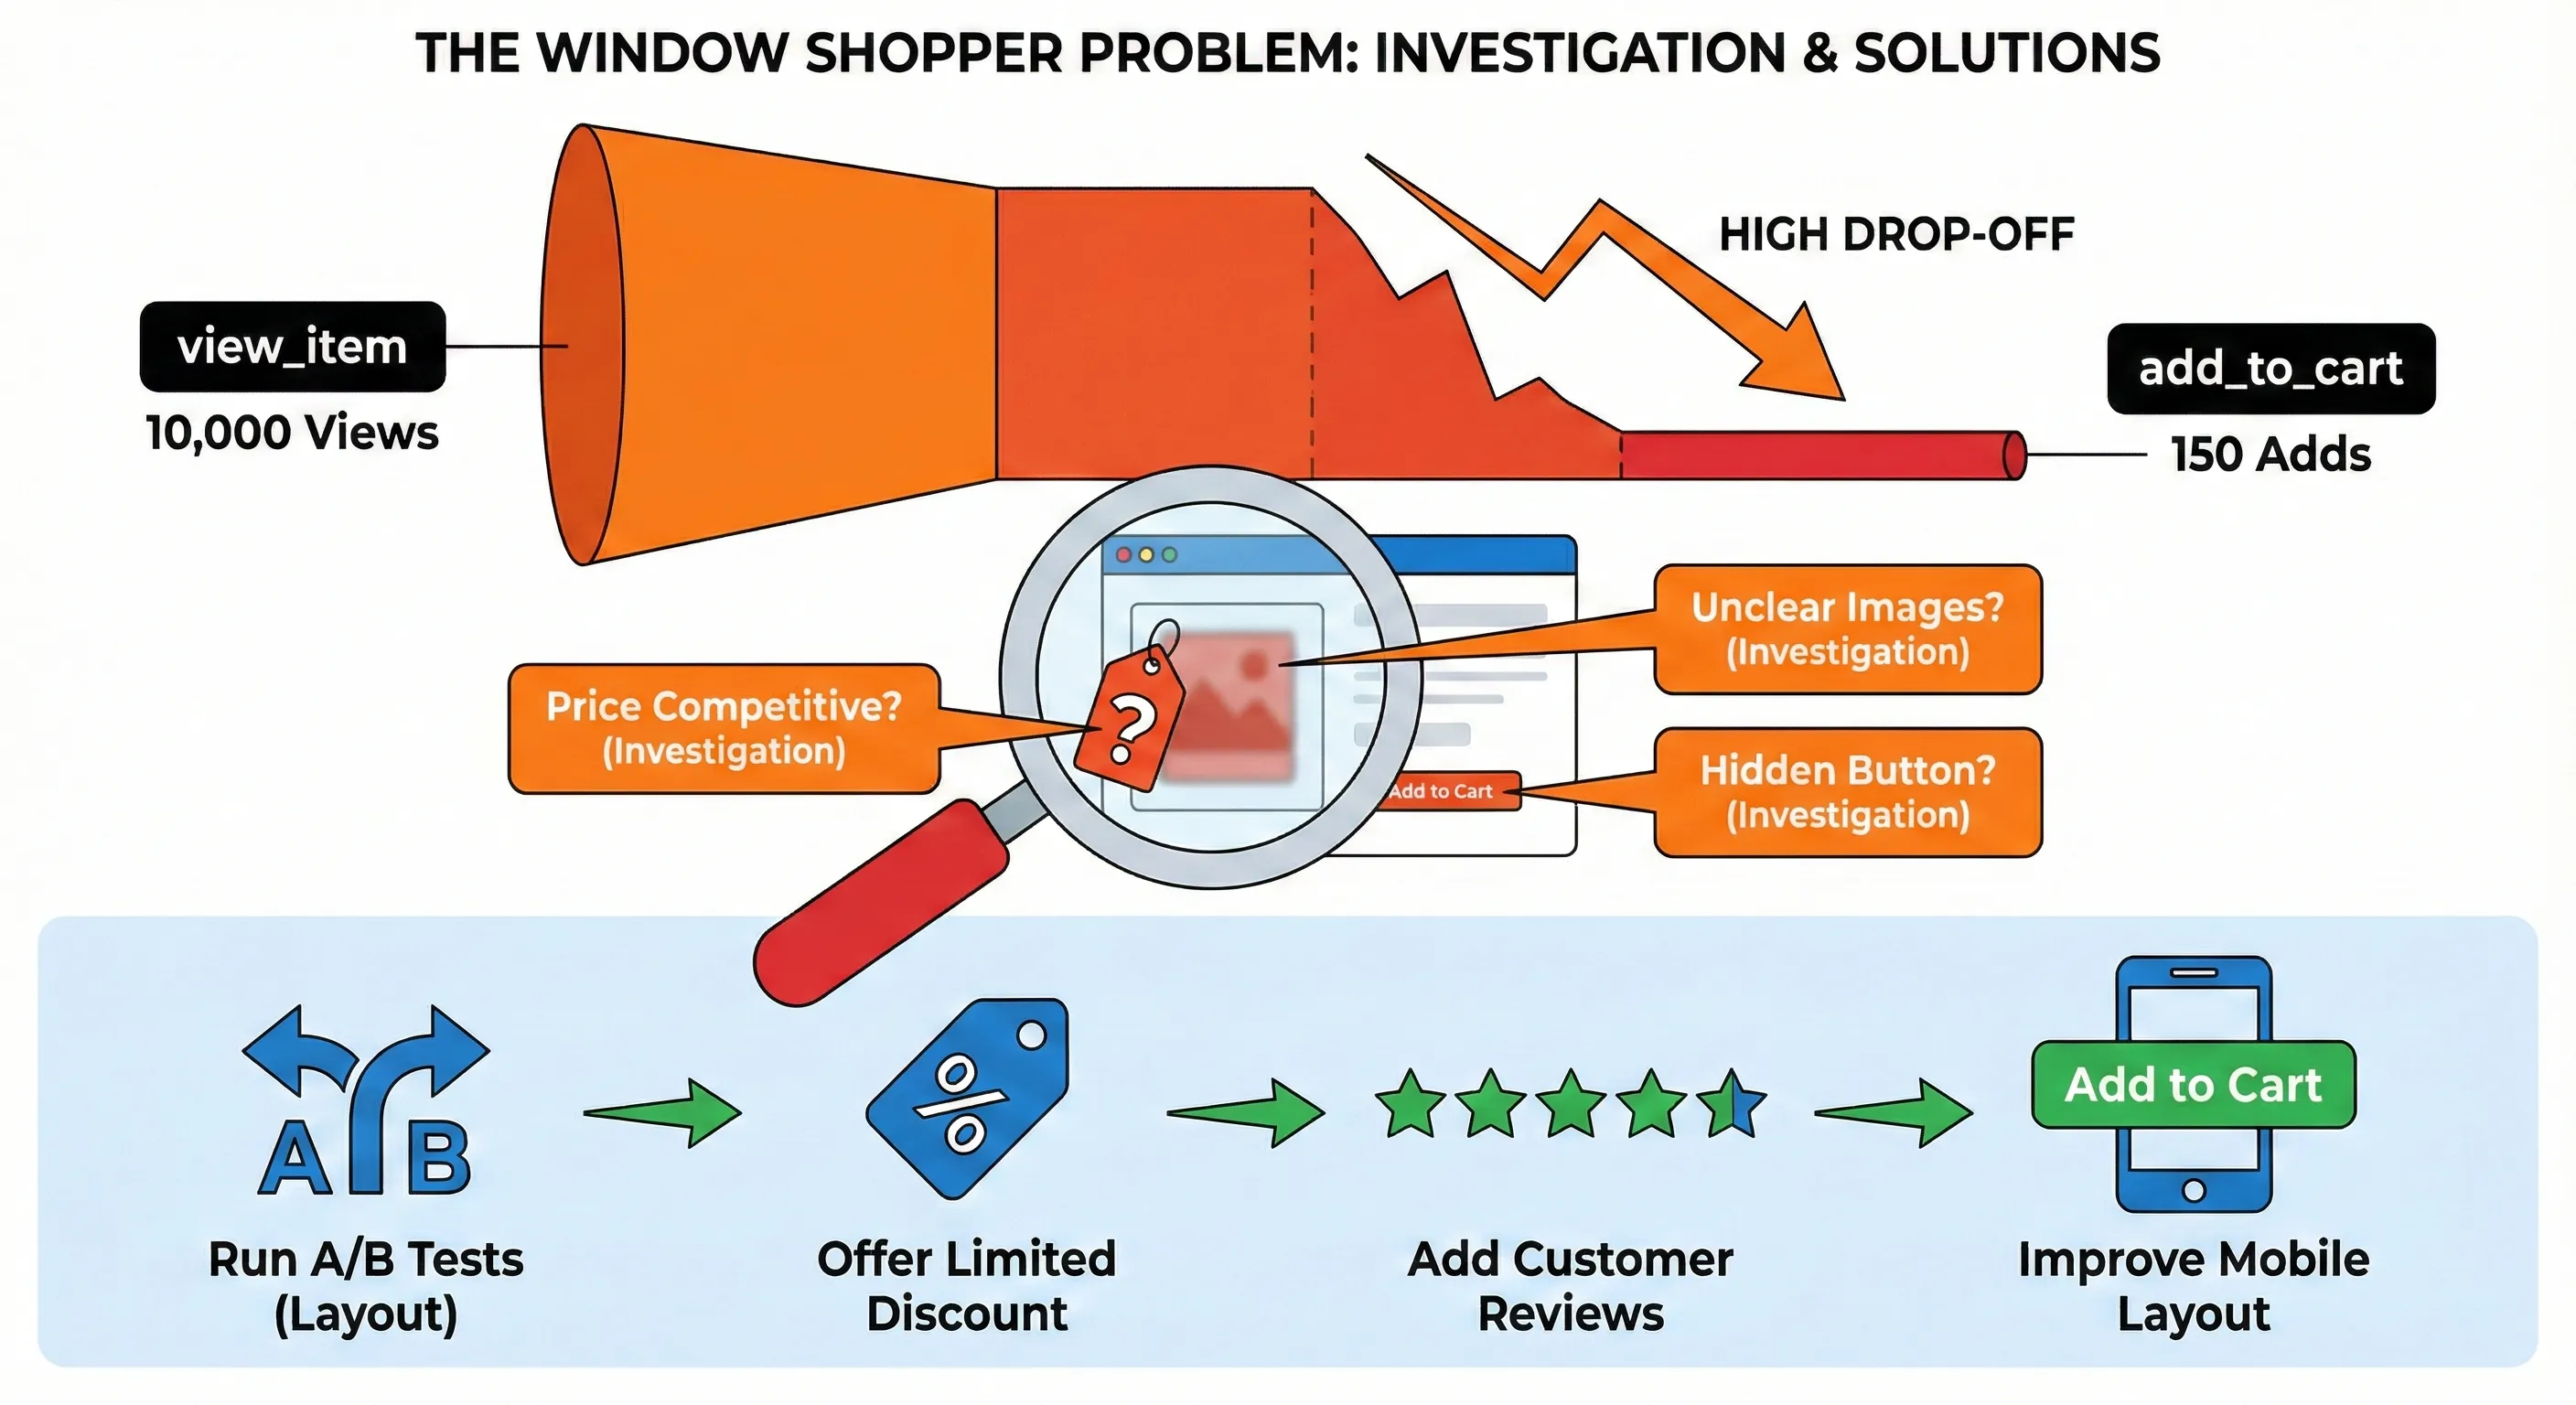
You observe high view_item counts in the Ecommerce Purchases report but very low add_to_cart rates for a specific product category.
Investigate:
Is the price competitive compared to alternatives? Are the product images high quality and showing the product clearly? Is the “Add to Cart” button visible and obvious on mobile devices? Do the product descriptions answer common questions?
Take action:
Run A/B tests on product page layout to improve clarity. Test a limited-time discount to check price sensitivity. Add customer reviews to build trust and social proof. Improve mobile layout if button visibility is poor.
Scenario: The Shipping Shock Problem
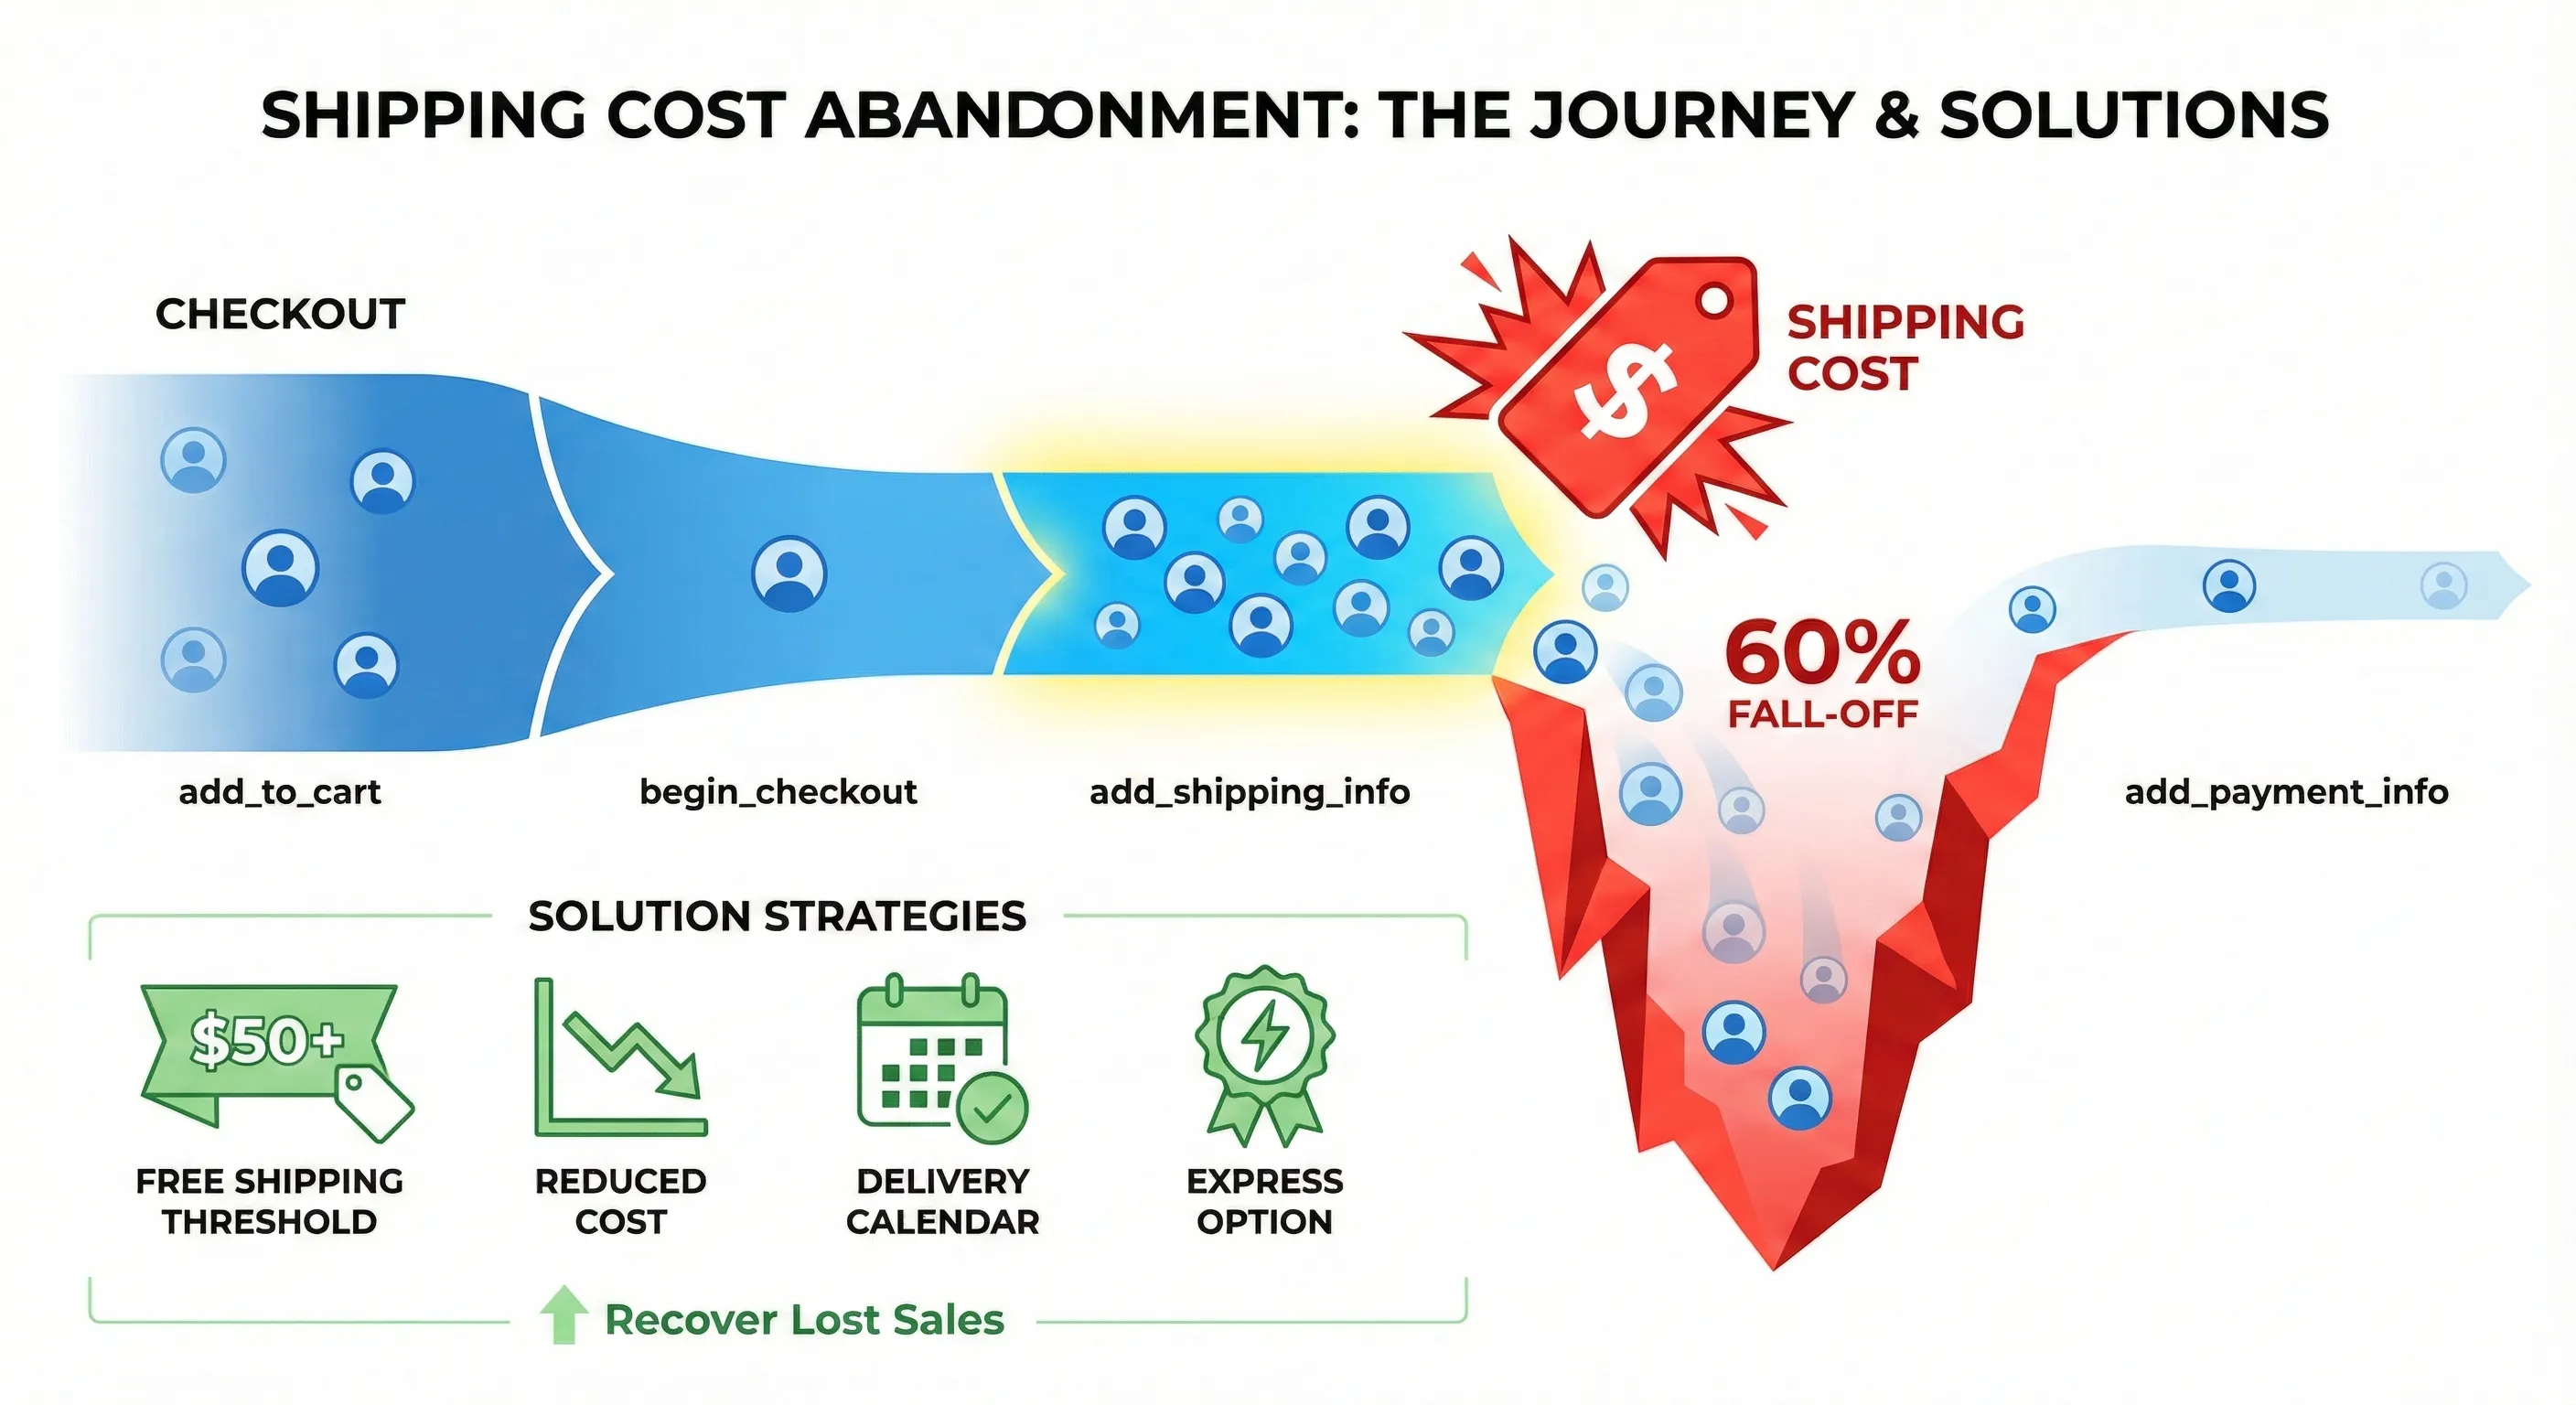
In the Checkout Journey report, you see a 60% drop-off between add_shipping_info and add_payment_info.
Investigate:
Users are entering their address, seeing the shipping cost, and leaving. The shipping price is likely higher than expected or delivery time is longer than acceptable.
Take action:
Implement a “Free Shipping Threshold” banner (like “Free shipping on orders over $50”) to encourage larger cart sizes. Test reduced shipping costs to see if conversion rate improvement offsets the cost reduction. Add estimated delivery dates earlier in the process so users know what to expect. Consider offering express shipping options for users who need faster delivery.
Scenario: The Funnel Leak
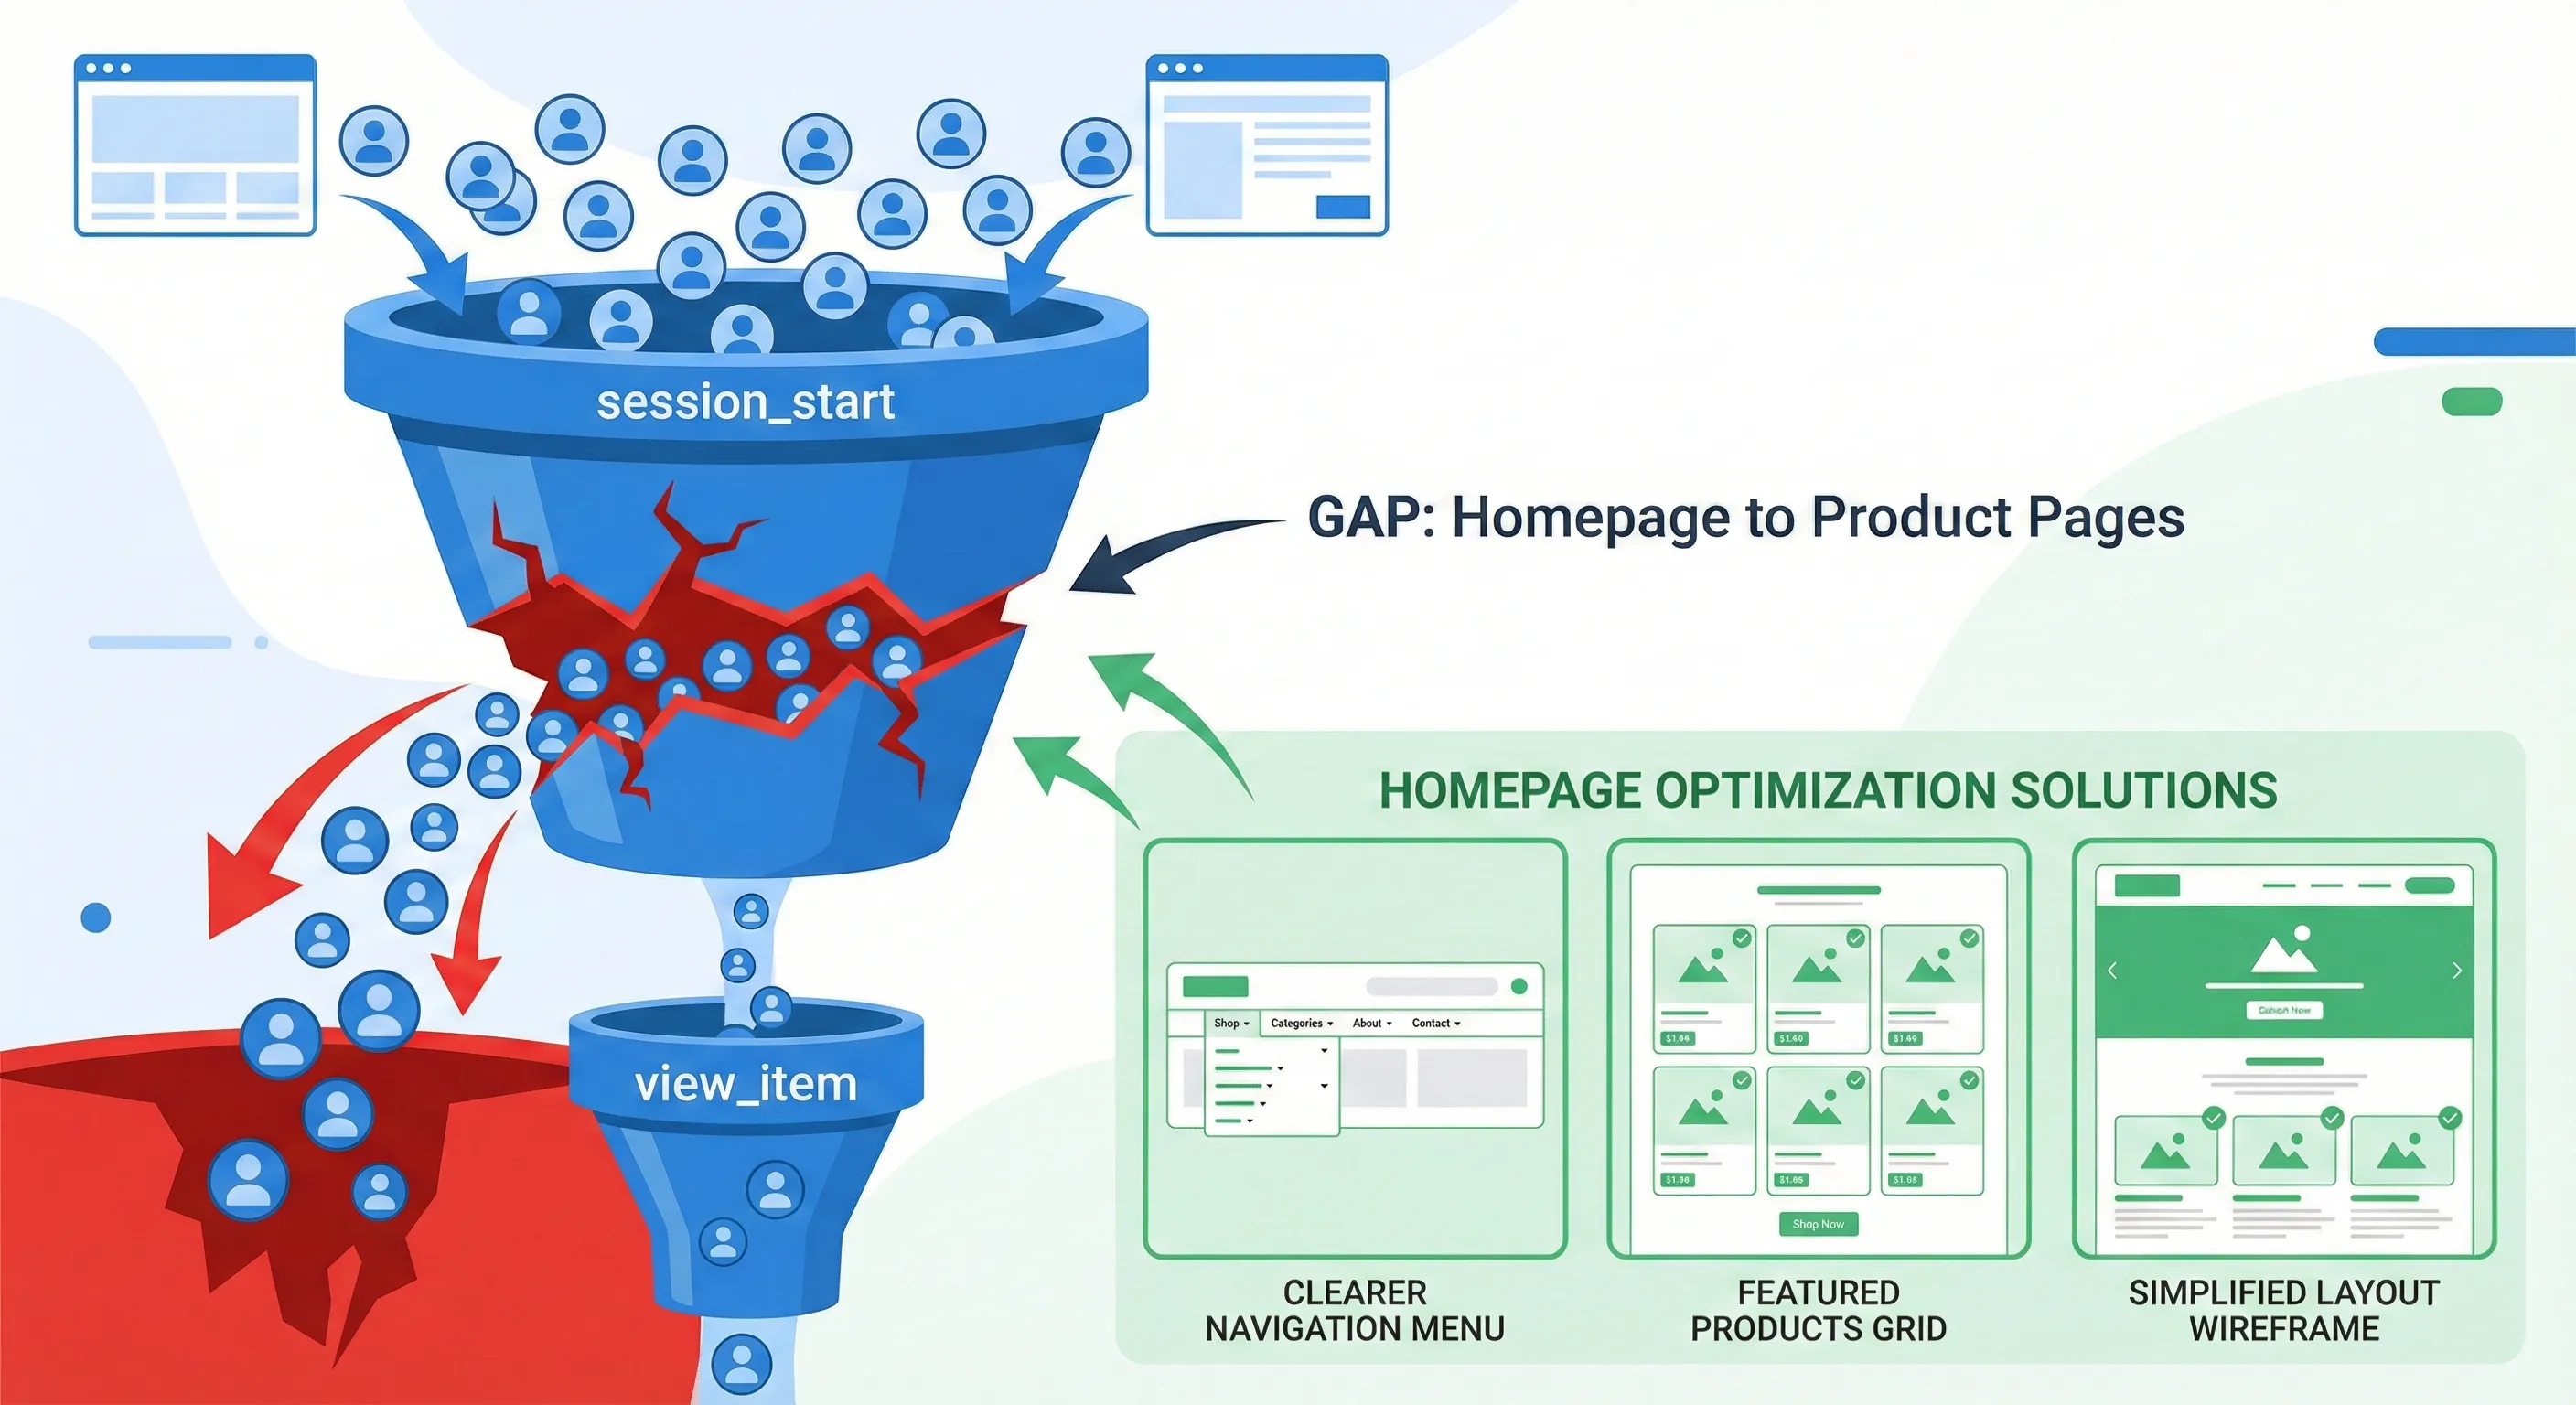
The Purchase Journey report shows a massive drop between session_start and view_item.
Investigate:
Users are landing on the site but not navigating to products. The homepage or landing pages may be confusing, navigation menus might be unclear, or featured products aren’t prominent enough.
Take action:
Simplify site navigation with clearer category labels and structure. Add featured products higher up on the homepage to drive users into product browsing faster. Test different homepage layouts that make it obvious what you sell and where to find it. Check if mobile navigation is particularly problematic compared to desktop.
Advanced: Extending This Setup
Once you have the foundation working, you can extend it to capture additional ecommerce events or customise the implementation for specific needs.
Adding More Events
If you later decide to track add_to_wishlist or other events, simply update the regex pattern in your trigger:
view_item|view_item_list|select_item|add_to_cart|remove_from_cart|view_cart|begin_checkout|add_payment_info|add_shipping_info|purchase|add_to_wishlistThe same single tag will automatically handle the new event type.
Integrating with Other Platforms
The same Data Layer structure that powers this GA4 implementation can feed other marketing platforms. Your Meta Pixel, Google Ads conversion tracking, and other tools can all read from the same ecommerce Data Layer events.
This creates a single source of truth across all your marketing measurement. When properly implemented, every platform receives identical product data from the same source, eliminating discrepancies.
Next Steps: Expanding Your Measurement Foundation
GA4 ecommerce tracking captures the critical conversion behaviours that drive revenue, but it’s one component of a complete measurement infrastructure. Understanding how it connects with traffic attribution, user experience analysis, and cross-platform conversion tracking creates a system that answers your most important business questions.
Immediate Implementation Steps
If you’ve completed the setup in this guide, verify these three things:
Test every event type: Go through your complete purchase flow from category page through checkout completion, confirming each event appears in both GTM Preview and GA4 DebugView.
Check the reports: Wait 24-48 hours for data to populate, then review the Monetization Overview, Ecommerce Purchases, Purchase Journey, and Checkout Journey reports to confirm data appears correctly.
Document your setup: Record which events you’re tracking, any customisations you made to the standard implementation, and where to find the trigger and tag in your GTM container for future reference.
Understanding the Complete Picture
Ecommerce tracking shows you conversion behaviours, but it’s most powerful when combined with a complete measurement foundation. Understanding how users discover your site, which channels drive qualified traffic, and how different segments behave throughout the journey requires additional components working together.
How to Build Your Marketing Measurement Foundation shows you how ecommerce tracking integrates with your complete measurement infrastructure.
Extending to Other Platforms
The Data Layer structure you’re using for GA4 can power tracking across all your marketing platforms. Meta Pixel, Google Ads conversion tracking, and other tools can read from the same ecommerce events, creating consistent measurement across your entire marketing stack.
Our guide on Meta Pixel Tracking Using Google Tag Manager and GA4 Data Layer shows you how to extend this foundation to Facebook advertising measurement.
If You Need Help
Our Marketing Measurement Foundation service provides complete implementation if you prefer expert setup. This includes Data Layer implementation, GTM configuration, and verified tracking across all platforms.
Conclusion: From Data Collection to Business Intelligence
You now have a comprehensive ecommerce tracking implementation that captures every critical interaction from product discovery through purchase completion. This isn’t about having the most tags or collecting the most data points. It’s about having systematic visibility into the behaviours that create revenue.
The single tag with regex trigger method creates a maintainable, scalable foundation. When you need to add new event types or modify tracking, you update one trigger pattern rather than rebuilding dozens of individual configurations.
More importantly, you’ve built the infrastructure that powers the critical GA4 reports that answer your most important business questions. You can now see which products drive engagement, where customers abandon the purchase flow, and which traffic sources bring buyers versus browsers.
The difference between having analytics installed and having actionable ecommerce measurement is the difference between guessing and knowing. You’ve moved from the former to the latter.