
For years, tracking what happens on your website meant submitting tickets to developers and waiting weeks for changes. Want to see if anyone clicked your “Buy Now” button? That’ll be three weeks and a developer’s hourly rate. Need to install the Facebook Pixel before your campaign launches tomorrow? Too bad.
This bottleneck didn’t just slow things down. It forced small businesses to choose between flying blind or paying premium rates for routine changes. Google Tag Manager changes everything by letting you control your own tracking infrastructure without touching code.
Table of Contents
Why Google Tag Manager Matters for Your Business
Before we dive into installation, you need to understand what Google Tag Manager actually does and why it’s worth your time.
The Old Way Was Expensive and Slow
In the traditional setup, every tracking tool you wanted to use required hardcoding a script directly into your website. Installing Google Analytics? That’s one script. Adding the Meta Pixel for Facebook ads? Another script. Google Ads conversion tracking? Yet another.
Each script had to be manually placed in your site’s code by someone with developer access. If you wanted to change anything, remove a tool, or add a new one, you needed developer time again.
This created several problems. Implementation took days or weeks instead of minutes. Every change cost money in developer fees. Multiple scripts competed for browser resources, slowing down your site. Managing everything was chaotic, with tracking codes scattered throughout your codebase and no central view of what was installed.
The Google Tag Manager Advantage
Google Tag Manager acts as a central hub. You install it once on your website, and from that point forward, you manage all your other tracking tools through GTM‘s web interface.
Think of it like this: instead of hardwiring each appliance directly into your walls, you install one smart hub. Every other device connects to that hub wirelessly. You can add, remove, or configure devices through an app without ever touching the walls again.

Here’s what changes when you use GTM:
Speed: Deploy new tracking in minutes instead of waiting for developer availability. When you launch a campaign, you can set up conversion tracking the same day.
Cost: After the initial installation, you rarely need developer time for tracking changes. This saves hundreds or thousands of pounds annually in technical maintenance.
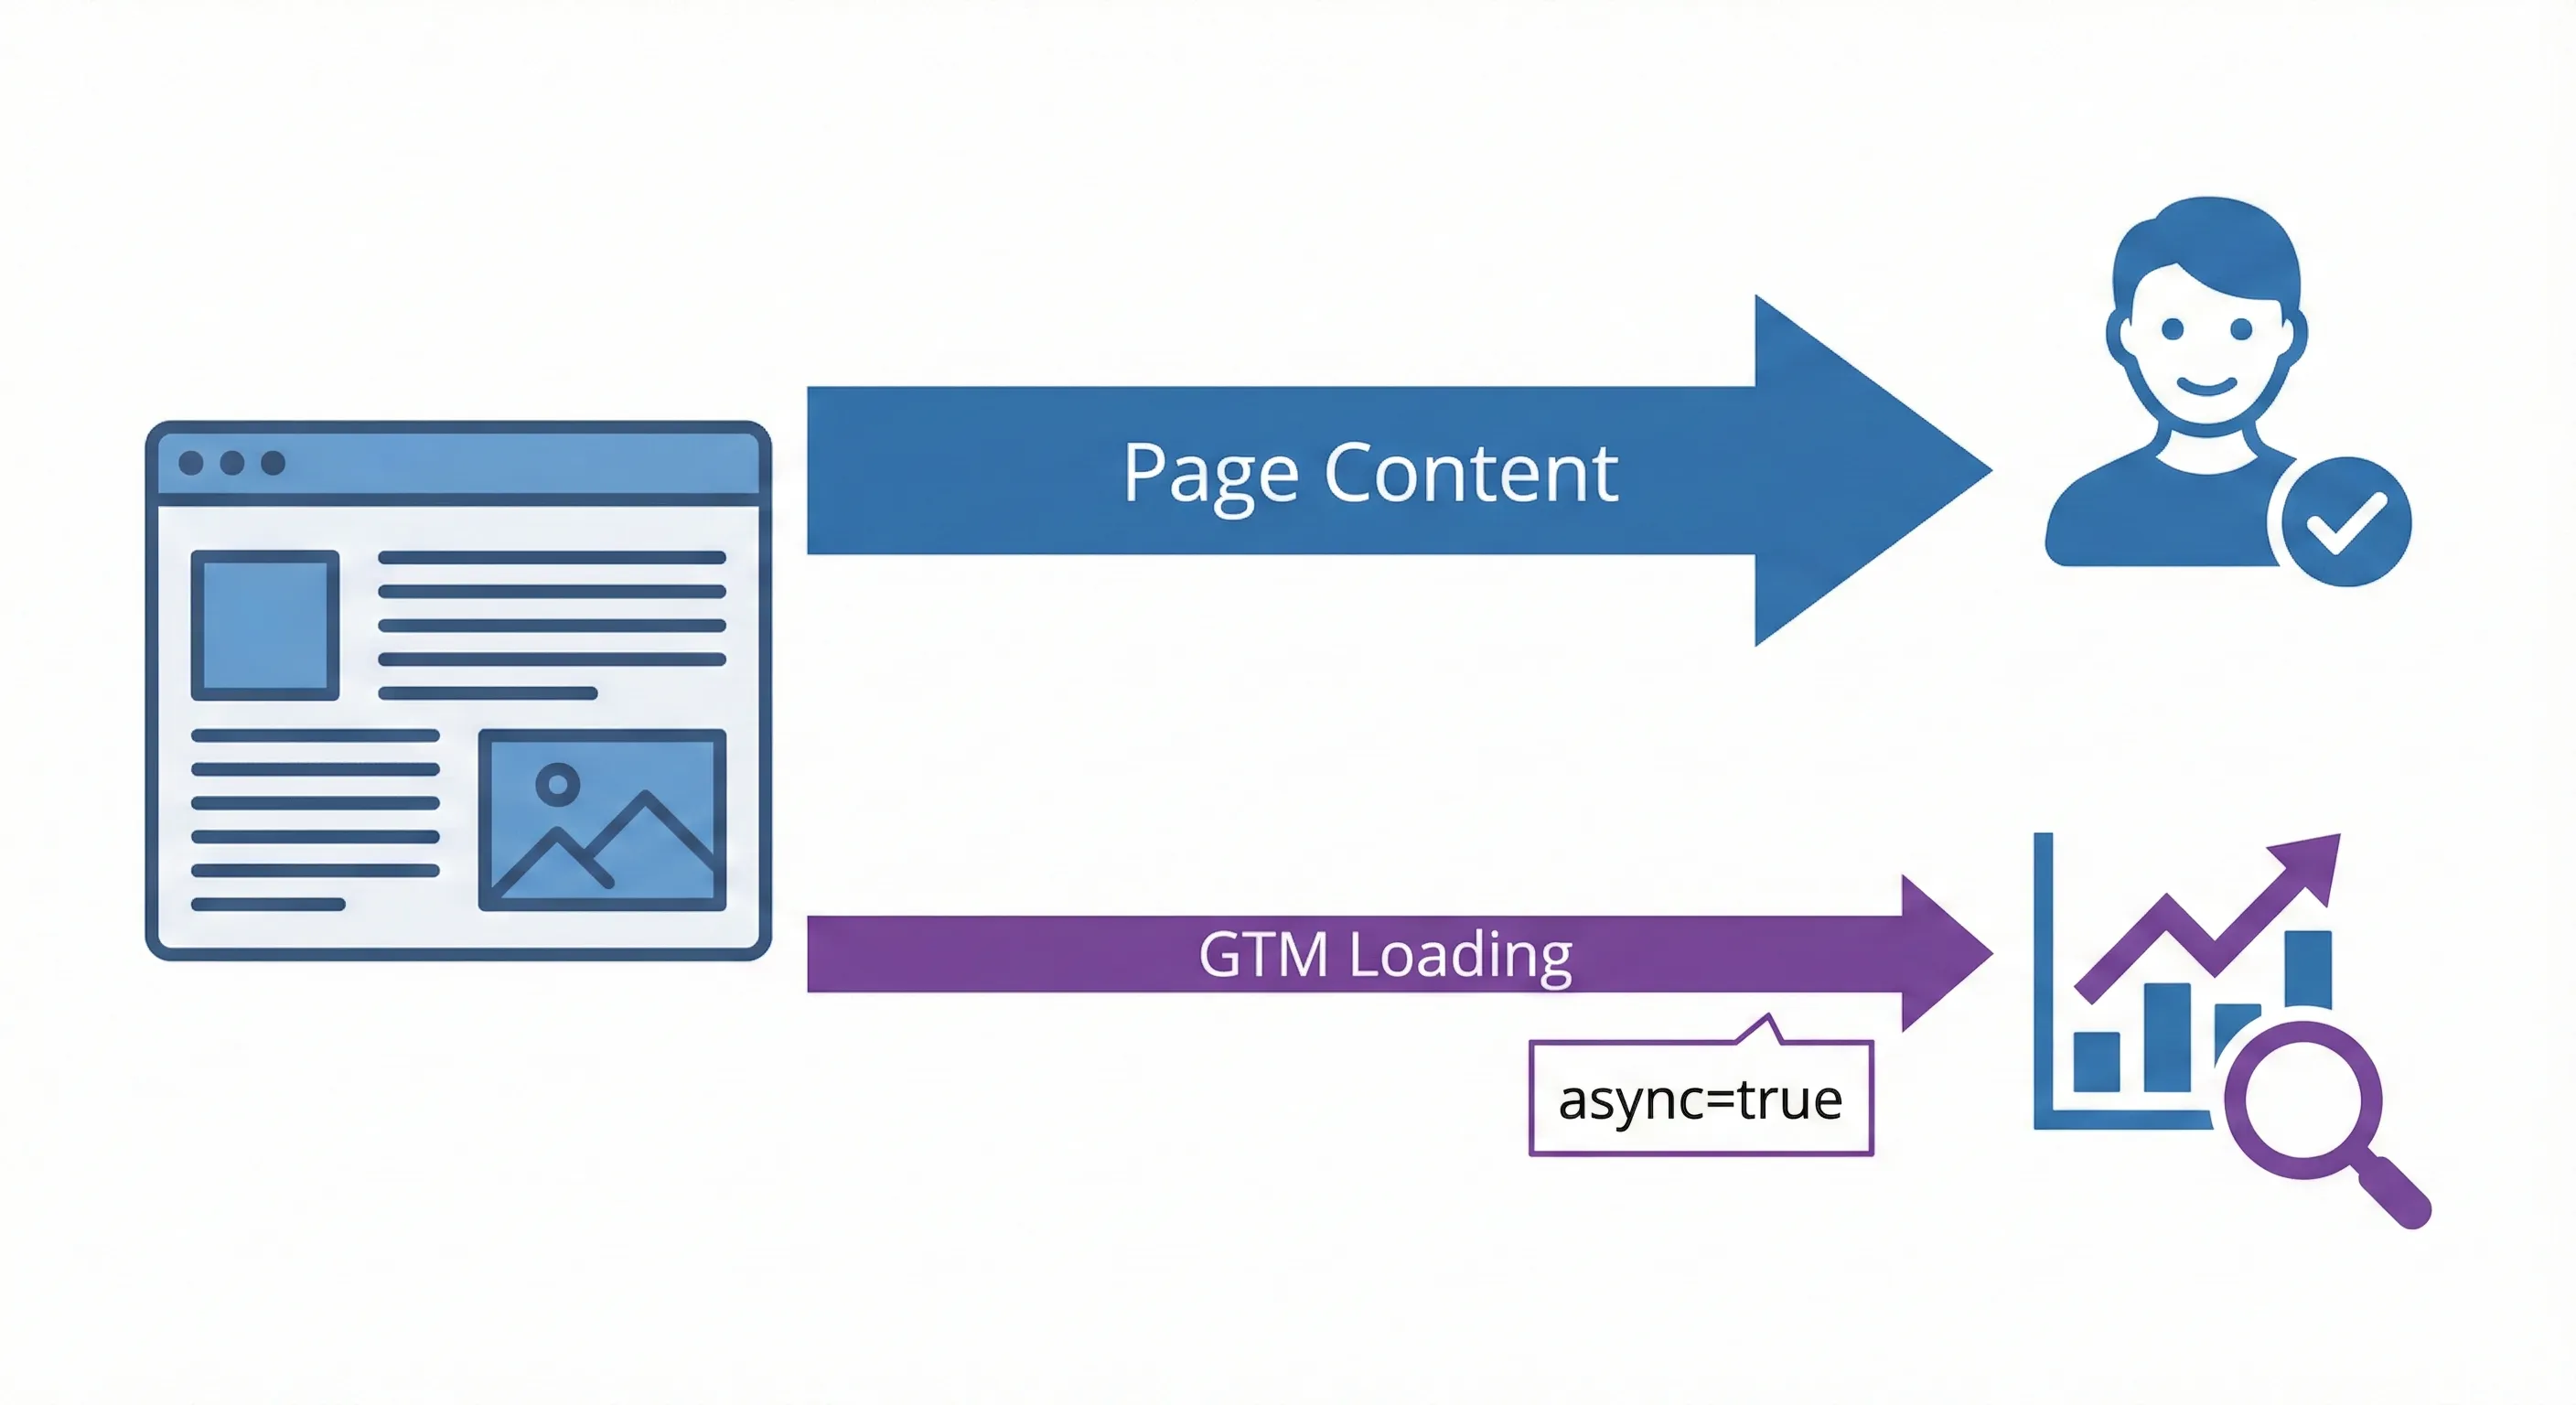
Performance: GTM loads all your tags asynchronously, meaning they don’t block your page from loading. Your site stays fast even with multiple tracking tools running.
Control: Everything lives in one dashboard. You can see exactly what’s tracking on your site, turn things on or off instantly, and test changes before they go live.
Data Quality: With built-in debugging tools, you catch tracking errors immediately instead of discovering weeks later that your conversion tracking never worked.
For small businesses and beginner marketers, GTM removes the fear of breaking something. You can experiment with tracking setups in a safe environment, knowing you won’t accidentally crash your checkout page.
Understanding GTM’s Structure: Accounts and Containers
Before creating anything, you need to understand how Google Tag Manager organises things. Getting this wrong causes headaches later.
The Two-Level Hierarchy
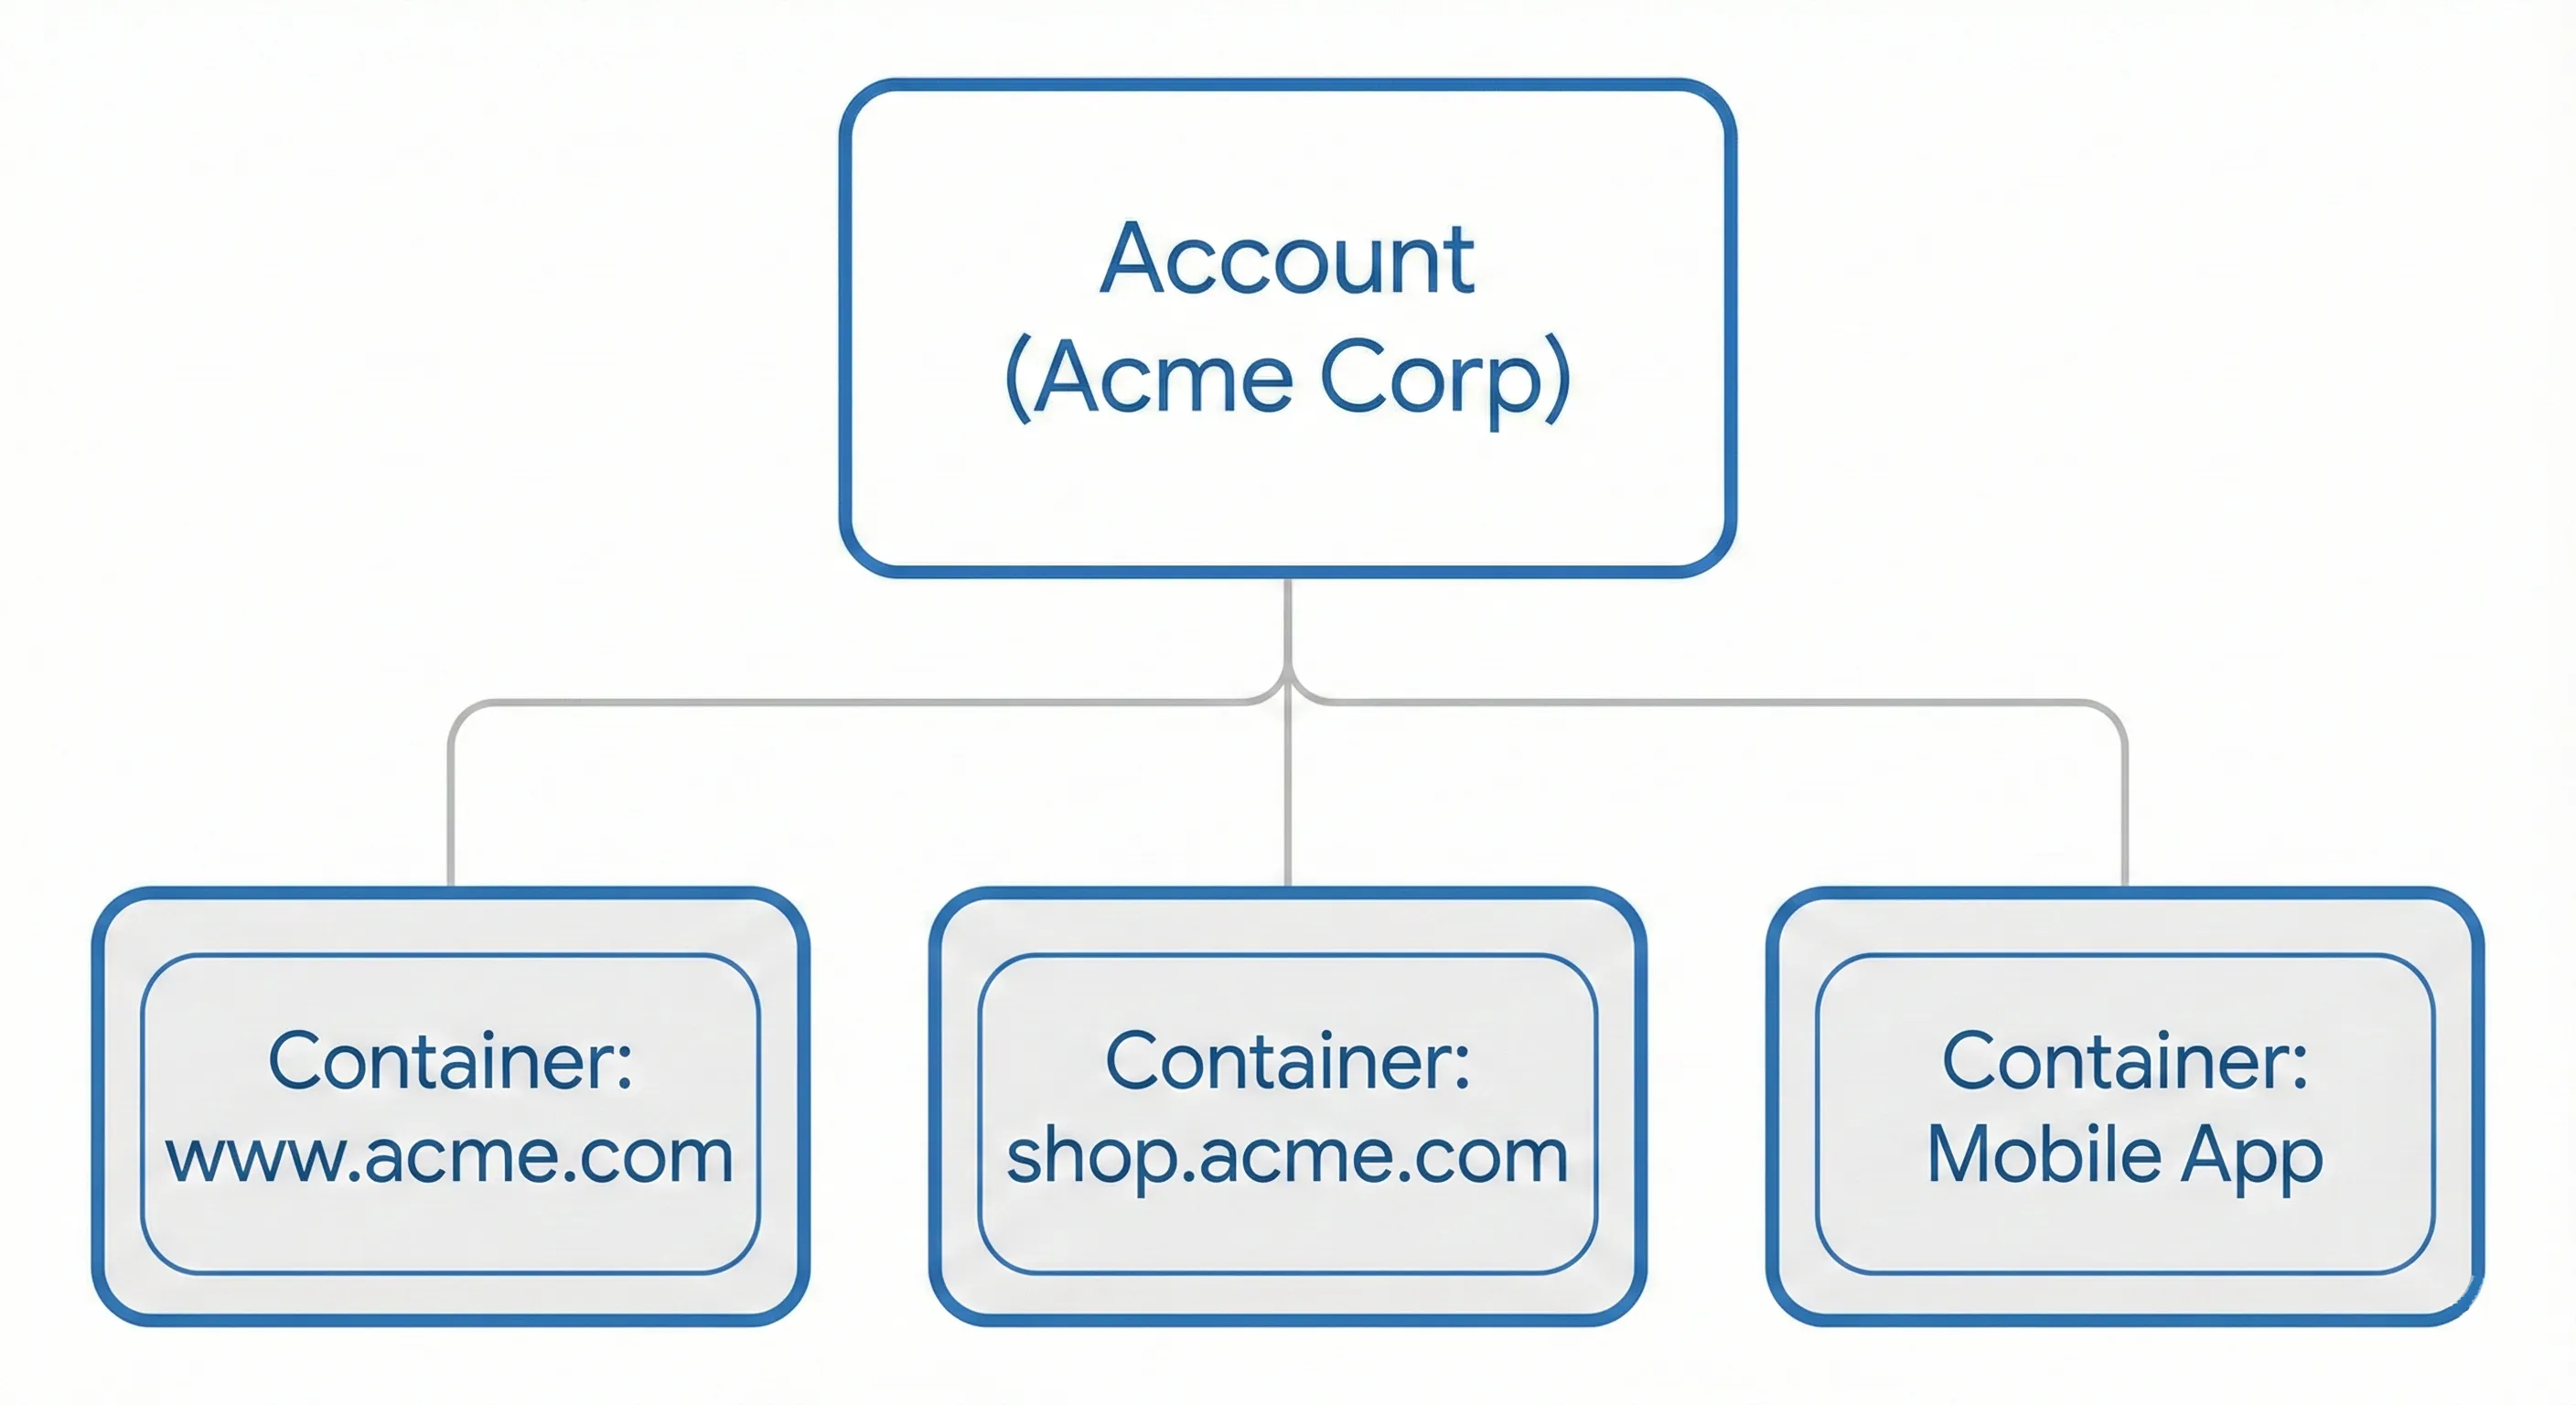
GTM uses a two-level system: Accounts and Containers.
An Account represents your business or organisation. If your company is called Acme Corp, your account should be named “Acme Corp”. This is the legal entity that owns the data.
A Container represents a specific digital property. Most commonly, this is a website. If you have www.acme.com, you’d create a container called “www.acme.com“. If you later build a mobile app or a second website, you’d create additional containers under the same account.
One account can hold multiple containers, but each website needs its own container.
Why This Matters
The account level controls ownership and permissions. Whoever owns the Google account that creates the GTM account owns all the data inside it.
Here’s a critical mistake many businesses make: they hire an agency to set up tracking, and the agency creates the GTM account under their own company name using their own Google account. Years later, when you part ways with that agency, you discover you don’t own your tracking setup. You lose all your historical data and configurations.
Always create the account under your company’s name using a company-controlled Google account. If you’re an agency setting this up for a client, use the client’s account and make them the owner. You can be added as a user with permissions afterward.
Prerequisites: What You Need Before Starting
Before you begin, make sure you have these two things ready:
A Company Google Account
Don’t use your personal Gmail address (like john.doe@gmail.com) to create business assets. If you leave the company or something happens to that personal account, access to your tracking infrastructure goes with it.
Use one of these instead:
- A
Google Workspaceaccount (e.g., marketing@yourcompany.com) - A dedicated Google account created specifically for managing marketing tools
- The business owner’s primary business Google account
The key is that the business entity must control the account, not an individual employee.
Administrative Access to Your Website
You’ll need to install code on your site. Depending on your platform, this means:
- Shopify: Admin access to your Shopify dashboard
- WordPress: Admin login credentials with the ability to install plugins or edit theme files
- Squarespace: Admin access to your site settings
- Custom sites: FTP access or access to your hosting control panel
If you don’t have this access, get it before proceeding. You can create the GTM account without it, but you won’t be able to complete the installation.
Creating Your Google Tag Manager Account
Now we’ll walk through the actual account creation process, step by step.
Step 1: Navigate to Google Tag Manager
Open your browser and go to tagmanager.google.com. Sign in with the Google account you’ve decided to use (remember, this should be a company-controlled account).
You’ll land on the “All Accounts” dashboard. For new users, this will be empty. Look for the Create Account button, typically in the top-right corner or prominently displayed in the centre of the screen.

Click Create Account.
Step 2: Configure Your Account Settings
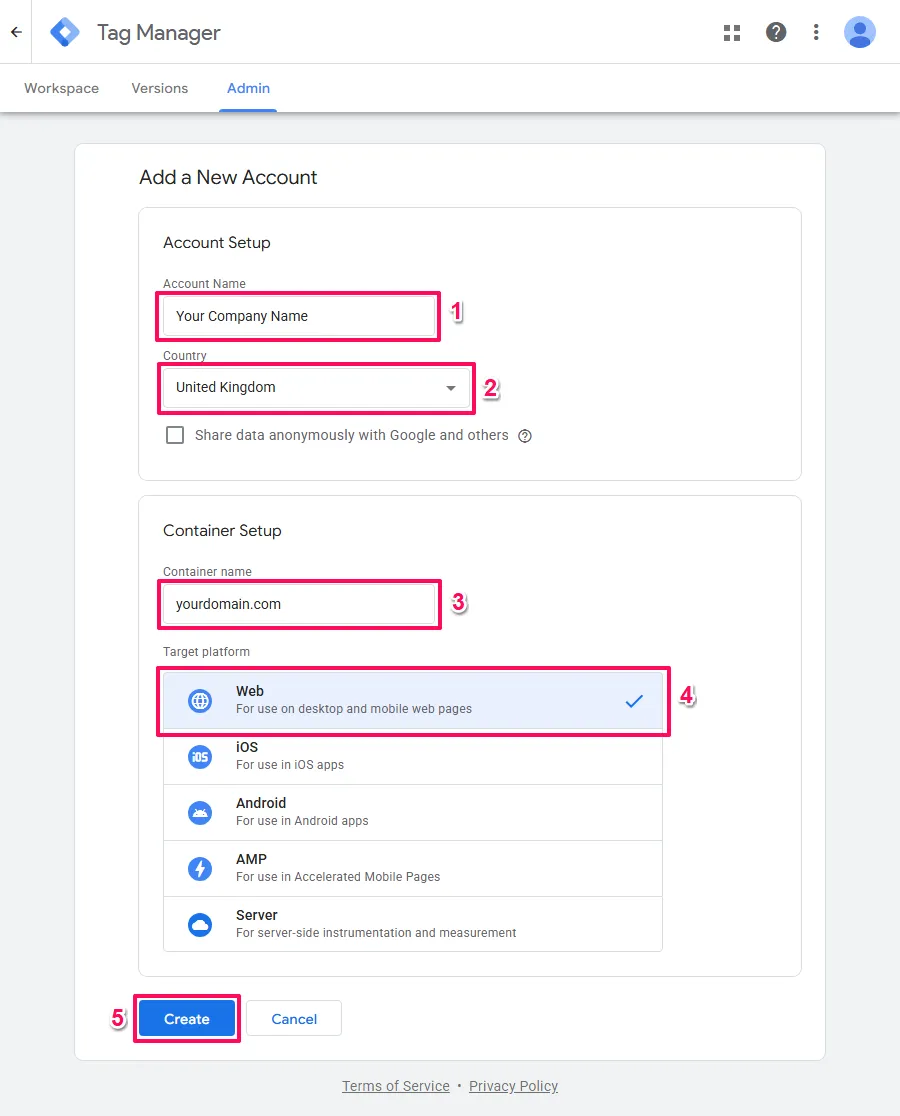
A setup screen appears with two main sections: Account Setup and Container Setup. We’ll fill out the account information first.
Account Name: Enter your company’s official business name. If you’re Acme Corporation, write “Acme Corporation”. Don’t use your website URL here, and definitely don’t use your agency’s name if you’re setting this up for a client.
Country: Select the country where your business is legally registered. This determines which data processing terms Google presents to you. For most businesses, this is straightforward—just pick where you’re based.
Data Sharing: You’ll see a checkbox asking if you want to “Share data anonymously with Google and others”. This allows Google to include your site’s anonymised data in industry benchmarks (things like “average ecommerce bounce rates”). The data is fully anonymised, so enabling this won’t expose your specific business information to competitors. Most small businesses can safely enable this, but if you have strict privacy requirements or unusual NDAs, you can leave it unchecked. It doesn’t affect GTM‘s functionality either way.
Step 3: Configure Your Container Settings
Now move to the Container Setup section on the same screen.
Container Name: Enter your website’s domain name, including the subdomain if relevant. For example, “www.acme.com” or “shop.acme.com”. Using the URL makes it easy to identify which container belongs to which property if you end up managing multiple sites.
Target Platform: This is crucial. You’ll see several options:
- Web: This is what you want for a normal website, whether it’s desktop or mobile-responsive. This generates JavaScript code. Choose this if you’re using
Shopify,WordPress,Wix,Squarespace, or any standard website platform. - iOS / Android: These are for native mobile apps that users download from app stores. Don’t select these for a mobile-friendly website. Only choose these if you’re literally building an app.
- AMP: This is for Accelerated Mobile Pages, a specific stripped-down format used primarily by news publishers. Unless you explicitly know you’re building
AMPpages, ignore this option. - Server: This is for server-side
GTM, an advanced configuration where tracking happens in the cloud rather than the user’s browser. It requires technical infrastructure, costs money to host, and is unnecessary for beginners. Skip this.
For a standard website, select Web and click Create.
Step 4: Accept the Terms of Service
A panel slides out displaying Google’s Terms of Service. This includes the Data Processing Terms required by data protection laws like GDPR.
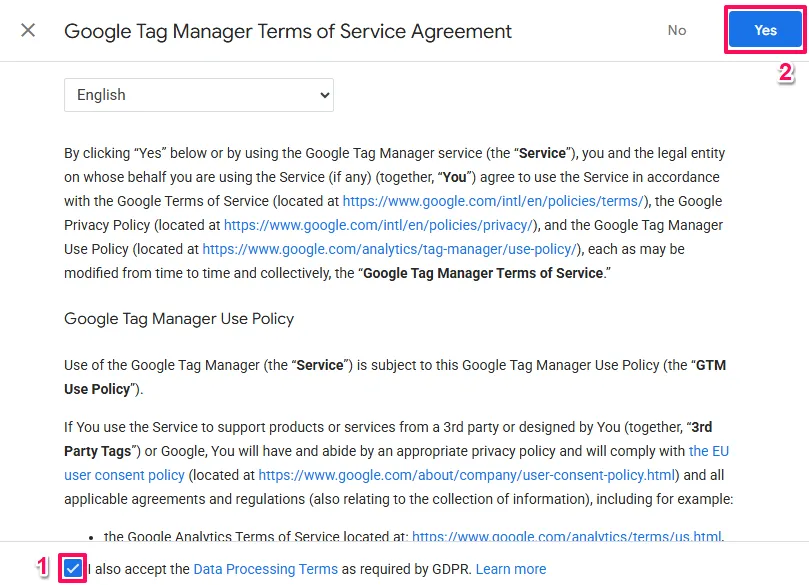
You need to review and accept these terms. Check the box indicating you accept the Data Processing Terms (the exact wording may vary slightly depending on your region), then click Yes or Continue.
Step 5: Your First Look at the Interface
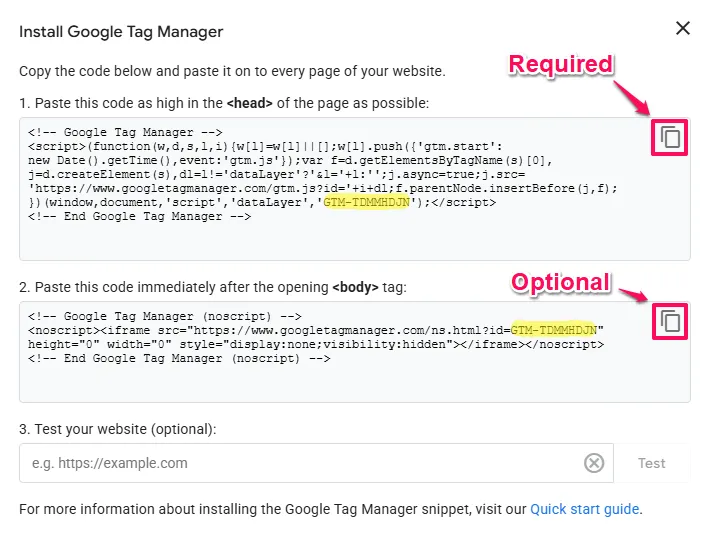
The screen refreshes and you’re now inside your new GTM workspace. Simultaneously, a modal window appears displaying two blocks of code.
Don’t close this window yet. This code is what we’ll install on your website in the next phase.
Understanding the Installation Code
Before we install anything, let’s understand what these two code snippets actually do. You don’t need to become a developer, but understanding the basics helps you troubleshoot issues and make informed decisions later.
The Head Snippet: Your Main Engine
The first code block is a <script> tag that you’ll place in the <head> section of your website. This is the engine that powers everything.
When someone visits your site, their browser reads this script and does several things instantly:
It creates something called the dataLayer, which is essentially an invisible bucket that lives in the browser’s memory. This bucket allows your website to send messages to GTM (like “the user just added a product to their cart” or “someone clicked the phone number”).
It then makes a request to Google’s servers to download your specific container configuration—all the tags, triggers, and settings you’ve configured in GTM.
The critical detail here is that it does this asynchronously. In the old days, tracking scripts would force your website to freeze and wait while they loaded. Modern GTM code includes async=true, which tells the browser: “Load this in the background while you continue showing the rest of the page.” This means even if Google’s servers were slow (rare, but possible), your website content would still appear immediately.
Why Position Matters
The installation instructions tell you to place this code “as high in the <head> as possible”. This isn’t arbitrary.
Browsers read code from top to bottom. If you put GTM at the top of your <head>, it starts loading immediately when someone lands on your page. If someone clicks a button one second after arriving, GTM is already awake and records that click.
If you bury the code at the bottom of your page or in the footer, GTM loads last. A user who lands on the wrong page and hits the back button within one second might leave before GTM ever loads. That visit disappears from your data entirely. In analytics, this is called “latency-induced data loss”.
Placing the code high means capturing the maximum possible percentage of user activity.
The Body Snippet: Your Backup System
The second code block uses a <noscript> tag wrapped around an <iframe>. This is your safety net.
The <noscript> tag tells the browser: “Only execute the code inside me if JavaScript is disabled.” About 98-99% of web users today have JavaScript enabled because the modern web simply doesn’t function without it. Facebook, Gmail, Amazon—none of these work with JavaScript turned off.
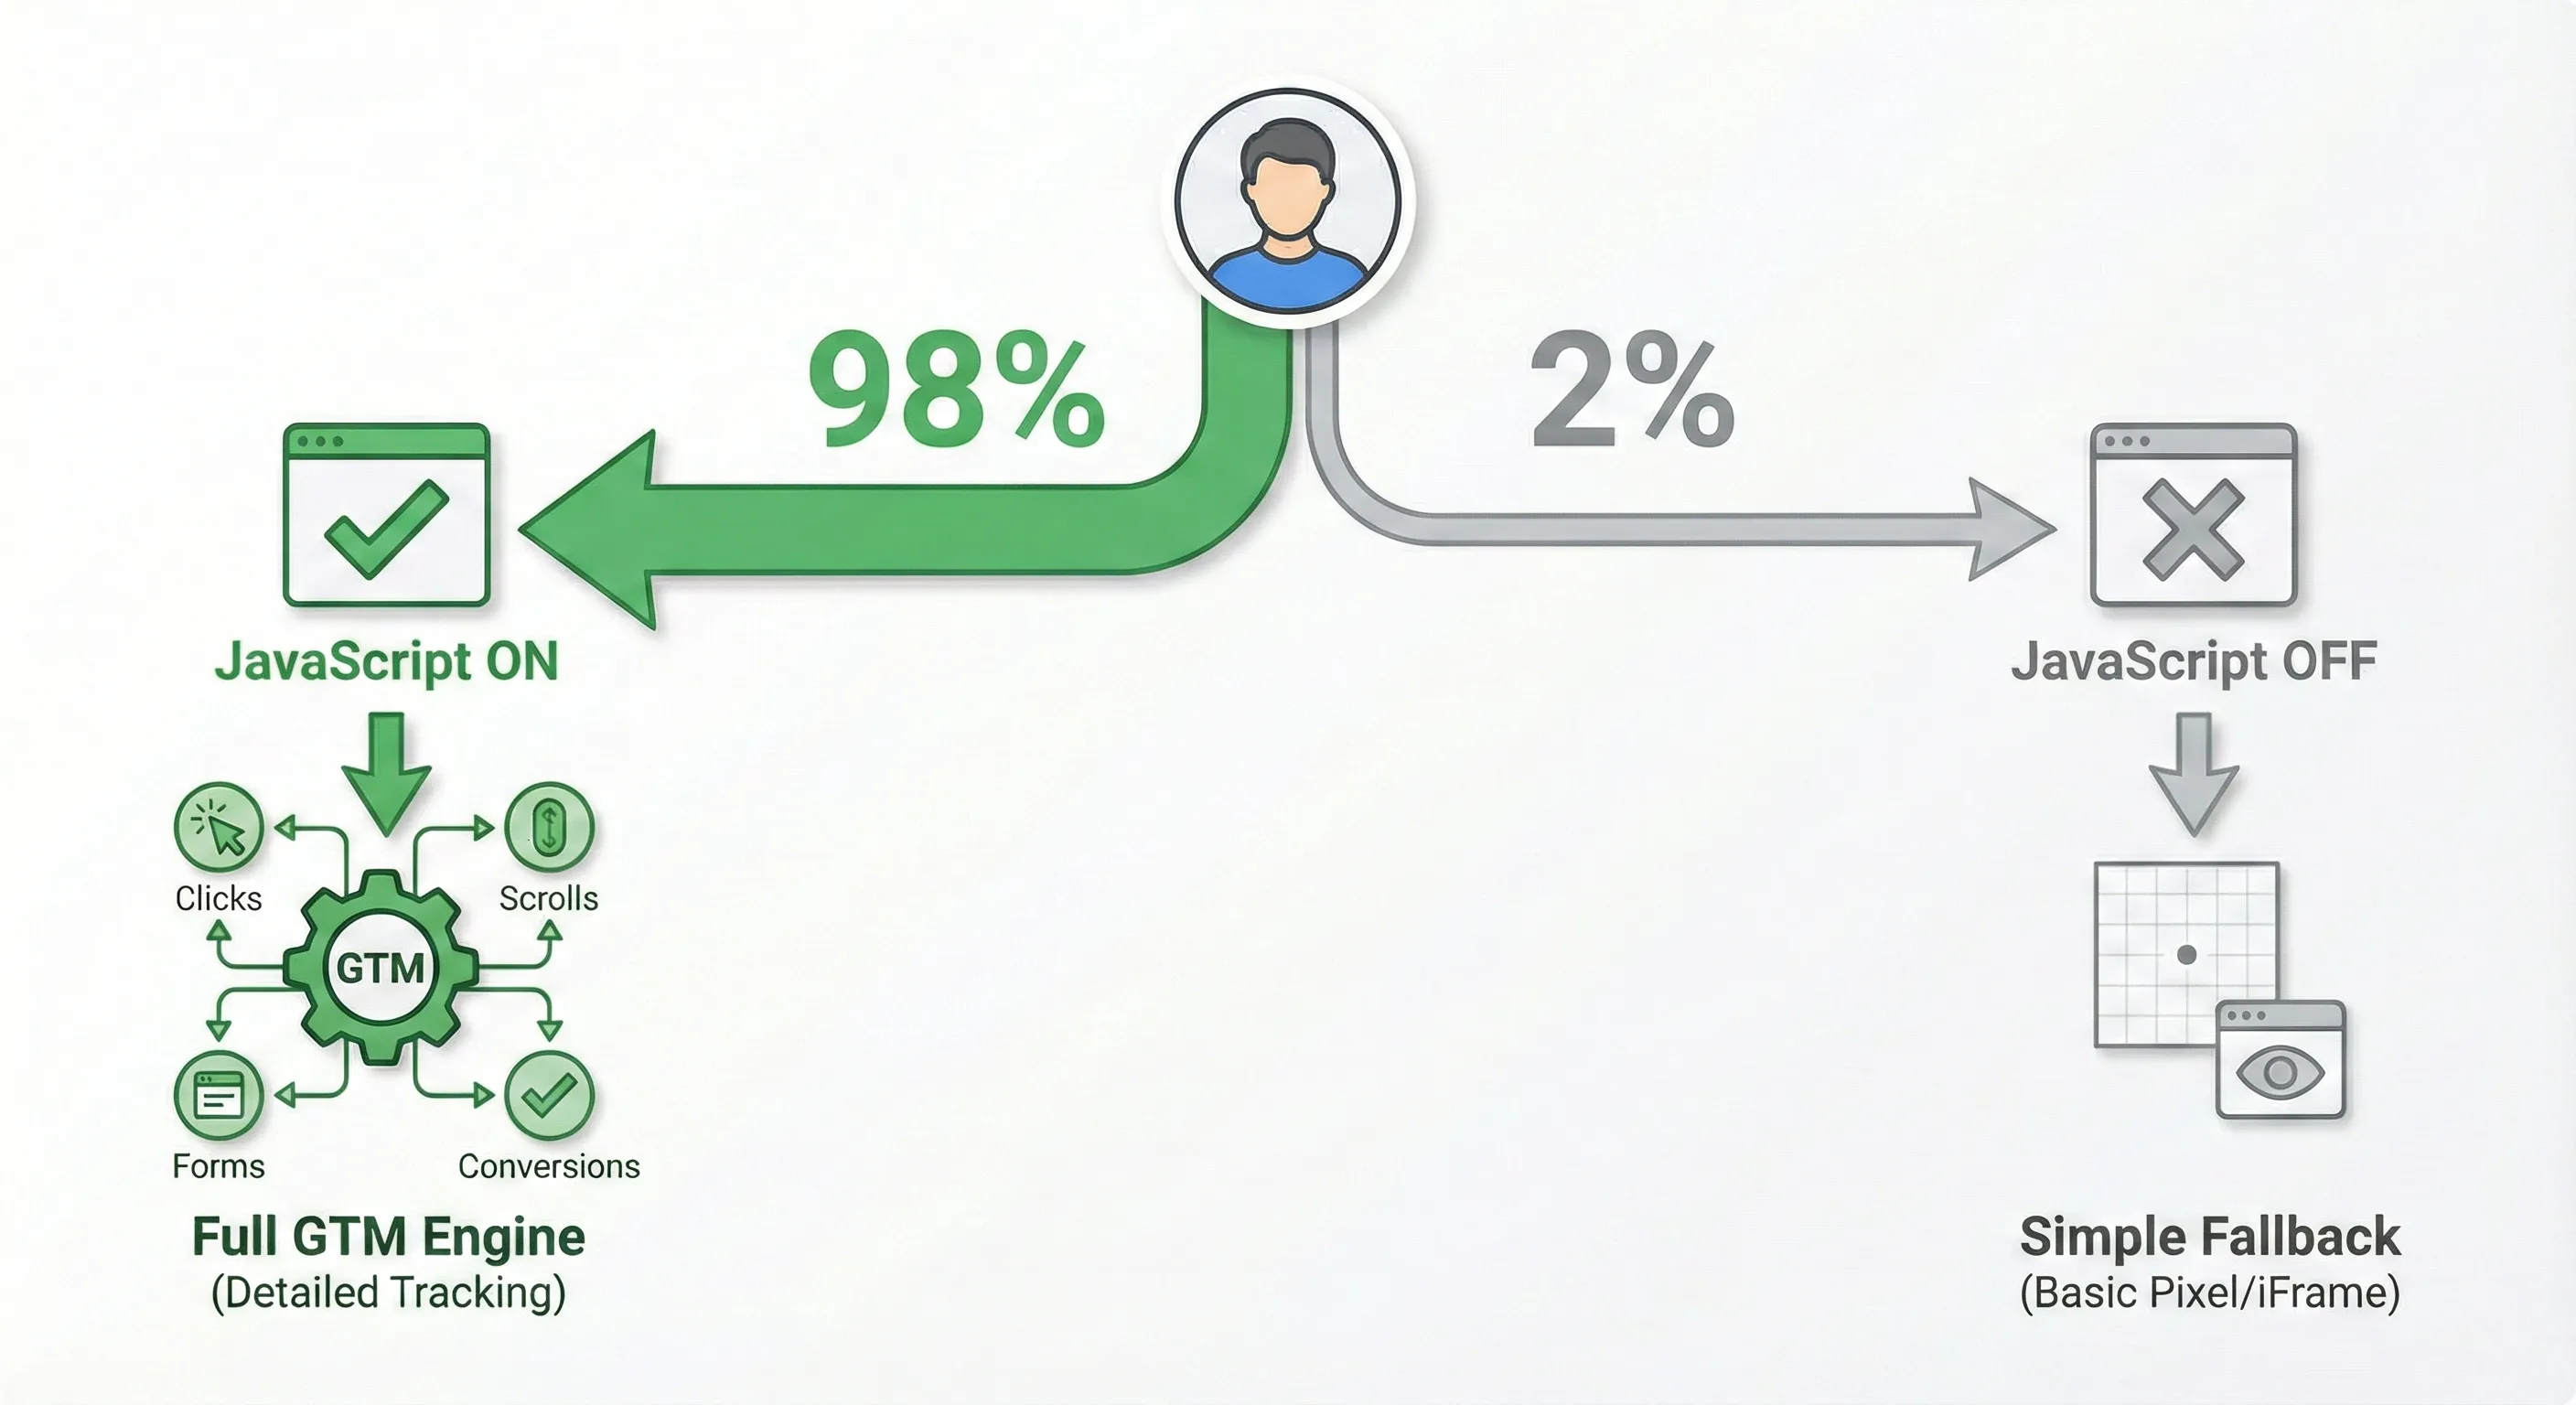
However, a small minority of users might have it disabled due to strict corporate firewalls, accessibility tools that use text-only browsers, or aggressive privacy extensions.
If JavaScript is off, your main GTM engine is dead. It can’t run. The browser sees the <noscript> tag and loads a tiny, invisible 1×1 pixel frame instead. This frame allows a basic “hit” to be sent to Google Analytics, so you at least know a visit occurred. It can’t track clicks, form submissions, or scrolls, but it counts the person.
The instructions say to place this “immediately after the opening <body> tag” because an iframe is technically a visual element (even though it’s hidden). Placing visual elements in the <head> section violates HTML standards and can cause rendering problems.
Choosing Your Installation Method
Here’s where paths diverge based on your website platform. The universal manual installation method (copying and pasting those two code blocks) assumes you’re working with custom HTML.
Most businesses don’t build from scratch. They use platforms like Shopify, WordPress, Squarespace, or Wix. These platforms have specific integrations that are easier and more reliable than manual code insertion.
If you’re using one of the following platforms, use the platform-specific method instead of the manual installation:
Shopify Users
Shopify limits access to checkout and thank you page code unless you’re on Shopify Plus. To track purchases correctly, you need to use Shopify’s built-in Google Tag Manager integration found in Settings > Customer Events or the legacy method in Online Store > Preferences. Don’t try to manually paste code into your theme files—it won’t capture checkout events properly.
WordPress Users
WordPress themes update frequently. If you paste tracking code directly into your header.php file, a theme update can completely wipe it out, breaking all your tracking overnight.
Instead, use a plugin like GTM4WP (Google Tag Manager for WordPress) or Insert Headers and Footers. These plugins create a safe location for your code that survives theme updates. GTM4WP is particularly powerful because it automatically creates many useful dataLayer variables for ecommerce sites using WooCommerce.
Squarespace Users
Squarespace has a dedicated Code Injection feature in Settings > Advanced > Code Injection. Use this instead of trying to access template files directly. Paste the head snippet in the Header section and the body snippet in the Footer section (Squarespace handles body placement automatically).
Wix Users
Wix doesn’t allow direct code editing of master template files. Instead, go to Settings > Tracking & Analytics > New Tool > Custom and paste your GTM container ID. Wix handles the installation automatically.
Custom or HTML Sites
If you’re working with a custom-coded website (or a platform not listed above), proceed with the universal manual installation described in the next section.
Universal Manual Installation for Custom Sites
This section covers the fundamental installation method for sites where you have direct access to the HTML source code.
Step 1: Retrieve Your Installation Code
If you closed the modal window that appeared when you created your container, you can get the code back easily.
Look at the top of your GTM interface. You’ll see your Container ID displayed in the format GTM-XXXXXX, usually in blue text near the top-right corner.
Click on that Container ID. The “Install Google Tag Manager” modal reappears with your two code snippets.
Step 2: Access Your Website’s Source Files
You need to edit the file that controls the global header of your website. This varies depending on your site’s technology:
Static HTML sites: Open your index.html file (and any other .html files if they don’t share a common template).
PHP sites: Look for header.php, often found in includes/header.php or template-top.php.
JavaScript frameworks (React, Vue, Angular): Look for public/index.html or your main App component file.
Access method: Use FTP software (like FileZilla), your hosting control panel’s file manager, or connect via SSH if you’re comfortable with the command line.
Step 3: Install the Head Snippet
Copy the top code block from the GTM modal (the one that starts with <script>).
In your source file, find the opening <head> tag. This is near the top of your HTML document.
Google says to place it “as high as possible” in the <head>, but there’s a small caveat. Your <head> section probably has tags that look like this near the very top:
html
<meta charset="UTF-8">
<meta name="viewport" content="width=device-width, initial-scale=1.0">
The charset tag tells the browser what character encoding to use (UTF-8 handles English, Japanese, emoji, etc.). Place your GTM code after these meta tags but before any other scripts, stylesheets, or title tags.
Here’s what it should look like:
html
<!DOCTYPE html>
<html lang="en">
<head>
    <meta charset="UTF-8">
    <meta name="viewport" content="width=device-width, initial-scale=1.0">

    <!-- Google Tag Manager -->
    <script>(function(w,d,s,l,i){w[l]=w[l]||[];w[l].push({'gtm.start':
    new Date().getTime(),event:'gtm.js'});var f=d.getElementsByTagName(s)[0],
    j=d.createElement(s),dl=l!='dataLayer'?'&l='+l:'';j.async=true;j.src=
    'https://www.googletagmanager.com/gtm.js?id='+i+dl;f.parentNode.insertBefore(j,f);
    })(window,document,'script','dataLayer','GTM-XXXXXX');</script>
    <!-- End Google Tag Manager -->

    <title>My Website</title>
    <link rel="stylesheet" href="styles.css">
</head>
Replace GTM-XXXXXX with your actual container ID.
Step 4: Install the Body Snippet
Copy the bottom code block from GTM (the one wrapped in <noscript> tags).
Scroll down in your source file to find where the <head> section ends. You’ll see </head> followed immediately by <body>.
Paste the body snippet directly after the opening <body> tag. It should be the very first thing inside the body, before your navigation menu, logo, or any content.
Here’s the correct placement:
html
</head>
<body>
    <!-- Google Tag Manager (noscript) -->
    <noscript><iframe src="https://www.googletagmanager.com/ns.html?id=GTM-XXXXXX"
    height="0" width="0" style="display:none;visibility:hidden"></iframe></noscript>
    <!-- End Google Tag Manager (noscript) -->

    <nav>
        <!-- Your navigation menu -->
    </nav>
    <main>
        <!-- Your page content -->
    </main>
</body>
</html>
Again, replace GTM-XXXXXX with your actual container ID.
Step 5: Save and Upload
Save your edited file. If you’re working on your local computer, upload the file back to your web server using FTP or your hosting control panel.
If your site uses multiple HTML files that don’t share a common template, you’ll need to repeat this process for each file. This is one reason why platforms with shared templates (like WordPress) are easier to manage.
Verifying Your Installation with Preview Mode
Installing code is only half the job. You need to verify it’s actually working before you trust your data.
In the past, verification meant reading source code or installing browser plugins. Modern GTM has a sophisticated built-in tool called Preview Mode (also known as Tag Assistant).
Starting a Debug Session
Go back to your GTM workspace. Make sure you’re in the correct workspace (you’ll typically see “Default Workspace” in the top bar).
Look for the Preview button in the top-right corner, next to the blue Submit button. Click Preview.
A new browser tab opens, taking you to tagassistant.google.com. This is your debugging control centre.
Connecting to Your Website
You’ll see a screen with a field asking for your website URL. Enter your full website address, including https:// (for example, https://www.yourwebsite.com).
Make sure the checkbox labeled “Include debug signal in the URL” is checked. This setting appends a special parameter to your URL that tells GTM: “The owner is testing. Switch to diagnostic mode.”
Click Connect.
What Happens Next
If everything is installed correctly, two things happen simultaneously:
Your website opens in a new tab or window. Look at the bottom-right corner of this window. You should see a small badge that says “Tag Assistant Connected”. This is your first confirmation that GTM is live and working.
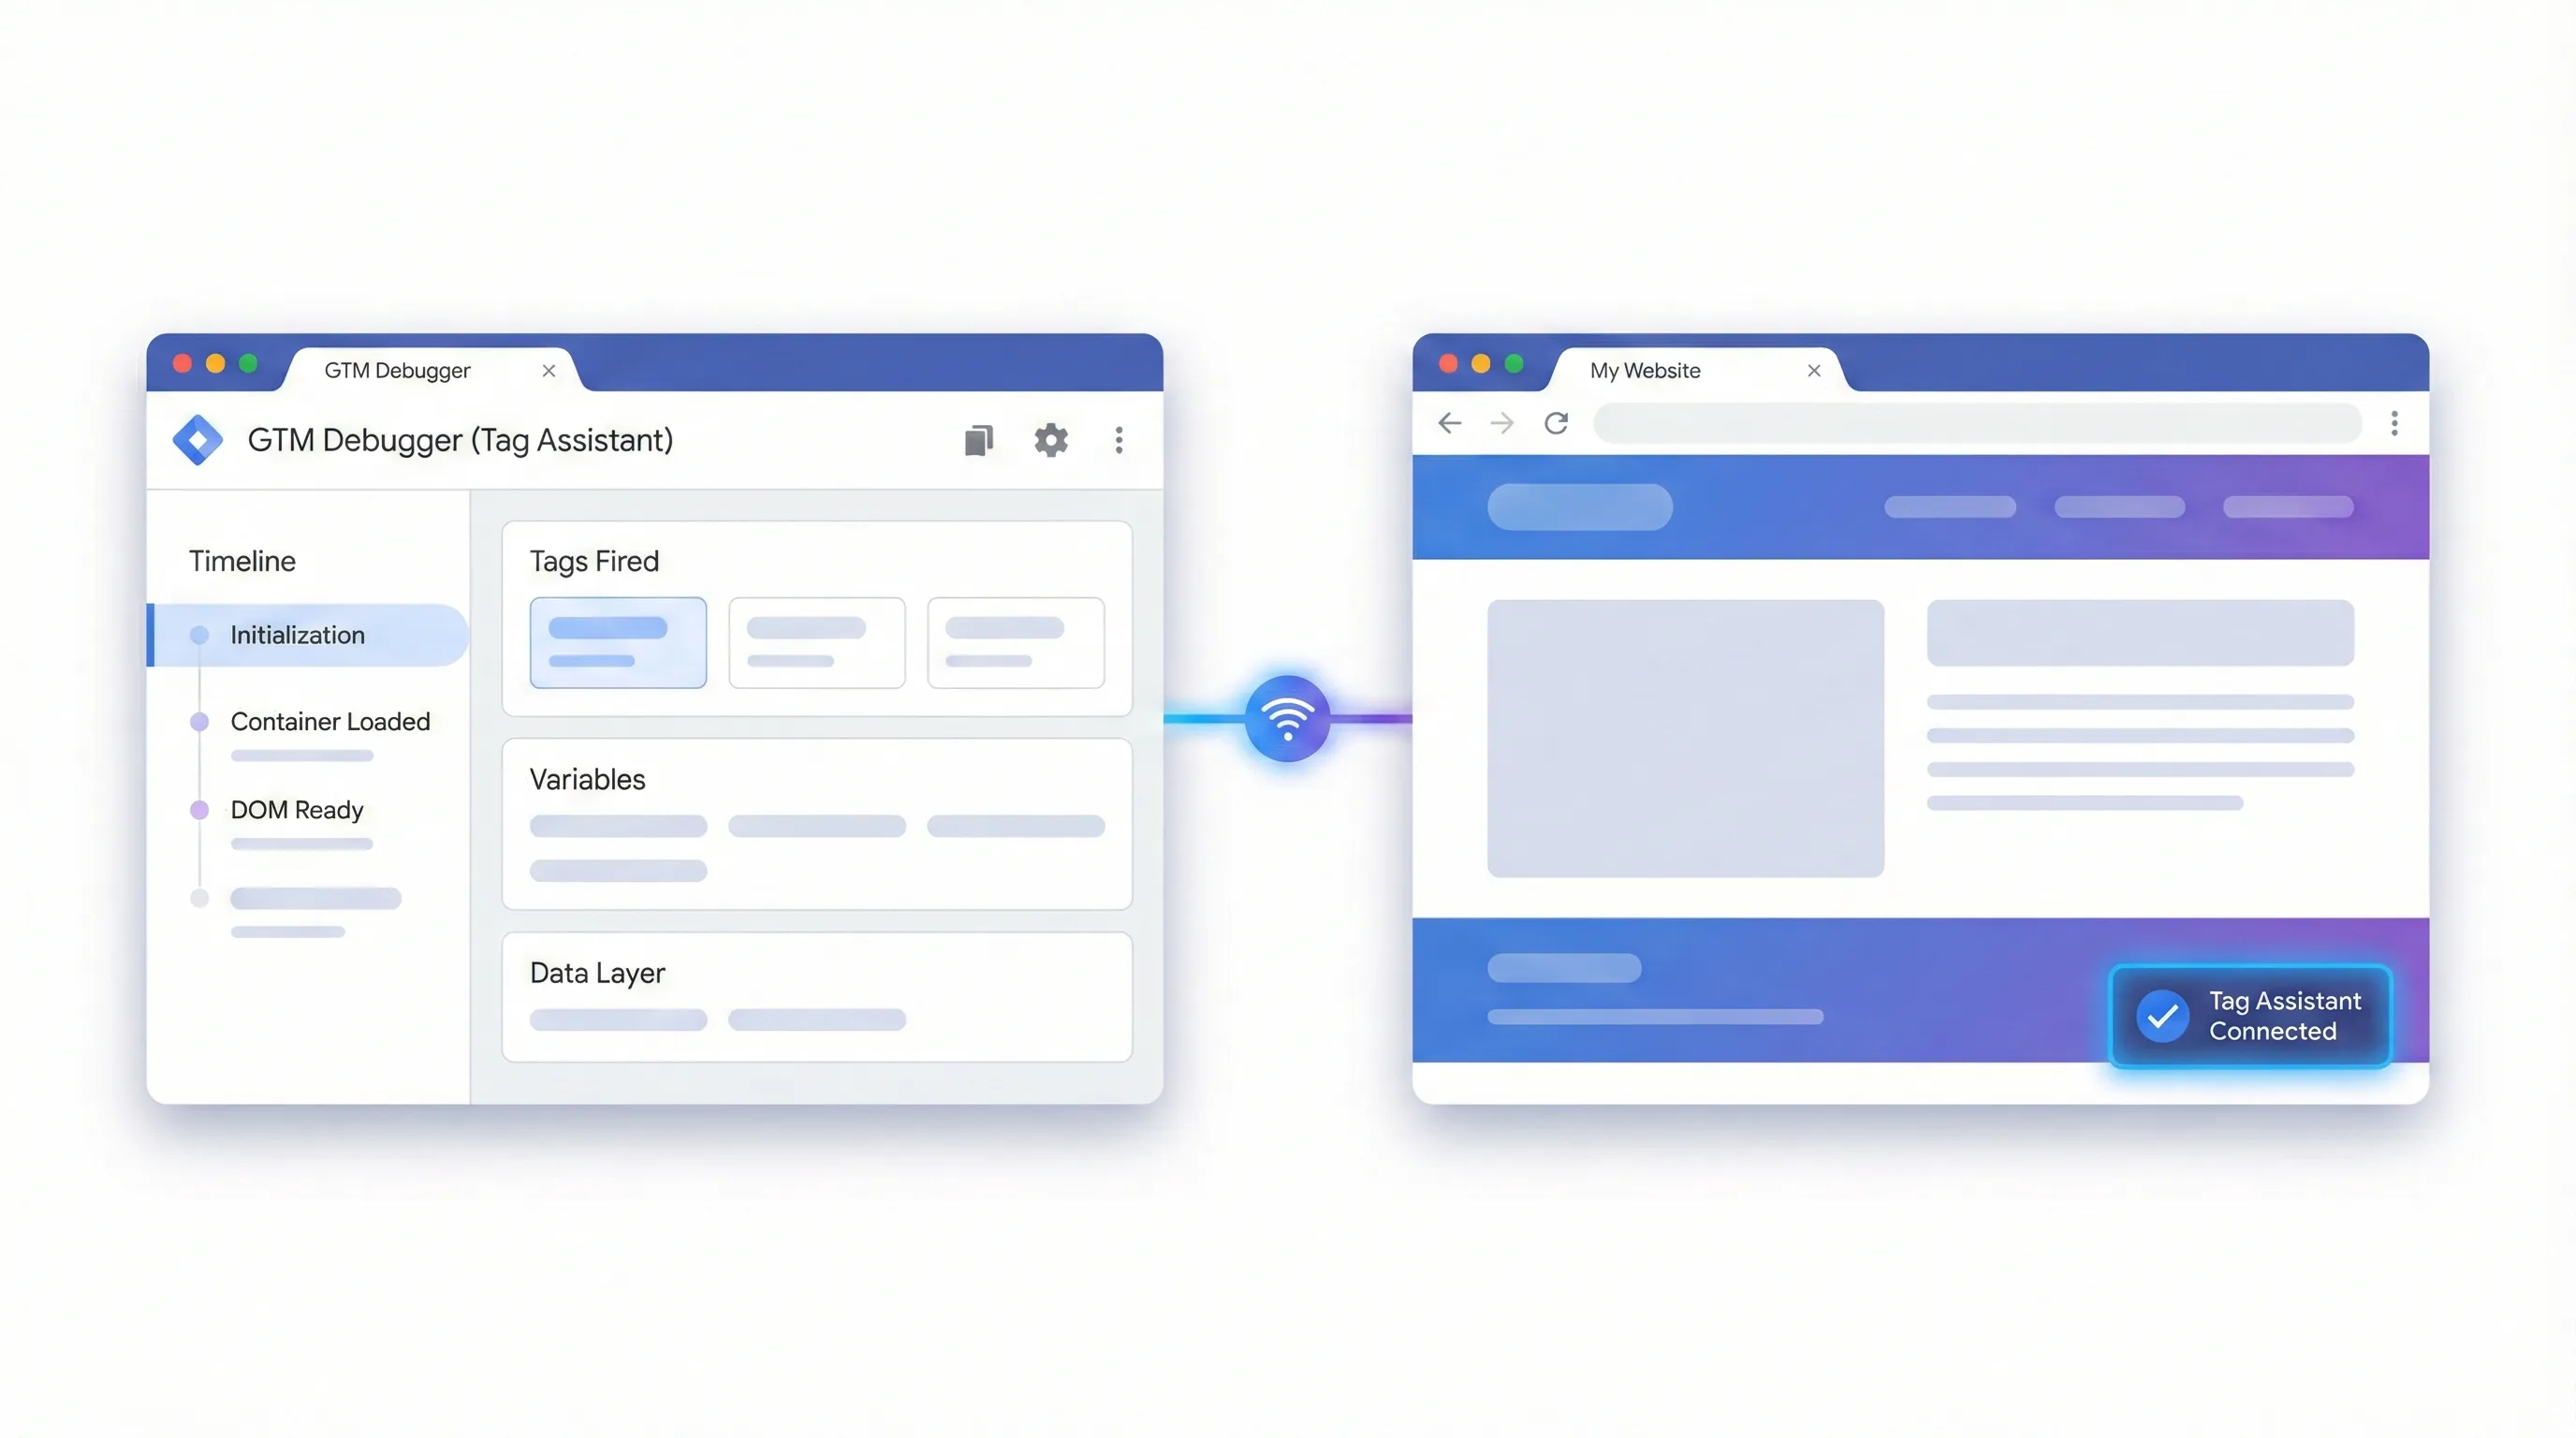
The debugger activates in the original Tag Assistant tab. The screen changes to show a “Connected” status, usually with a green checkmark and a split-screen interface displaying your container ID.
Reading the Debug Console
Click Continue in the debugger tab to enter the full console. This interface might look overwhelming at first, but focus on these key areas:
Timeline (left sidebar): This shows every event that occurred on your page. For a fresh installation, you should see events like Initialization, Container Loaded, DOM Ready, and Window Loaded. This proves GTM is receiving and processing page activity.
Tags (main panel): This section shows “Tags Fired” and “Tags Not Fired”. Since you just installed GTM and haven’t created any tags yet, you’ll see “Tags Not Fired” with an empty list. This is actually good—it proves the system is working and ready for you to add tags.
Variables: Click on any event in the timeline, then look at the Variables section. This shows internal values GTM can read from your page, like page URL, referrer, and more. You’ll use these later to build targeting rules.
Data Layer: This shows the raw message passing between your website and GTM. It will become essential for advanced tracking later.
If you see this interface working and the “Connected” badge on your site, you’ve successfully installed Google Tag Manager.
Troubleshooting Connection Issues
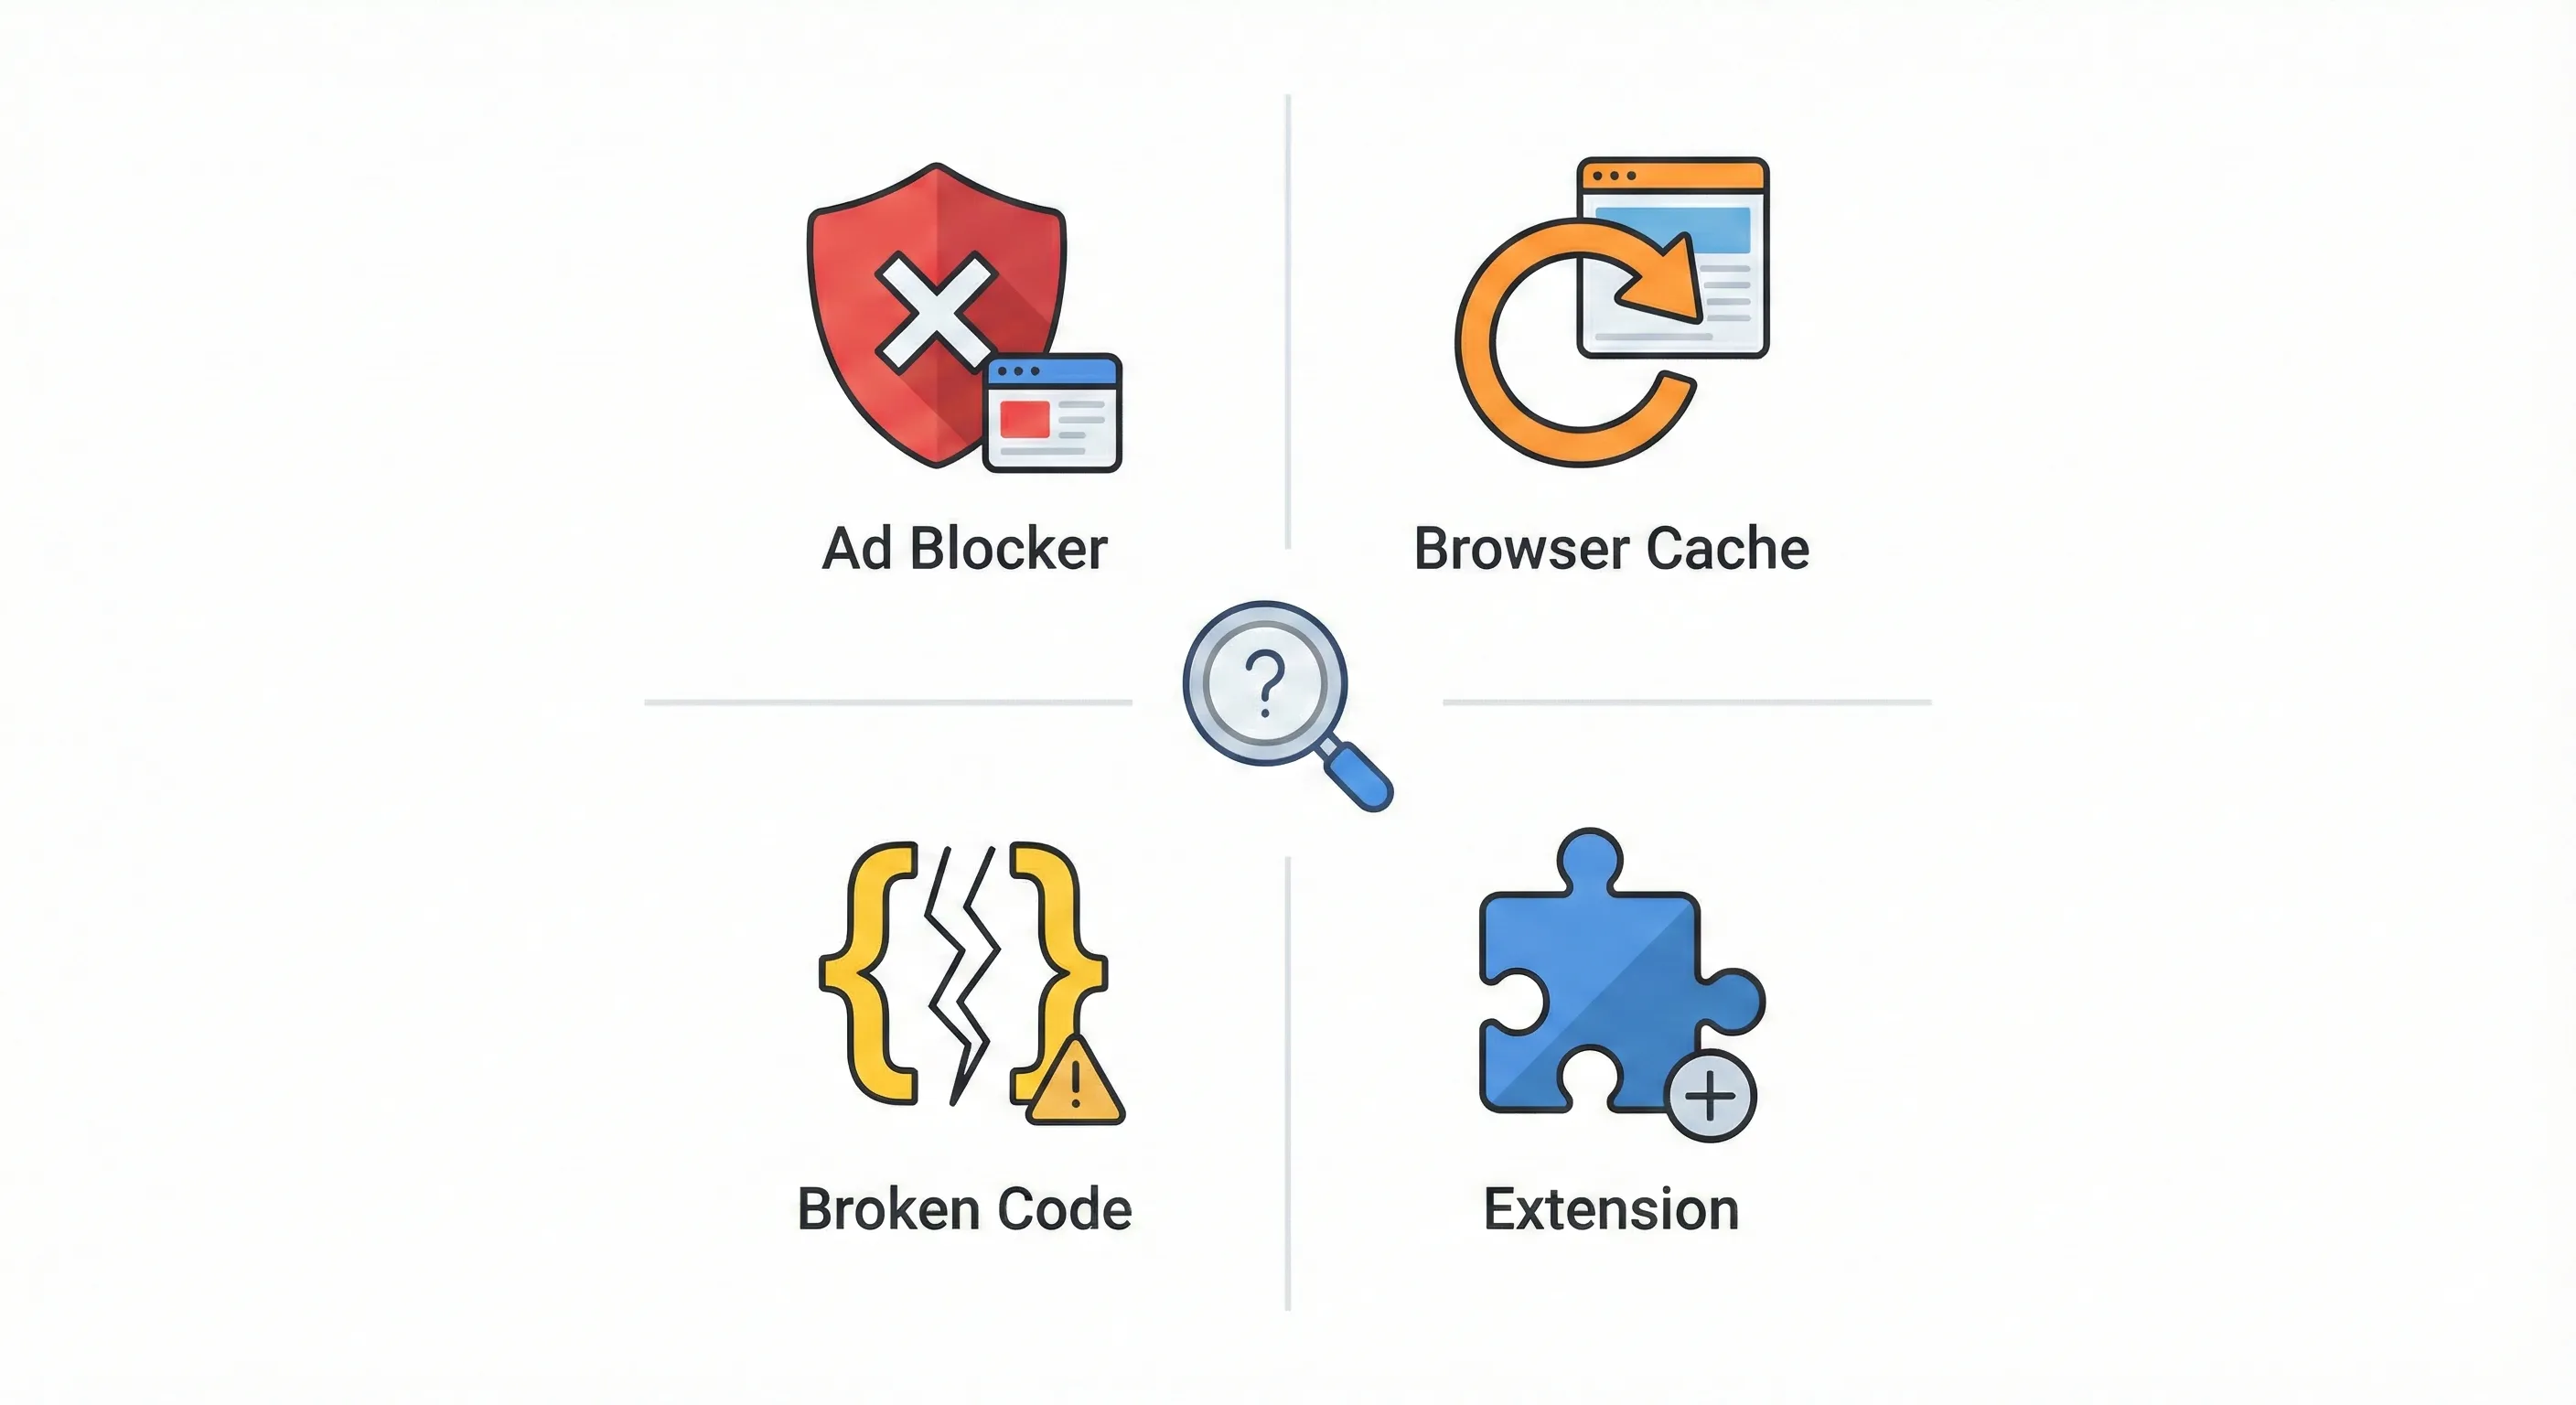
If the Tag Assistant times out or displays “Not Connected”, don’t panic. This happens to everyone. Here are the most common culprits:
Ad Blockers Are Blocking GTM
This is the number one cause of connection failures. Browser extensions like uBlock Origin, AdBlock Plus, or Ghostery block tracking scripts by default. To them, gtm.js looks like any other tracker.
The fix: Temporarily disable your ad blocker, or add your website and tagassistant.google.com to your ad blocker’s whitelist. You can re-enable it after testing.
Browser Caching
If you just added the GTM code to your site, your browser might still be serving the old cached version without GTM installed.
The fix: Perform a “hard refresh” to bypass the cache. On Windows, press Ctrl+F5. On Mac, press Cmd+Shift+R. Alternatively, open your site in an Incognito or Private browsing window, which doesn’t use cached files.
Code Placement Errors
Check your source code carefully. Common mistakes include:
- Pasting the code inside an HTML comment (
<!-- comment -->) - Accidentally deleting a closing tag like
</script> - Placing the body snippet in the wrong location
- Having typos in the container ID
The fix: Re-copy the code from GTM and paste it again, carefully following the placement instructions.
The Tag Assistant Companion Extension
If you’re still having issues, install the Tag Assistant Companion Chrome extension. This helps the debugger maintain its connection even if your site redirects between pages quickly. Search for “Tag Assistant Companion” in the Chrome Web Store and install it.
Next Steps
Your Container Is Ready for Tags
Right now, your GTM container is empty but listening. The next step is populating it with the tracking tools you need:
- Google Analytics 4 (GA4) for understanding traffic and user behaviour
- Google Ads conversion tracking to measure return on ad spend
- Meta Pixel for Facebook and Instagram advertising
- Event tracking to capture form submissions, button clicks, or video views
Each of these will be added as a “Tag” inside GTM, configured with “Triggers” that determine when they fire, and tested in Preview Mode before going live.
Understanding the Bigger Picture
GTM is your measurement infrastructure’s foundation, but it works best as part of a complete system. Understanding how it connects with the Data Layer for reliable data capture, GA4 for analytics processing, conversion tracking for optimization, and attribution for channel performance creates measurement that actually answers your business questions.
How to Build Your Marketing Measurement Foundation shows you how GTM integrates with your complete measurement infrastructure, the optimal implementation sequence, and how these components work together to transform tracking capability into strategic intelligence.
If You Need Help
GTM installation is straightforward, but proper configuration—Data Layer implementation, event tracking architecture, cross-domain setup, and consent mode integration—requires understanding how tags, triggers, and variables work together. Our Marketing Measurement Foundation service provides complete implementation with proper Data Layer structure and integration testing if you prefer expert setup.
Continue Building Your Foundation
Next Recommended Component: Data Layer Implementation
With GTM installed, establish a Data Layer structure that provides reliable, consistent data regardless of website design changes. This prevents the silent tracking failures that plague most implementations.
Using the Data Layer with Google Tag Manager shows you how to build the communication protocol that makes your tracking resilient and scalable.
Security Best Practices
Before moving forward, implement two quick security measures:
Enable Two-Factor Authentication: Go to your Google Account settings and turn on 2-Step Verification if you haven’t already. GTM code is powerful—if someone hacks your Google account, they could inject malicious scripts into your website.
Publish Your Empty Container: Click the blue Submit button in GTM’s top-right corner. Name this version “Initial installation” and click Publish. This creates a Version 1 snapshot and prevents 404 errors when browsers load your container file.
Conclusion
Google Tag Manager represents a fundamental shift in how businesses collect and manage data. By installing it, you’ve reclaimed control over your marketing measurement infrastructure. You’re no longer waiting on developers for routine changes. You’re no longer flying blind because tracking was too expensive to implement.
The installation process you’ve just completed—creating an account with proper ownership structure, understanding the code architecture, placing snippets correctly, and verifying through Preview Mode—builds a foundation that can scale with your business for years to come.
You now have the infrastructure. The next phase is learning to use it effectively, starting with your first tags and evolving toward sophisticated tracking strategies as your confidence grows. You’re not just a marketer anymore. You’re a data architect.