
Using the data layer with Google Tag Manager (GTM) provides a structured, reliable way to pass information from your website to GTM. Instead of relying on inconsistent page elements, the data layer ensures accurate, consistent data collection for tracking user actions, conversions, and events; making your tags more flexible, scalable, and easier to maintain.
Table of Contents
What Problem Does the Data Layer Solve?
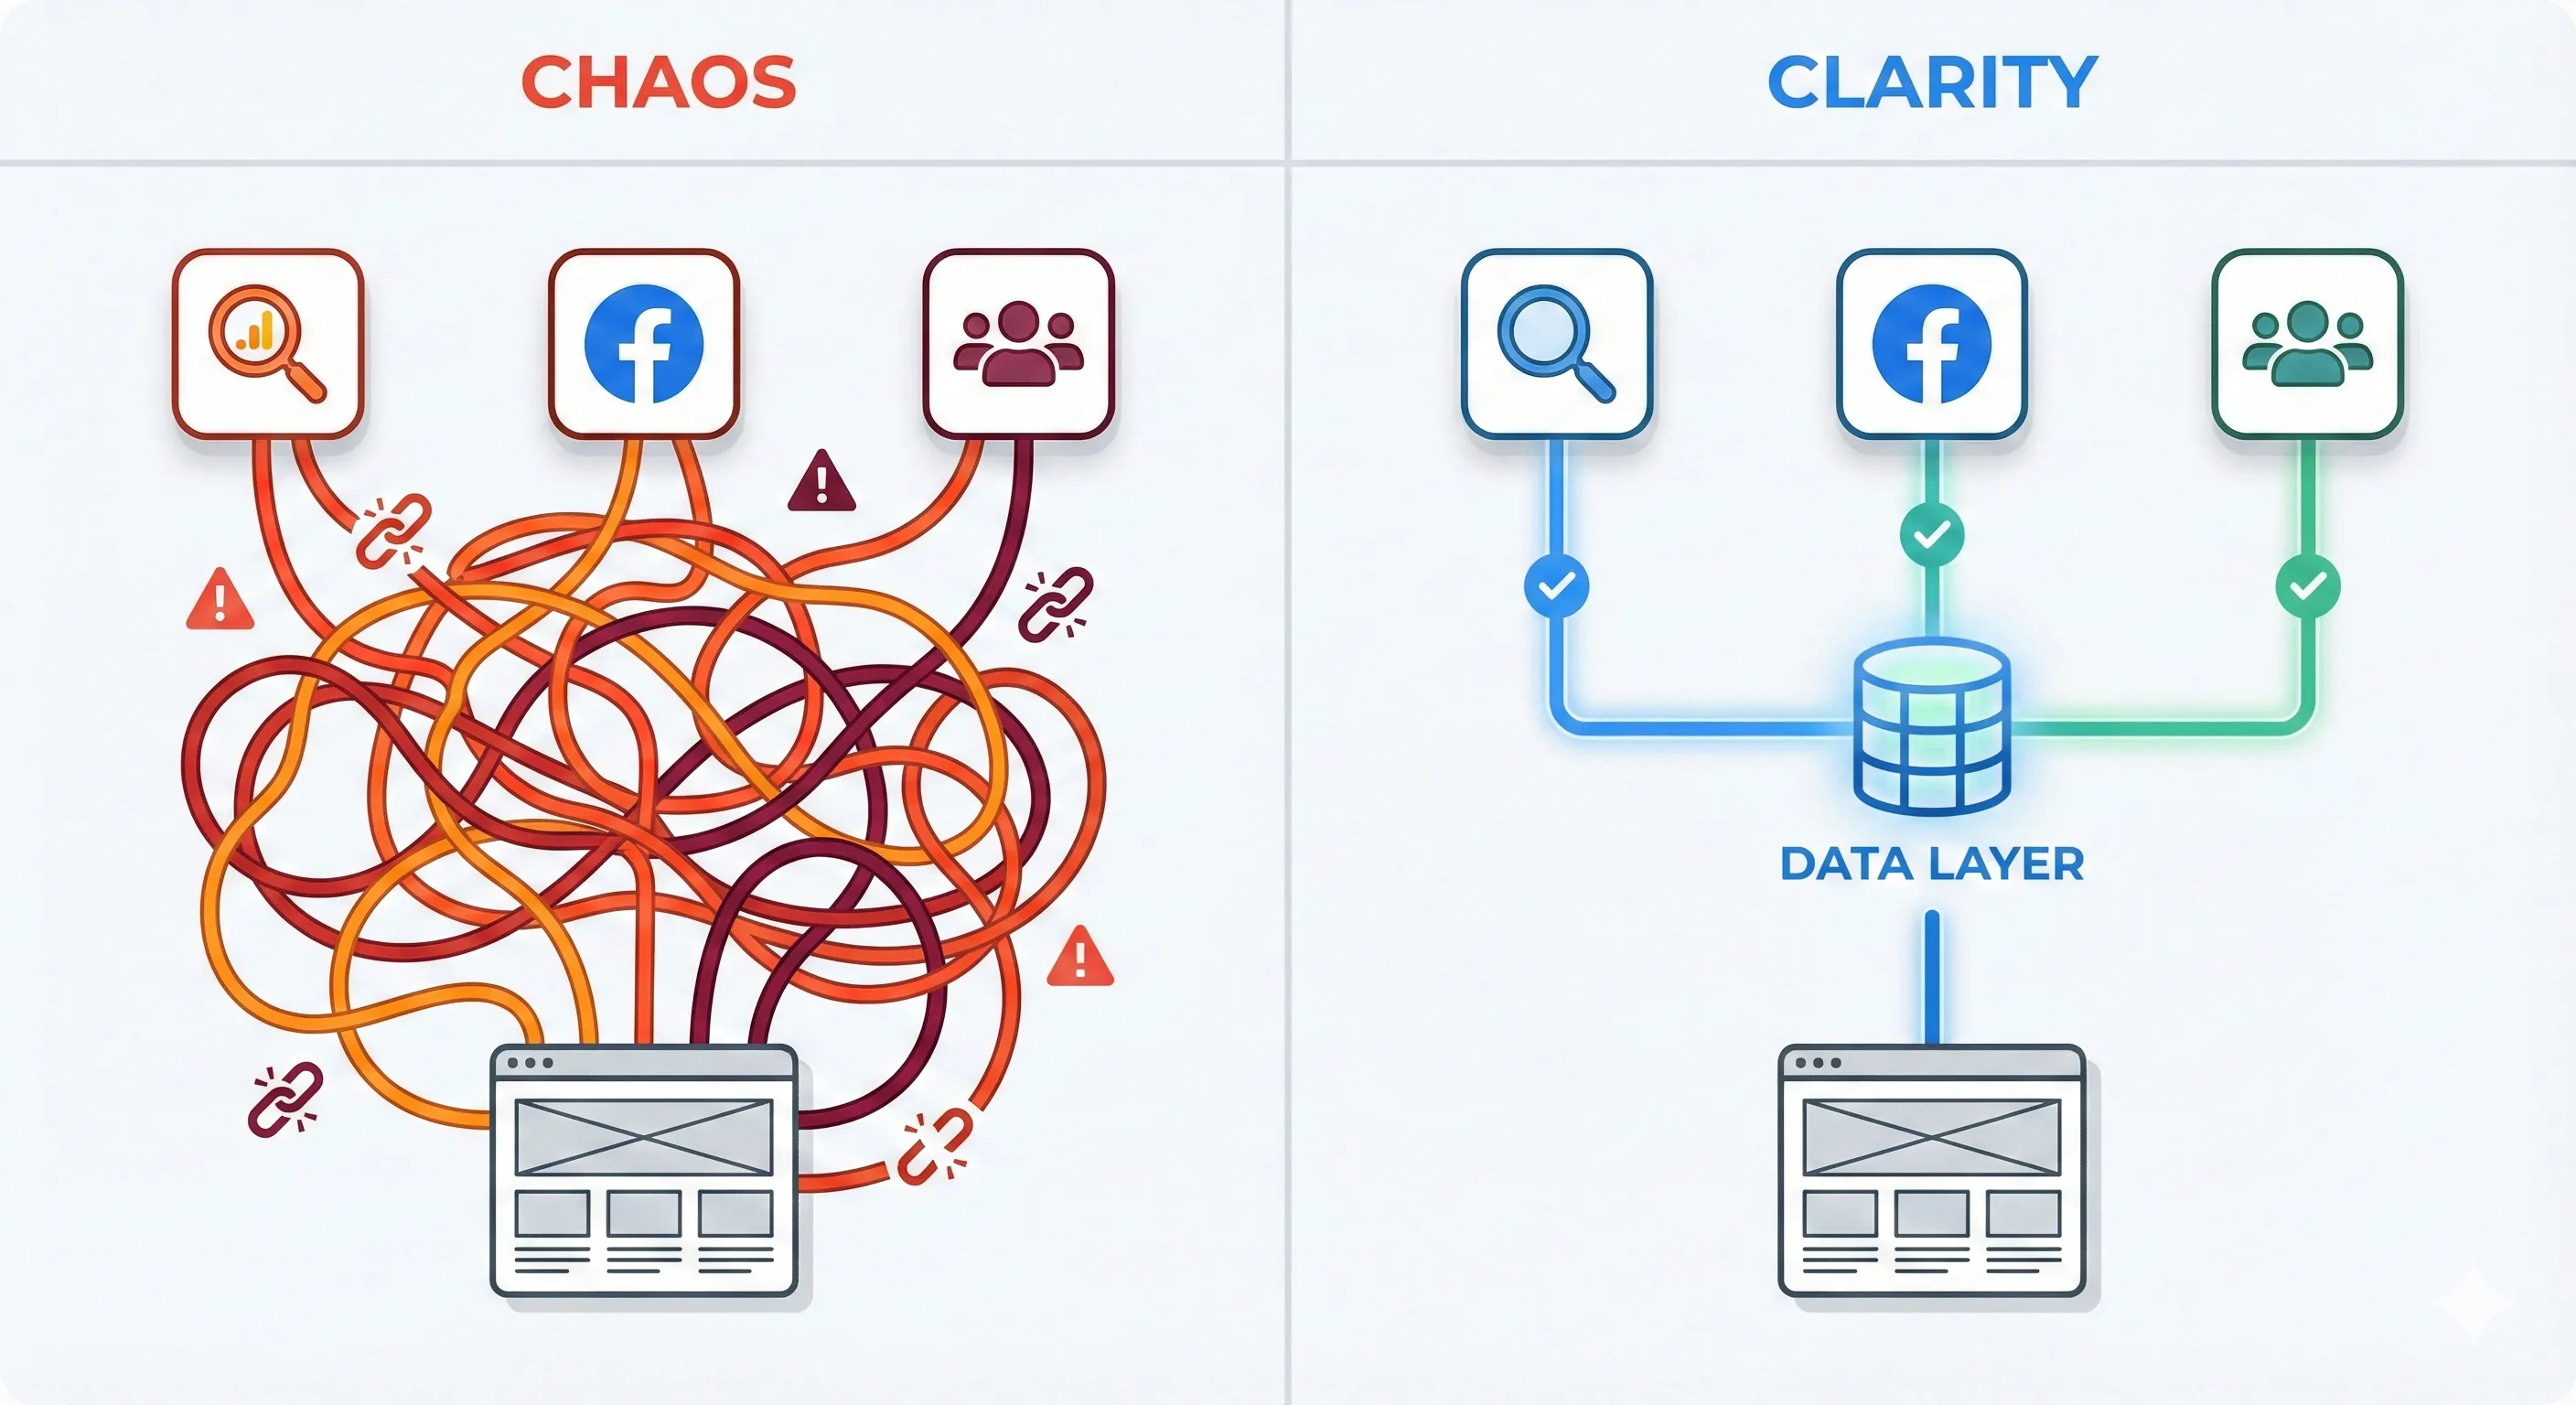
The fundamental problem the data layer solves is the chaotic and unreliable collection of data. Before the widespread adoption of data layers, tracking scripts from various marketing and analytics tools would be scattered throughout a website’s code, each independently trying to scrape information directly from the HTML.
This approach created several significant issues:
Inconsistent and Inaccurate Data
Without a centralised system, different tracking tools could easily interpret the same user interaction in different ways. For instance, one tool might record a “purchase” event when a user lands on the thank you page, while another might only trigger it when the payment confirmation button is clicked. This led to discrepancies in data across platforms, making it difficult to get a single, accurate view of user behaviour.
Fragile Tracking Setups
When tracking code is tightly coupled with the website’s HTML structure, any changes to the website’s design or code could break the tracking. For example, if a developer changes the ID or class of a button that a tracking script is looking for, that tracking will silently fail. This meant that website updates often led to data loss without anyone immediately realising it.
Developer Dependency and Slow Implementation
Marketers and analysts would frequently need to rely on developers to implement or modify tracking code. This created a bottleneck, as developers have their own priorities. The process of adding a new tracking tag or modifying an existing one could be slow and cumbersome, hindering the ability to quickly adapt to new marketing initiatives or analytics needs.
Redundant and Inefficient Code
Having multiple tracking scripts from different vendors all trying to collect similar information led to redundant code on the website. This could negatively impact page load times and overall site performance.
What is a Data Layer? (Essential Foundation)
A data layer is a central communication hub (created using a type of JavaScript object designed for storing data collections) that acts as a bridge between your website and your marketing tools like Google Tag Manager (GTM). Think of it as a universal translator that speaks the same language to GTM, Google Analytics, Meta Ads, your Customer Relationship Managemnt (CRM) System, and any other platform you use.
The Restaurant Kitchen Analogy
Imagine your website is a busy restaurant kitchen with complex processes happening everywhere. Your marketing and analytics platforms are like accountants in the back office who need precise records of every transaction to understand business performance.
The Old Way (Without Data Layer): This is like sending accountants into the chaotic kitchen to read handwritten notes and count ingredients themselves. They might gather some information, but it will be inconsistent, incomplete, and they’ll constantly disrupt operations.
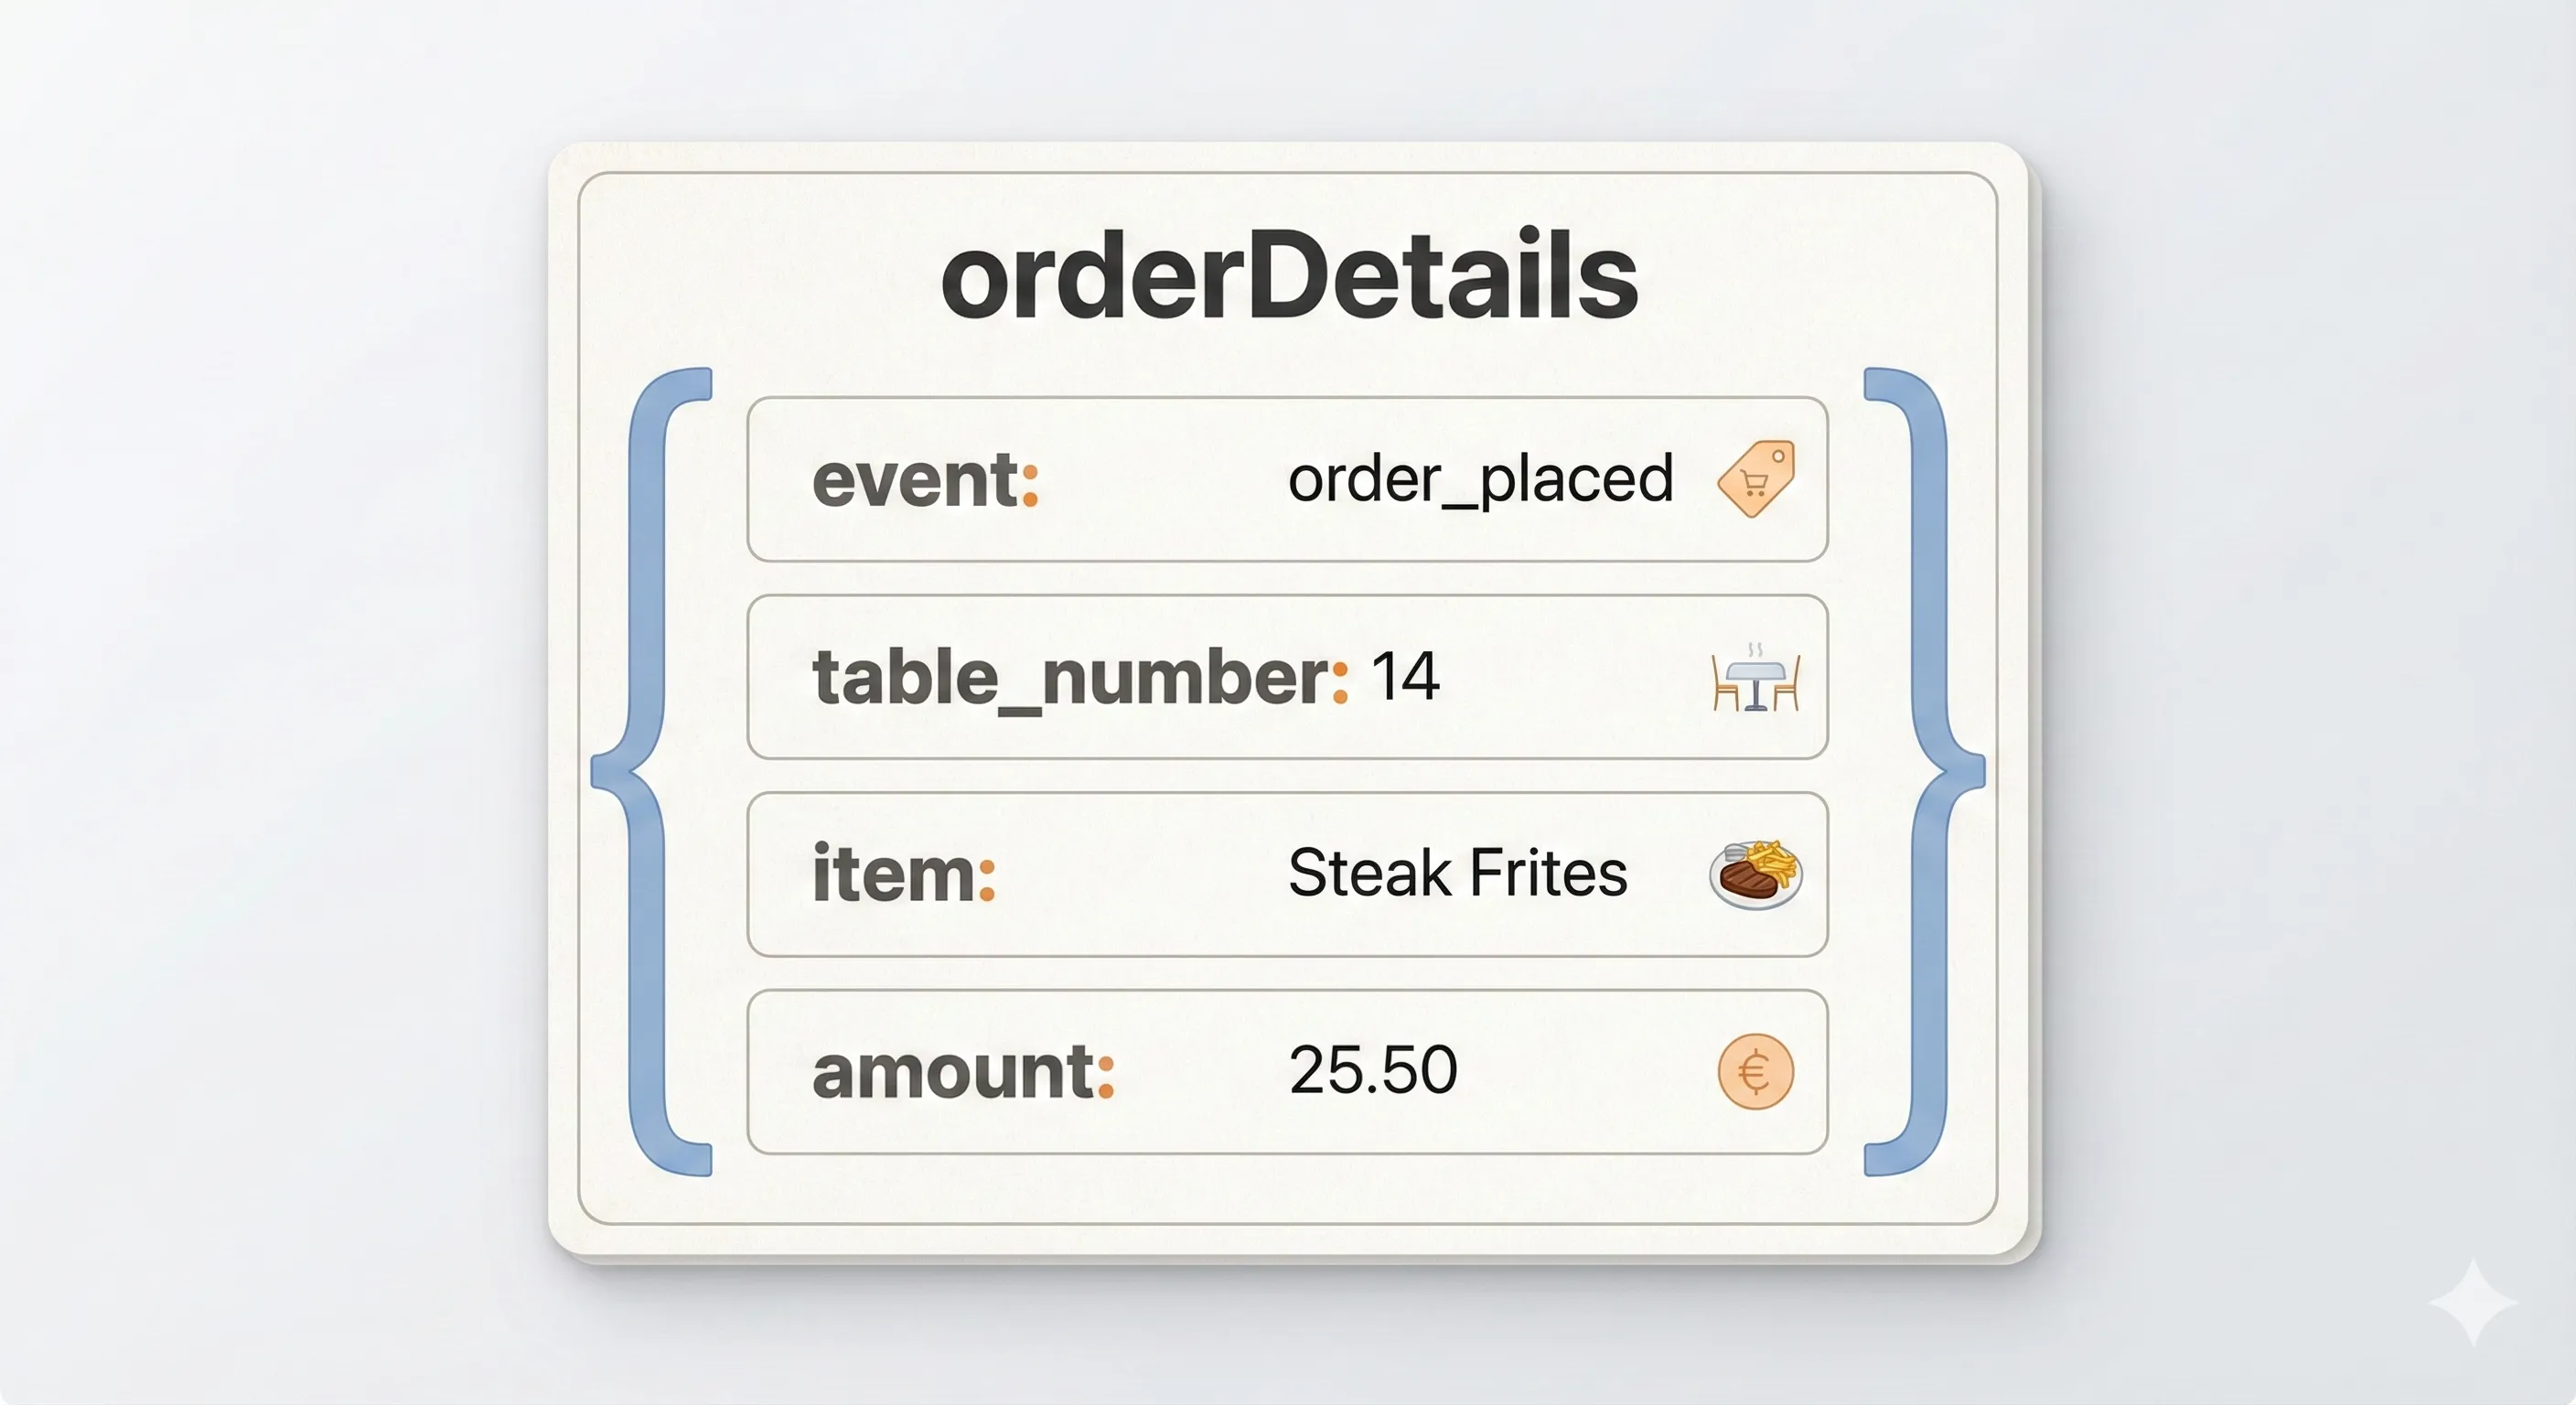
The Data Layer Way: This establishes a standardised process. For every important event – an order placed, payment processed, ingredient used – kitchen staff places a clear, structured ticket on a central communication hub. Each ticket contains all necessary details:
{
  "event": "order_placed",
  "table_number": 14,
  "item": "Steak Frites",
  "amount": 25.50
}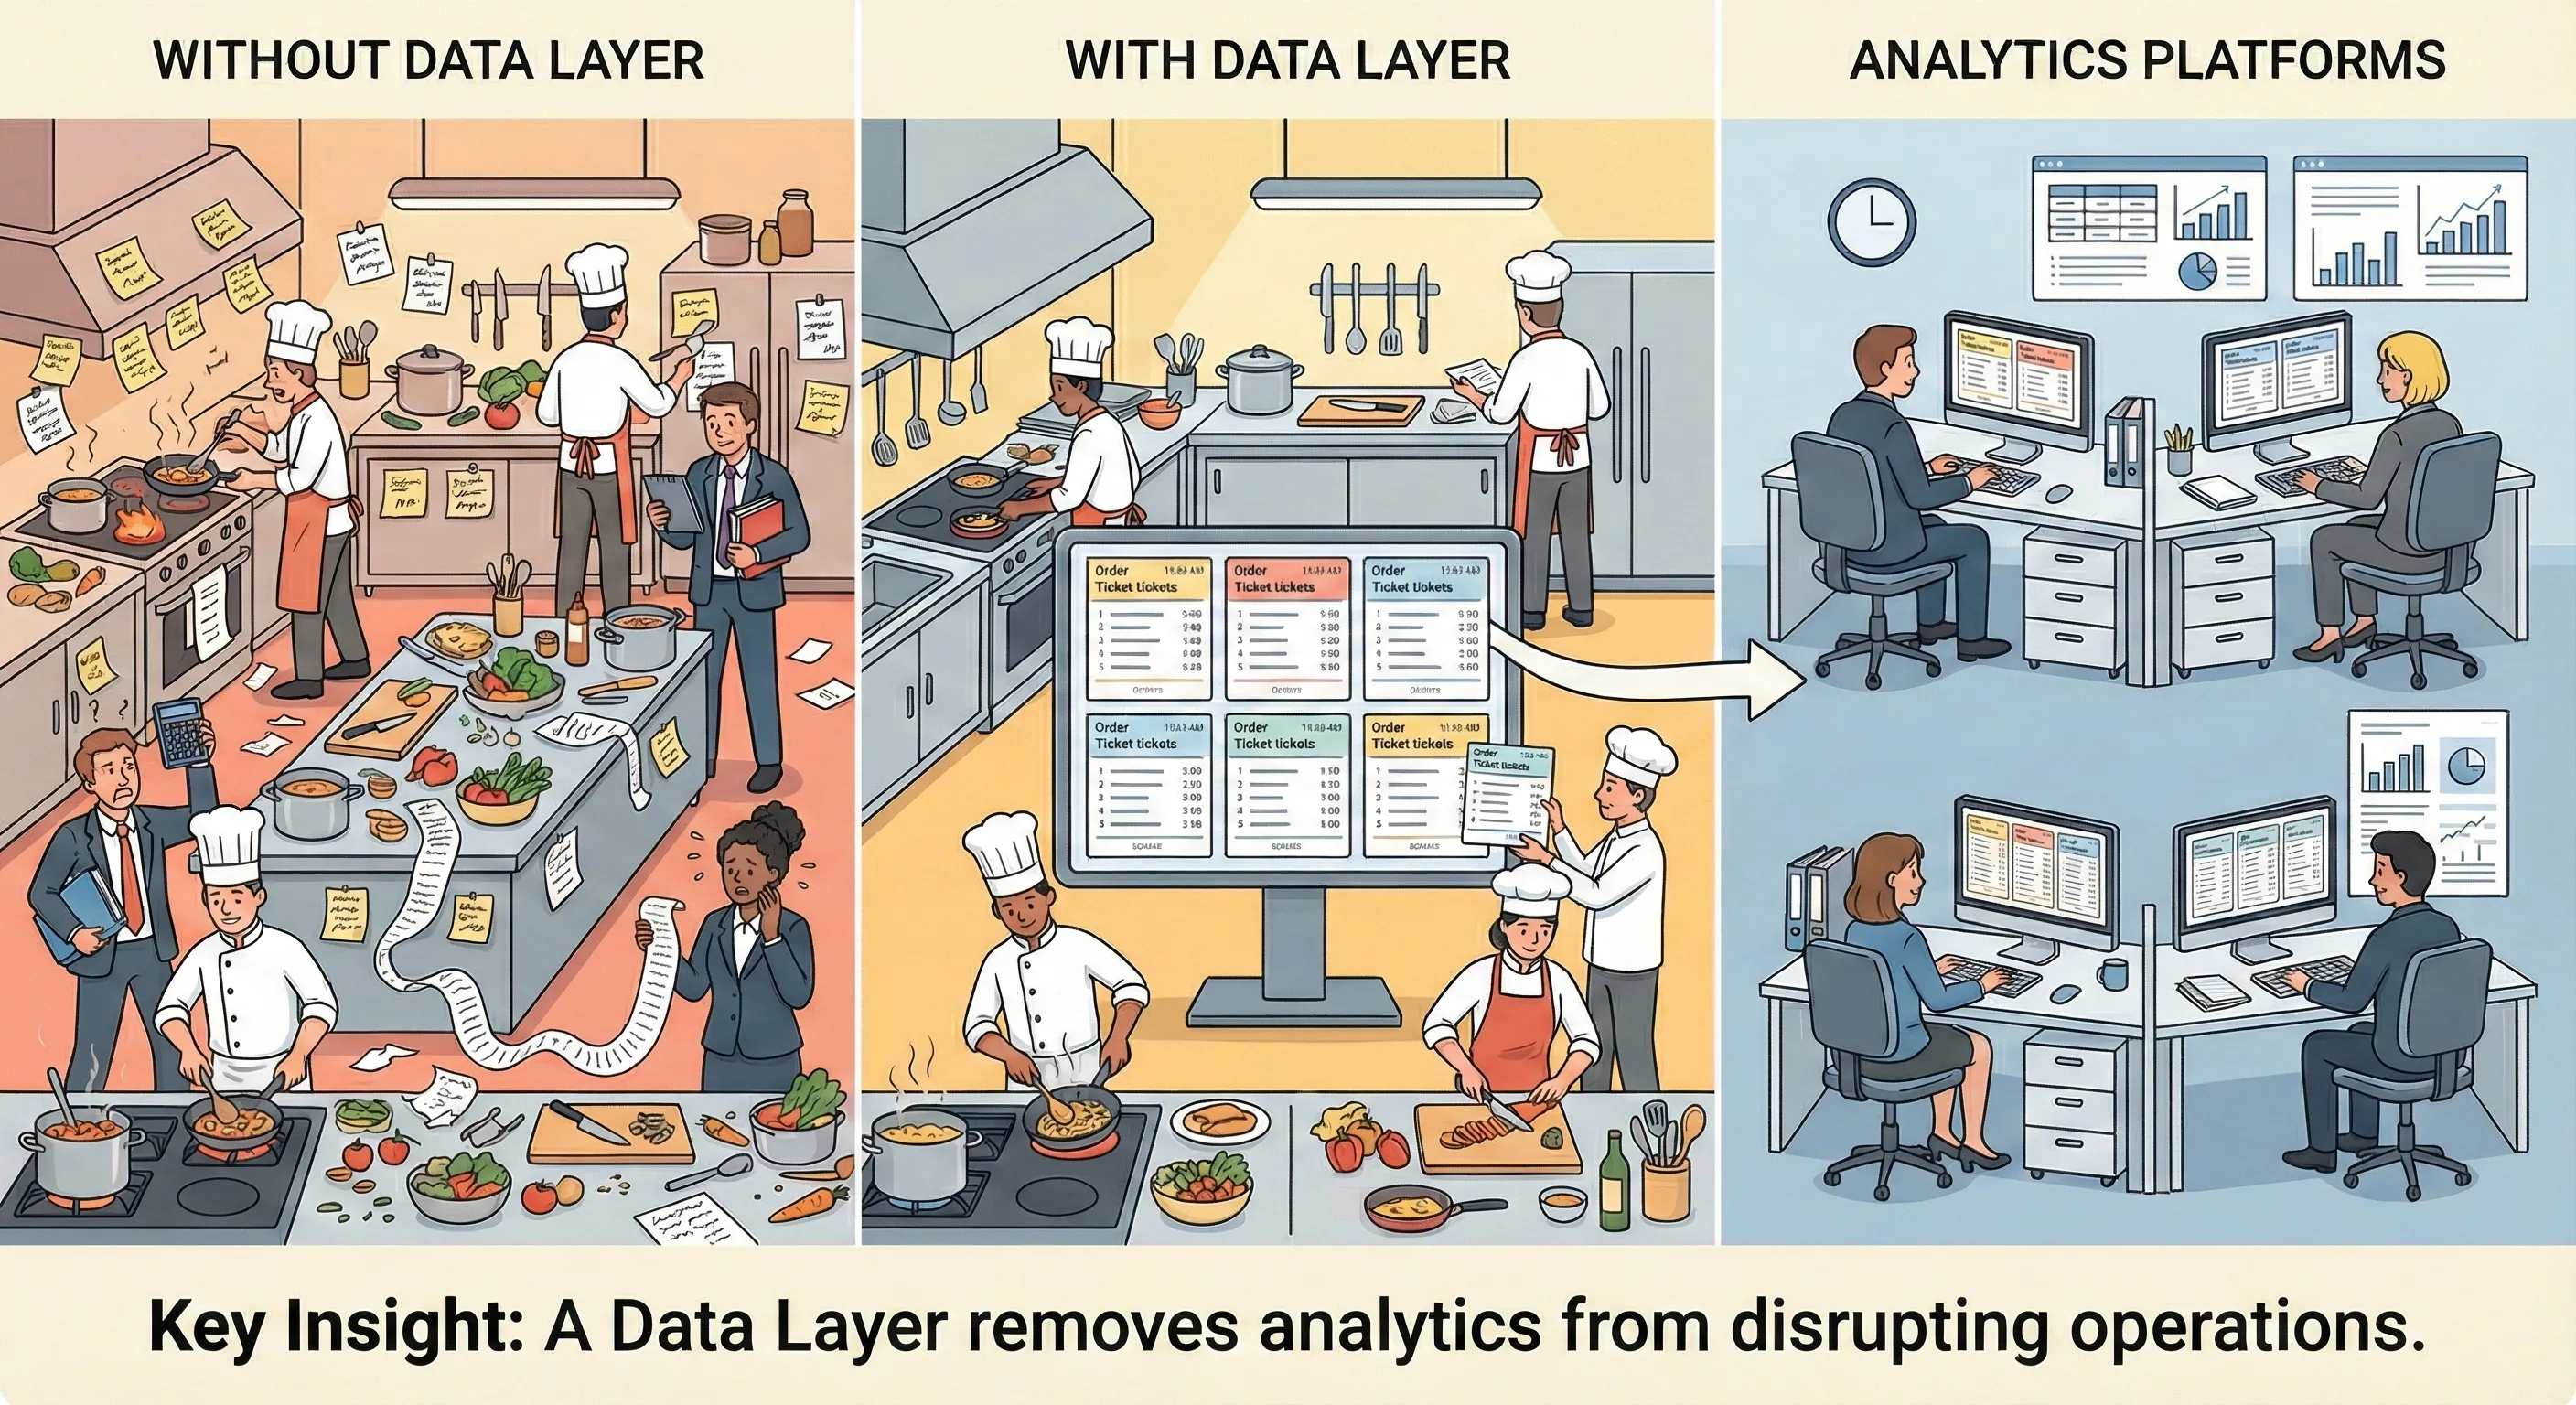
Now accountants can collect these standardised tickets and have a perfect, reliable record of everything that happened.
The data layer is that communication hub – a clean, stable channel designed specifically for data transfer.
How the Data Layer Works in Practice
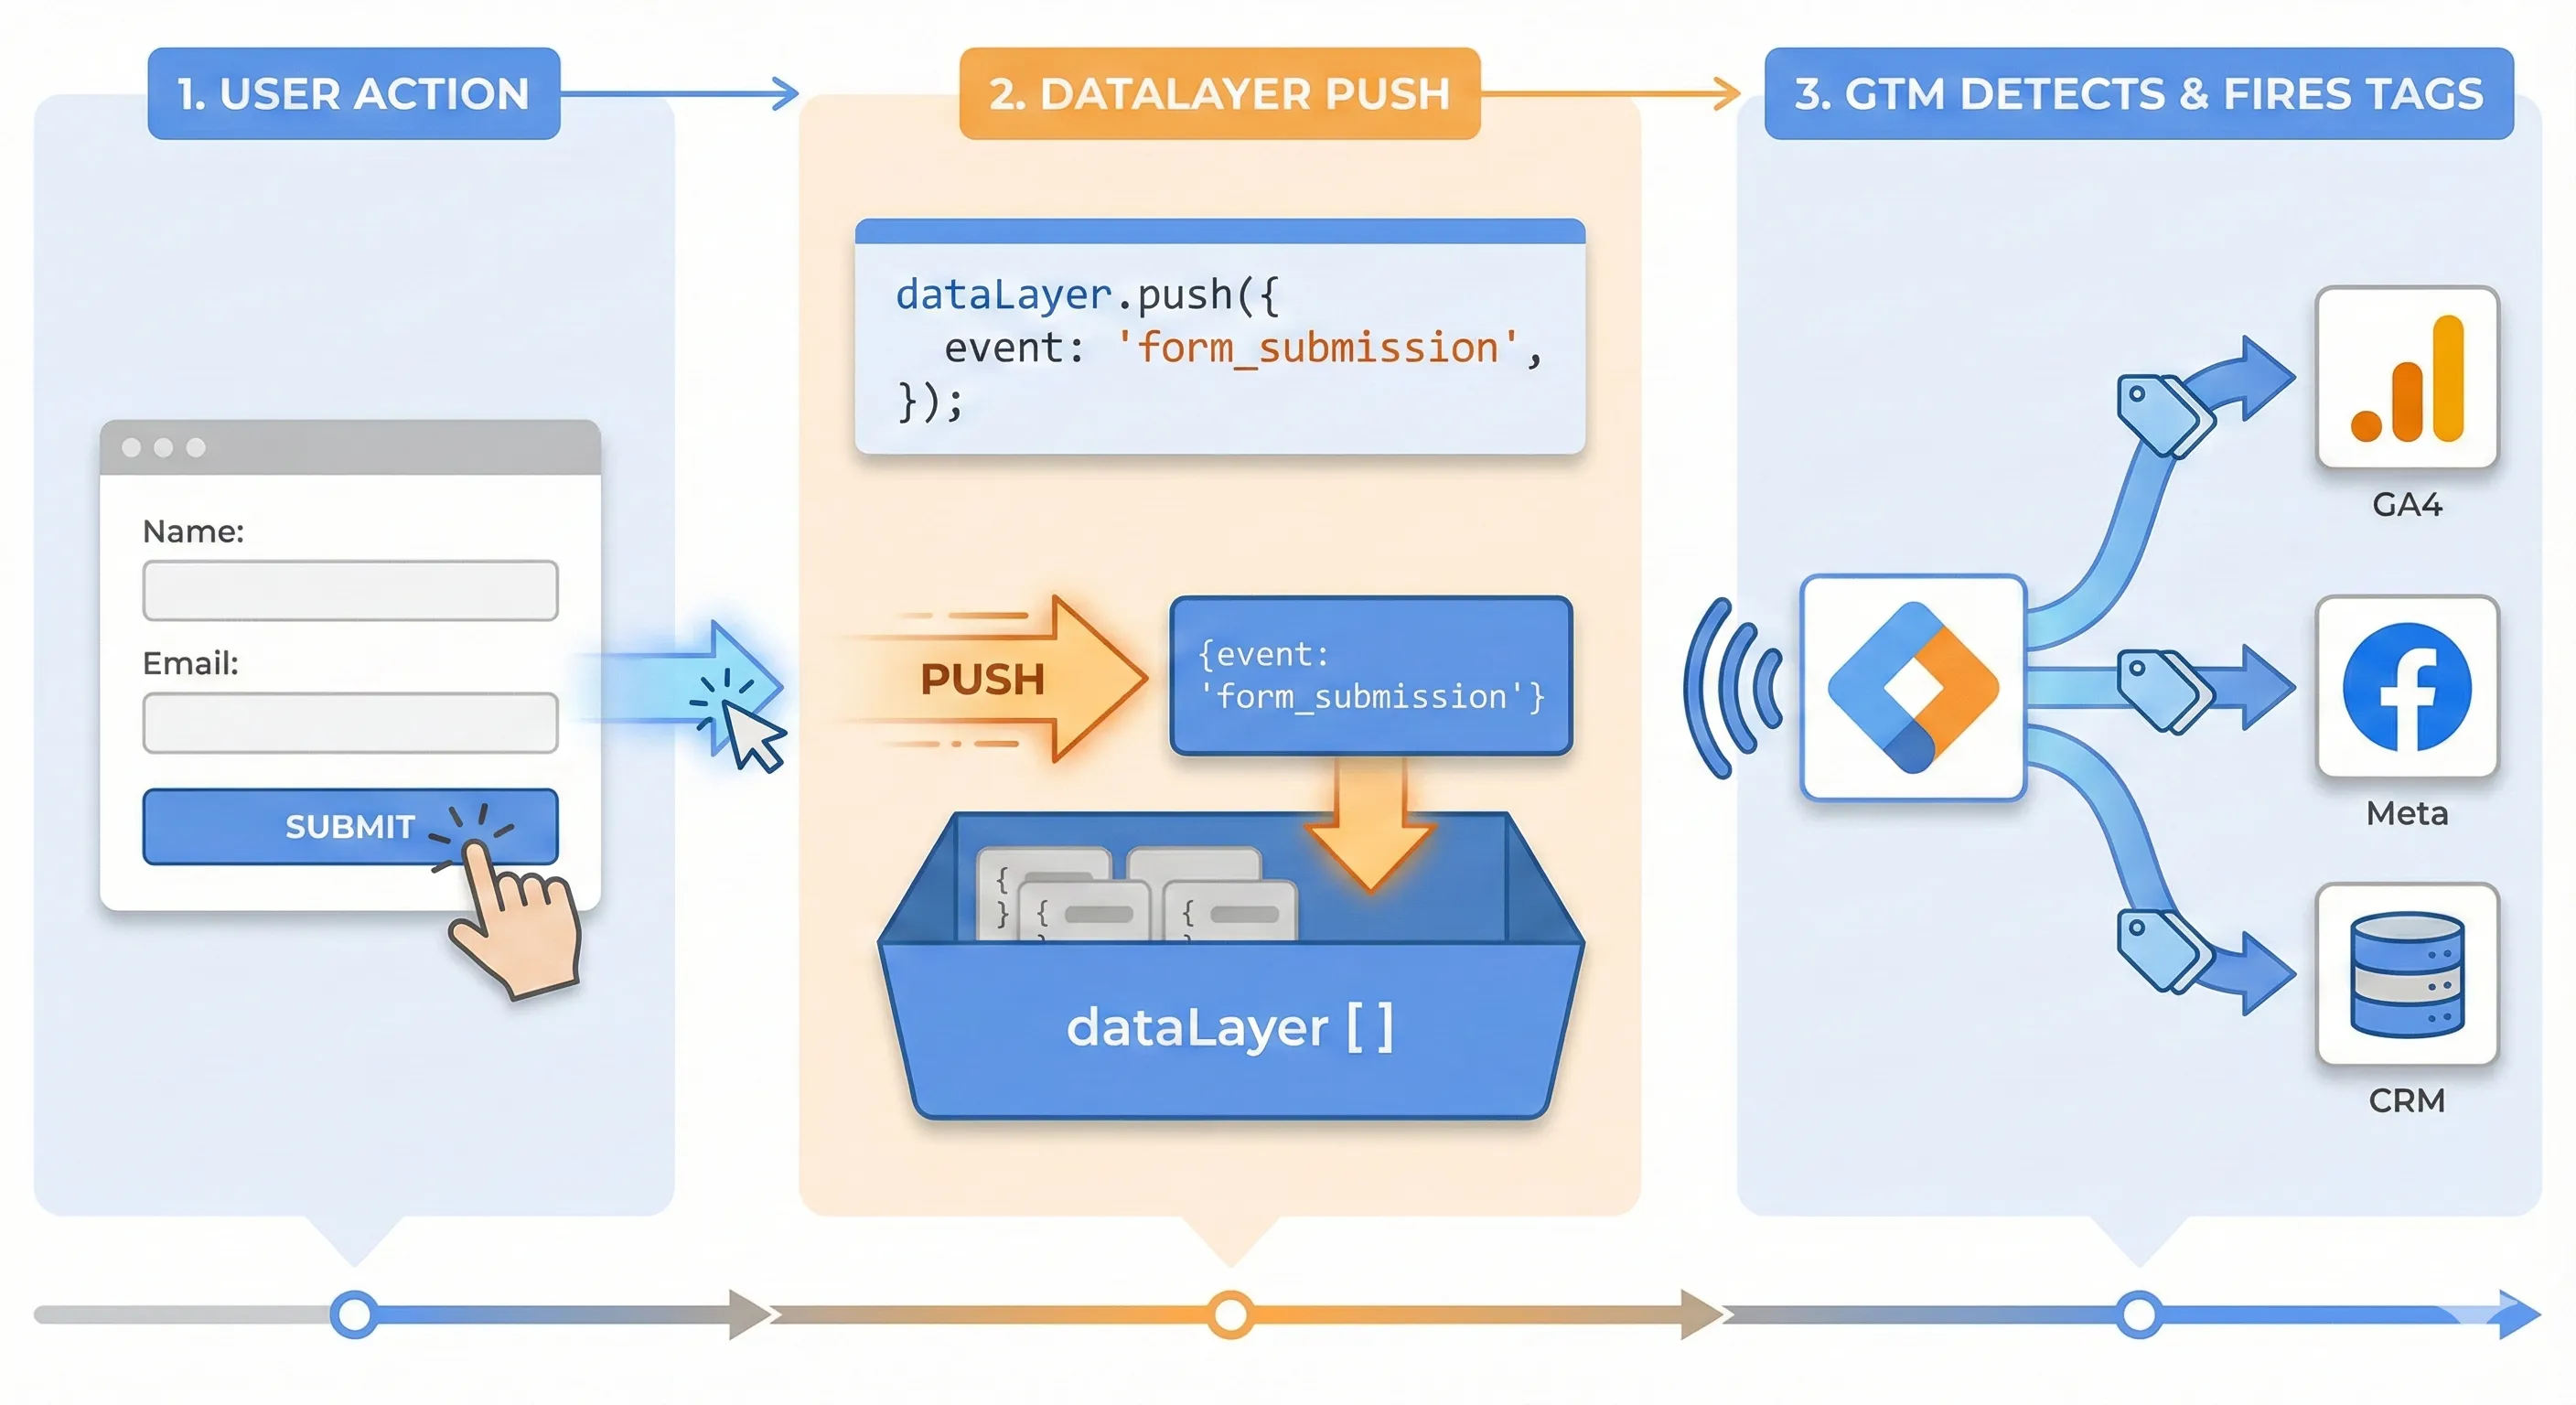
The Technical Reality: When a user performs an action on your website – makes a purchase, submits a form, or clicks a button – your website’s code pushes structured information about that event into the data layer. Google Tag Manager continuously monitors this data layer and can instantly react to these events, sending relevant information to your analytics platforms, advertising tools, or any other connected service.
Example: Let’s say the restaurant has a website and customers can order takeout. When a customer successfully places an order, the website pushes structured information into the data layer:
dataLayer.push({
  "event": "order_placed",
  "order_number": "tk389",
  "order_type": "Takeout",
  "item": "Steak Frites",
  "amount": 25.50
});Now every tool that needs order data – Google Analytics, Facebook Pixel, your email platform can receive exactly the same, reliable information simultaneously.
Don’t worry about the technical details just yet, we’ll get into that later.
What You’ll Accomplish
By the end of this guide, you’ll understand how to:
- Implement dataLayer.push() commands for key user actions
- Configure Google Tag Manager to capture and route your data
- Set up tracking for e-commerce, lead generation, and engagement events
Prerequisites
You should have:
- Basic familiarity with Google Tag Manager interface
- Ability to edit website code or collaborate with a developer
- Understanding that JavaScript is the programming language of web browsers
Why This Foundation Matters
The following sections will detail the crisis facing modern measurement and why traditional methods fail. Understanding what a data layer is and how it works will help you recognise why it’s the definitive solution to these challenges.
Common Tracking Challenges: Why Traditional Methods Create Problems
Three weeks ago, your website got a fresh redesign. The new look is perfect, customers love it, and sales are strong. But when you check your monthly analytics report, there’s a problem: Google Tag Manager shows zero form submissions for the past three weeks.
Your CRM tells a different story. It’s full of new leads from your website. The issue? Your developer changed some button classes during the redesign, and your tracking code can’t find the elements it was looking for. Your conversion tracking silently broke, and you’re losing weeks of crucial attribution data.
This crisis is largely self-inflicted, born from a reliance on “good enough” tracking methods that are fundamentally unsuited for the complexities of the modern web. To build a case for a better future, one must first deconstruct the fragile pillars of the past.
Deconstructing “Good Enough” Tracking: The Pitfalls of Common Workarounds
For years, technical marketers and analysts have relied on a toolkit of workarounds to gather data without dedicated development resources. While seemingly agile, these methods build a measurement foundation on quicksand, destined to crumble under the slightest pressure.
DOM Scraping: The Illusion of Agility
DOM scraping, the practice of extracting data directly from the HTML structure of a webpage using Google Tag Manager’s (GTM) DOM Element variables, is often the first tool reached for in a pinch. Need to capture the name of a product? Just grab the text from the <h1> tag. Want to track a button click? Target its CSS class. This approach offers a powerful sense of independence from developer cycles, allowing marketers to deploy tracking quickly.
However, this agility is an illusion. The Document Object Model (DOM) is a presentational layer, designed for visual rendering and user experience, not for stable data collection. It is inherently volatile. A developer, completely unaware of the tracking dependencies, might change a CSS class name for a rebranding, restructure a product title into multiple <span> elements for styling, or run an A/B test that alters the page layout. Any of these routine front-end updates can silently break the tracking logic, causing data to stop flowing without any warning. This method is particularly unreliable for modern websites that use JavaScript to dynamically load content, as the desired elements may not even exist in the HTML when the page first loads. Relying on DOM scraping creates a brittle, reactive system that requires constant monitoring and maintenance, turning the initial time saved into a significant long-term technical debt.
“Thank You” Page Tracking: The Unreliable Conversion Signal
Tracking conversions by firing a tag when a user lands on a confirmation or “thank you” page is one of the oldest methods in the book due to its simplicity. A user fills out a form, is redirected to /thank-you, and a conversion is counted. Simple, but dangerously inaccurate.
This method is susceptible to a host of data pollution issues. Bot traffic, which can account for a significant portion of ad clicks, can crawl these pages and trigger false conversions, inflating performance metrics and leading to biased bidding in ad platforms. A real user might refresh the confirmation page, triggering a duplicate conversion event and making a single action appear as multiple successes. Furthermore, if the form is hosted on a third-party domain, the referral information is often lost during the redirect, causing the conversion to be misattributed to “Direct” or “Referral” traffic instead of the true marketing channel that drove the initial visit.
The most significant flaw, however, is its context blindness. Thank you page tracking confirms that a conversion happened, but provides no detail about what was converted. It cannot capture crucial business data like the transaction value, currency, specific products purchased, or lead type without resorting to complex and equally unreliable workarounds. It is a blunt instrument in an era that demands precision.
URL Parameter Tracking: The Human Error Magnet
Using URL parameters for internal tracking, beyond standard campaign tagging like UTMs, is another common but risky practice. While they can pass information from one page to another, they introduce significant fragility. Overly long or complex URLs can appear untrustworthy to users and may even break in certain browsers or applications. From an SEO perspective, if not managed correctly with canonical tags, parameter-based URLs can lead to duplicate content issues that dilute search engine authority.
The greatest risk is human error. A successful parameter-based tracking system requires absolute consistency in naming conventions across all teams and campaigns. A single typo, a variation in capitalisation, or an inconsistent structure can pollute reports with fragmented data, making analysis a nightmare. This method places the burden of data integrity on flawless human execution; a notoriously unreliable strategy at scale.
The External Threat: A Hostile Tracking Environment
Compounding the inherent weaknesses of these methods is a rapidly changing digital ecosystem that is actively hostile to traditional client-side tracking. Privacy regulations like GDPR, browser-level prevention measures like Safari’s Intelligent Tracking Prevention (ITP), and the widespread adoption of ad blockers are systematically degrading data quality. These technologies block tracking scripts, reduce cookie lifetimes, and strip identifying parameters from URLs, creating significant gaps in the data. In this environment, relying on fragile, browser-dependent workarounds is no longer a viable strategy. A robust, first-party data approach is now a prerequisite for survival.
The fundamental flaw of these legacy methods is that they treat data collection as an afterthought, an attempt to reverse-engineer user actions from a user interface designed for human consumption, not for machine-readable data transfer. Tying a measurement system, which demands stability and consistency, to the most volatile part of a digital property, its visual presentation, creates an inherently unstable system. This instability inevitably leads to a third-order effect: a crisis of confidence. When marketing presents conflicting numbers from different platforms, leadership loses faith in the team’s ability to measure ROI, jeopardising budgets and diminishing marketing’s strategic role. The problem is not just “broken tracking”; it is a systemic failure to establish a trustworthy source of truth.
The following table provides a clear, at-a-glance summary of these trade-offs, making the case for a more robust approach immediately apparent:
| Feature | Data Layer | DOM Scraping | “Thank You” Page Tracking |
| Reliability | High: Independent of website design changes. | Low: Brittle; breaks when HTML structure is altered. | Low: Prone to bot traffic, page reloads, and misattribution. |
| Data Richness | High: Can include any custom business data (e.g., LTV, user status). | Medium: Limited to text/attributes visible in the HTML. | Low: Typically captures only the conversion event, not context. |
| Maintainability | High: Centralised logic in GTM; easy to update and scale. | Low: Requires constant monitoring and updates with site changes. | Medium: Simple for one form, but complex to manage for many. |
| Developer Dependency | None to High: Built-in/plugin solutions require no developers. DIY implementations (like HubSpot forms in GTM) can be done by technical marketers. Custom implementations typically need developers. | Low (Initially): Can be done by a technical marketer without developers. | Low: Can often be set up entirely within GTM. |
The Data Layer: Your Central Source of Measurement Truth
Having established the unreliability of legacy tracking methods, the solution becomes clear: a system designed from the ground up for stable, structured, and rich data collection. That system is the data layer.
Key Concept: The data layer is not merely a better technique; it is a paradigm shift in how measurement is approached, moving it from a reactive afterthought to a strategic, foundational component of your digital presence.
The Core Principle: Decoupling Data from Design
Critical Understanding: The most profound benefit of the data layer is that it decouples the data you need to collect from the visual presentation of your website.
The information in the data layer is separate from the HTML, CSS, and front-end code that users see and interact with. This separation is the key to a stable and scalable measurement foundation.
What this means in practice:
- Your development and UX teams have complete freedom to redesign the website
- They can change button colors, restructure page layouts, or run A/B tests
- They can alter CSS classes, modify HTML structure, or update JavaScript frameworks
- Your tracking remains perfectly intact – as long as they continue to push the same structured information to the data layer when key actions occur
Before Data Layer (Fragile):
Website Design Change → Broken Tracking → Emergency Fixes → Repeat CycleWith Data Layer (Stable):
Website Design Change → Tracking Continues Working → No Maintenance Required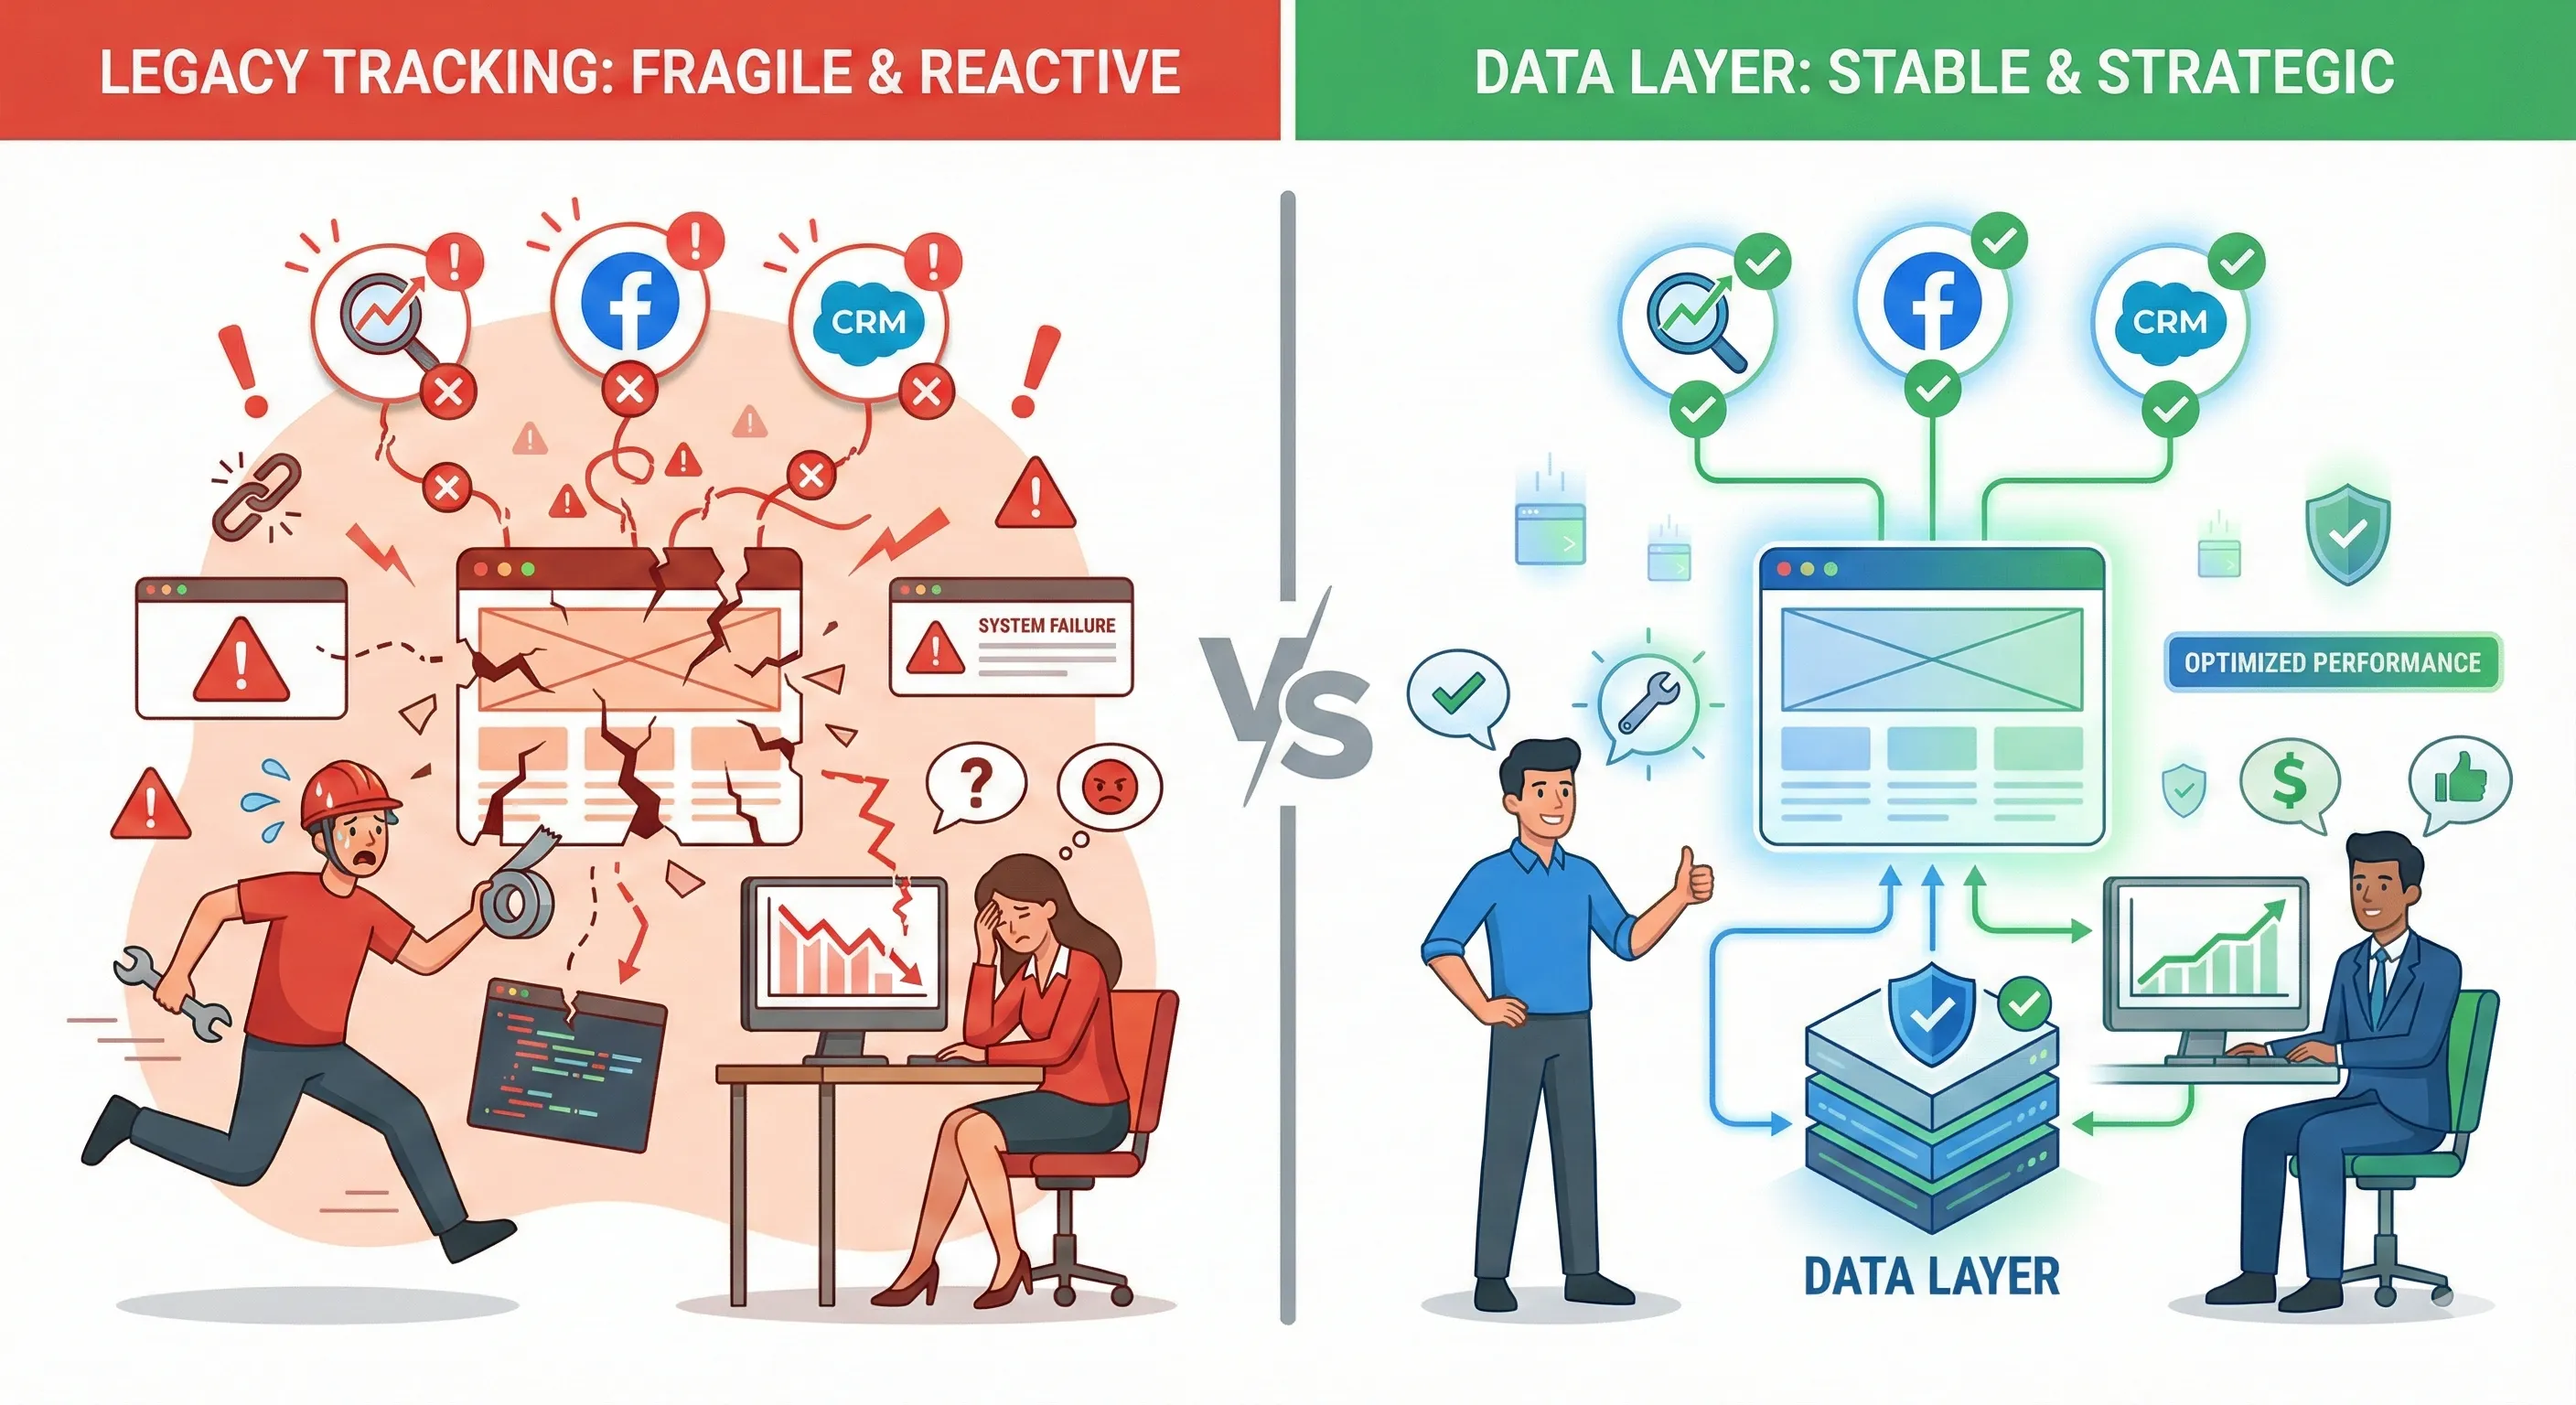
The Business Case: Why Data Layer Implementation is Essential
For marketing leaders, implementing a data layer is a strategic investment with measurable commercial returns and operational advantages.
Immediate Business Benefits
Data Consistency Across Platforms The data layer acts as a single source of truth, ensuring every tool in your marketing stack operates from identical datasets. This eliminates discrepancies between Google Analytics, Meta Ads, your CRM, and other platforms, providing unified performance views.
Rich, Contextual Analytics Unlike traditional tracking methods, the data layer can include business data not visible on the page: user subscription tiers, customer lifetime value, product margins, internal segment IDs, and purchase history. This transforms analytics from simple behavioral tracking into business intelligence.
Operational Efficiency and Speed While requiring initial developer investment, the data layer dramatically reduces long-term maintenance. Marketing teams gain autonomy to deploy new tracking through GTM without developer dependencies, accelerating campaign deployment and freeing technical resources.
Strategic Advantages
Future-Proof Measurement In an era of increasing signal loss from privacy regulations and browser restrictions, a robust data layer is the foundation of a durable first-party data strategy. It provides explicit control over data collection and routing, reducing compliance risk while building valuable assets immune to third-party platform changes.
Development-Marketing Alignment Implementation requires creating a data layer specification; a document outlining exact events and data points needed for measurement. This becomes a shared blueprint that aligns teams around common objectives, moving conversations from reactive fixes to proactive collaboration.
The Technical Reality
The data layer transforms website measurement from a fragile, reactive system into robust infrastructure. Development teams gain freedom to redesign, restructure, or A/B test without breaking tracking, while marketing maintains consistent data collection.
This isn’t merely a technical upgrade; it’s the prerequisite for advanced marketing capabilities: accurate attribution in complex customer journeys, meaningful personalisation engines, and AI-driven automation that depends on high-quality data inputs.
A JavaScript Primer
Introduction: JavaScript, The Language of the Web
To work effectively with modern web tools, one does not need to become a full-fledged JavaScript developer. Instead, the goal is to become a confident reader of JavaScript, specifically, the small, structured snippets of it used to pass information on a website.
A program, at its core, is simply a set of instructions for a computer to follow. The objective here is not to learn how to write a novel in a new language, but to learn how to read its essential grammar and vocabulary. The most significant barrier for those new to code is not the complexity of the syntax itself, but the challenge of forming a mental picture of what the code is actually doing inside the browser. When a line of code is executed, it isn’t just text; it’s an instruction that creates, labels, and organises information in the computer’s memory. This section is designed to build that foundational mental model. By understanding a few core concepts through simple, real-world analogies, you will gain the ability to look at a block of JavaScript and see not just characters, but a logical structure of information.
The Core Concepts: How Data is Stored and Labeled
All data, no matter how complex, is built from two fundamental components: the information itself (the data’s value) and a name or label used to refer to that information (a variable). Understanding this distinction is the first step toward deciphering any JavaScript code.
Variables: Labeled Boxes for Your Data
In programming, a variable is a symbolic name for a value; it is a container used to store information that your application needs. The most effective way to conceptualise a variable is as a labelled box or a lunchbox. The box itself is not the data; it is merely the container that holds the data. The label on the box allows you to find and access its contents easily.
In JavaScript, you create a variable using a declaration statement. For example:
var transactionTotal = 38.26;
This single line of code performs two actions:
- Declaration: The
var transactionTotalpart creates a new, empty box and puts the labeltransactionTotalon it. The keywordvarsignals the intent to declare a variable. - Initialisation: The
= 38.26part is the initialiser. It takes the value38.26and places it inside the box labeledtransactionTotal.
Now, whenever the code needs to know the total of the transaction, it can simply refer to the transactionTotal label, and the program will look inside that box to retrieve the value 38.26.
JavaScript provides three keywords for declaring variables: var, let, and const. Though let and const are modern addtions, we’ll stick to var to avoid having to exmpain the nuances which are not needed for this guide.
Data Types: The Different Kinds of Information
If variables are the labeled boxes, then data types are the different kinds of things you can put inside them. JavaScript organises data into a few simple categories, often called “primitive” types because they are the most basic, indivisible “atoms” of information. For now, we will focus on three essential primitives: String, Number, and Boolean. In the next section, we will see how these individual variables can be grouped together into more complex structures.
String: A Piece of Text
A String is a sequence of characters used to represent text. Any piece of descriptive information, like a product name, a page category, or a form type, will be a string. In JavaScript, strings are always enclosed in either single (' ') or double (" ") quotes.
Here, we store text data in variables:
var eventName = "order_placed";
var product = "Stan and Friends Tee";
var leadType = "Demo Request";Number: A Numerical Value
A Number is a numerical value used for quantities, prices, calculations, and any other metric data. Unlike strings, numbers are written without any quotes. JavaScript uses a single Number type for both whole numbers (integers) and numbers with decimal points (floats).
Here, we store numerical data in variables:
var tableNum = 14;
var orderAmount = 25.50;
var itemQuantity = 1;This distinction between a string and a number is not merely academic; it has significant consequences. JavaScript is a “weakly typed” language, meaning it can sometimes automatically convert data from one type to another. If a developer mistakenly stores a price as a string (e.g., var orderAmount = "25.50";) instead of a number, a problem arises. When that data is used in a calculation or sent to an analytics platform, the system may fail to recognise “25.50” as a monetary value, leading to inaccurate reporting.
Boolean: A Simple True or False
A Boolean is the simplest data type, representing a binary state. It can only have one of two values: true or false, written without quotes. Booleans are perfect for answering yes-or-no questions. The most effective analogy is a simple on/off light switch.
Here, we store a true/false state in a variable:
var userIsLoggedIn = true;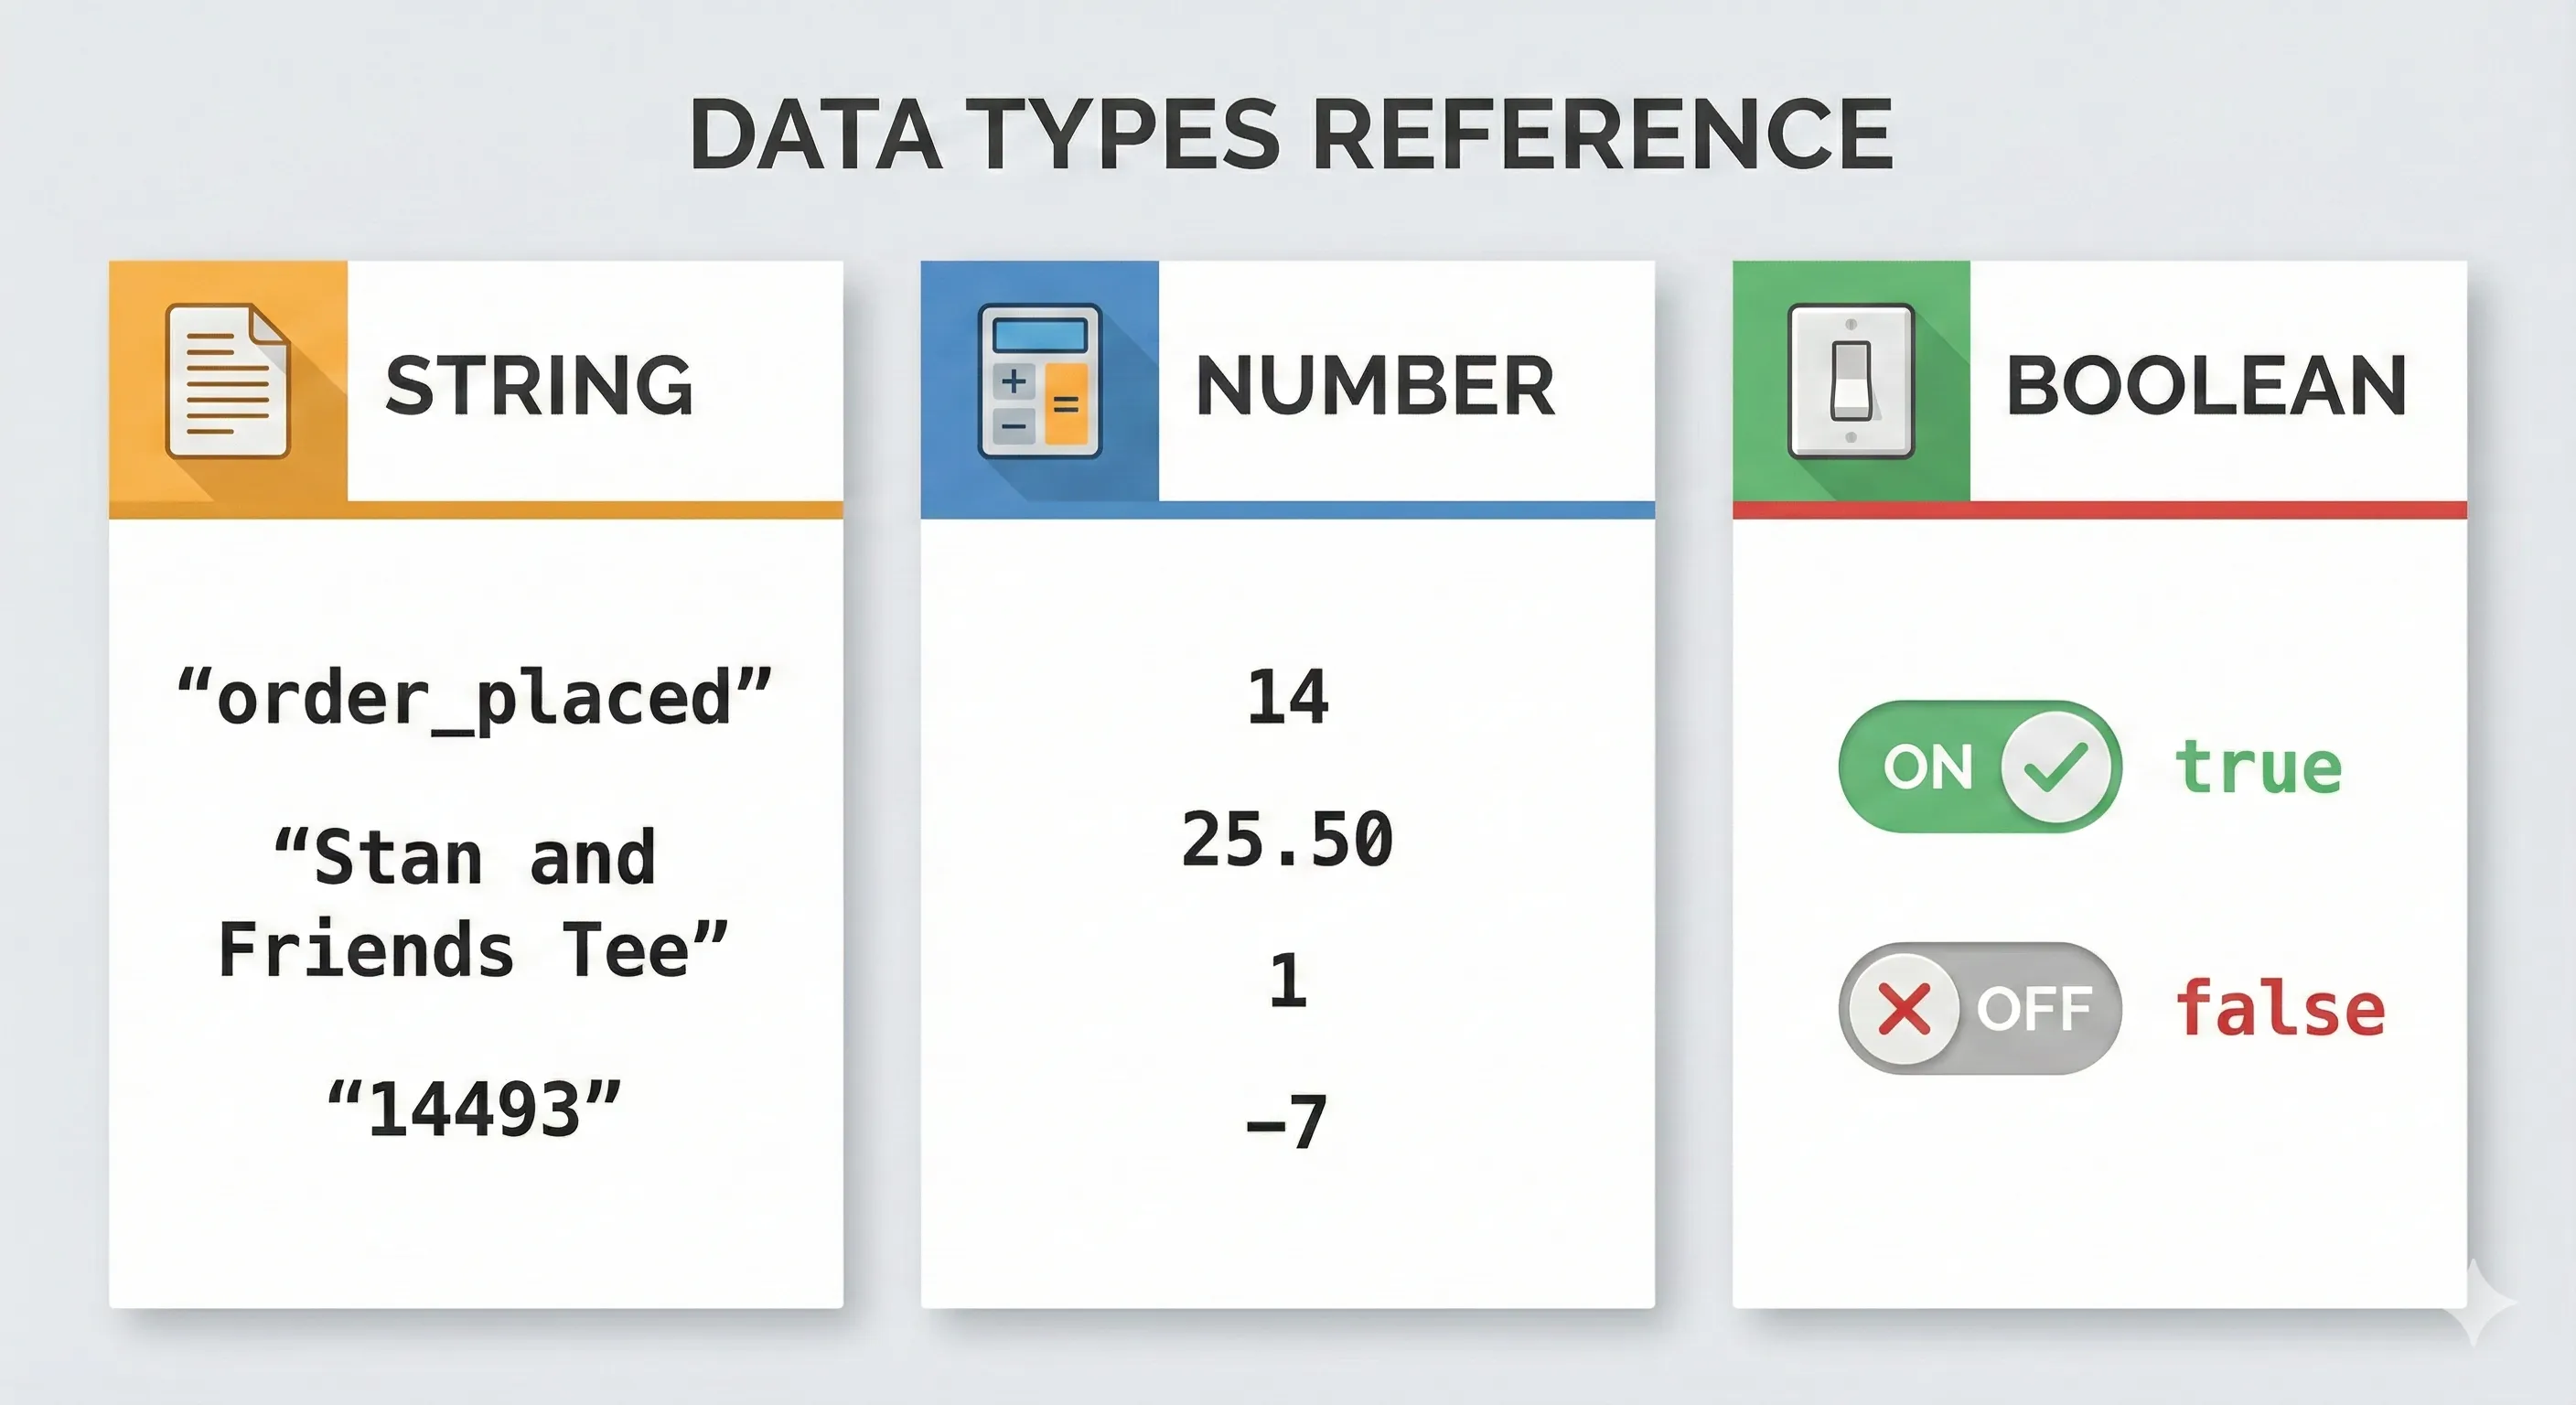
The Structures: How Data is Organised
While primitive data types are the fundamental atoms, they are rarely used in isolation. Instead, they are organised into more complex structures, or “molecules,” that can hold related information together. The two essential structures in JavaScript are Objects and Arrays.
Objects: The Detailed Recipe Card
An Object is one of the most fundamental structures in JavaScript. It is a collection of related data, organised as a set of key-value pairs, and enclosed in curly braces {}. An object is like a detailed recipe card or a student’s report card; it doesn’t just list information, it gives each piece of information a specific label.
Each entry in an object is a key-value pair, which consists of:
- Key: A string that acts as the label or name for the piece of data (e.g., “item_name”).
- Value: The actual data associated with that key. The value can be any data type: a String, a Number, a Boolean, or even the other structures we will discuss.
Here is a simple example of an object. Notice how it uses the primitive variables we declared earlier as some of its values:
var eventName = "order_placed";
var tableNum = 14;

var orderDetails = {
  "event": eventName,
  "table_number": tableNum,
  "item": "Steak Frites",
  "amount": 25.50
};
In this object:
"event"is a key, and its value is the variableeventName, which holds the string"order_placed"."table_number"is a key, and its value is the variabletableNum, which holds the number14."item"is a key, and its value is the string"Steak Frites"."amount"is a key, and its value is the number25.50.
This structure is powerful because it is self-describing. You don’t need to guess what the number 14 represents; the key "table_number" explicitly tells you.
Arrays: The Ordered Shopping List
An Array is an ordered list of items, enclosed in square brackets []. Arrays are general-purpose and can contain a mix of different data types, including strings, numbers, booleans, and even other objects. The key characteristic of an array is that its order is meaningful. The best analogy for an array is a bookshelf or a shopping list. On a bookshelf, the order of the volumes in a series matters. On a shopping list, you might list items in the order you’ll find them in the store aisles.
A critical concept for arrays is zero-indexing. This means the position of items in the list starts counting from 0, not 1. The first item is at index 0, the second is at index 1, the third at index 2, and so on.
Here are some examples of arrays holding different types of primitive data:
var productCategories = ['Tees', 'Hoodies', 'Accessories'];
var lotteryNumbers = [12, 45, 2, 9, 33];
var mixedData = ['SKU-123', 150, true];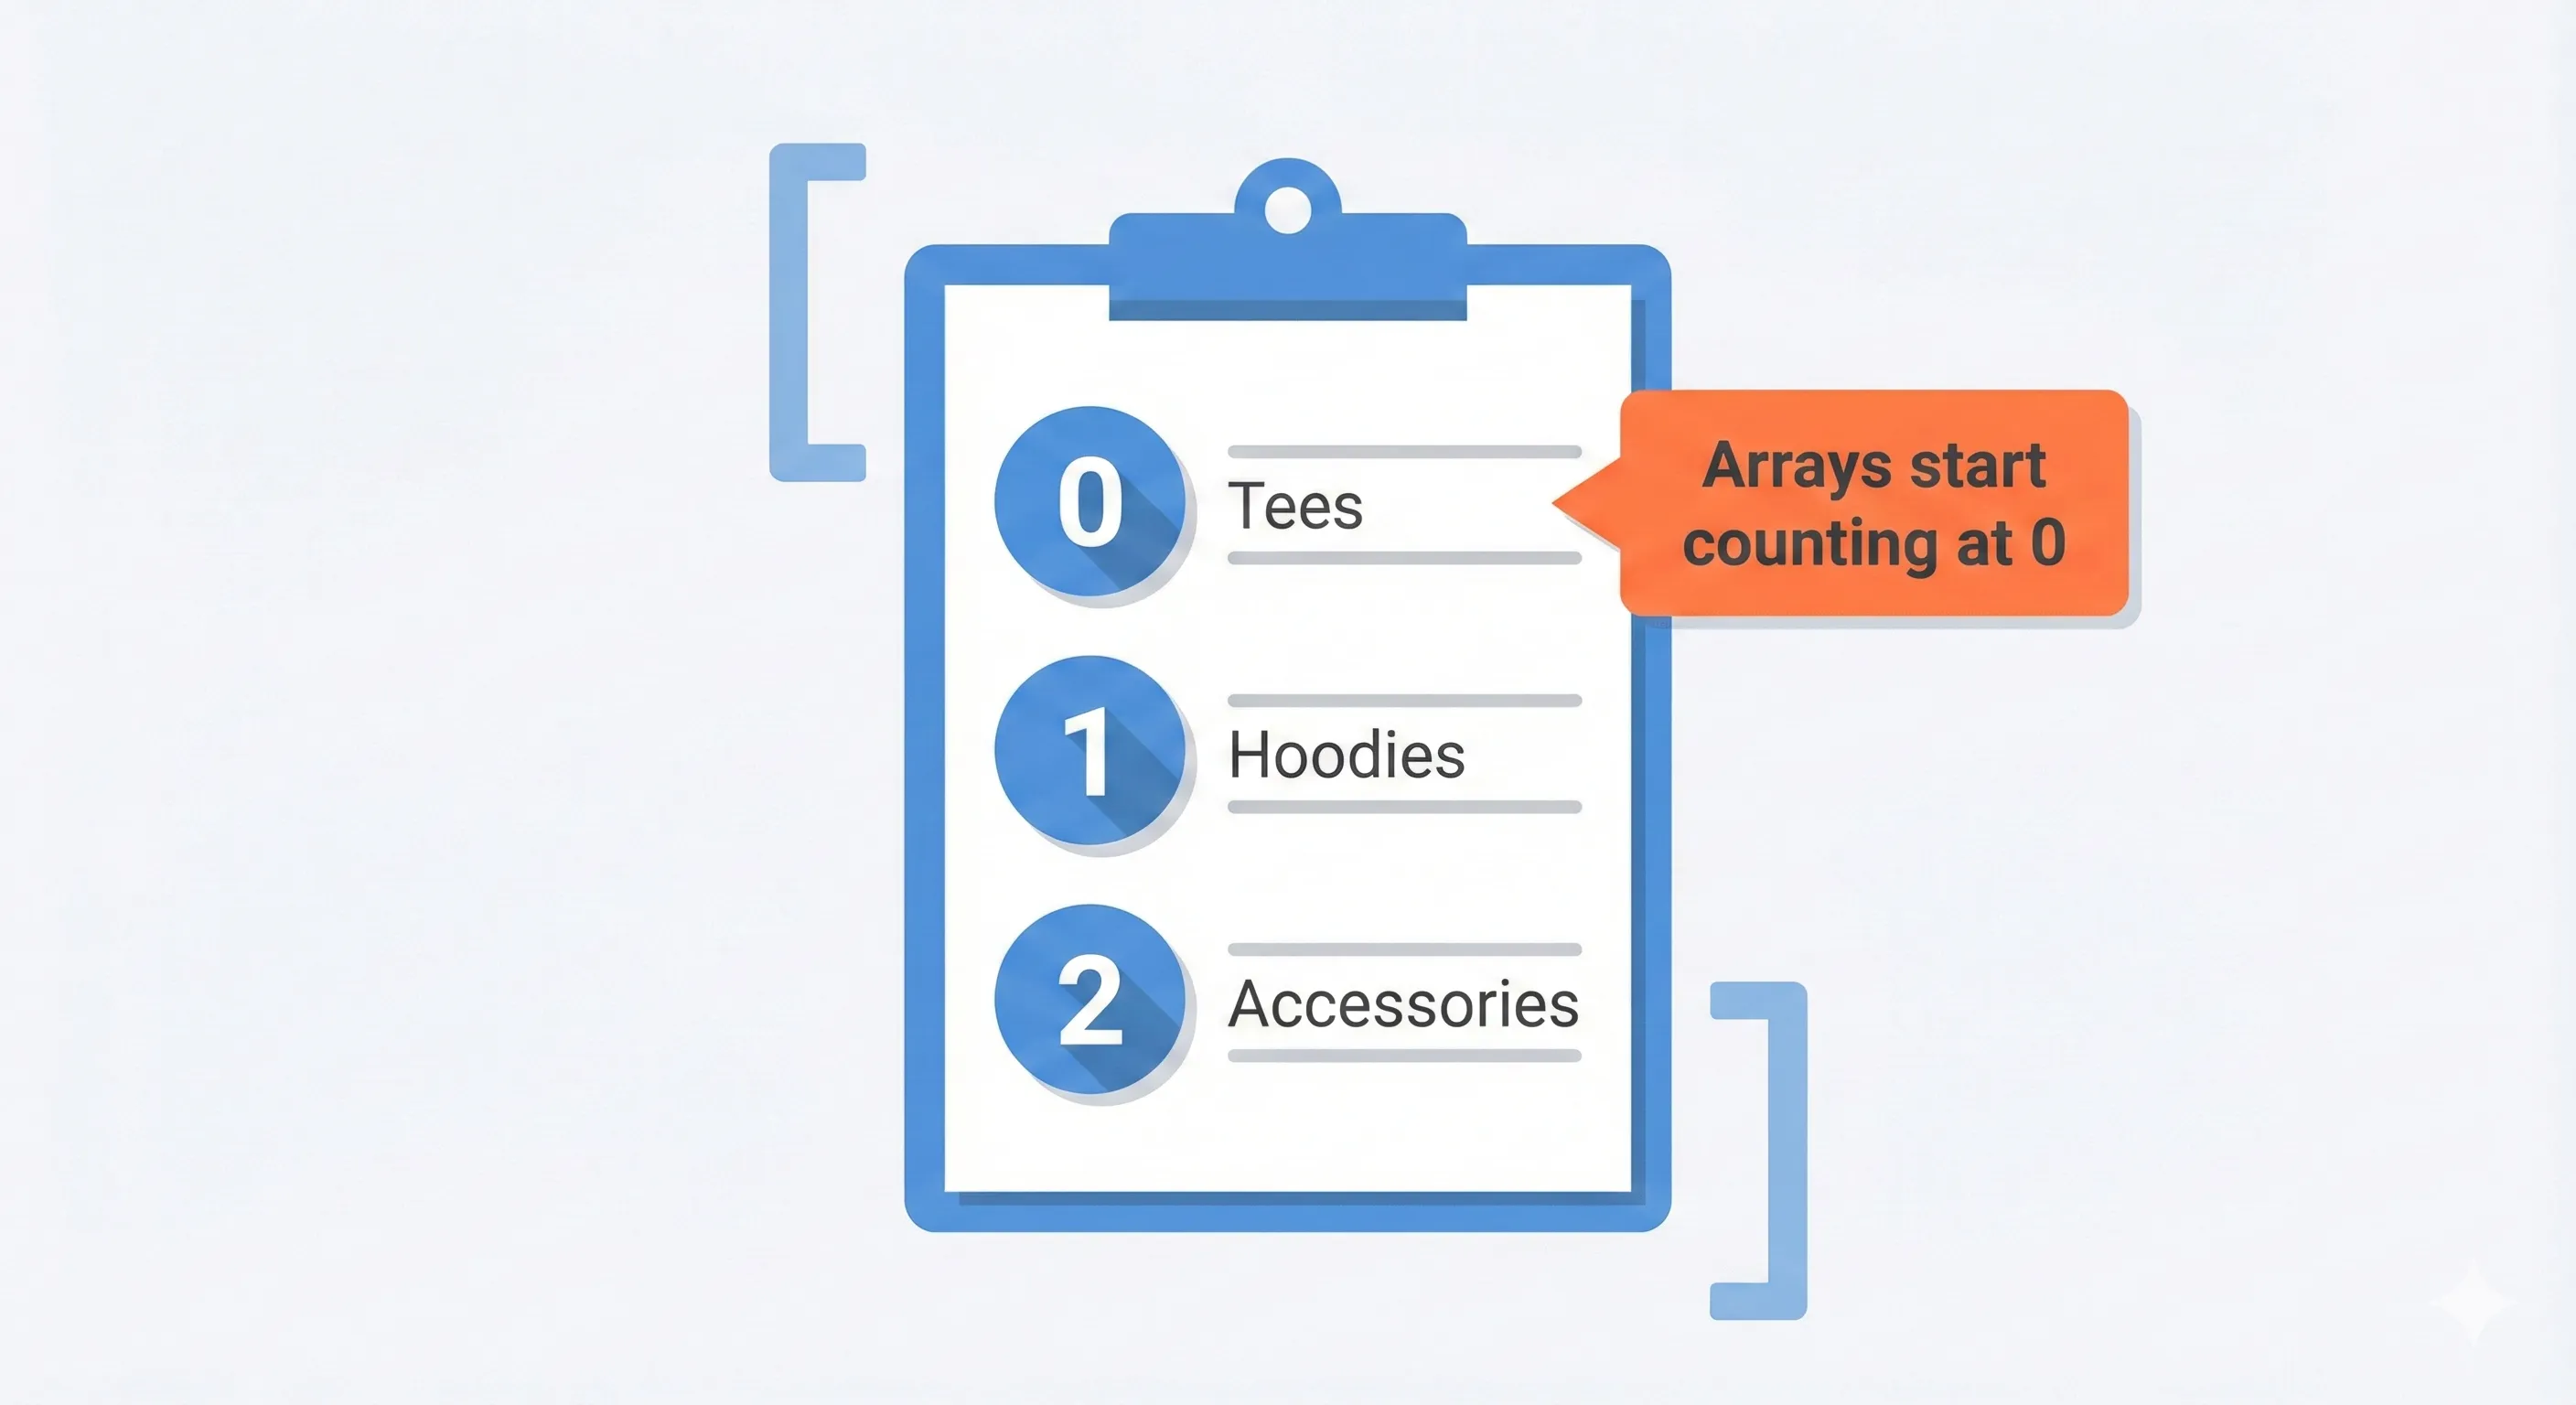
Nested Structures: A Recipe Card with a Shopping List Attached
The true flexibility of JavaScript comes from nesting these structures inside one another. An object can contain an array, and that array can contain more objects. This allows for the creation of rich, hierarchical data that can accurately model complex information.
Let’s look at a more complex data structure that combines everything we’ve learned:
var purchaseDetails = {
  "transaction_id": "T_12345",
  "value": 37.39,
  "currency": "USD",
  "items": [
    {
      "item_id": "SKU_001",
      "item_name": "Stan and Friends Tee",
      "price": 20.00,
      "quantity": 1
    },
    {
      "item_id": "SKU_002",
      "item_name": "Classic Sticker Pack",
      "price": 5.50,
      "quantity": 2
    }
  ]
};Breaking this down layer by layer reveals it is just a combination of the simple structures already discussed:
- The entire structure is an Object, denoted by the outer curly braces
{}. - This top-level object has keys like
"transaction_id"(with a String value) and"value"(with a Number value). - It also contains the key
"items". - The value for the
"items"key is an Array, denoted by the square brackets[]. - This array is a list that contains two Objects.
- Each object inside the array represents a single product in the transaction and has its own key-value pairs.
This ability to build structured data is fundamental to how modern websites and applications work. It allows developers to create a stable, predictable data format that different parts of an application can use to communicate, making the overall system more robust and easier to maintain.
The Anatomy of a Data Layer
To effectively implement and manage a data layer, it is essential to understand its technical structure. Whether you’re working with plugin-generated data layers or implementing custom solutions, the fundamental structure remains consistent. This section transitions from the “why” to the “what,” breaking down the core components for both technical and non-technical audiences.
Before We Begin: This section covers technical concepts but don’t worry if you’re not a developer. Understanding these basics will help you work effectively with plugins, troubleshoot issues, and communicate with technical team members.
The dataLayer: A Specialised JavaScript Array for Measurement
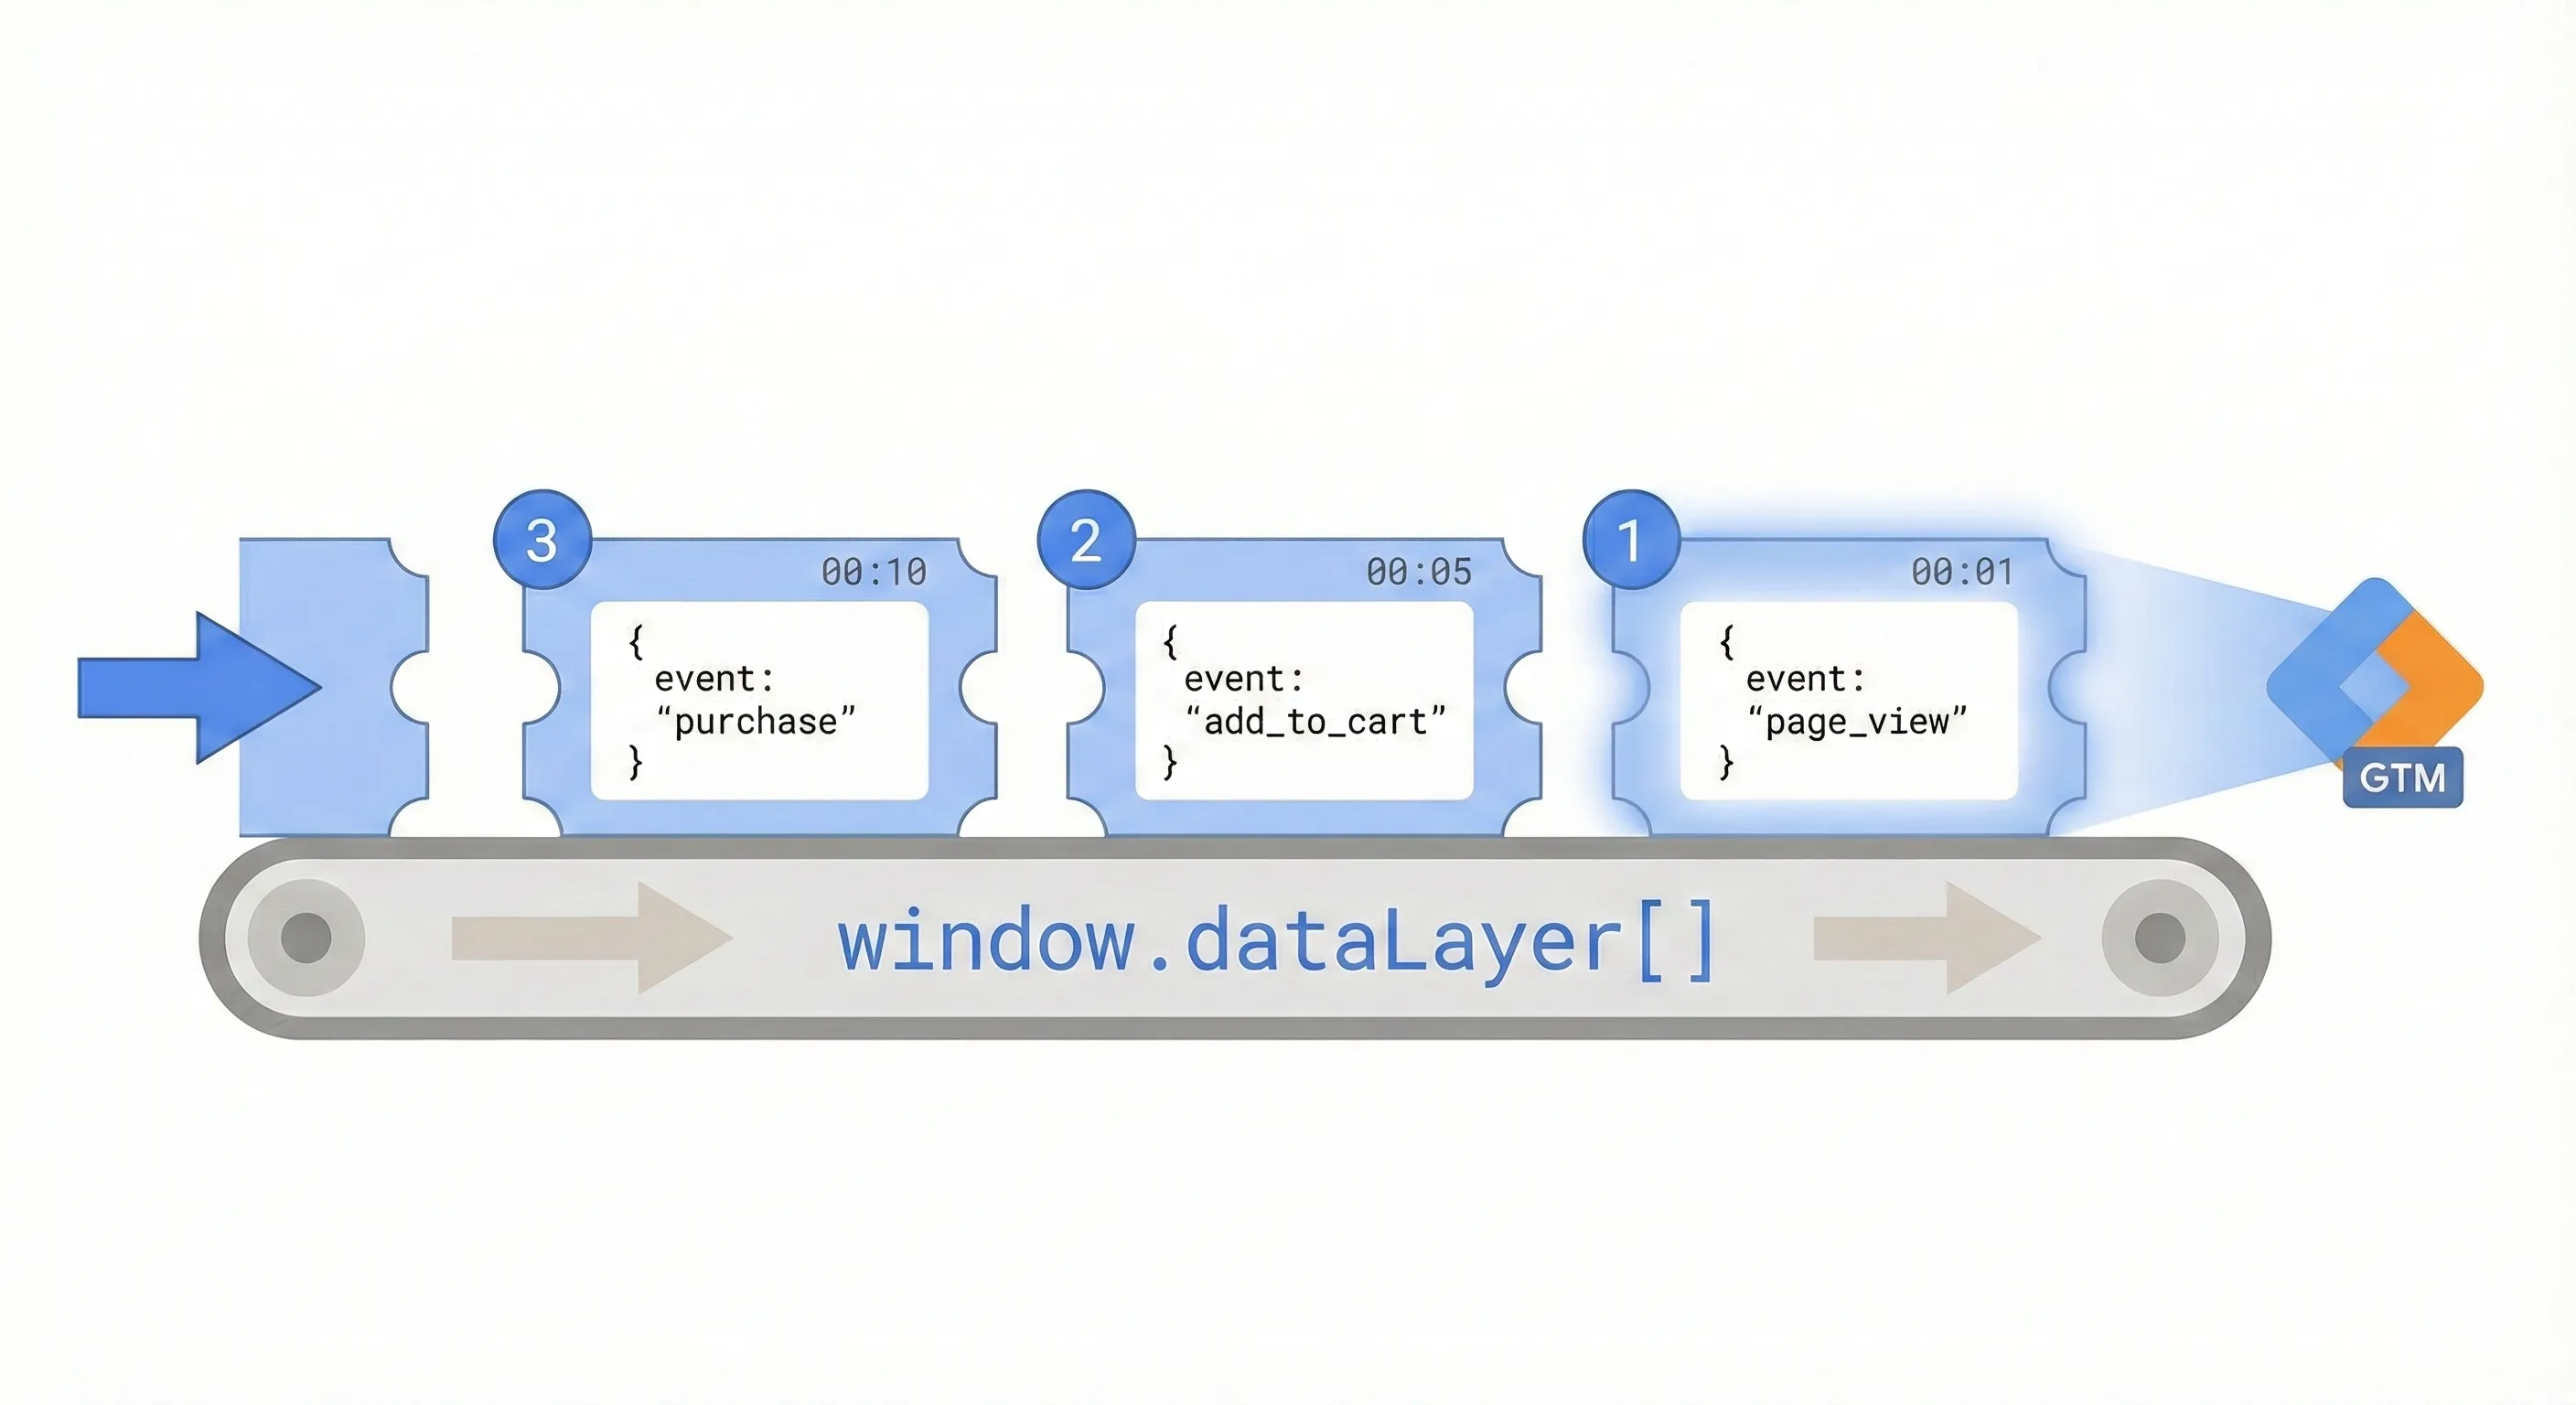
Technically, the dataLayer is a JavaScript Array with specific conventions for how it’s used. When you add the Google Tag Manager container snippet to your website, it automatically checks for an existing object named dataLayer. If it doesn’t find one, it initialises an empty array with that name: dataLayer = [];. All subsequent information is then added, or “pushed,” into this array as a series of JavaScript Objects.
This choice of data structure is a critical design decision. Because new information is added to the end of the list, the Array functions as a chronological message queue, or a “message bus”. GTM’s internal data model processes these messages sequentially, ensuring that user interactions and data updates are handled in the precise order they occurred. This provides a stable and predictable mechanism for managing the state of all tracking variables.
The Golden Rule: Safe Initialisation
Before executing any dataLayer.push() command, it is a critical best practice to ensure that the dataLayer array actually exists. If a script containing a push command runs before the GTM container has had a chance to initialise the dataLayer, it will cause a JavaScript error.
window.dataLayer = window.dataLayer || [];This line is a safeguard that should precede any push or be included as part of the GTM container snippet itself. It checks if window.dataLayer already exists. If it does, it does nothing. If it doesn’t, it creates an empty array, ensuring that subsequent .push() commands have a valid array to push to.
The Core Unit of Information: The Data Layer Object
Every piece of information added to the dataLayer Array takes the form of a JavaScript Object. Each time data is pushed, a new, self-contained “recipe card” of information is added to the “shopping list” (the Array). This structure is what gives the data layer its power and clarity.
The key-value pair structure of JavaScript Objects makes data layer information inherently meaningful and self-describing. The data layer object, by its very nature, packages the crucial “what” context alongside the “that” of the event itself.
The versatility of the data layer comes from its ability to handle different types of data. Here are the most common data types you will encounter, with examples:
String: A sequence of characters, or plain text. This is used for descriptive information.
{
  "product_name": "Stan and Friends Tee"
}
Number: A numerical value, without quotes. This is used for quantities, prices, and other numeric metrics.
{
  "transactionTotal": 38.26
}
Boolean: A simple true or false value, without quotes. This is useful for binary states.
{
  "isLoggedIn": true
}
Array: A list of items, enclosed in square brackets []. Arrays are perfect for situations where you need to pass multiple similar items, such as the products in a shopping cart.
{
  "items": [
    {...},
    {...}
  ]
}
Object: A collection of key-value pairs, enclosed in curly braces {}. Objects are used to group related information. They can also be “nested” inside other objects to create rich, hierarchical data structures. The ecommerce object in GA4’s recommended events is a prime example.
{
  "ecommerce":{
    "currency":"USD",
    "value":25.00,
    "items":[
      {...}
    ]
  }
}
In this example, ecommerce is an object that contains other key-value pairs, including an items array which itself contains another object.
The Engine of GTM: The Special ‘event’ Key
While you can name most keys whatever you want, there is one special, reserved key that is the engine of event-based tracking in GTM: the 'event' key.
When GTM processes an object in the data layer that contains an 'event' key, it recognises this as a specific, named event that has occurred on the page. This event name is then made available in the GTM interface and can be used to create a “Custom Event Trigger.” This is the primary mechanism for telling GTM when to fire a tag in response to a specific user interaction or state change on your website. The 'event' key is the command that says, “An important moment has just occurred. Check the rules and fire any relevant tags NOW.”

Event Examples Across Implementation Types:
GA4 Recommended Events (Often, but not always, Built-on or made available using plugins):
'purchase'– When someone completes a transaction'add_to_cart'– When someone adds a product to their cart'view_item'– When someone views a product page'begin_checkout'– When someone starts the checkout process'generate_lead'– When someone submits a lead form
Custom Events (business-specific, usually require setup):
'calculator_interaction'– When someone uses a custom ROI calculator'webinar_registration'– When someone signs up for a webinar'quote_request'– When someone requests a custom quote'support_ticket_created'– When someone creates a support ticket
Key Understanding: Whether generated by a plugin or custom code, all data layer events follow this same pattern. The
'event'key tells GTM “something important happened,” and the other keys provide context about what happened.
Mastering the dataLayer.push(): The Engine of Modern Tracking
Understanding the structure of the data layer is the first step. The next is learning how information gets added to it. The single most important method for this is dataLayer.push(). This JavaScript command is the engine that powers dynamic, event-driven tracking, whether it’s executed automatically by your platform/tools or manually implemented through custom code.
Implementation Context: While plugins and platforms handle most dataLayer.push() commands automatically, understanding how they work helps you troubleshoot issues, request custom implementations, and work effectively with technical teams.
What is dataLayer.push()?
While some static information (like page category or user ID) might be declared in the data layer before the GTM snippet loads, most valuable tracking relies on capturing actions that happen in real-time. When a user clicks a button, submits a form, or plays a video, you need a way to communicate that event to GTM. dataLayer.push() is the function that accomplishes this: it “pushes” a new JavaScript object containing the event information onto the end of the dataLayer array.
How Different Implementation Approaches Use dataLayer.push():
Built-in Platform Features: Some platforms automatically execute dataLayer.push() for basic events without any additional setup.
Plugin/App Solutions: Third-party plugins handle dataLayer.push() commands automatically when configured properly.
DIY Technical Implementations: You might write dataLayer.push() commands in custom JavaScript, form success callbacks, or GTM’s Custom HTML tags.
Hybrid Approaches: Combine plugin-generated events with custom dataLayer.push() for business-specific tracking.
Full Custom Development: Developers integrate dataLayer.push() commands throughout your website’s codebase.
Correct Syntax and Common Mistakes
The syntax for dataLayer.push() is straightforward, but small mistakes can cause it to fail silently. Adhering to the correct format is crucial whether you’re writing code yourself or reviewing developer implementations.
Correct Syntax:
window.dataLayer.push({"event": "login", "loginMethod": "google"});Most Common Pitfalls to Avoid:
// Incorrect:
window.datalayer.push(...) // Will not work
window.DataLayer.push(...) // Will not work

// Correct:
window.dataLayer.push(...)2. Quoted Keys: While some JavaScript environments are permissive, the best practice for GTM is to always enclose keys in single or double quotes.
// Risky:
window.dataLayer.push({event: "generate_lead"}) // May fail

// Reliable:
window.dataLayer.push({"event": "generate_lead"}) // Recommended format3. Overwriting vs. Pushing: A critical mistake is to re-declare the data layer using dataLayer = [...] after the page has loaded.
// Never do this after GTM loads:
dataLayer = [{"event": "some_event"}]; // Breaks everything

// Always do this:
dataLayer.push({"event": "some_event"}); // Safe and correctOverwriting will destroy the entire existing data layer, including GTM initialisation messages, and break all tracking.
Pushing Data vs. Pushing Events
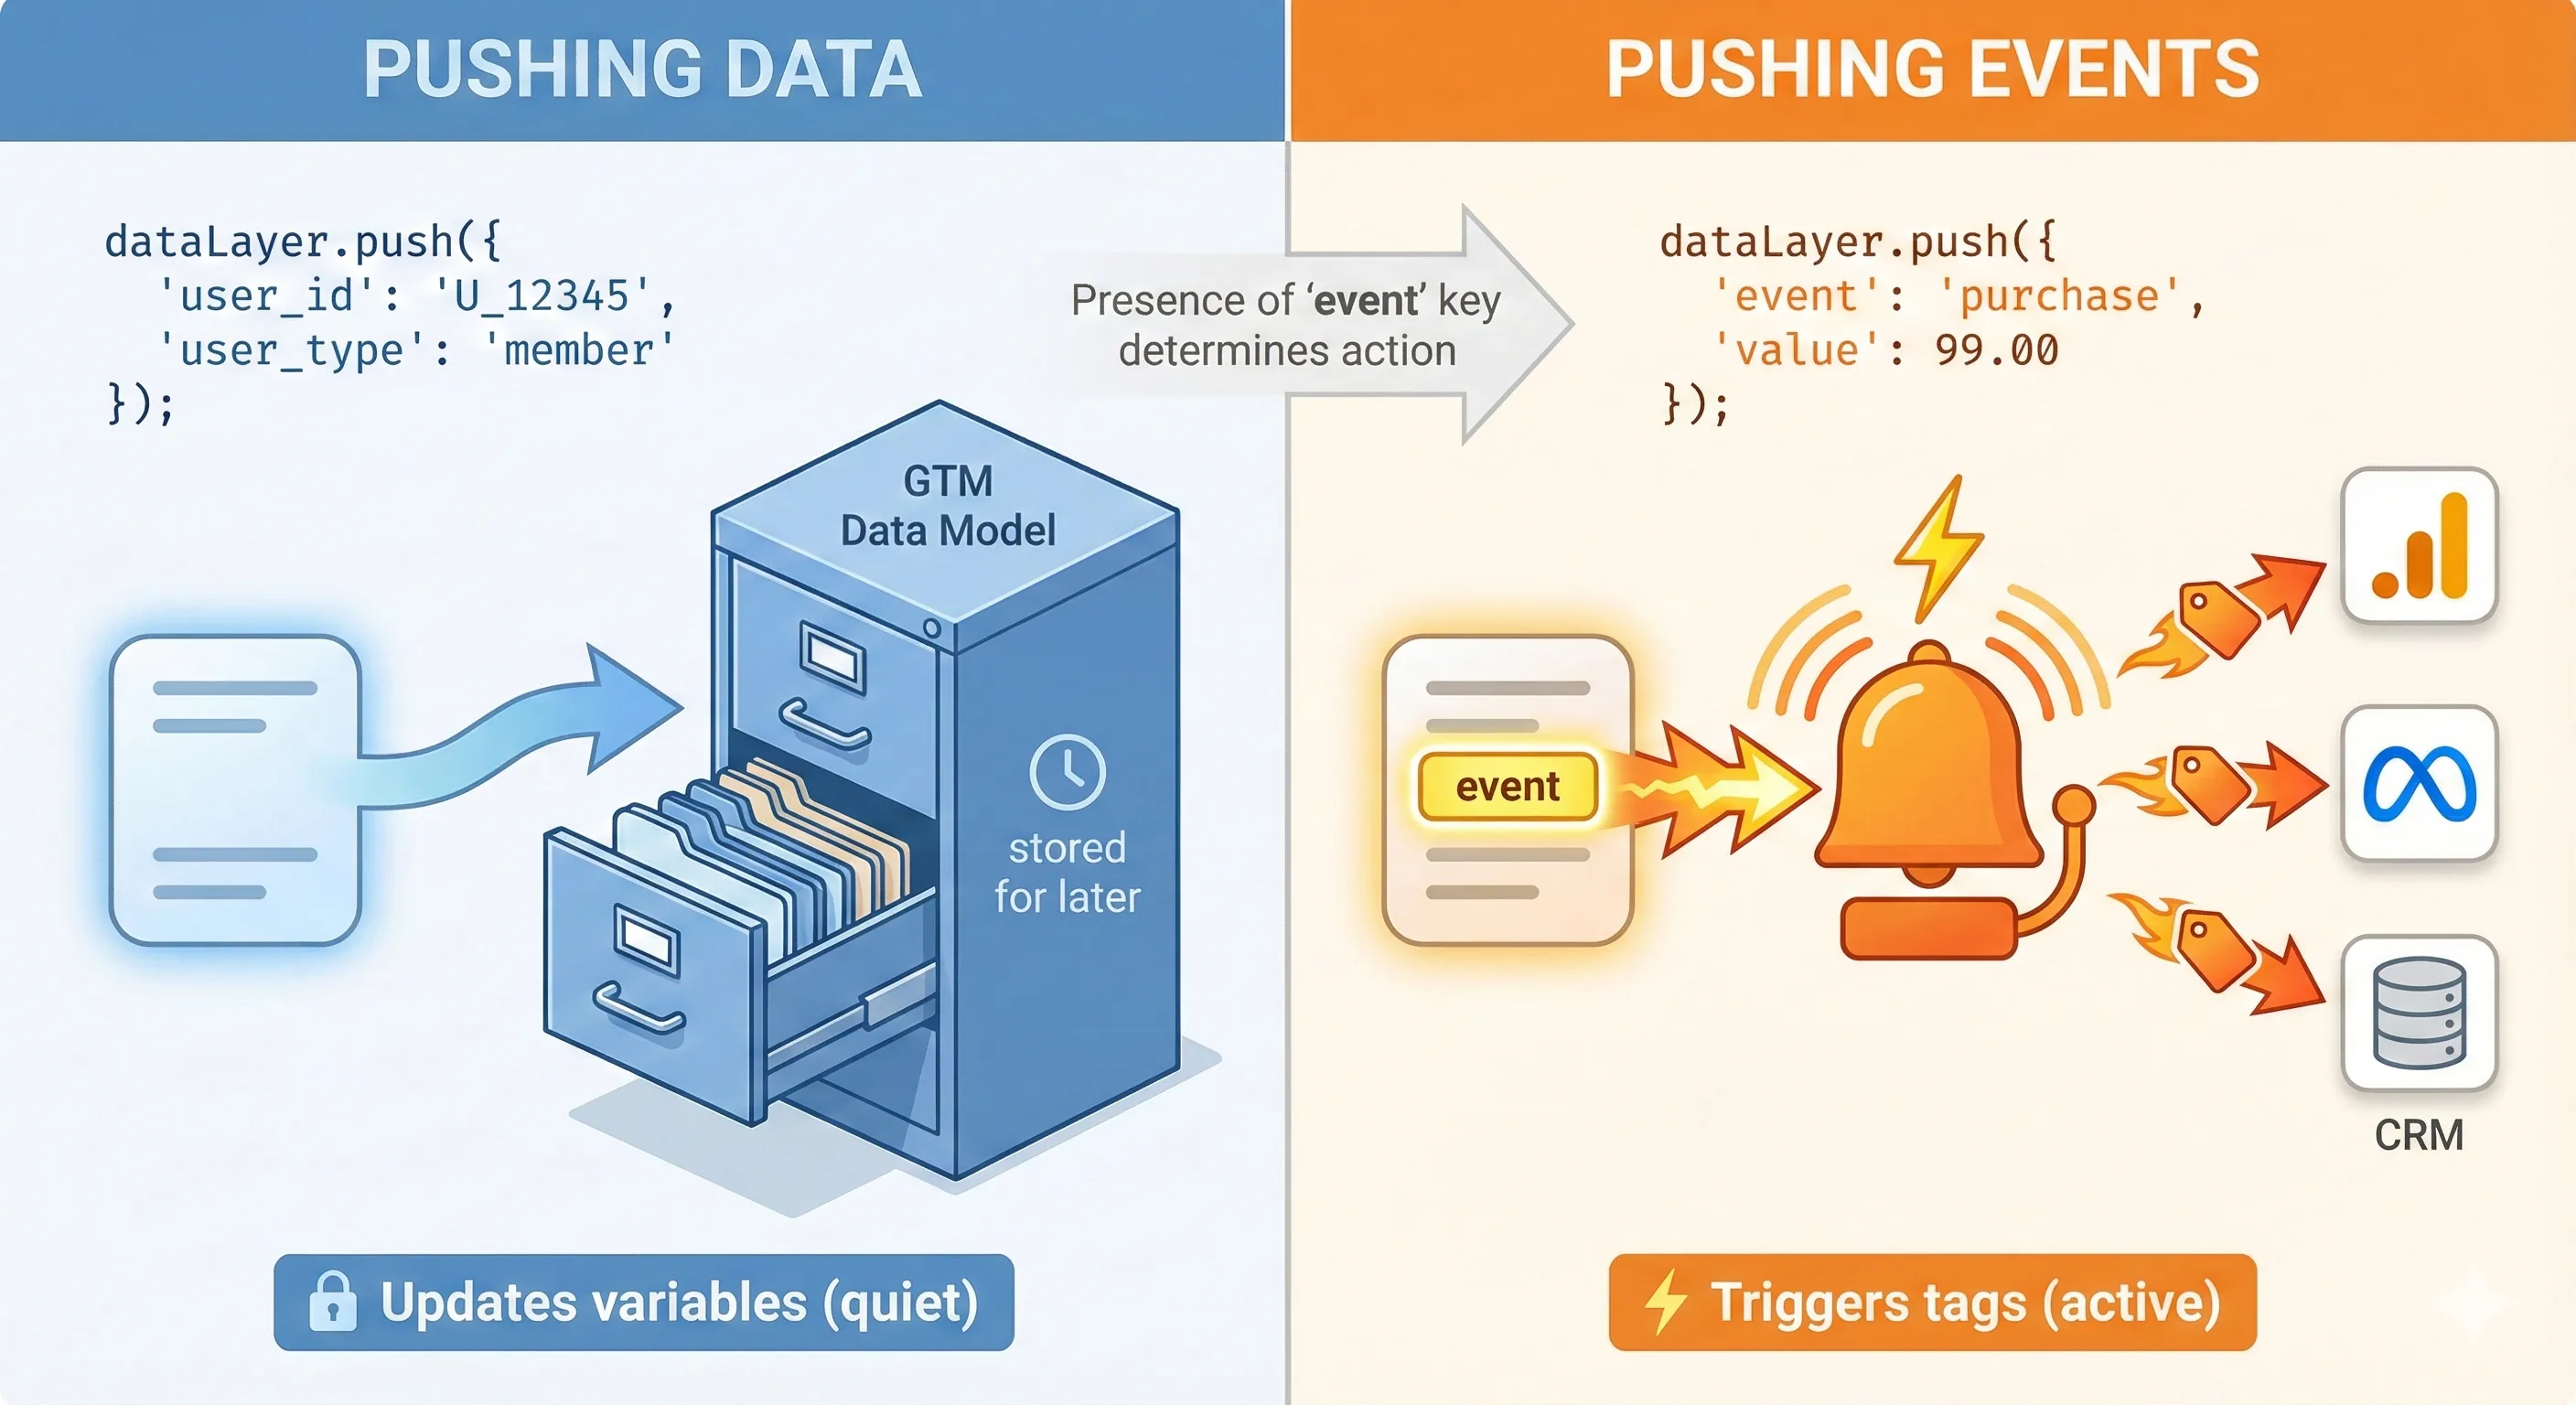
A dataLayer.push() can serve two primary purposes: adding or updating data, or signaling an event. Understanding this distinction is crucial for effective implementation.
Pushing Data (Information Update): A push can add new information to GTM’s internal data model without signalling an immediate action.
dataLayer.push({'user_type': 'premium', 'customer_segment': 'enterprise'});When this code executes, the user_type and customer_segment variables are set in GTM’s data model. This information is now stored and can be accessed by tags that fire on subsequent events. For instance, a purchase tag that fires later could pull these values and include them in the transaction data sent to analytics platforms.
Pushing Events (Action Signal): A push that includes the special 'event' key creates an actionable moment in GTM.
dataLayer.push({
  "event":"calculate_roi",
  "calculator_type":"pricing",
  "user_input_revenue":50000,
  "calculated_result":"23% improvement"
});When GTM sees this push, it not only updates the calculator-related variables but also registers that a calculate_roi event has occurred. This event can then trigger tags immediately, sending data to analytics platforms, advertising pixels, or other tools.
Best Practice: Any significant data push should be accompanied by an 'event' key. This makes the data immediately actionable and creates a clear, named entry in the GTM debug console, which vastly improves testing and troubleshooting.
Activating Your Data: A Practical GTM Implementation Workflow

Having data in the data layer is only half the battle. To make it useful, you must configure Google Tag Manager to listen for this data, understand it, and act on it. This process follows a logical, three-step workflow within the GTM interface: creating Variables to capture the data, creating Triggers to react to events, and creating Tags to send the data to your marketing and analytics platforms. Mastering this workflow is the key to unlocking the full power of your data layer.
Capturing Information: How to Create Data Layer Variables
By default, GTM does not automatically recognise any custom data you push to the data layer. You must explicitly tell GTM which pieces of information you are interested in by creating Data Layer Variables. Each variable corresponds to a specific key in your data layer object.
Step-by-Step Guide:
- Navigate to Variables: In the left-hand navigation menu of your GTM workspace, click on “Variables.”
- Create a New User-Defined Variable: Scroll down to the “User-Defined Variables” section and click the “New” button.
- Choose Variable Type: In the “Variable Configuration” panel, click to choose a variable type and select “Data Layer Variable” from the list.
- Enter the Variable Name: In the “Data Layer Variable Name” field, enter the exact key from your
dataLayer.push()that you want to capture. This field is case-sensitive and must be a perfect match. For example, if your push contains{'form_type': 'Demo Request'}, you would enterform_typehere. - Use Dot Notation for Nested Data: If your data is nested within other objects, use dot notation to access the specific value. For example, to access the revenue from a standard GA4 ecommerce object, you would enter
ecommerce.purchase.actionField.revenue. - Name and Save: Give your GTM variable a descriptive name. A common convention is to use a prefix, such as “DLV – Form Type”. Click “Save.”
Reacting to Actions: How to Create Custom Event Triggers
The 'event' key in a dataLayer.push() is the signal that an important action has occurred. A Custom Event Trigger is how you configure GTM to listen for that specific signal.
Step-by-Step Guide:
- Navigate to Triggers: In the left-hand navigation menu, click on “Triggers.”
- Create a New Trigger: Click the “New” button.
- Choose Trigger Type: In the “Trigger Configuration” panel, select “Custom Event” as the trigger type.
- Enter the Event Name: In the “Event name” field, enter the exact value that you pushed to the
'event'key. For example, if your push was{'event': 'form_submission'}, you would enterform_submissionhere. This is also case-sensitive. - Set Firing Conditions: For most cases, you will set the trigger to fire on “All Custom Events” that match the name. However, you can make the trigger more specific by selecting “Some Custom Events” and adding conditions. For example, you could configure the trigger to fire only when the “Event name” equals
form_submissionAND your{{DLV - Form Type}}variable equals “Demo Request”. - Name and Save: Give the trigger a descriptive name, such as “Custom Event – Form Submission,” and click “Save.”
Sending Data to Platforms: Configuring a GA4 Event Tag
The final step is to bring the variables and trigger together in a tag. The tag is the component that packages the data and sends it to an external platform like Google Analytics 4.
Step-by-Step Guide:
- Navigate to Tags: In the left-hand navigation menu, click “Tags,” then click “New.”
- Choose Tag Type: In the “Tag Configuration” panel, select “Google Analytics: GA4 Event”.
- Select Configuration Tag: From the dropdown, select your main GA4 Configuration Tag. This tag contains your Measurement ID and ensures the event is sent to the correct GA4 property.
- Enter Event Name: In the “Event Name” field, enter the name for the event as you want it to appear in your GA4 reports. It is a best practice to use Google’s recommended event names (like
generate_lead) or a consistentsnake_caseformat for custom events. - Add Event Parameters: Expand the “Event Parameters” section. This is where you attach the data you captured with your Data Layer Variables. Click “Add Row.” In the “Parameter Name” field, enter the name for the parameter as you want it to appear in GA4 (e.g.,
form_type). In the “Value” field, click the lego-brick icon next to the field and select the corresponding Data Layer Variable you created (e.g.,{{DLV - Form Type}}). Repeat this for every piece of data you want to send with the event. - Apply the Trigger: Click on the “Triggering” section at the bottom of the panel. Select the Custom Event Trigger you created in the previous step (e.g.,
{{Custom Event - Form Submission}}). This tells the tag to fire only when that specific event occurs. - Name and Save: Give the tag a descriptive name, such as “GA4 Event – Generate Lead,” and click “Save.”
- Test Thoroughly: Use GTM’s Preview Mode to test the entire flow. Submit the form on your website and watch the debug console. You should see your custom event appear, see that your GA4 tag has fired, and be able to click on the tag to inspect the exact data that was sent. Concurrently, open GA4’s DebugView to confirm that the event and its parameters were received correctly.
This three-part structure is the fundamental grammar of Google Tag Manager. The data layer provides the raw vocabulary: the nouns are the data points (like form_type), which are made available to GTM via Data Layer Variables. The dataLayer.push() with an 'event' key provides the verb (the action, like form_submission), which GTM listens for with a Custom Event Trigger. Finally, the Tag constructs the complete sentence that is sent to your analytics platform: “When the form_submission action happens, send a generate_lead event to GA4 and report that the form_type was ‘Demo Request’.” Understanding this grammar elevates a practitioner from simply deploying tags to architecting a sophisticated and meaningful measurement system.
Data Layer in Action: Implementation Recipes for High-Value Tracking
Theory and workflow are essential, but practical examples make the concepts tangible. This section provides three detailed “recipes” for common, high-value tracking scenarios. Each recipe includes the business objective, a developer-ready dataLayer.push() code snippet, and a summary of the required GTM configuration.
E-commerce Recipe: Capturing a Full Purchase Transaction
- Business Goal: To accurately track a completed purchase with comprehensive transaction-level and item-level details. This data is critical for revenue reporting, marketing attribution, and understanding product performance.
- The dataLayer.push() Code: This implementation should occur on the purchase confirmation page or be triggered by the back-end event that confirms a successful transaction. The code should follow Google’s recommended GA4 e-commerce schema to ensure automatic processing in GA4 reports.
// This script should be executed once a purchase is successfully completed.
// Initialise the dataLayer if it doesn"t exist.
window.dataLayer = window.dataLayer || [];
window.dataLayer.push({
  "event": "purchase",
  "ecommerce": {
    "transaction_id": "T_12345",      // *Required - Unique ID for the transaction.
    "value": 37.39,                   // *Required - Total transaction value, including tax and shipping.
    "currency": "USD",                // *Required - Currency code for the transaction. Required.
    "items": [ // *Required
      {
        "item_id": "SKU_12345", // *Required
        "item_name": "Stan and Friends Tee", // *Required
        "currency": "USD",
        "price": 9.99,
        "quantity": 1
      }
    ]
  }
});GTM Setup Summary:
- Variables: While you can create individual Data Layer Variables for each piece of data (e.g.,
ecommerce.transaction_id), GTM offers a powerful shortcut for this specific schema. You only need one variable pointing to the entire ecommerce object: create a Data Layer Variable named “DLV – ecommerce” with the variable nameecommerce. - Trigger: Create a Custom Event Trigger named “Custom Event – Purchase” that fires on the event name
purchase. - Tag: Create a new “GA4 Event” tag named “GA4 Event – Purchase.” Set the Event Name to
purchase. In the tag configuration, go to “More Settings,” check the box for “Send E-commerce data,” and ensure the Data Source is set to “Data Layer”. Attach the “Custom Event – Purchase” trigger. This single checkbox tells GTM to automatically find the correctly formattedecommerceobject in the data layer and send it to GA4, eliminating the need to map each parameter manually.
Lead Generation Recipe: Tracking a Detailed Form Submission
- Business Goal: To track every successful lead form submission and, crucially, to differentiate between various types of leads (e.g., a high-intent “Demo Request” vs. a lower-intent “Newsletter Signup”) for better lead scoring and channel analysis.
- The dataLayer.push() Code: This script should be executed by the form’s success callback function, that is, only after the form has been successfully validated and submitted.
// This script should be fired ONLY on a successful form submission event.
// Initialise the dataLayer if it doesn"t exist.
window.dataLayer = window.dataLayer || [];
window.dataLayer.push({
  "event": "form_submission",
  "form_type": "Demo Request", // Dynamic value indicating the purpose of the form. Examples: "Demo Request", "Contact Us", "Newsletter Signup"
  "form_location": "Homepage Hero" // Dynamic value indicating where the form is located on the site. Examples: "Homepage Hero", "Footer", "Blog Sidebar", "Contact Page"
});GTM Setup Summary:
- Variables: Create two Data Layer Variables: “DLV – form_type” (variable name:
form_type) and “DLV – form_location” (variable name:form_location). - Trigger: Create a Custom Event Trigger named “Custom Event – Form Submission” that fires on the event name
form_submission. - Tag: Create a new “GA4 Event” tag named “GA4 Event – Generate Lead.” Set the GA4 Event Name to
generate_lead. Under “Event Parameters,” add two rows:- Parameter Name:
form_type, Value:{{DLV - form_type}} - Parameter Name:
form_location, Value:{{DLV - form_location}}
- Parameter Name:
- Attach the “Custom Event – Form Submission” trigger to this tag.
Engagement Recipe: Measuring Video Player Interaction
- Business Goal: To understand how users engage with embedded video content to measure its effectiveness and identify opportunities for improvement. This requires tracking plays, progress milestones (e.g., 25%, 50%, 75%), and completions.
- The dataLayer.push() Code: This requires a developer to add event listeners to the video player’s API to trigger these pushes at the appropriate moments. While GTM has a built-in YouTube Video trigger, this custom data layer method is universal and works for any player (Vimeo, Wistia, custom HTML5), demonstrating the flexibility of the data layer.
// This is a conceptual example. Actual implementation depends on the video player"s API.
window.dataLayer = window.dataLayer || [];

// Fired when the video begins playing for the first time
function onVideoPlay() {
  window.dataLayer.push({
    "event": "video_engagement",
    "video_action": "play",
    "video_title": "The Ultimate Guide to Data Layers", // Should be dynamically populated
    "video_provider": "Vimeo" // Should be dynamically populated
  });
}

// Fired when the video reaches the 50% mark
function onVideoProgress50() {
  window.dataLayer.push({
    "event": "video_engagement",
    "video_action": "progress",
    "video_percent": 50,
    "video_title": "The Ultimate Guide to Data Layers",
    "video_provider": "Vimeo"
  });
}

// Fired when the video finishes
function onVideoComplete() {
  window.dataLayer.push({
    "event": "video_engagement",
    "video_action": "complete",
    "video_title": "The Ultimate Guide to Data Layers",
    "video_provider": "Vimeo"
  });
}GTM Setup Summary:
- Variables: Create Data Layer Variables for
video_action,video_title,video_percent, andvideo_provider. - Trigger: Create a single Custom Event Trigger named “Custom Event – Video Engagement” that fires on the event name
video_engagement. - Tag: Create a single “GA4 Event” tag. This is where an advanced technique can save significant time. Instead of creating separate tags for play, progress, and complete, you can create one dynamic tag.
- Tag Name: “GA4 Event – Video Engagement”
- Event Name:
video_{{DLV - video_action}}(This will dynamically create event names in GA4 likevideo_play,video_progress, andvideo_complete). - Event Parameters: Add parameters for
video_title,video_percent, andvideo_provider, using their respective variables.
- Attach the “Custom Event – Video Engagement” trigger.
Next Steps
Implement What You’ve Learned
Quick Start Checklist:
- [ ] Verify your GTM container includes the dataLayer initialization
- [ ] Identify 2-3 high-priority events to track (purchases, form submissions, key engagements)
- [ ] Test each implementation in GTM Preview Mode before publishing
- [ ] Validate data appears correctly in GA4 DebugView
Understanding the Bigger Picture
The Data Layer is the foundation of reliable measurement, but it’s one component of a complete system. Understanding how it integrates with GTM configuration, GA4 event architecture, conversion tracking, and attribution creates a measurement infrastructure that actually answers your business questions.
How to Build Your Marketing Measurement Foundation shows you how the Data Layer connects with your other measurement tools, which business questions this foundation helps you answer, and the optimal sequence for building a complete system that transforms tracking data into strategic intelligence.
If You Need Help
Data Layer implementation appears straightforward in examples, but production environments introduce complexity. Nested ecommerce objects require precise schema adherence—a single inconsistency breaks GA4’s internal matching. Form success callbacks firing before data is available capture empty values. Dynamic content loading requires timing adjustments most implementations miss. Our Marketing Measurement Foundation service provides complete implementation with proper Data Layer architecture, integration testing, and validation if you prefer expert setup.
Continue Building Your Foundation
Next Recommended Component: Google Analytics 4 Event Implementation
With your Data Layer structure in place, the next step is configuring GA4 to capture and process the events you’re pushing. This transforms raw data into actionable analytics.
GA4 event tracking post coming soon.
Conclusion: The Data Layer as a Non-Negotiable Competitive Advantage
This guide has journeyed from the chaos of unreliable, legacy tracking methods to the clarity and stability of a structured data layer. We began by exposing the inherent fragility of DOM scraping, the inaccuracies of “thank you” page tracking, and the error-prone nature of URL parameters; methods that create a constant state of data distrust and reactive maintenance. We then introduced the data layer as the strategic solution: a stable, independent communication bridge that decouples measurement from design and serves as a single source of truth for all marketing and analytics platforms. Finally, we have provided the technical blueprints; the anatomy of the dataLayer object, the mastery of the dataLayer.push() command, and the practical GTM workflow; to empower technical marketers and developers to build this robust foundation.
The central thesis of this guide is that in the modern data landscape, implementing a data layer is not a “nice-to-have” technical upgrade. It is a foundational, non-negotiable business requirement.