Getting cookie consent right in Google Tag Manager requires balancing regulatory compliance with your measurement needs. Implementation errors typically fall into two categories: firing tags without proper consent (creating compliance risk), or blocking tags unnecessarily (losing measurement data even when collection would be permissible).
This guide walks through implementing Google Consent Mode v2 in Google Tag Manager using the Advanced Implementation approach. This approach allows Google’s tags to adapt their behavior based on user consent – maintaining full tracking for consented users while sending anonymized signals for unconsented users. These signals enable conversion modeling, which can recover some attribution data even when cookies are declined.
We’ll cover the complete technical setup: configuring your Consent Management Platform (Cookiebot in our examples), setting up Google Tag Manager triggers and tags, handling both Google and non-Google tags, debugging consent signals, and troubleshooting common issues.
Table of Contents
What You’ll Need:
- Access to Google Tag Manager (Editor or Publish permissions)
- A Consent Management Platform account (examples use Cookiebot)
- Basic familiarity with GTM concepts (tags, triggers, variables)
Why Cookie Consent Implementation Matters
European privacy regulations (GDPR and the 2024 Digital Markets Act) now require explicit user consent before setting advertising and analytics cookies. Google Consent Mode v2 is Google’s technical framework that allows their tags to adapt behaviour based on user consent choices.
The key evolution: Consent Mode v1 (2020) controlled whether cookies could be stored. Consent Mode v2 adds controls for how user data can be used for advertising, specifically whether Google can use data for ad targeting and personalisation.
This guide implements Consent Mode v2 using the Advanced approach, which sends anonymized signals even from unconsented users to enable conversion modelling. For a detailed explanation of why this change happened, the regulatory context, and how the technical framework works, see our complete guide: What is Google Consent Mode v2.
Understanding Google Consent Mode v2
Before you start configuring tags and triggers, you need to understand how the consent signaling system actually works.
From Storage Control to Data Usage Signals
Consent Mode v2 expanded the consent signaling framework to distinguish between storage permissions and data usage permissions.
What Changed from v1 to v2
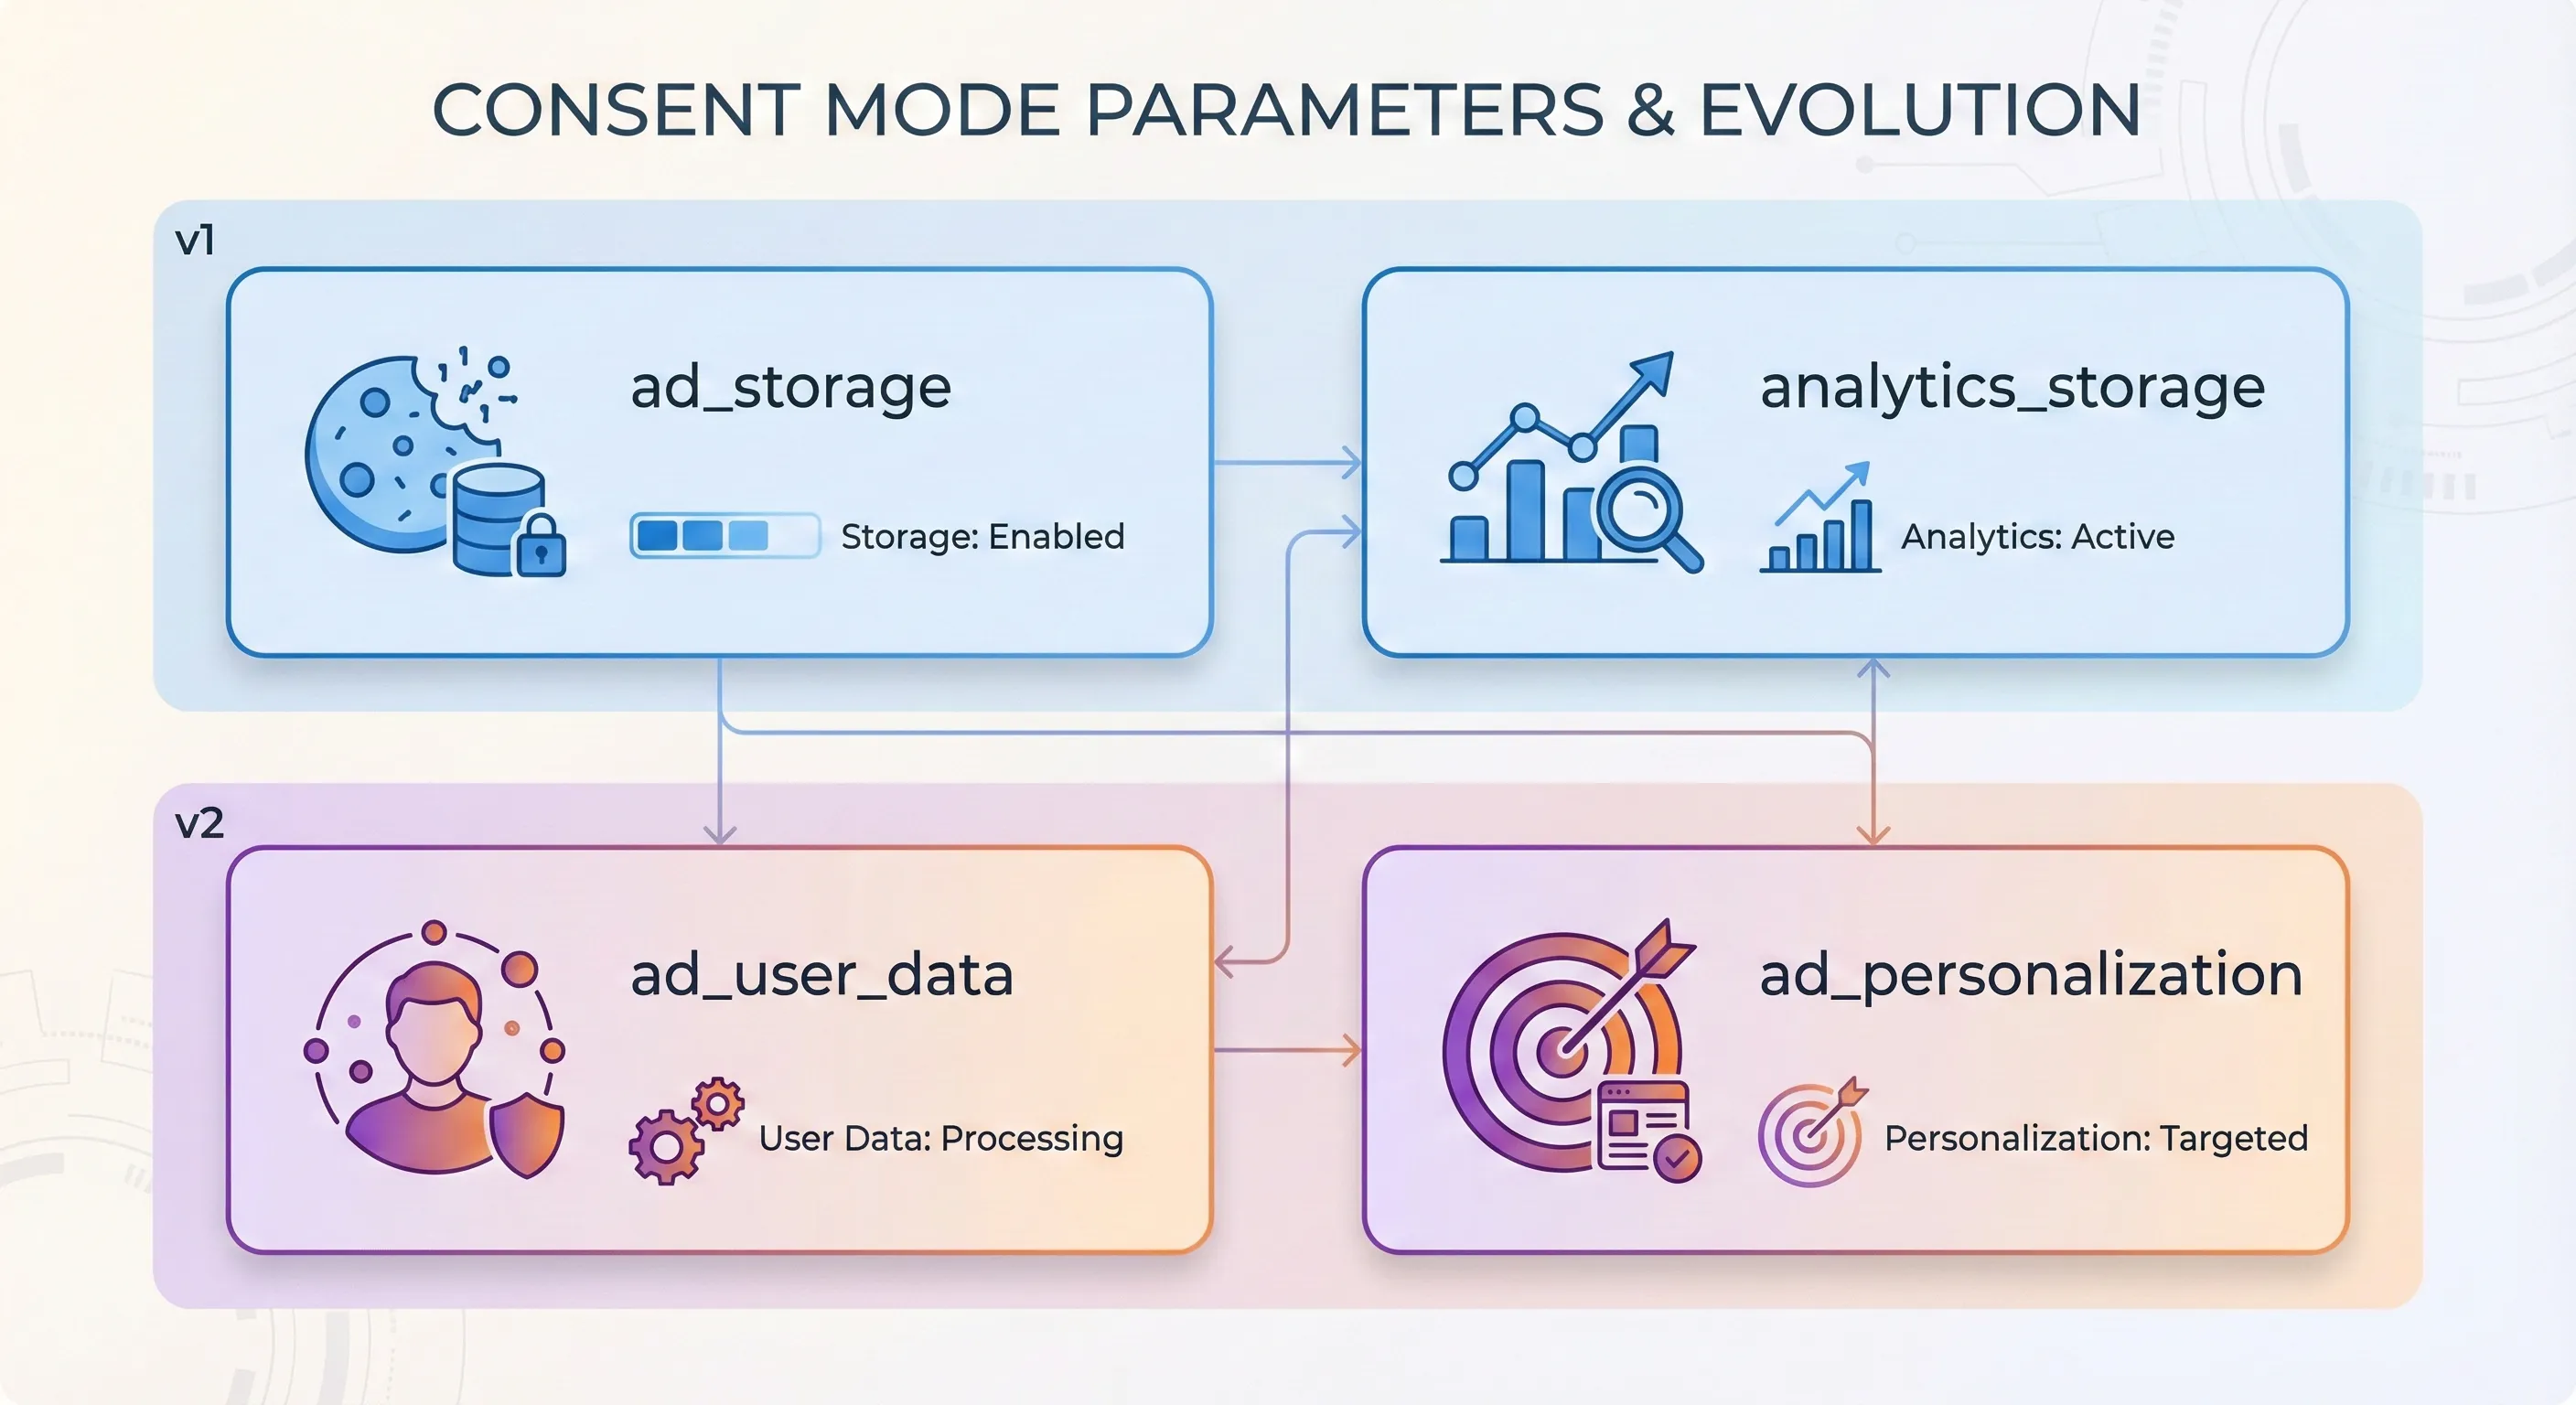
Consent Mode v1 provided two signals that controlled storage access:
ad_storage– Permission to read/write advertising cookiesanalytics_storage– Permission to read/write analytics cookies
These signals told tags whether they could access the browser’s local storage, which addressed cookie consent requirements under the ePrivacy Directive.
Consent Mode v2 added two new signals that control data usage:

ad_user_data– Consent for sending user data to Google for advertising purposesad_personalization– Consent for personalized advertising (remarketing/retargeting)
The Storage vs Usage Distinction
The four parameters now work together to control two different aspects of tracking:
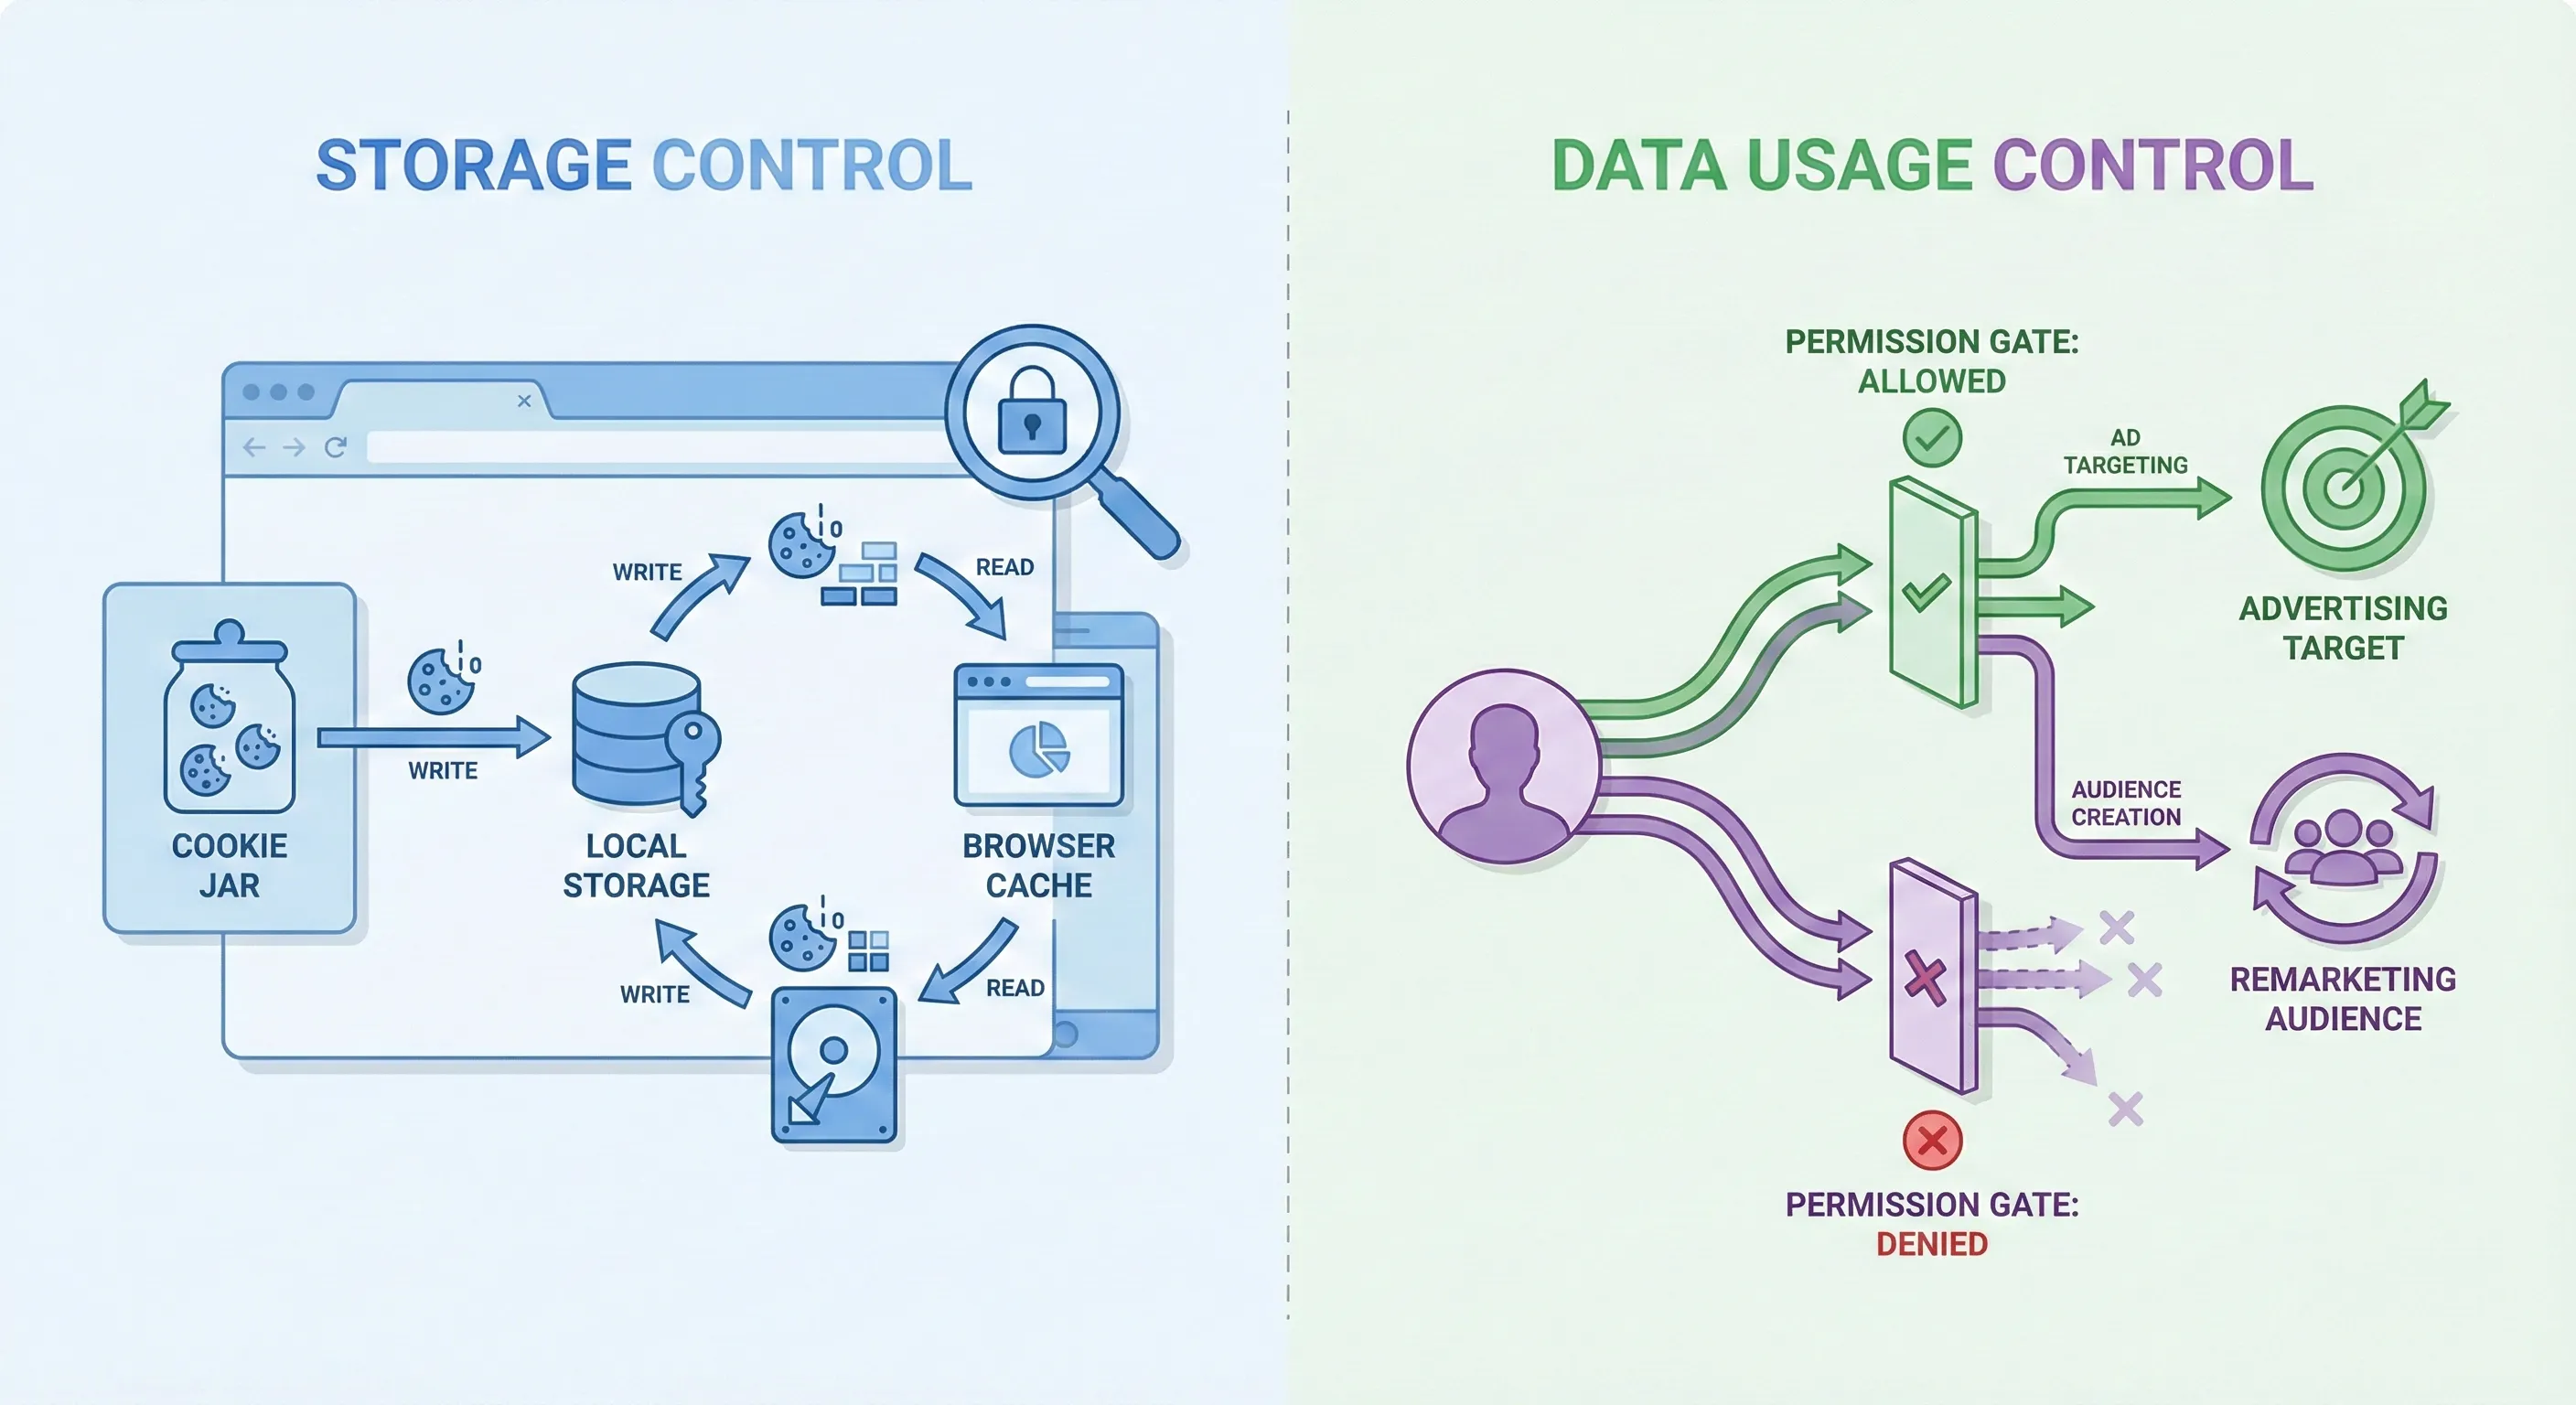
Storage signals control whether cookies can be written to and read from the browser:
- If
ad_storageis denied, Google Ads tags cannot set or read cookies like_gcl_au - If
analytics_storageis denied, GA4 cannot set or read cookies like_ga
Usage signals control whether user data can be sent to Google and how it can be processed:
- If
ad_user_datais denied, user-identifiable information (hashed emails, phone numbers) cannot be sent to Google Ads - If
ad_personalizationis denied, the user cannot be added to remarketing audiences or personalized advertising campaigns
Why the Separation Matters
A user might consent to having an analytics cookie stored on their device (for measuring site performance) but not consent to having their browsing behavior used to target them with advertising across Google’s services.
While most Consent Management Platforms currently present these as unified choices to users (like a single “Marketing Cookies” toggle), your GTM implementation must send all four distinct signals to Google’s systems. Missing any of these signals can result in:
- Loss of conversion modeling capabilities
- Inability to build remarketing audiences
- Enhanced Conversions not functioning
- Warnings in Google Ads about missing consent implementation
The technical implementation in GTM must track and transmit all four consent states, even if your CMP groups them together in the user interface.
The Four Core Consent Parameters
Consent Mode operates by maintaining a global “Consent State” in the browser. Consent state is preserved in a first-party cookie (typically named CookieConsent) for 12 months. On return visits, the CMP reads this cookie and immediately updates the Consent API before any tags fire.
When a Google tag fires, it doesn’t immediately execute its tracking logic. Instead, it first queries this global state to determine what it’s permitted to do.
This behaviour is governed by four core parameters:
| Parameter Name | Introduced | Primary Function | Technical Impact | Critical Dependency |
|---|---|---|---|---|
ad_storage | v1 | Storage Access: Controls the enabling of storage (cookies, localStorage) related to advertising. | If Denied: Google Ads/Floodlight tags cannot read/write cookies (e.g., _gcl_au). | Conversion Modelling: Essential for basic conversion tracking. |
analytics_storage | v1 | Storage Access: Controls the enabling of storage related to analytics. | If Denied: GA4 cannot read/write first-party analytics cookies (e.g., _ga). | Behavioural Modelling: Determines if session continuity is maintained via cookies. |
ad_user_data | v2 | Data Usage: Sets consent for sending user data to Google for advertising purposes. | If Denied: User-identifiable data is not sent to Google Ads services. | Enhanced Conversions: Required for hashing and matching user data (email, phone) for conversion attribution. |
ad_personalization | v2 | Data Usage: Sets consent for personalised advertising (remarketing). | If Denied: User is excluded from remarketing lists and audience segments. | Audience Building: Required to populate Google Ads remarketing lists. |
The v2 parameters, ad_user_data and ad_personalization, are the specific technical responses to the DMA. If these signals are not present or are set to “Denied,” Google Ads will continue to function for reporting aggregate counts, but the ability to retarget those users or use their data for uplift modelling is severed.
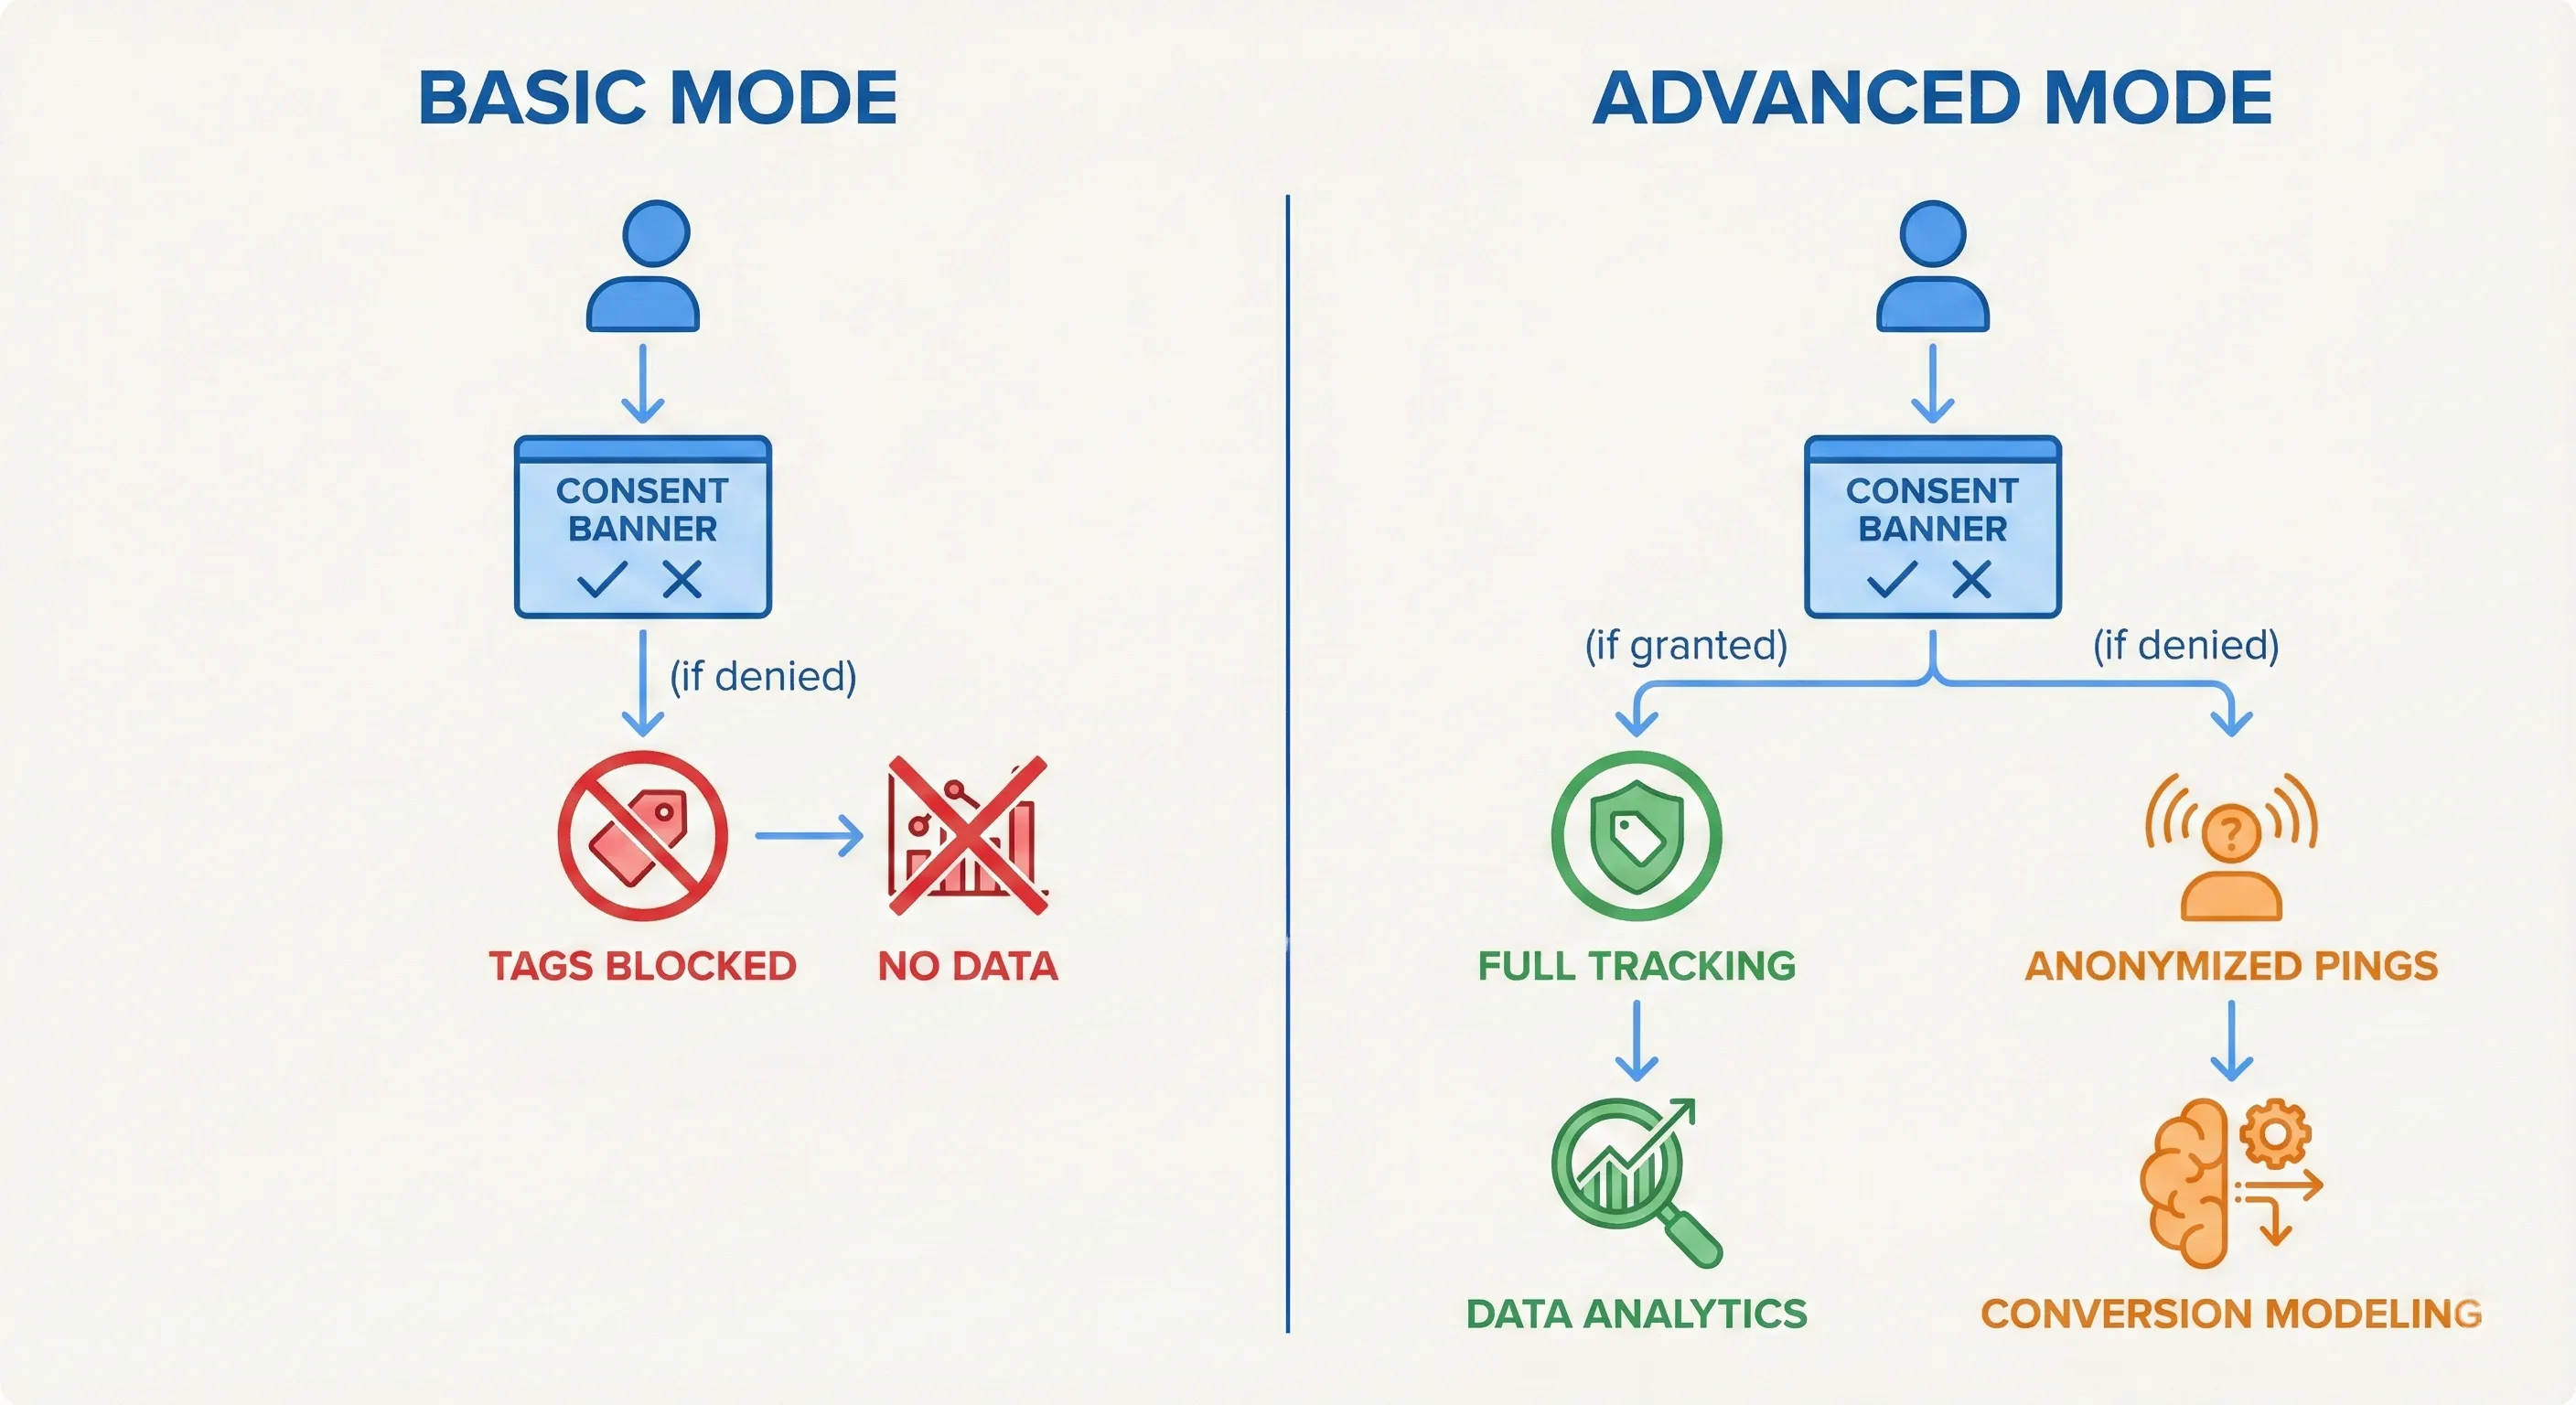
Basic vs. Advanced Consent Mode
Google Consent Mode supports two approaches:
Basic Consent Mode: Tags blocked until consent granted. Complete data blindness for unconsented users.
Advanced Consent Mode: For tags that support it, tags load immediately but adapt behaviour. Consented users = full tracking. Unconsented users = anonymized “cookieless pings” that enable conversion modelling.
This guide implements Advanced Consent Mode for the tags that support it (mainly Google related) and Basic Consent Mode for the tags that don’t. Your legal team should confirm this approach aligns with your organization’s risk tolerance.
If your legal team requires Basic Consent Mode (tags blocked until consent) for all tags, including Google related, most of this guide still applies (CMP setup, consent signals, debugging), but you’ll need to implement blocking triggers for Google tags (similar to the non-Google tag approach shown later in this guide) rather than relying on their built-in consent checks.
Before You Start: Prerequisites and Setup
A successful implementation relies on a clean environment and precise configuration of your Consent Management Platform. Before modifying a single tag in GTM, you need to lay the architectural foundation.
Critical: Remove Existing Hardcoded Scripts (The Clean Slate Principle)
⚠️ MOST COMMON FAILURE POINT: A common source of implementation failure is the “Hybrid State,” where parts of the implementation are hardcoded in your website’s HTML and parts are managed in GTM.
The conflict risk: If gtag.js is loaded directly in your source code AND via GTM, or if your CMP script is hardcoded in the <head> while also being deployed via GTM, race conditions occur. The hardcoded script might set a default state that conflicts with the GTM default state, or tags might fire twice.
Best practice: If you’re deploying via GTM (which is recommended for granular control), remove all hardcoded instances of your CMP script and the Google Global Site Tag (gtag.js) from your website source code. The GTM container should be the sole arbiter of tag injection.
Audit and Classify Your Existing Tags
Before proceeding, audit your existing GTM container. You must classify every tag into one of two categories based on whether they have built-in consent awareness.
This classification determines your entire implementation approach. Google tags can adapt their behaviour based on consent signals, while non-Google tags cannot.
Google Tags (Consent Aware):
- Google Analytics 4 (GA4) Configuration & Events
- Google Ads Conversion Tracking
- Google Ads Remarketing
- Floodlight / DoubleClick
- Conversion Linker
Strategy: These will be configured for Advanced Mode (always load, adapt behaviour).
Non-Google Tags (Consent Ignorant):
- Meta (Facebook) Pixel
- LinkedIn Insight Tag
- TikTok Pixel
- Microsoft (Bing) Ads
- Hotjar / CrazyEgg
- Any custom HTML tags
Strategy: These must be configured for Basic Mode (block until consent is verified).
GTM Prerequisite: Enabling the Consent Overview
Google Tag Manager includes a dedicated interface for managing tag consent settings, but it must be manually enabled. The Consent Overview provides a centralized dashboard to view and modify the consent requirements for every tag in the container, which is indispensable for a compliant setup.
To enable this feature:
- In the GTM container, navigate to the Admin tab.
- Under the
Containercolumn, selectContainer Settings.
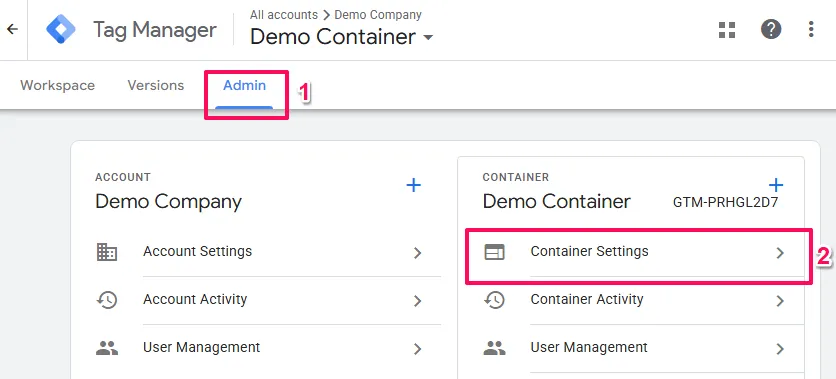
- In the
Additional Settingssection, check the box labelled Enable consent overview. - Click Save.

A new shield icon will now be visible in the main Tags workspace, granting access to the Consent Overview page.
Choosing a Consent Management Platform
Your CMP is the foundation of your consent implementation. It captures user consent choices and broadcasts them to GTM via the Consent API.
Minimum Requirements
For this implementation to work, your CMP must support:
- Google Consent Mode v2: All four consent parameters (
ad_storage,analytics_storage,ad_user_data,ad_personalization) - GTM Template: An available template in the GTM Template Gallery or official documentation for GTM integration
- Cookie Scanning: Automatic detection and categorisation of cookies on your site
- Regional Configuration: Ability to set different default consent states by region (essential for GDPR vs. CCPA compliance, etc.)
Popular GTM-Compatible CMPs
CMPs that meet these requirements and have established GTM templates include:
- Cookiebot (by Usercentrics)
- OneTrust
- Termly
- CookieYes
- Complianz
Most enterprise-grade CMPs support Consent Mode v2, but verify GTM template availability before purchasing.
Evaluation Considerations
When choosing between CMPs, consider:
- Pricing model: Per-pageview, per-domain, or flat rate
- Scanning accuracy: How well it detects third-party cookies
- Regional coverage: Support for GDPR, CCPA/CPRA, LGPD, and other regulations
- Customisation: Banner design flexibility and branding options
- Documentation quality: GTM integration guides and support resources
Configuring Your CMP
The remainder of this guide uses Cookiebot for all examples and screenshots. While specific interface details vary by CMP, the underlying concepts (domain identification, default consent states, regional configuration) apply universally.
Cookiebot Setup
Getting Your Cookiebot Domain Group ID
The critical link between the Cookiebot cloud service and your GTM container is the Domain Group ID. This isn’t the script ID or the API key. It’s a specific GUID (Globally Unique Identifier) assigned to your domain group.
To find it:
- Starting from the left sidebar click on
Domains & Aliases>Manage your domain groups.
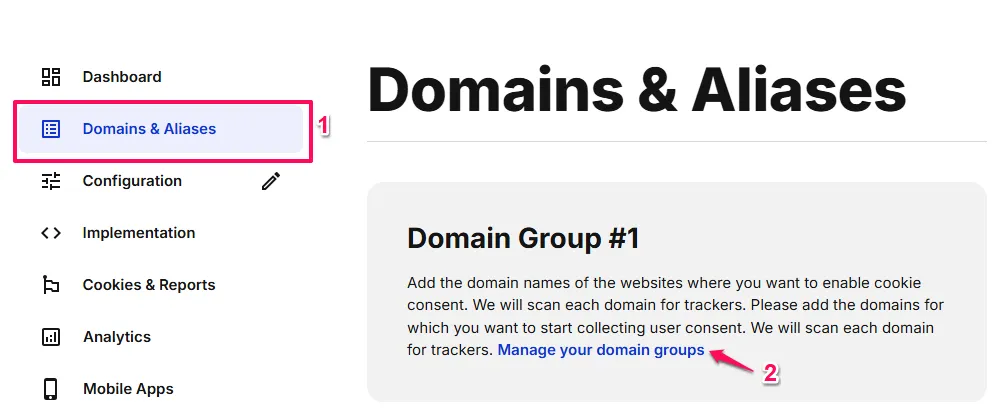
- The GUID is the alphanumeric string (format:
00000000-0000-0000-0000-000000000000). You can click it to copy it.

You’ll need this ID for the GTM template configuration.
Understanding Cookiebot’s Consent Categories
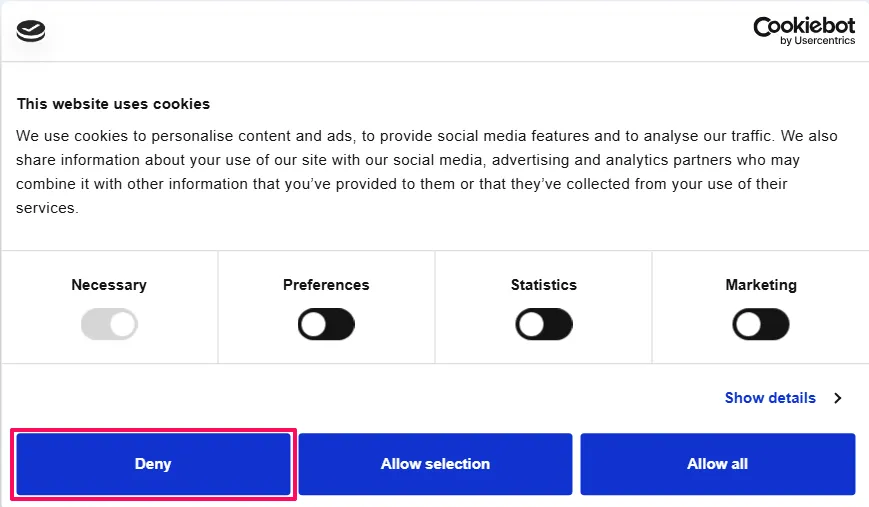
Cookiebot operates by scanning your website to identify all cookies and trackers, then groups them into four categories:
Necessary: Essential for the site to function. Always active.Preferences: Stores user choices (language, currency, etc.).Statistics: Analytics and measurement (maps toanalytics_storage).Marketing: Advertising and tracking (maps toad_storage,ad_user_data,ad_personalization).
For Consent Mode to function, Cookiebot must be the “Source of Truth.” It captures the user’s choice and broadcasts this choice to the GTM container via the Consent API.
Implementing the Cookiebot CMP in Google Tag Manager
The cornerstone of your implementation is the “Cookiebot CMP” tag template. This template abstracts the complex JavaScript required to interface with the Google Consent API.
Installing the Template
- Within your GTM workspace, navigate to
Templates>Tag Templates>Search Gallery
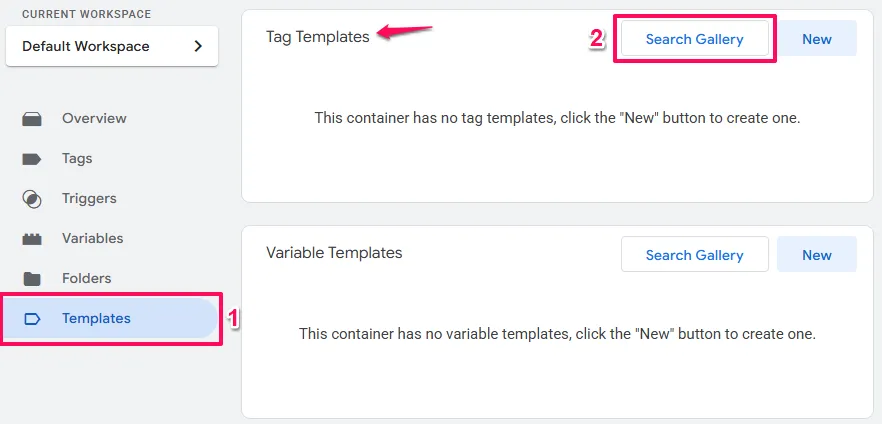
- Search for Cookiebot and click
Cookiebot CMPbyUsercentrics
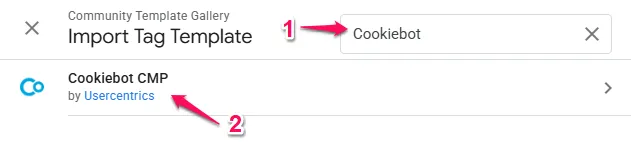
- Click
Add to workspace.

- The will be a popup with permission, click
Add.
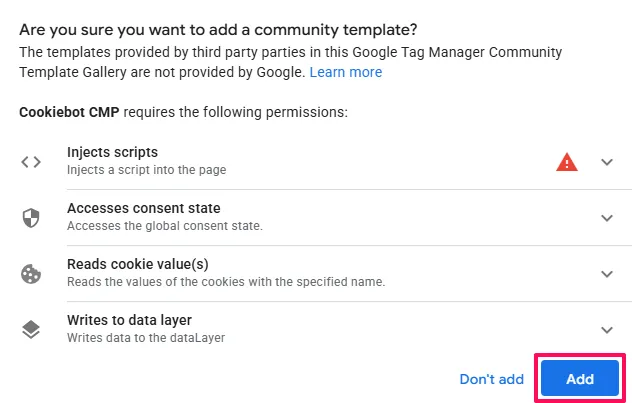
This makes the Cookiebot CMP tag type available when creating new tags.
Configuring the Cookiebot CMP Tag
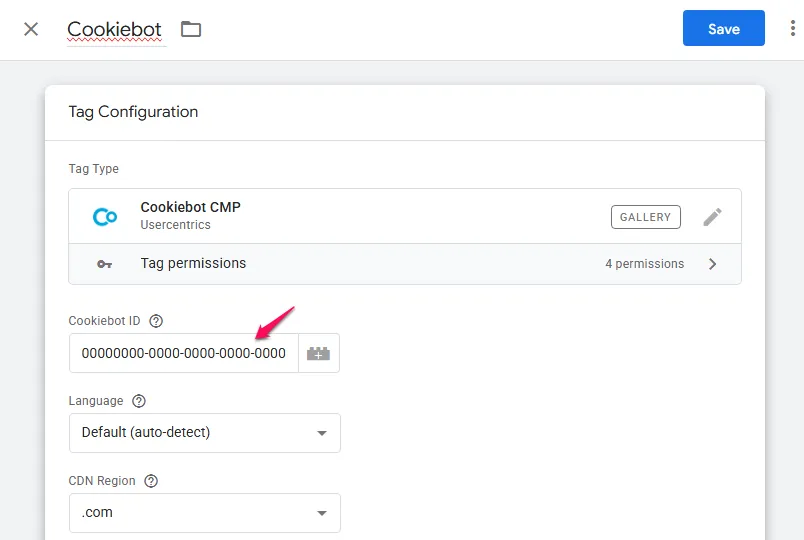
Create a new tag using the Cookiebot CMP type. This tag will act as the “Controller” for consent across your entire site.
Core Identification
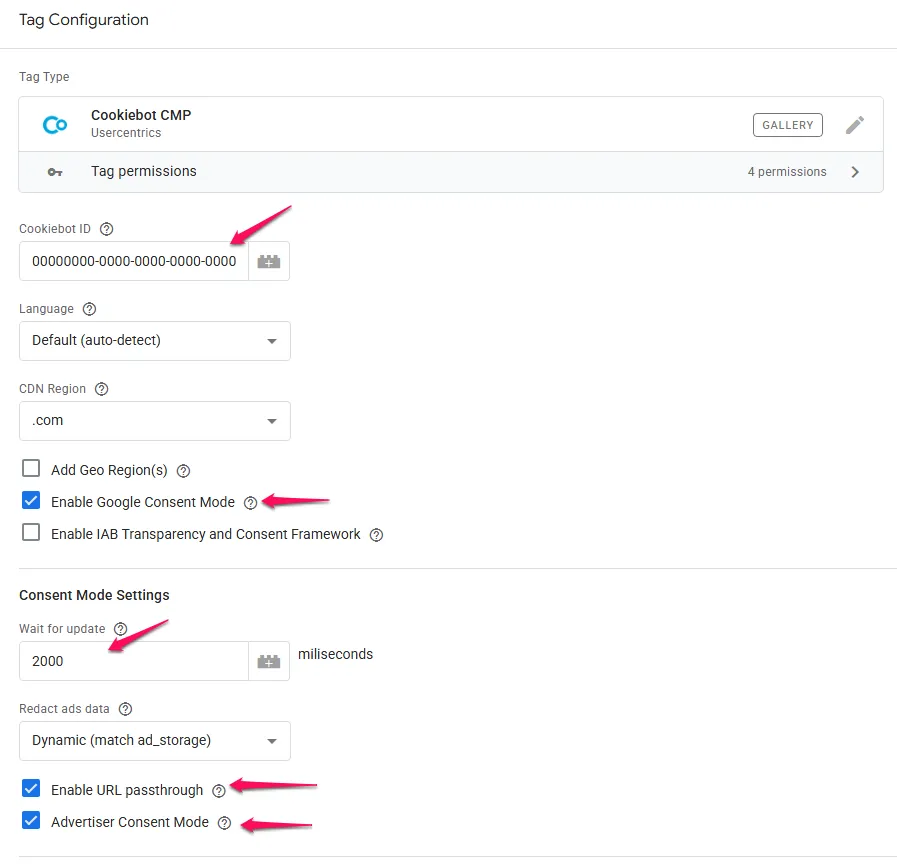
Cookiebot ID: Paste the Domain Group ID you retrieved earlier.
Language: Set to “Auto-detect” (Default). This ensures the banner language dynamically adjusts to the user’s browser settings, improving user experience and potentially consent rates.
Enabling Consent Mode v2
Enable Google Consent Mode: This checkbox must be selected. It activates the API integration, allowing the Cookiebot script to push gtag('consent', 'update',...) commands to the Data Layer.
Without this enabled, your Google tags won’t receive consent signals and will operate blindly.
Setting Default Consent States
Understanding Default Consent States
Default consent states define what happens before a user interacts with your cookie banner. This initial state determines whether tracking begins immediately when someone lands on your site, or only after they’ve made an explicit choice.
Getting this wrong creates serious problems:
- Too permissive: You track users illegally before they consent (compliance violations, potential fines).
- Too restrictive: You unnecessarily block tracking in regions where it’s allowed (lost data).
Understanding the Two Legal Models
Different regions have different requirements:
Opt-In (Explicit Consent Required)
- Default state must be:
denied. - Users must actively accept before tracking begins.
- Required in: EU/EEA/UK (GDPR), Quebec, Canada (Law 25), etc.
Opt-Out (Implicit Consent Allowed)
- Default state can be:
granted. - Tracking can begin immediately, but users must be able to opt out easily.
Critical point: Privacy laws apply based on where your visitors are located, not where your business is based. A business in an Opt-out region tracking EU visitors must comply with GDPR for those visitors.
Configuration for Cookiebot Free Tier
The free tier of Cookiebot does not include geo-targeting, so you can only set one global default that applies to all visitors worldwide.
Configuration in the Cookiebot CMP template:
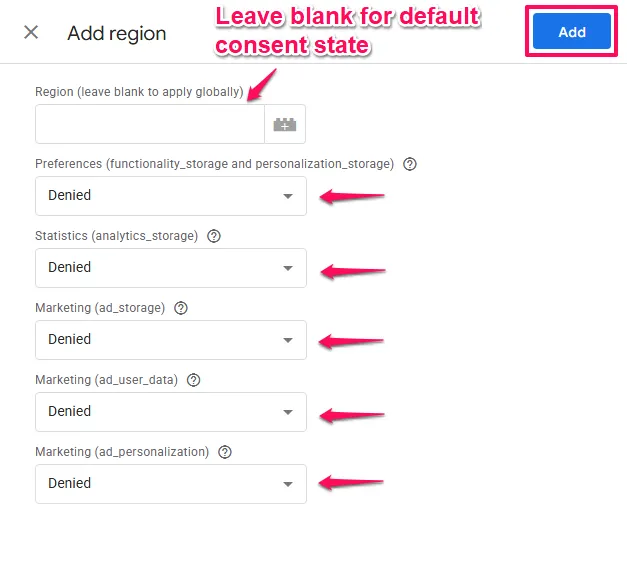
- Region: [leave blank]
- Preferences (
functionality_storageandpersonalization_storage): Denied - Marketing (
ad_storage): Denied - Marketing (
ad_user_data): Denied - Marketing (
ad_personalization): Denied
What this means: No matter where in the world a visitor comes from, they’ll see your consent banner and tracking won’t begin until they click “Accept.”
This configuration:
- Complies with GDPR, Law 25, and other strict regulations.
- Works with Cookiebot’s free tier.
- Safe for traffic from any region (you exceed requirements in opt-out regions).
- Loses data from non-consenting visitors even where tracking would be legal.
What Geo-Targeting Enables (Premium Feature)
With Cookiebot Premium, you gain access to regional configuration that allows different default states by region.
What becomes possible:
- EU/EEA/UK visitors get denied defaults (GDPR compliance).
- Visitors from Opt-out regions can get granted defaults.
- Different banner configurations per region.
Benefits:
- Legal compliance in all regions
- Maximum data collection where legally permitted
- Automatic adaptation based on visitor location
How it works: Instead of one global default row in the Cookiebot CMP template, you’ll add multiple regional rows, each specifying which regions get which default states.
Wait for Update
This setting (measured in milliseconds) instructs Google tags to pause their execution for a brief window to allow the CMP to load and provide the current consent status.
The race condition problem: Without this setting, a Google tag firing on “Initialization” might execute before the Cookiebot script has retrieved the user’s previous consent from the cookie. The tag would see the “Default” (Denied) state and send a cookieless ping, even if the user had actually consented.
Recommendation: Leave the 2000ms default. If the update happens sooner, the tags fire immediately – they don’t wait the full duration set.
Redact Ads Data
What it does: When ad_storage is denied, this setting (ads_data_redaction) instructs Google tags to route ad click traffic through a cookieless domain (gstatic.com) rather than the standard doubleclick.net or google.com.
It also actively strips ad-click identifiers (like the GCLID) from outgoing network requests to prevent them from being stored in third-party cookies.
Recommendation: Leave the default Dynamic (matches ad_storage). This is a privacy-enhancing feature that reinforces the “Denied” state for advertising data.
Enable URL Passthrough
The problem it solves: When ad_storage is denied, the GCLID (Google Click Identifier) cannot be stored in a cookie. If the user navigates to a second page, the GCLID is lost, breaking attribution.
The solution: url_passthrough enables the tags to append the click identifier (and session ID) to the URL of internal links as query parameters (e.g., ?_gl=1*xyz...). This passes the identity state from page to page without touching the browser’s storage.
Recommendation: Set to True. This is vital for Advanced Mode. It ensures that even if a user denies cookies, their session and conversion can still be attributed (via modelling) because the click ID persists during the session.
Technical note: Ensure your web server is configured to ignore unknown query parameters. Some strict caching rules (like Varnish) might cache the page with the query parameter, serving a user-specific link to other users. Configure your caching layer to strip _gl before caching, or vary cache by query string.
Setting the Trigger
The placement of the Cookiebot CMP tag in the firing order is the single most critical factor in your setup.
Trigger: Consent Initialization - All Pages

Why this matters: GTM executes triggers in a specific sequence:
- Consent Initialization: Reserved for CMPs
- Initialization: Where GA4/Google Ads config tags should live
- Container Loaded (Page View): Standard tags
- DOM Ready: Tags needing page elements
- Window Loaded: Late-loading tags
By placing the Cookiebot tag on the Consent Initialization trigger, you guarantee that the API defaults are set and the listener is active before any Google tag attempts to check for permission.
If you place the CMP tag on “All Pages” (Container Loaded), it will fire too late, causing all Google tags to fire with “Denied” status regardless of user choice.
Configuring Google Tags for Advanced Mode
With the CMP establishing the rules of engagement, the next phase involves configuring your Google tags to operate within this framework. In an Advanced Implementation, we don’t block these tags, we allow them to fire, relying on their internal logic to adapt.
To configure Google tags:
- Navigate to the
Tagssection in GTM and click the shield icon to open theConsent Overview. - In the list of tags, select all relevant Google related tags, such as the GA4 Configuration tag, all GA4 Event tags, Google Ads Conversion Tracking tags, and Google Ads Remarketing tags.
- With the tags selected, click the “Edit Consent Settings” icon (a shield with a gear) at the top of the list.
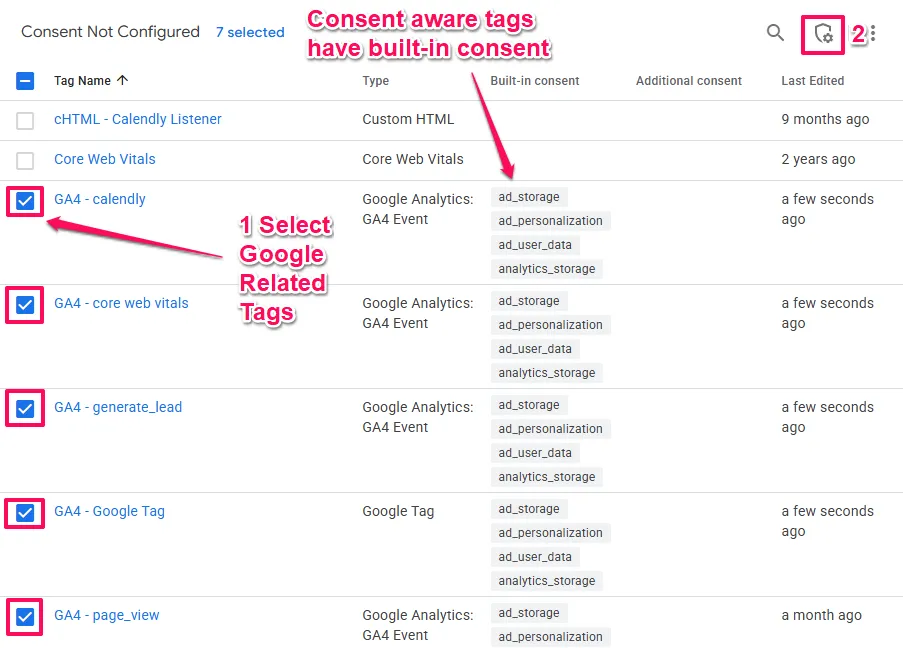
- In the dialog that appears, select the option
No additional consent required. This tells GTM that the tags have their own internal logic for handling consent and do not need to be blocked by GTM’s consent-checking mechanism. - Save the changes.
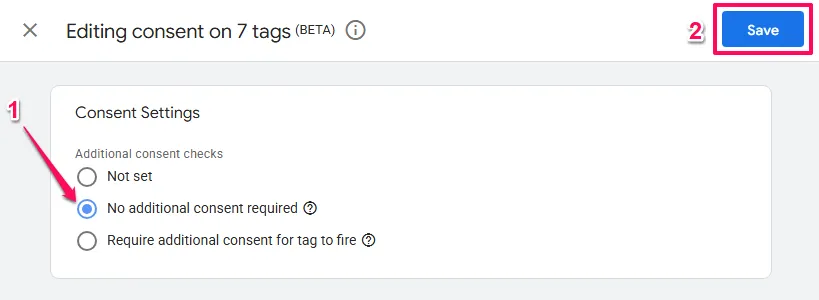
The existing triggers for these tags (e.g., Initialization - All Pages for the GA4 Config tag, or specific event triggers for conversion tags) should be left as they are.
Understanding Built-in Consent Checks
Google’s primary tags (GA4 Configuration, GA4 Events, Google Ads Conversion Tracking, Conversion Linker, and Floodlight) possess “Built-in Consent Checks.” They’re hardcoded to check the gtag consent state before executing.
Scenario A (User Accepts):
- Tag fires
- Consent API says “Granted”
- Tag writes
_gacookie - Tag sends full hit with user identifiers
Scenario B (User Denies):
- Tag fires
- Consent API says “Denied”
- Tag does NOT write
_gacookie - Tag generates a random, ephemeral ID
- Tag sends a “ping” with
gcs=G100(denied status) - Google servers receive the ping, note the conversion, but don’t profile the user
This is the magic of Advanced Mode, the tag always fires, but its behaviour adapts based on consent.
Handling Non-Google Tags (Basic Mode Logic)
Third-party tags like the Meta (Facebook) Pixel, LinkedIn Insight Tag, and TikTok Pixel don’t have built-in consent logic. They’re binary: if they fire, they track. If they track without consent, you’re non-compliant.
Therefore, these tags must be implemented using “Basic Mode” logic, blocking them until consent is positive.
The “Update” Event Logic
You cannot simply fire a Facebook Pixel on “All Pages.” Here’s why:
On the first page load, the default consent is “Denied.” If the Pixel fires on “All Pages,” it executes immediately, illegally dropping cookies.
Conversely, if you block it, and the user clicks “Accept” 10 seconds later, the Pixel won’t fire because the “All Pages” trigger has already passed.
The solution: We need a trigger that listens for the change in consent.
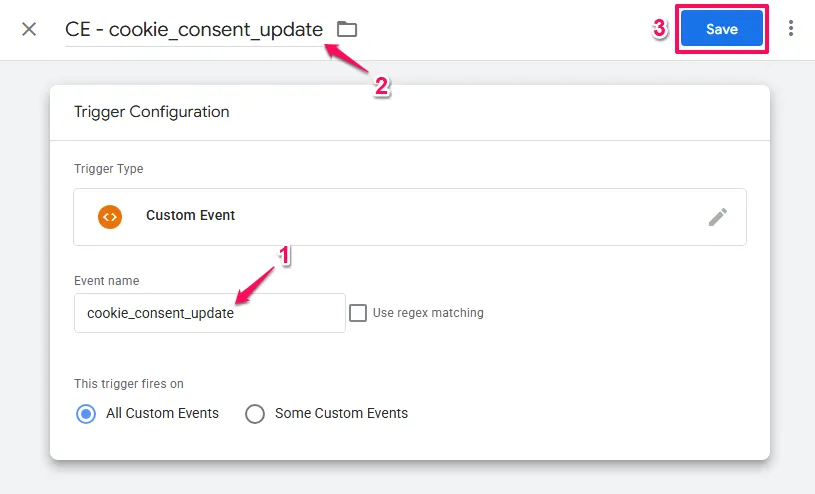
Creating the Cookie Consent Update Trigger
Cookiebot pushes a Data Layer event whenever the consent status is resolved (either by reading a cookie on load or by user interaction). This event is typically named cookie_consent_update.
Create the trigger:
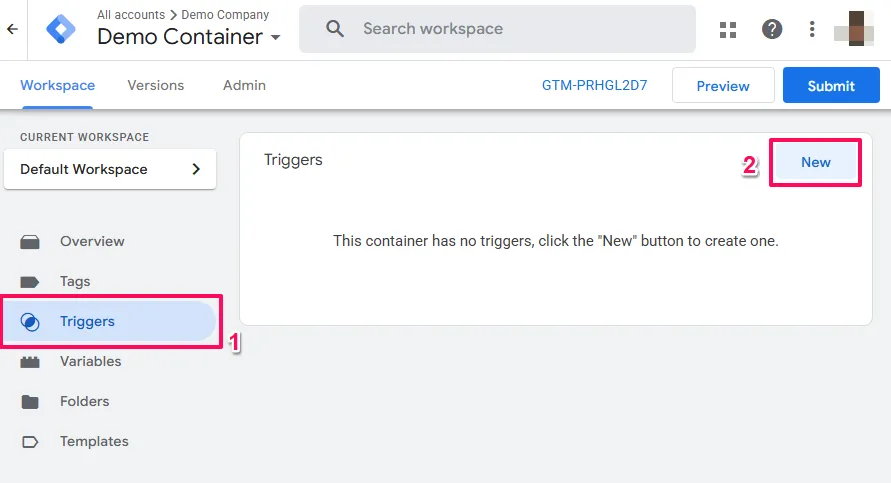

- Trigger Type:
Custom Event - Event Name:
cookie_consent_update - Trigger Name:
CE - cookie_consent_update.
Setting Additional Consent Checks
First, GTM must be instructed that the Meta Pixel tag requires specific user consent before it is allowed to fire.
- From the Consent Overview screen, select the Meta Pixel tag(s).
- Click the “Edit Consent Settings” icon.
- Select the option Require additional consent for tag to fire.
- A new option will appear to specify the type of consent needed. Click + Add required consent.
- For the Meta Pixel, the primary consent type required is
ad_storage. If the pixel is also used for analytics purposes,analytics_storagemay also be added. The Cookiebot scan report can provide guidance on which categories a specific script falls into. - Save these settings.
What about ad_user_data and ad_personalization?
While these are critical for Google tags (GA4, Google Ads, Floodlight, etc.), for 3rd party tags like Meta, ad_storage remains the primary “on/off switch” for the tag itself in GTM. When a user grants “Marketing” consent on your banner, your CMP should automatically grant ad_storage, ad_user_data, and ad_personalization together.
Applying the New Trigger
Finally, the Meta Pixel tag’s trigger must be replaced.
- Open the Meta Pixel base tag for editing.
- Click on the Triggering section.
- Remove the existing page view trigger (e.g., “All Pages”).
- Add the newly created “CE – Cookie Consent Update” trigger.
- To prevent the tag from firing multiple times if a user changes their consent on the same page, navigate to Advanced Settings > Tag firing options and set it to Once per page.
- Save the tag. This process must be repeated for all other non-Google tags that set cookies or collect user data.

Handling Advanced Matching and PII
For tags like Meta Pixel that use “Advanced Matching” (sending hashed email/phone), ensure that you’re only populating these variables when marketing consent is granted.
Even if the tag fires, sending hashed PII without consent (specifically the ad_user_data equivalent) violates the DMA. Since Meta doesn’t read the Google Consent API, the blocking trigger is your only line of defence.
Validation and Debugging
Your implementation is only as good as its verification. Consent Mode v2 requires validating both that consent signals are being sent correctly and that tags are responding to those signals appropriately.
This section covers two validation approaches: visual validation using GTM Tag Assistant (recommended for most users) and advanced network-level validation for complex debugging scenarios.
Visual Validation with Tag Assistant
While network-level debugging provides raw technical data, GTM Preview Mode (Tag Assistant) offers the most user-friendly way to verify your consent implementation. It translates complex consent signals into a readable interface, letting you see exactly when consent is granted and how your tags respond.
Accessing Tag Assistant:
- In your GTM workspace, click the
Previewbutton in the top-right corner
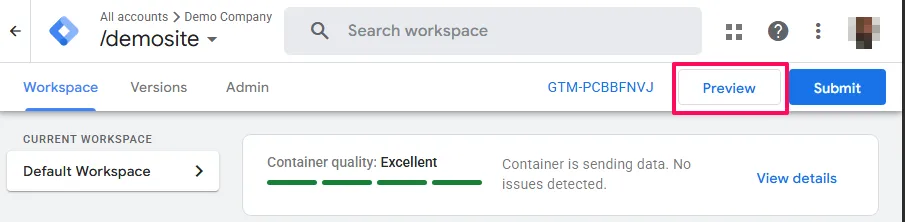
- Enter your website URL in the dialog.
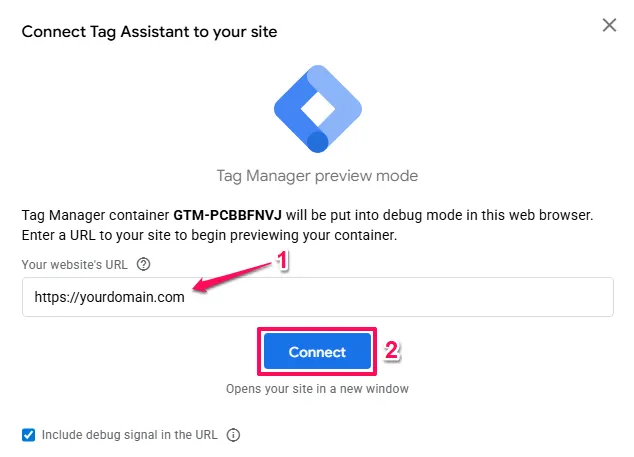
- Your site opens in a new window with the Tag Assistant debug panel attached
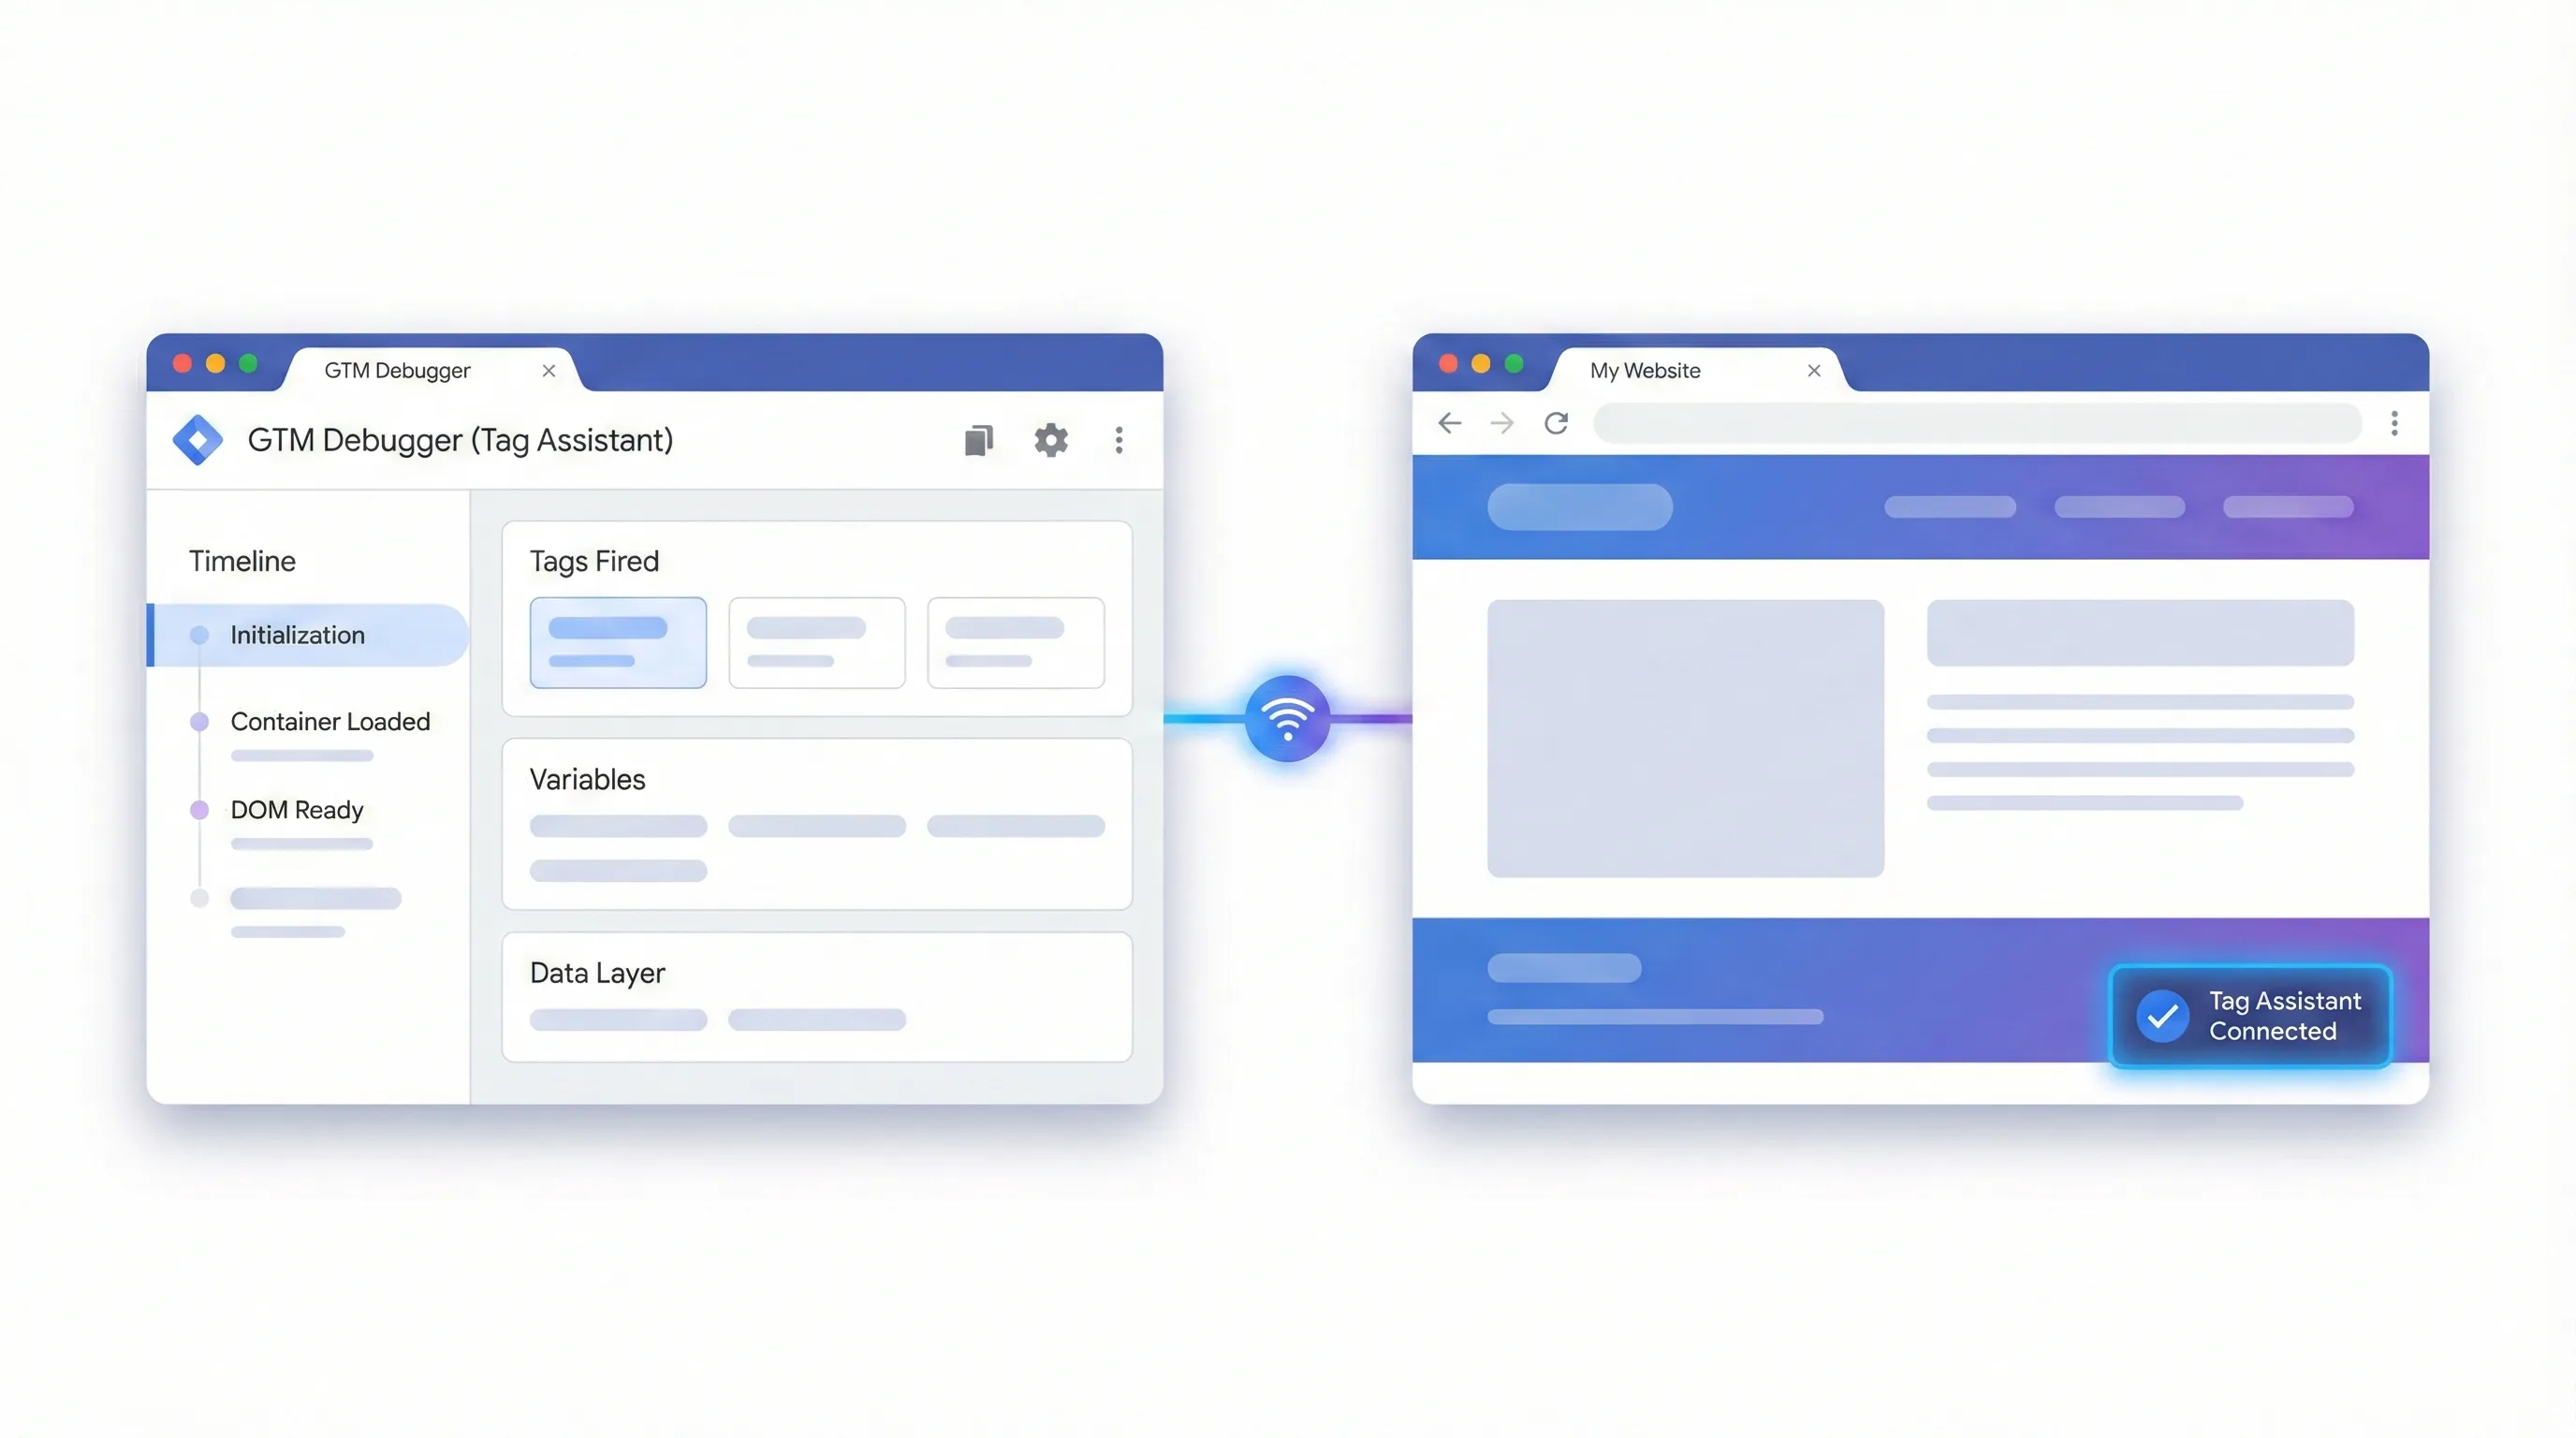
Understanding the Tag Assistant Interface
Tag Assistant displays two critical areas for consent validation:
The Event Timeline (left sidebar) records every interaction processed by GTM. For consent implementations, you’ll see these key events:
Consent Initialization: Marks when your CMP tag fires (should be one of the first).Consentevents: These appear multiple times; once for the default state, again when consent updates after user interaction.
The Consent Tab (top navigation) shows the state of consent at any specific moment. This is your primary diagnostic tool.
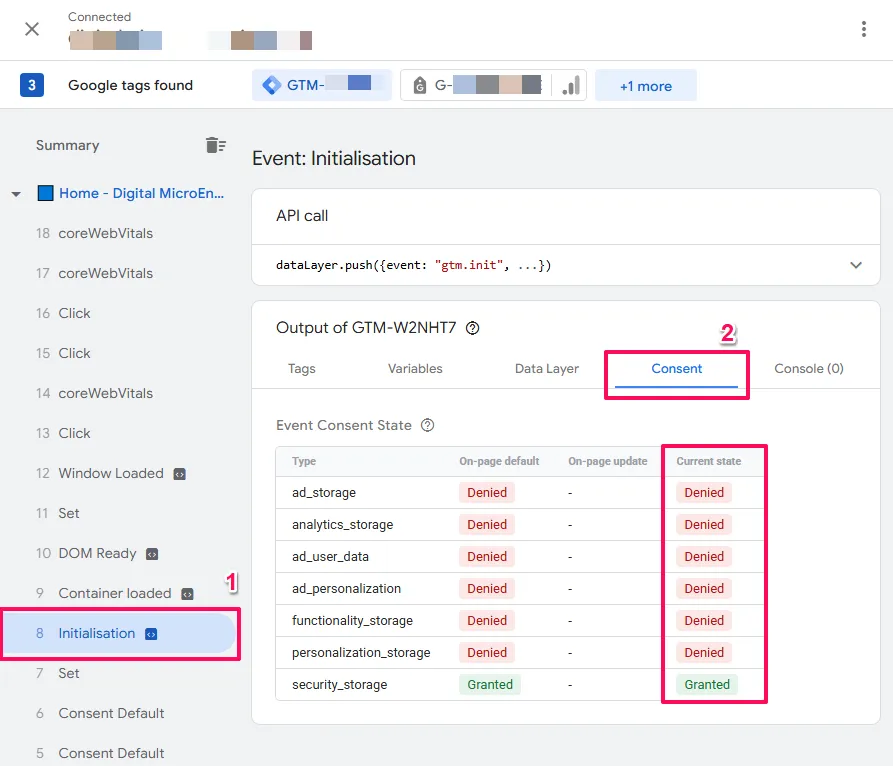
The Consent Tab: Your Primary Diagnostic Tool
Click any event in the timeline, then select the Consent tab in the top navigation. You’ll see a table with three critical columns that tell the complete consent story:
On-page default: The baseline state set immediately when the page loads, before any user interaction. For GDPR compliance, this must show Denied for all four consent parameters (ad_storage, analytics_storage, ad_user_data, ad_personalization).
If this column shows Granted before the user clicks anything, your default settings are non-compliant for GDPR and you’re tracking users illegally before they opt in.
On-page update: The state after your CMP reads the user’s stored preferences or after they interact with the banner. This reflects the user’s actual choice.
If the user clicks “Accept,” these values should change to Granted. If they click “Reject,” they remain Denied. This column confirms your CMP is communicating correctly with GTM.
Current state: The resolved consent status active for the selected event. This is the actual permission level available to tags firing at this moment.
This column combines Default and Update. For example, if Default is Denied and Update is Granted, Current State shows Granted. This is what your tags actually see when they check for permission.
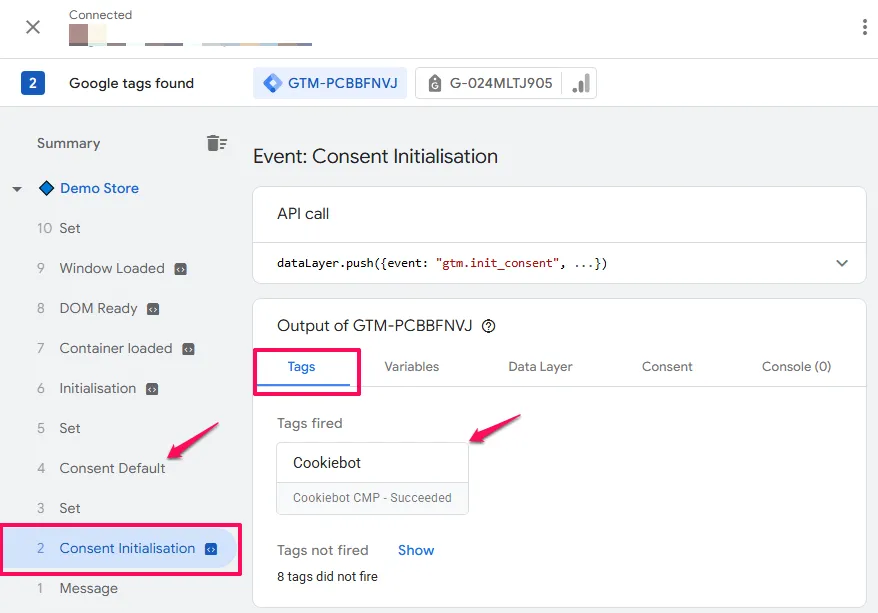
Scenario A: Verifying Denied Consent (The “Reject” Flow)
This scenario verifies that when a user denies consent, your tags either block completely (Basic Mode) or fire with restrictions (Advanced Mode).
Step 1: Start Fresh
Clear your browser cookies or use an Incognito window to simulate a new user. Launch Tag Assistant Preview mode and load your site.
Critical: Don’t click anything on the cookie banner yet.
Step 2: Verify the Default State
In Tag Assistant’s left sidebar, click the Consent default event. Then click the Consent tab in the top navigation.
Check the On-page Default column. You should see Denied for all four parameters.
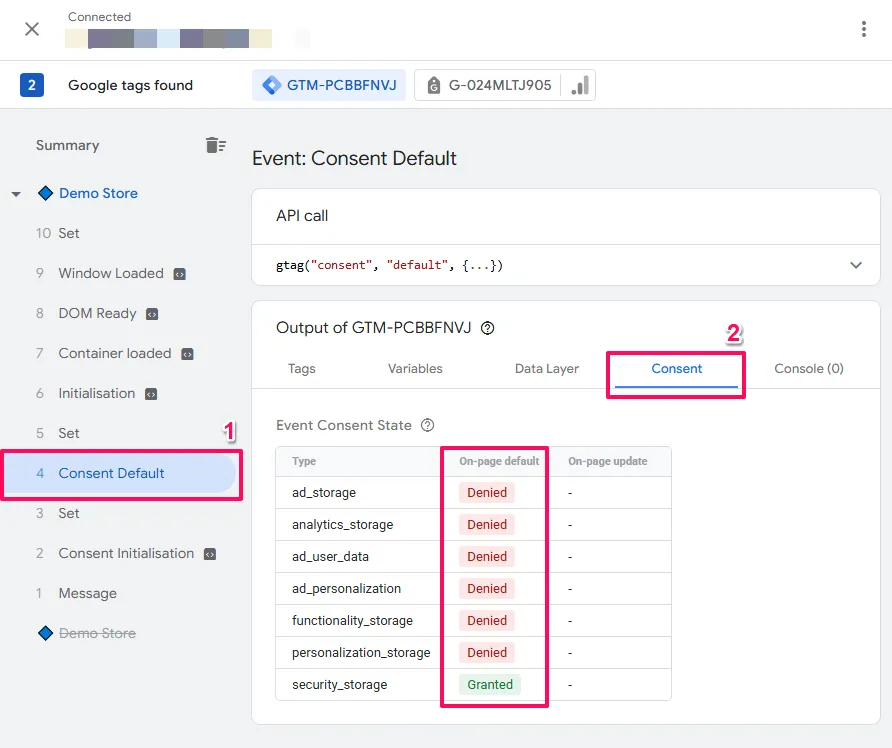
If these show Granted before you’ve interacted with anything, your implementation has a critical compliance flaw. Your CMP is not setting proper defaults.
Step 3: Reject Consent
Switch to your website preview window and click “Reject All” or “Decline” on the cookie banner.
Step 4: Verify the Update
Back in Tag Assistant, you should see a new Consent event appear in the timeline (this is the update event triggered by your rejection).
Select this event and check the Consent tab. The On-page Update column should explicitly show Denied for marketing and analytics parameters.
Step 5: Verify Tag Behaviour
This is where Basic Mode and Advanced Mode differ significantly.
For Basic Mode tags (Meta Pixel, LinkedIn Insight Tag, etc.):
Click the event in the timeline where these tags should fire (typically Container Loaded or your custom consent trigger). Look at the Tags Not Fired section. Your third-party tags should appear here, blocked by your consent trigger.
Click on a blocked tag card to see why it didn’t fire. Under “Firing Triggers,” you should see your blocking trigger (e.g., “Cookie Consent Update”) listed with an exception that prevented execution.
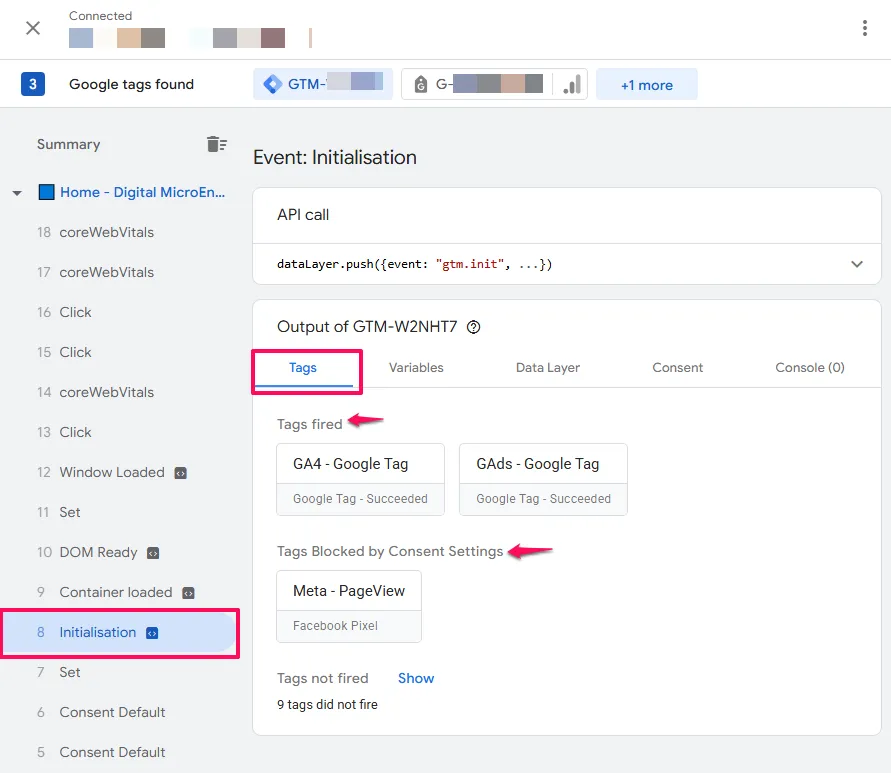
For Advanced Mode tags (GA4, Google Ads):
These tags should appear under Tags Fired. This is correct behaviour, not an error.
Click on the tag card (e.g., your GA4 Configuration tag). Scroll to the Consent Settings section. Look for the status indicator.
You should see Active (or text indicating analytics_storage is Denied). This status confirms the tag fired in restricted mode. It sent a cookieless ping for conversion modeling but did not read or write cookies or process personal data.
Critical distinction: An “Active” status for a Google tag when consent is denied is correct implementation. The tag adapted its behaviour based on the consent signal. This is how Advanced Mode is supposed to work.
Scenario B: Verifying Granted Consent (The “Accept” Flow)
This scenario confirms that accepting cookies unlocks full tracking and that your tags respond appropriately.
Step 1: Reset and Accept
Close the preview window. Clear cookies again to reset the banner state. Relaunch Preview mode.
On the website banner, click “Accept All” or “Accept.”
Step 2: Verify the Update Event
In Tag Assistant, find the Consent event that fired immediately after your click. Click the Consent tab.
The On-page Update column must now show Granted for all four parameters. The Current State column should also show Granted.
Step 3: Verify Tag Firing
Select an event where your tags fire (typically Container Loaded or Page View after the consent update).
For Basic Mode tags: Your Meta Pixel should now appear under Tags Fired. The blocking trigger condition was met, allowing execution.
For Advanced Mode tags: Click on a Google tag (like GA4 Configuration). Under Consent Settings, the status should show Succeeded (often with a green checkmark).
This confirms the tag is now operating with full permissions—writing cookies, tracking with identifiers, and sending complete data to Google’s servers.
Interpreting Tag Statuses: Succeeded vs Active vs Blocked
Understanding these three status indicators is essential for distinguishing between broken implementations and correctly functioning Advanced Mode.
Succeeded (Green Checkmark)
This status appears when all of the tag’s required consent checks are satisfied. For example, if a Google Ads tag requires ad_storage and the user has granted it, the status shows Succeeded.
The tag executes its full JavaScript, writes cookies (like _gcl_au), and sends complete data with user identifiers.
Active (Grey or No Checkmark)
This status appears when a Google tag fires but the required consent is Denied. In previous GTM implementations, you might expect this to indicate an error. In Consent Mode v2, “Active” means the tag is functioning correctly in Advanced Mode.
The tag detected the lack of consent, suppressed cookie creation, stripped personal identifiers, and sent an anonymized beacon. This is the intended behaviour for unconsented users—it enables conversion modeling while respecting privacy choices.
If you see “Active” on a Google tag when consent is denied, your implementation is working correctly.
Blocked
This status appears only when a trigger exception prevented the tag from firing entirely. This is the signature of Basic Mode implementation.
For Google tags, if you see “Blocked” status, you’re not collecting the cookieless pings required for conversion modeling. This might be intentional if your legal team requires Basic Mode for all tags, but it means you’re losing modeling capabilities.
For non-Google tags, “Blocked” is the expected and correct status when consent is denied.
Troubleshooting with Tag Assistant
Issue: “On-page Default” is Empty or Shows “Not Set”
This indicates the CMP tag fired too late in the sequence. Verify your CMP tag is assigned to the Consent Initialization - All Pages trigger, not All Pages or Container Loaded.
Issue: Tags Show “Still Running” Indefinitely
This often occurs with the wait_for_update parameter configured. The tag initiated but paused execution waiting for the consent signal.
Check the Chrome DevTools Network tab. If you see successful requests (200 OK status) to Google’s servers despite the “Still Running” status, the implementation is likely functional. The debug interface simply didn’t receive the completion signal.
If no network requests appear, verify your CMP is properly updating the consent state and check for JavaScript errors in the Console tab.
Issue: First Page View Shows “Denied,” Second Shows “Granted” for Same User
This indicates a race condition. The user has previously consented (returning visitor), but your tags fired before the CMP finished reading the stored consent cookie.
Increase the wait_for_update value in your CMP template configuration (try 1000-2000ms). This forces Google tags to pause until the consent status is resolved.
Advanced Validation: Network Signal Analysis
Visual validation with Tag Assistant handles most debugging scenarios. However, when you need to verify the exact signals being transmitted to Google’s servers or diagnose subtle timing issues, network-level analysis provides additional insight.
Understanding the gcs Parameter
In every network request to Google (GA4 collect, Google Ads conversion), there’s a query parameter named gcs (Google Consent Status). It encodes the consent state at the moment the tag fired.
Opening Network Tab:
- Open Chrome DevTools (F12)
- Click the
Networktab - Filter for
collect(GA4) orgoogleadservices(Google Ads) - Click a request and view the
Payloadsection
Format: G1xyzw (Consent Mode v2)
x:ad_storage(1 = Granted, 0 = Denied)y:analytics_storage(1 = Granted, 0 = Denied)z:ad_user_data(1 = Granted, 0 = Denied)w:ad_personalization(1 = Granted, 0 = Denied)
Common Values:
G100: All denied (Advanced Mode cookieless ping)G111: All granted (full consent)G111: Storage granted, usage denied
Troubleshooting: If you see G100 but you’ve accepted cookies in Tag Assistant, your tag fired before the update signal arrived (race condition). Increase your wait_for_update setting.
Understanding the gcd Letter Code Pattern
The gcd parameter (Google Consent Default) encodes the complete consent interaction history. It shows both the default state and any updates, helping you verify the proper consent flow occurred.
Each parameter is represented by a letter indicating its consent journey.
The gcd parameter uses 9 lowercase letters organized in a logical matrix based on the DEFAULT consent state and the UPDATE state after user interaction:
| Default State | No Update Yet | Updated to Denied | Updated to Granted |
|---|---|---|---|
| Not Set (no default command) | l | m | n |
| Denied | p | q | r |
| Granted | t | u | v |
How to read this table:
- Row = What was the default consent state when the page loaded?
- Column = What happened after the user interacted with the consent banner?
- Letter = The code you’ll see in the
gcdparameter
Memory aid: The letters follow alphabetical clusters:
- l-m-n: No default was set (Consent Mode may not be properly configured)
- p-q-r: Default was “denied” (proper GDPR setup)
- t-u-v: Default was “granted” (potentially non-compliant for EEA)
Format: 11<ad_storage><analytics><ad_user_data><ad_personalization>...
Common Examples:
11p1p1p1p5: All four parameters show p (denied by default, awaiting user interaction)
- Scenario: User just landed on site, banner is visible, proper GDPR defaults set
11r1r1r1r5: All parameters show r (denied by default → granted after update)
- Scenario: ✅ IDEAL GDPR FLOW – User clicked “Accept All”
- Interpretation: Default was denied, user explicitly granted consent
11q1q1q1q5: All parameters show q (denied by default → denied after update)
- Scenario: User clicked “Reject All”
- Interpretation: Default was denied, user explicitly rejected
11l1l1l1l5: All parameters show l (no default set, no update)
- Scenario: ⚠️ ERROR – Consent Mode not properly implemented
- Action needed: Verify CMP tag fires on Consent Initialization trigger
11t1t1t1t5: All parameters show t (granted by default, no update)
- Scenario: ⚠️ COMPLIANCE RISK – Default consent granted before user interaction
- Action needed: Check region-specific defaults for EEA
13r3q3r3r5: Mixed states across parameters
- Scenario: User granted some permissions but denied others
- Interpretation:
ad_storage: r (denied → granted)analytics_storage: q (denied → denied)ad_user_data: r (denied → granted)ad_personalization: r (denied → granted)
| Letter | Default State | Update State | Interpretation | Scenario |
|---|---|---|---|---|
| l | Not Set | None | ERROR: No consent signal | CMP template missing or not firing |
| m | Not Set | Denied | No default, user denied | Unusual: user denied before defaults loaded |
| n | Not Set | Granted | No default, user granted | Unusual: user accepted before defaults loaded |
| p | Denied | None | Denied by default, no update yet | User just landed, banner visible |
| q | Denied | Denied | User explicitly rejected | User clicked “Reject All” |
| r | Denied | Granted | User explicitly accepted | Ideal GDPR flow |
| t | Granted | None | Granted by default | Risk: non-compliant default |
| u | Granted | Denied | User withdrew consent | User revoked previously granted consent |
| v | Granted | Granted | Remains granted | Default granted, user confirmed |
Format Variations in gcd Parameter
While most gcd parameters follow the pattern 11[letter]1[letter]1[letter]1[letter]5, you may encounter variations:
Prefix variations:
11...– Most common format13...– Alternative format (separator = 3 instead of 1)
Separator variations:
- Numbers between letters can be
1,3, or other values - These separate the four consent parameters but don’t affect interpretation
Suffix variations:
- Usually ends with
5 - Sometimes
7or other values - Purpose not officially documented by Google (possibly format version or regional indicators)
Additional parameters:
Some implementations append extra characters (e.g., 11r1r1r1r5l1)
- The
l1suffix may relate toads_data_redactionsetting - Not confirmed by Google documentation
Focus on the letters: Regardless of prefix/separator variations, the letter codes (l-v) remain the key diagnostic indicators.
Interpreting Real-World gcd Strings
Example 1: Fresh Visitor (GDPR Compliant)
gcd: 11p1p1p1p5
- All parameters:
p(denied default, no update) - Meaning: User just arrived, consent banner showing, proper GDPR defaults
- Action: Normal – waiting for user interaction
Example 2: User Accepted All (Ideal Flow)
gcd: 11r1r1r1r5
- All parameters:
r(denied → granted) - Meaning: Perfect GDPR implementation
- Action: Full tracking now active
Example 3: Partial Consent
gcd: 13r3q3r3q5
- ad_storage:
r(granted) - analytics_storage:
q(denied) - ad_user_data:
r(granted) - ad_personalization:
q(denied) - Meaning: User accepted ads but rejected analytics and personalization
- Action: Google tags adapt behavior per parameter
Example 4: Implementation Error
gcd: 11l1l1l1l5
- All parameters:
l(no signal) - Meaning: ⚠️ Consent Mode not active
- Troubleshooting:
- CMP tag not firing on Consent Initialization trigger
- Template not properly configured
- Check Tag Assistant for CMP tag firing order
Example 5: Compliance Risk
gcd: 11t1t1t1t5
- All parameters:
t(granted by default) - Meaning: ⚠️ Consent granted before user interaction
- Risk: GDPR violation for EEA users
- Action: Review region-specific default settings in CMP template
Example 6: Returning User (Stored Consent)
gcd: 11r1r1r1r5
- Appears immediately on page load for returning visitor
- Meaning: CMP read stored consent cookie successfully
- Note: If you see
pthenron same pageview, you have a race condition – increasewait_for_updatesetting
When to Use Network Analysis:
Use network-level validation when Tag Assistant shows correct consent states but you’re seeing unexpected behaviour in your Google Analytics or Ads reports. The gcs and gcd parameters reveal the exact signals reaching Google’s servers, which can differ from what GTM displays if timing issues exist.
Troubleshooting Common Issues
Before diving into these common issues, ensure you’ve completed the visual validation process described in the Validation and Debugging section. Many issues that appear to be configuration problems are actually timing or trigger sequencing issues that Tag Assistant helps identify.
Zero Traffic in GA4
Symptom: After implementing Consent Mode, real-time traffic drops to near zero.
Cause: You likely added “Additional Consent Checks” to the GA4 tag settings in GTM. By adding analytics_storage as a required additional check, GTM was forced to block the tag entirely when consent was denied (Basic Mode behaviour), but the trigger logic wasn’t updated to support it.
Fix: Revert GA4 tags to “Additional Consent Checks: Not Set.” Trust the built-in behaviour. Use Tag Assistant to verify the tag shows “Active” status when consent is denied and “Succeeded” when consent is granted.
Modelling Not Active
Symptom: “Modelled” data column in GA4 is empty or shows no uplift.
Cause 1: Insufficient volume. “Google requires sufficient conversion volume to train the model. While not officially documented, industry observation suggests approximately 500-700 conversions per day over a 7-day period. This threshold may vary by account type and industry.
Cause 2: ad_user_data is missing. If the CMP template is outdated, it might only be sending the v1 signals (ad_storage). Without the v2 signals, Google cannot validate eligibility for modelling.
Fix: Update the Cookiebot template in GTM. Verify the gcd parameter shows signals for all 4 types.
“Missing Consent Mode signals” Warning in Google Ads
Symptom: Google Ads UI displays a warning that Consent Mode is not implemented.
Cause: Google’s bots crawl the site to verify implementation. If the default state is “Granted” (e.g., t in gcd) for an EEA IP address, the bot flags it as non-compliant.
Fix: Ensure Region-Specific Defaults are correctly configured in the Cookiebot template to set “Denied” for EEA country codes.
Tags Firing Before Consent Update
Symptom: Tags are firing with denied status even though users have previously consented.
Cause: Race condition. Tags are firing before Cookiebot reads the stored consent from the cookie.
Fix: Increase the wait_for_update value in the Cookiebot CMP template (try 2000ms).
Non-Google Tags Still Firing Without Consent
Symptom: Third-party pixels (Facebook, LinkedIn, etc.) are firing even when users deny marketing consent.
Cause: Tags are still using standard “All Pages” trigger without consent checks.
Fix: Replace with the “Cookie Consent Update” trigger that only fires when cookiebot_consent_marketing equals true.
Maintenance and Ongoing Management
Consent Mode isn’t a “set and forget” system. It requires active maintenance to remain effective and compliant.
Template Updates
The GTM Community Template Gallery does not auto-update. You must periodically (quarterly recommended) check if the cybotcorp template has an update available.
Why this matters: Updates often include fixes for new browser restrictions (like ITP updates) or new Google API parameters.
How to check:
- Go to Templates > Tag Templates in GTM
- Look for an “Update Available” indicator on the Cookiebot CMP template
- Review the changelog before updating
- Test in a preview environment before publishing
Managing New Tags
Every new tag added to your container must be rigorously classified:
Ask yourself:
- Does it support Consent Mode? (Google tags do, most others don’t)
- If not, does it need the
cookie_consent_updatetrigger? - What consent category does it belong to (Marketing, Statistics, Preferences)?
Adding a new Facebook Pixel on “All Pages” without consent checks effectively breaks the compliance of your entire container.
Banner and Cookie Audits
Periodically rescan your site in the Cookiebot console to ensure new cookies (dropped by new plugins or widgets) are categorised.
The risk: Uncategorised cookies might be blocked by Cookiebot’s auto-blocker (if enabled) or might leak through if you’re using manual GTM blocking without updated logic.
Recommended frequency: After any major site changes (new plugins, theme updates, new marketing tools).
Documentation
Maintain documentation of your consent implementation:
- Which tags are Google tags vs. third-party tags
- Which consent categories each tag requires
- Your regional default settings
- Any custom trigger logic
- Known issues and their resolutions
This documentation becomes invaluable when onboarding new team members or troubleshooting issues months later.
Testing After Changes
After any changes to your GTM container, test the consent flow:
- Clear your cookies
- Load the site in an incognito window
- Check the Network tab for consent signals
- Accept the banner
- Verify tags fire correctly
- Reject the banner (new incognito window)
- Verify Google tags fire in restricted mode
- Verify non-Google tags don’t fire
This testing routine should take 5-10 minutes but prevents costly compliance mistakes.
Next Steps: Optimizing Your Consent Implementation
Monitor Conversion Modelling Performance
If you’ve implemented Advanced Mode correctly, Google should begin modelling conversions from unconsented users within 7-14 days (assuming sufficient volume).
Navigate to your GA4 property → Reports > Engagement > Conversions and look for the “Modelled” column. Compare modelled vs. observed conversions to understand the data recovery from unconsented users.
If modelling isn’t active after 2-3 weeks with sufficient traffic, revisit your gcd parameter using Chrome DevTools to ensure all four consent signals are present.
Review Your Consent Banner Performance
Your implementation is only as good as your consent rate. If only 10% of users consent, even perfect technical implementation won’t solve your data loss problem.
Analyze your consent acceptance rate in your CMP dashboard. Consider:
- Is your banner design clear and professional?
- Is the copy easy to understand?
- Are you explaining the value exchange (why users should consent)?
- Have you tested different banner positions and designs?
Small improvements in consent rate (e.g., 30% to 45%) can dramatically impact your data quality.
Implement Enhanced Conversions
With ad_user_data now properly signalled, you can implement Enhanced Conversions for Google Ads. This allows you to send hashed first-party data (email, phone, address) to improve conversion attribution, particularly valuable when cookies are limited.
Audit Third-Party Scripts
Now that you have proper consent management in place, audit all third-party scripts on your site:
- Which scripts are loading outside of GTM?
- Which scripts need consent but aren’t being managed?
- Can you move more scripts into GTM for better consent control?
Common culprits include chat widgets, social media embeds, and heatmap tools. Many can be lazy-loaded through GTM with proper consent checks.
Understanding the Complete System
Cookie consent governs your entire measurement infrastructure—it determines what data you can collect and how. Understanding how consent management integrates with GTM for deployment, the Data Layer for tracking, GA4 for analytics, and conversion tracking for optimization creates a system where you can maintain measurement capability while respecting user privacy.
How to Build Your Marketing Measurement Foundation shows you how consent management fits within your complete measurement infrastructure, how privacy compliance enables rather than restricts measurement, and how these components work together to create a consent-first foundation that adapts to regulatory changes.
If You Need Help
Consent Mode implementation is technically demanding—proper CMP configuration, trigger sequencing, consent signal validation, and region-specific defaults require understanding both the regulatory requirements and the technical framework.Our Marketing Measurement Foundation service provides complete implementation with proper consent management configuration if you prefer expert setup.
Conclusion
Implementing cookie consent in Google Tag Manager requires precise coordination between your Consent Management Platform, GTM configuration, and Google’s tracking endpoints. The technical details (trigger sequences, consent parameters, and signal validation) determine whether your implementation achieves both compliance and measurement utility.
This guide has walked you through the complete setup process: configuring your CMP to broadcast consent signals, setting up GTM tags and triggers to respect those signals, handling both Google and non-Google tags appropriately, and debugging the consent flow to verify correct implementation.
Privacy regulations will continue to evolve, and browser restrictions will become more stringent. By building your measurement infrastructure on a consent-first foundation, you’ve created a system that can adapt to these changes while maintaining the data visibility your business needs.
If you encounter issues during implementation, refer back to the troubleshooting section, use the debugging techniques covered in the validation section, and test thoroughly before publishing to production.